使用Tensorflow和MNIST识别自己手写的数字

使用Tensorflow和MNIST识别自己手写的数字

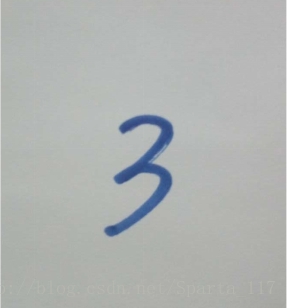
最近在学习神经网络相关的东西,发现有很多资料是Tensorflow教程上的内容,但是教程很多只是一个验证官方程序的过程。如何将官方程序变成自己可以利用的程序,网上似乎资料比较少,所以我就来介绍一下如何使用Tensorflow和MNIST搭建自己的手写识别算法,识别自己写的数字(比如下面我写的这个苍劲有力的3~~)。本文也参考了国外大神博客的内容。纯新手,之前在博客上收益良多,也希望能帮助和我一样刚刚起步的童鞋,大家多多指教。
就来识别这个我写的3吧
内容如下:
- Tensorflow和MNIST简介
- CNN算法
- 训练程序
- 写数字,并用Opencv进行预处理
- 将图片输入网络进行识别


Tensorflow和MNIST简介

TensorFlow™ 是一个采用数据流图,用于数值计算的开源软件库。它是一个不严格的“神经网络”库,可以利用它提供的模块搭建大多数类型的神经网络。它可以基于CPU或GPU运行,可以自动使用GPU,无需编写分配程序。主要支持Python编写,但是官方说也有C++使用界面。

MNIST是一个巨大的手写数字数据集,被广泛应用于机器学习识别领域。MNIST有60000张训练集数据和10000张测试集数据,每一个训练元素都是28*28像素的手写数字图片。作为一个常见的数据集,MNIST经常被用来测试神经网络,也是比较基本的应用。

CNN算法

识别算法主要使用的是卷积神经网络算法(CNN)。
图1.CNN算法结构
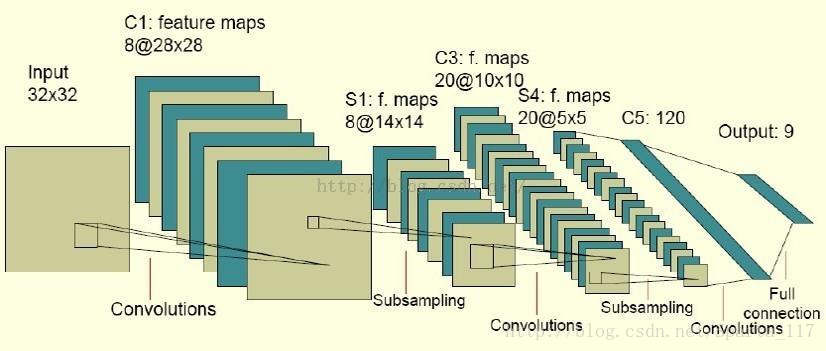
主要结构为:输入-卷积层-池化层-卷积层-池化层-全连接层-输出
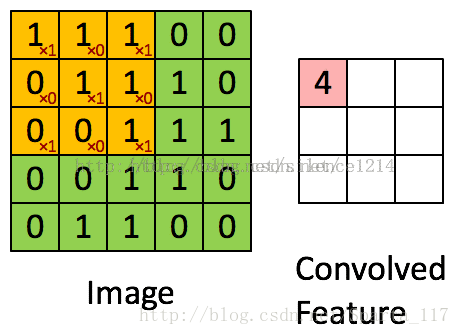
卷积
卷积其实可以看做是提取特征的过程。如果不使用卷积的话,整个网络的输入量就是整张图片,处理就很困难。
这里写图片描述
(这里使用了参考了别人博客中的内容,来源记不清了TAT)
假设图中绿色5*5矩阵为原图片,黄色的3*3矩阵就是我们的过滤器,即卷积核。将黄色矩阵和绿色矩阵被覆盖的部分进行卷积计算,即每个元素相乘求和,便可得到这一部分的特征值,即图中的卷积特征。
然后,向右滑动黄色的矩阵,便可继续求下一部分的卷积特征值。而滑动的距离就是步长。

池化
池化是用来把卷积结果进行压缩,进一步减少全连接时的连接数。
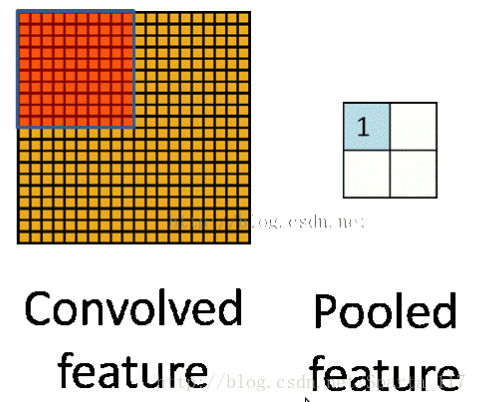
这里写图片描述
池化有两种:
一种是最大池化,在选中区域中找最大的值作为抽样后的值;
一种是平均值池化,把选中的区域中的平均值作为抽样后的值。

实现过程

1.训练程序

这里我就先把程序贴出来,主体和tensorflow教程上大致相同。值得注意的是其中的saver部分,将训练的权重和偏置保存下来,在评价程序中可以再次使用。

from tensorflow.examples.tutorials.mnist import input_data
mnist = input_data.read_data_sets('MNIST_data', one_hot=True)


import tensorflow as tf

sess = tf.InteractiveSession()


x = tf.placeholder(tf.float32, shape=[None, 784])
y_ = tf.placeholder(tf.float32, shape=[None, 10])
W = tf.Variable(tf.zeros([784,10]))
b = tf.Variable(tf.zeros([10]))


sess.run(tf.global_variables_initializer())

y = tf.matmul(x,W) + b

cross_entropy = tf.reduce_mean(
    tf.nn.softmax_cross_entropy_with_logits(labels=y_, logits=y))

train_step = tf.train.GradientDescentOptimizer(0.5).minimize(cross_entropy)

for _ in range(1000):
  batch = mnist.train.next_batch(100)
  train_step.run(feed_dict={x: batch[0], y_: batch[1]})
correct_prediction = tf.equal(tf.argmax(y,1), tf.argmax(y_,1))

accuracy = tf.reduce_mean(tf.cast(correct_prediction, tf.float32))

print(accuracy.eval(feed_dict={x: mnist.test.images, y_: mnist.test.labels}))

def weight_variable(shape):
  initial = tf.truncated_normal(shape, stddev=0.1)
  return tf.Variable(initial)

def bias_variable(shape):
  initial = tf.constant(0.1, shape=shape)
  return tf.Variable(initial)

def conv2d(x, W):
  return tf.nn.conv2d(x, W, strides=[1, 1, 1, 1], padding='SAME')

def max_pool_2x2(x):
  return tf.nn.max_pool(x, ksize=[1, 2, 2, 1],
                        strides=[1, 2, 2, 1], padding='SAME')

W_conv1 = weight_variable([5, 5, 1, 32])
b_conv1 = bias_variable([32])
x_image = tf.reshape(x, [-1,28,28,1])
h_conv1 = tf.nn.relu(conv2d(x_image, W_conv1) + b_conv1)
h_pool1 = max_pool_2x2(h_conv1)

W_conv2 = weight_variable([5, 5, 32, 64])
b_conv2 = bias_variable([64])
h_conv2 = tf.nn.relu(conv2d(h_pool1, W_conv2) + b_conv2)
h_pool2 = max_pool_2x2(h_conv2)

W_fc1 = weight_variable([7 * 7 * 64, 1024])
b_fc1 = bias_variable([1024])

h_pool2_flat = tf.reshape(h_pool2, [-1, 7*7*64])
h_fc1 = tf.nn.relu(tf.matmul(h_pool2_flat, W_fc1) + b_fc1)
keep_prob = tf.placeholder(tf.float32)
h_fc1_drop = tf.nn.dropout(h_fc1, keep_prob)
W_fc2 = weight_variable([1024, 10])
b_fc2 = bias_variable([10])

y_conv = tf.matmul(h_fc1_drop, W_fc2) + b_fc2
cross_entropy = tf.reduce_mean(
    tf.nn.softmax_cross_entropy_with_logits(labels=y_, logits=y_conv))
train_step = tf.train.AdamOptimizer(1e-4).minimize(cross_entropy)
correct_prediction = tf.equal(tf.argmax(y_conv,1), tf.argmax(y_,1))
accuracy = tf.reduce_mean(tf.cast(correct_prediction, tf.float32))

saver = tf.train.Saver()  # defaults to saving all variables

sess.run(tf.global_variables_initializer())
for i in range(20000):
  batch = mnist.train.next_batch(50)
  if i%100 == 0:
    train_accuracy = accuracy.eval(feed_dict={
        x:batch[0], y_: batch[1], keep_prob: 1.0})
    print("step %d, training accuracy %g"%(i, train_accuracy))

  train_step.run(feed_dict={x: batch[0], y_: batch[1], keep_prob: 0.5})
saver.save(sess, '/home/XXX/learning_tensorflow/form/model.ckpt')  #保存模型参数,注意把这里改为自己的路径

print("test accuracy %g"%accuracy.eval(feed_dict={
    x: mnist.test.images, y_: mnist.test.labels, keep_prob: 1.0}))

2.写数字,并用Opencv进行预处理

训练好了网络,下一步就要测试它了。自己写一个数字,然后用Opencv预处理一下再扔到评价程序里,看看能不能准确识别。
我们先来识别这张我开头写的3吧:(可以写得再奇怪一些,检测一下识别能力)
我写的3
下面我们就要对它进行预处理,缩小它的大小为28*28像素,并转变为灰度图,进行二值化处理。我使用的是Opencv对图像进行处理,也可以使用MATLAB等进行预处理。
图片预处理程序如下:(程序改编自http://blog.csdn.net/skeeee/article/details/16844937,可以使用鼠标拖动选取框,对选取框中的图像进行处理)

#include <opencv2/core/core.hpp>
#include <opencv2/highgui/highgui.hpp>
#include <opencv2/imgproc/imgproc.hpp>
#include <stdio.h>

using namespace cv;
using namespace std;

cv::Mat org,dst,img,tmp;
void on_mouse(int event,int x,int y,int flags,void *ustc)//event鼠标事件代号,x,y鼠标坐标,flags拖拽和键盘操作的代号
{
    static Point pre_pt = cv::Point(-1,-1);//初始坐标
    static Point cur_pt = cv::Point(-1,-1);//实时坐标
    char temp[16];
    if (event == CV_EVENT_LBUTTONDOWN)//左键按下,读取初始坐标,并在图像上该点处划圆
    {
        org.copyTo(img);//将原始图片复制到img中
        sprintf(temp,"(%d,%d)",x,y);
        pre_pt = Point(x,y);
        putText(img,temp,pre_pt,FONT_HERSHEY_SIMPLEX,0.5,Scalar(0,0,0,255),1,8);//在窗口上显示坐标
        circle(img,pre_pt,2,Scalar(255,0,0,0),CV_FILLED,CV_AA,0);//划圆
        imshow("img",img);
    }
    else if (event == CV_EVENT_MOUSEMOVE && !(flags & CV_EVENT_FLAG_LBUTTON))//左键没有按下的情况下鼠标移动的处理函数
    {
        img.copyTo(tmp);//将img复制到临时图像tmp上,用于显示实时坐标
        sprintf(temp,"(%d,%d)",x,y);
        cur_pt = Point(x,y);
        putText(tmp,temp,cur_pt,FONT_HERSHEY_SIMPLEX,0.5,Scalar(0,0,0,255));//只是实时显示鼠标移动的坐标
        imshow("img",tmp);
    }
    else if (event == CV_EVENT_MOUSEMOVE && (flags & CV_EVENT_FLAG_LBUTTON))//左键按下时,鼠标移动,则在图像上划矩形
    {
        img.copyTo(tmp);
        sprintf(temp,"(%d,%d)",x,y);
        cur_pt = Point(x,y);
        putText(tmp,temp,cur_pt,FONT_HERSHEY_SIMPLEX,0.5,Scalar(0,0,0,255));
        rectangle(tmp,pre_pt,cur_pt,Scalar(0,255,0,0),1,8,0);//在临时图像上实时显示鼠标拖动时形成的矩形
        imshow("img",tmp);
    }
    else if (event == CV_EVENT_LBUTTONUP)//左键松开,将在图像上划矩形
    {
        org.copyTo(img);
        sprintf(temp,"(%d,%d)",x,y);
        cur_pt = Point(x,y);
        putText(img,temp,cur_pt,FONT_HERSHEY_SIMPLEX,0.5,Scalar(0,0,0,255));
        circle(img,pre_pt,2,Scalar(255,0,0,0),CV_FILLED,CV_AA,0);
        rectangle(img,pre_pt,cur_pt,Scalar(0,255,0,0),1,8,0);//根据初始点和结束点,将矩形画到img上
        imshow("img",img);
        img.copyTo(tmp);
        //截取矩形包围的图像,并保存到dst中
        int width = abs(pre_pt.x - cur_pt.x);
        int height = abs(pre_pt.y - cur_pt.y);
        if (width == 0 || height == 0)
        {
            printf("width == 0 || height == 0");
            return;
        }
        dst = org(Rect(min(cur_pt.x,pre_pt.x),min(cur_pt.y,pre_pt.y),width,height));
        cv::resize(dst,dst,Size(28,28));
        cvtColor( dst, dst, CV_BGR2GRAY );
        threshold(dst, dst, 170, 255, CV_THRESH_BINARY);
        imwrite("/media/sda/Ubuntu 14.0/myMNIST/MNIST_recognize/temp3.png",dst);//注意将这里改为自己的处理结果存储地址
        namedWindow("dst");
        imshow("dst",dst);
        waitKey(0);
    }
}
int main()
{
    org = imread("/media/sda/Ubuntu 14.0/myMNIST/MNIST_recognize/num3.jpg");//读取图片地址
    org.copyTo(img);
    org.copyTo(tmp);
    namedWindow("img");//定义一个img窗口
    setMouseCallback("img",on_mouse,0);//调用回调函数
    imshow("img",img);
    cv::waitKey(0);
}

完成预处理程序后,我们得到了这样的图片:
处理后图片
这就是28*28的二值化后的图片,这样的格式和我们MNIST数据集中的图片格式相同。只有这样,我们才能将图片输入到网络中进行识别。

3.将图片输入网络进行识别

这里我是编写了一个前向传播的程序,最后softmax层分类的结果就是最后的识别结果啦。
程序如下:(这里参考了一个外网的博客,地址不记得了。。。)

from PIL import Image, ImageFilter
import tensorflow as tf
import matplotlib.pyplot as plt
import cv2

def imageprepare():
    """
    This function returns the pixel values.
    The imput is a png file location.
    """
    file_name='/home/mzm/MNIST_recognize/p_num2.png'#导入自己的图片地址
    #in terminal 'mogrify -format png *.jpg' convert jpg to png
    im = Image.open(file_name).convert('L')


    im.save("/home/mzm/MNIST_recognize/sample.png")
    plt.imshow(im)
    plt.show()
    tv = list(im.getdata()) #get pixel values

    #normalize pixels to 0 and 1. 0 is pure white, 1 is pure black.
    tva = [ (255-x)*1.0/255.0 for x in tv] 
    #print(tva)
    return tva


    """
    This function returns the predicted integer.
    The imput is the pixel values from the imageprepare() function.
    """

    # Define the model (same as when creating the model file)
result=imageprepare()
x = tf.placeholder(tf.float32, [None, 784])
W = tf.Variable(tf.zeros([784, 10]))
b = tf.Variable(tf.zeros([10]))

def weight_variable(shape):
  initial = tf.truncated_normal(shape, stddev=0.1)
  return tf.Variable(initial)

def bias_variable(shape):
  initial = tf.constant(0.1, shape=shape)
  return tf.Variable(initial)

def conv2d(x, W):
  return tf.nn.conv2d(x, W, strides=[1, 1, 1, 1], padding='SAME')

def max_pool_2x2(x):
  return tf.nn.max_pool(x, ksize=[1, 2, 2, 1], strides=[1, 2, 2, 1], padding='SAME')   

W_conv1 = weight_variable([5, 5, 1, 32])
b_conv1 = bias_variable([32])

x_image = tf.reshape(x, [-1,28,28,1])
h_conv1 = tf.nn.relu(conv2d(x_image, W_conv1) + b_conv1)
h_pool1 = max_pool_2x2(h_conv1)

W_conv2 = weight_variable([5, 5, 32, 64])
b_conv2 = bias_variable([64])

h_conv2 = tf.nn.relu(conv2d(h_pool1, W_conv2) + b_conv2)
h_pool2 = max_pool_2x2(h_conv2)

W_fc1 = weight_variable([7 * 7 * 64, 1024])
b_fc1 = bias_variable([1024])

h_pool2_flat = tf.reshape(h_pool2, [-1, 7*7*64])
h_fc1 = tf.nn.relu(tf.matmul(h_pool2_flat, W_fc1) + b_fc1)

keep_prob = tf.placeholder(tf.float32)
h_fc1_drop = tf.nn.dropout(h_fc1, keep_prob)

W_fc2 = weight_variable([1024, 10])
b_fc2 = bias_variable([10])

y_conv=tf.nn.softmax(tf.matmul(h_fc1_drop, W_fc2) + b_fc2)

init_op = tf.initialize_all_variables()


"""
Load the model2.ckpt file
file is stored in the same directory as this python script is started
Use the model to predict the integer. Integer is returend as list.

Based on the documentatoin at
https://www.tensorflow.org/versions/master/how_tos/variables/index.html
"""
saver = tf.train.Saver()
with tf.Session() as sess:
    sess.run(init_op)
    saver.restore(sess, "/home/mzm/MNIST_recognize/form/model2.ckpt")#这里使用了之前保存的模型参数
    #print ("Model restored.")

    prediction=tf.argmax(y_conv,1)
    predint=prediction.eval(feed_dict={x: [result],keep_prob: 1.0}, session=sess)
    print(h_conv2)

    print('recognize result:')
    print(predint[0])

通过这个程序,得到最后的识别结果截图如下:
识别结果
可以看到识别的结果为3。(花费时间包括了我关闭图像的时间,不是识别的时间。真正的识别时间和计算机的配置有关,使用GPU的话,会小于0.5秒。)
大功告成!

整个识别自己手写数字的过程就是这样,参考了很多大神编写的程序,在自己编写的过程中还是学到了不少。博客是过了一段时间写的,预处理程序重新写了一下,如有错误,还请多多指教啊。

  • 49
    点赞
  • 277
    收藏
    觉得还不错? 一键收藏
  • 85
    评论
### 回答1: 基于TensorFlowMNIST手写数字识别是一种机器学习技术,它可以通过训练模型来识别手写数字MNIST是一个常用的数据集,包含了大量的手写数字图像和对应的标签。TensorFlow是一个流行的深度学习框架,可以用来构建和训练神经网络模型。通过使用TensorFlow,我们可以构建一个卷积神经网络模型,对MNIST数据集进行训练和测试,从而实现手写数字识别的功能。 ### 回答2: 随着机器学习技术的不断发展,MNIST手写数字识别已成为一个基础、常见的图像分类问题。TensorFlow是目前最流行的深度学习框架之一,广泛应用于图像处理、自然语言处理等领域,所以在TensorFlow上实现MNIST手写数字识别任务是非常具有代表性的。 MNIST手写数字识别是指从给定的手写数字图像中识别数字的任务。MNIST数据集是一个由数万张手写数字图片和相应标签组成的数据集,图片都是28*28像素的灰度图像。每一张图片对应着一个标签,表示图片中所代表的数字。通过对已经标记好的图片和标签进行训练,我们将构建一个模型来预测测试集中未知图片的标签。 在TensorFlow中实现MNIST手写数字识别任务,可以通过以下步骤完成: 1. 导入MNIST数据集:TensorFlow中的tf.keras.datasets模块内置了MNIST数据集,可以通过如下代码导入:(train_images, train_labels), (test_images, test_labels) = tf.keras.datasets.mnist.load_data() 2. 数据预处理:对数据进行标准化处理,即将灰度值范围从[0,255]缩放到[0,1]之间。同时将标签值进行独热编码,将每个数字的标签由一个整数转换为一个稀疏向量。采用以下代码完成数据预处理:train_images = train_images / 255.0 test_images = test_images / 255.0 train_labels = tf.keras.utils.to_categorical(train_labels, 10) test_labels = tf.keras.utils.to_categorical(test_labels, 10) 3. 构建模型:采用卷积神经网络(CNN)进行建模,包括卷积层、池化层、Dropout层和全连接层。建议采用可重复使用的模型方法tf.keras.Sequential()。具体代码实现为:model = tf.keras.Sequential([ tf.keras.layers.Conv2D(32, (3,3), activation='relu',input_shape=(28,28,1)), tf.keras.layers.MaxPooling2D((2,2)), tf.keras.layers.Flatten(), tf.keras.layers.Dropout(0.5)), tf.keras.layers.Dense(128, activation='relu'), tf.keras.layers.Dense(10, activation='softmax') ]) 4. 编译模型:指定优化器、损失函数和评估指标。可采用Adam优化器,交叉熵损失函数和准确率评估指标。具体实现代码如下:model.compile(optimizer='adam', loss='categorical_crossentropy', metrics=['accuracy']) 5. 训练模型:采用train()函数进行模型训练,完成代码如下:model.fit(train_images, train_labels, epochs=5, validation_data=(test_images, test_labels)) 6. 评估模型:计算测试准确率,完成代码如下:test_loss, test_acc = model.evaluate(test_images, test_labels) print('Test accuracy:', test_acc) 以上就是基于TensorFlowMNIST手写数字识别的简要实现过程。其实实现过程还可以更加复杂,比如调节神经元数量,添加卷积层数量等。总之采用TensorFlow框架实现MNIST手写数字识别是一个可行的任务,未来机器学习发展趋势将越来越向深度学习方向前进。 ### 回答3: MNIST手写数字识别是计算机视觉领域中最基础的问题,使用TensorFlow实现这一问题可以帮助深入理解神经网络的原理和实现,并为其他计算机视觉任务打下基础。 首先,MNIST手写数字数据集由28x28像素的灰度图像组成,包含了数字0到9共10个类别。通过导入TensorFlow及相关库,我们可以很容易地加载MNIST数据集并可视化: ``` import tensorflow as tf import matplotlib.pyplot as plt (train_images, train_labels), (test_images, test_labels) = tf.keras.datasets.mnist.load_data() print("Training images:", train_images.shape) print("Training labels:", train_labels.shape) print("Test images:", test_images.shape) print("Test labels:", test_labels.shape) plt.imshow(train_images[0]) plt.show() ``` 在实现MNIST手写数字识别神经网络模型中,最常用的是卷积神经网络(Convolutional Neural Networks,CNN),主要由卷积层、激活层、池化层和全连接层等组成。卷积层主要用于提取局部特征,激活层用于引入非线性性质,池化层则用于加速处理并减少过拟合,全连接层则进行最终的分类。 以下为使用TensorFlow搭建CNN实现MNIST手写数字识别的代码: ``` model = tf.keras.Sequential([ tf.keras.layers.Conv2D(32, kernel_size=(3,3), activation='relu', input_shape=(28,28,1)), tf.keras.layers.MaxPooling2D(pool_size=(2,2)), tf.keras.layers.Conv2D(64, kernel_size=(3,3), activation='relu'), tf.keras.layers.MaxPooling2D(pool_size=(2,2)), tf.keras.layers.Flatten(), tf.keras.layers.Dense(128, activation='relu'), tf.keras.layers.Dropout(0.5), tf.keras.layers.Dense(10, activation='softmax') ]) model.summary() model.compile(optimizer='adam', loss='sparse_categorical_crossentropy', metrics=['accuracy']) train_images = train_images.reshape((60000, 28, 28, 1)) train_images = train_images / 255.0 test_images = test_images.reshape((10000, 28, 28, 1)) test_images = test_images / 255.0 model.fit(train_images, train_labels, epochs=5, batch_size=64) test_loss, test_acc = model.evaluate(test_images, test_labels, verbose=2) print("Test accuracy:", test_acc) ``` 这段代码中使用了两个卷积层分别提取32和64个特征,池化层进行特征加速和降维,全连接层作为最终分类器输出预测结果。在模型训练时,使用Adam优化器和交叉熵损失函数进行训练,经过5个epoch后可以得到约99%的测试准确率。 总之,通过使用TensorFlow实现MNIST手写数字识别的经历,可以深切认识到深度学习在计算机视觉领域中的应用,以及如何通过搭建和训练神经网络模型来解决实际问题。

“相关推荐”对你有帮助么?

  • 非常没帮助
  • 没帮助
  • 一般
  • 有帮助
  • 非常有帮助
提交
评论 85
添加红包

请填写红包祝福语或标题

红包个数最小为10个

红包金额最低5元

当前余额3.43前往充值 >
需支付:10.00
成就一亿技术人!
领取后你会自动成为博主和红包主的粉丝 规则
hope_wisdom
发出的红包
实付
使用余额支付
点击重新获取
扫码支付
钱包余额 0

抵扣说明:

1.余额是钱包充值的虚拟货币,按照1:1的比例进行支付金额的抵扣。
2.余额无法直接购买下载,可以购买VIP、付费专栏及课程。

余额充值