


在讲解如何通过代码来实现屏幕适配前,先来了解一下,屏幕适配中用到的约束添加的规则。
在创建约束之后,需要将其添加到作用的view上
在添加时要注意目标view需要
遵循以下规则:
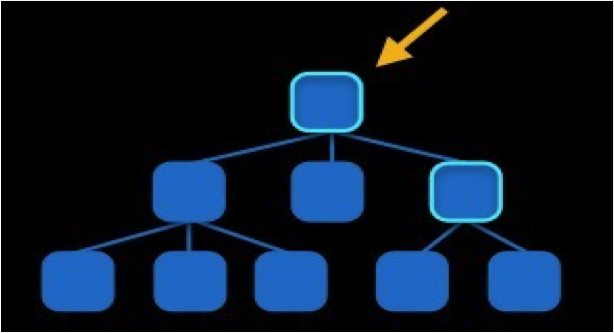
1. 约束规则
1> 添加约束的规则(一)
对于两个同层级view之间的约束关系,添加到它们的父view上

2> 添加约束的规则(二)
对于两个不同层级view之间的约束关系,添加到他们最近的共同父view上

3> 添加约束的规则(三)
对于有层次关系的两个view之间的约束关系,添加到层次较高的父view上
小案例:Autolayout动画:

用代码来采用动画形式移动小红view:


 1 #import "ViewController.h"
 2
 3 @interface ViewController ()
 4
 5 /**
 6  *  直接将用到的约束和红色View拖拽到控制器中,以便使用.
 7  */
 8 @property (weak, nonatomic) IBOutlet NSLayoutConstraint *heightCos;
 9 @property (weak, nonatomic) IBOutlet NSLayoutConstraint *topCos;
10 @property (weak, nonatomic) IBOutlet UIView *redView;
11 @end
12
13 @implementation ViewController
14
15 - (void)touchesBegan:(nonnull NSSet<UITouch *> *)touches withEvent:(nullable UIEvent *)event
16 {
17 //    NSLog(@"%f", self.heightCos.constant);
18 //    self.heightCos.constant += 50;
19     self.topCos.constant += 150;
20     [UIView animateWithDuration:2.0 animations:^{
21         // 强制更新界面
22         // 会更新当前控件和当前控件所有的子控件
23         [self.redView layoutIfNeeded];
24     }];
25 }
26
27 @end
小案例:红色View是蓝色View宽度一半.....约束实现:
  1 //
  2 //  ViewController.m
  3
  4 #import "ViewController.h"
  5
  6 @interface ViewController ()
  7
  8 @end
  9
 10 @implementation ViewController
 11
 12 - (void)viewDidLoad {
 13     [super viewDidLoad];
 14     // Do any additional setup after loading the view, typically from a nib.
 15
 16     /**
 17      1. 实现红色View是蓝色View宽度的一半,等。
 18      */
 19
 20     // 1.创建两个控件, 并且添加到父控件上
 21     UIView *blueView = [[UIView alloc] init];
 22     blueView.backgroundColor = [UIColor blueColor];
 23     [self.view addSubview:blueView];
 24
 25     UIView *redView = [[UIView alloc] init];
 26     redView.backgroundColor = [UIColor redColor];
 27     [self.view addSubview:redView];
 28
 29
 30     // 2.添加约束
 31 //    self.view.translatesAutoresizingMaskIntoConstraints = NO; // 错误写法, 禁用父控件的对子控件无效
 32
 33     redView.translatesAutoresizingMaskIntoConstraints = NO;
 34     blueView.translatesAutoresizingMaskIntoConstraints = NO;
 35
 36     // 2.1添加蓝色的约束
 37     // 2.1.1顶部
 38     NSLayoutConstraint *blueTopCos = [NSLayoutConstraint constraintWithItem:blueView attribute:NSLayoutAttributeTop relatedBy:NSLayoutRelationEqual toItem:self.view attribute:NSLayoutAttributeTop multiplier:1.0 constant:20];
 39     [self.view addConstraint:blueTopCos];
 40
 41     // 2.1.2左边
 42     NSLayoutConstraint *blueLeftCos = [NSLayoutConstraint constraintWithItem:blueView attribute:NSLayoutAttributeLeft relatedBy:NSLayoutRelationEqual toItem:self.view attribute:NSLayoutAttributeLeft multiplier:1.0 constant:20];
 43     [self.view addConstraint:blueLeftCos];
 44
 45
 46     // 2.1.3右边
 47     NSLayoutConstraint *blueRightCos = [NSLayoutConstraint constraintWithItem:blueView attribute:NSLayoutAttributeRight relatedBy:NSLayoutRelationEqual toItem:self.view attribute:NSLayoutAttributeRight multiplier:1.0 constant:-20];
 48     [self.view addConstraint:blueRightCos];
 49
 50     // 2.1.4高度
 51     NSLayoutConstraint *blueHeightCos = [NSLayoutConstraint constraintWithItem:blueView attribute:NSLayoutAttributeHeight relatedBy:NSLayoutRelationEqual toItem:nil attribute:kNilOptions multiplier:1.0 constant:50];
 52     [blueView addConstraint:blueHeightCos];
 53
 54
 55     // 2.2添加红色的约束
 56     // 2.2.1顶部
 57     NSLayoutConstraint *redTopCos = [NSLayoutConstraint constraintWithItem:redView attribute:NSLayoutAttributeTop relatedBy:NSLayoutRelationEqual toItem:blueView attribute:NSLayoutAttributeBottom multiplier:1.0 constant:20];
 58     [self.view addConstraint:redTopCos];
 59
 60     // 2.2.2右边
 61     NSLayoutConstraint *redRightCos = [NSLayoutConstraint constraintWithItem:redView attribute:NSLayoutAttributeRight relatedBy:NSLayoutRelationEqual toItem:self.view attribute:NSLayoutAttributeRight multiplier:1.0 constant:-20];
 62     [self.view addConstraint:redRightCos];
 63
 64     // 2.2.3高度
 65     NSLayoutConstraint *redHeightCos = [NSLayoutConstraint constraintWithItem:redView attribute:NSLayoutAttributeHeight relatedBy:NSLayoutRelationEqual toItem:nil attribute:kNilOptions multiplier:1.0 constant:50];
 66     [redView addConstraint:redHeightCos];
 67
 68     // 2.2.4宽度
 69     NSLayoutConstraint *redWidthCos = [NSLayoutConstraint constraintWithItem:redView attribute:NSLayoutAttributeWidth relatedBy:NSLayoutRelationEqual toItem:blueView attribute:NSLayoutAttributeWidth multiplier:0.5 constant:0.0];
 70     [self.view addConstraint:redWidthCos];
 71
 72
 73 }
 74
 75
 76 - (void)demo1
 77 {
 78
 79     // 1.创建控件
 80     UIView *redView = [[UIView alloc] init];
 81     redView.backgroundColor = [UIColor redColor];
 82     [self.view addSubview:redView];
 83
 84     // 2.创建约束
 85     /*
 86      Item == first item
 87      attribute == first item需要设置的约束类型
 88      relatedBy == Relatio(等于)
 89      toItem ==  Second item
 90      attribute == Second item的约束类型
 91      multiplier == 乘以
 92      constant == 加上多少
 93      */
 94
 95 #warning 注意点: 如果通过代码来设置Autolayout约束, 那么必须先禁用Autoresizing
 96     redView.translatesAutoresizingMaskIntoConstraints = NO;
 97
 98     // 2.1宽度
 99     NSLayoutConstraint *width = [NSLayoutConstraint constraintWithItem:redView attribute:NSLayoutAttributeWidth relatedBy:NSLayoutRelationEqual toItem:nil attribute:kNilOptions multiplier:1.0 constant:100.0];
100     // 将约束添加给自己
101     [redView addConstraint:width];
102
103     // 2.2高度
104     NSLayoutConstraint *height = [NSLayoutConstraint constraintWithItem:redView attribute:NSLayoutAttributeHeight relatedBy:NSLayoutRelationEqual toItem:nil attribute:kNilOptions multiplier:1.0 constant:100.0];
105     // 将约束添加给自己
106     [redView addConstraint:height];
107
108     // 2.3水平居中
109     NSLayoutConstraint *xCos = [NSLayoutConstraint constraintWithItem:redView attribute:NSLayoutAttributeCenterX relatedBy:NSLayoutRelationEqual toItem:self.view attribute:NSLayoutAttributeCenterX multiplier:1.0 constant:0.0];
110     // 将约束添加到层次较高的父view上
111     [self.view addConstraint:xCos];
112
113     // 2.4垂直居中
114     NSLayoutConstraint *yCos = [NSLayoutConstraint constraintWithItem:redView attribute:NSLayoutAttributeCenterY relatedBy:NSLayoutRelationEqual toItem:self.view attribute:NSLayoutAttributeCenterY multiplier:1.0 constant:0.0];
115     // 将约束添加到层次较高的父view上
116     [self.view addConstraint:yCos];
117
118 #warning 注意: 通过代码添加Autolayout约束, 添加约束之前必须保证控件已经在父控件上了
119     //    [self.view addSubview:redView];
120 }
121 @end
2、了解一下VFL语言来处理适配
2.1 什么是VFL语言
VFL全称是Visual Format Language,翻译过来是“可视化格式语言”
VFL是苹果公司为了简化Autolayout的编码而推出的抽象语言
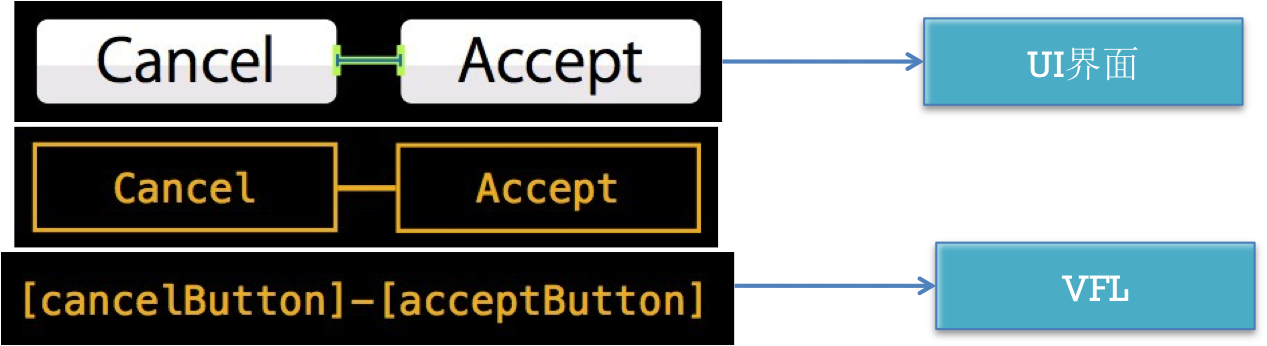
2.2 VFL示例
 1 H:[cancelButton(72)]-12-[acceptButton(50)]
 2//  canelButton宽72,acceptButton宽50,它们之间间距12
 3
 4 H:[wideView(>=60@700)]
 5 // wideView宽度大于等于60point,该约束条件优先级为700(优先级最大值为1000,优先级越高的约束越先被满足)
 6
 7 V:[redBox][yellowBox(==redBox)]
 8 // 竖直方向上,先有一个redBox,其下方紧接一个高度等于redBox高度的yellowBox
 9
10 H:|-10-[Find]-[FindNext]-[FindField(>=20)]-|
11 // 水平方向上,Find距离父view左边缘默认间隔宽度,之后是FindNext距离Find间隔默认宽度;再之后是宽度不小于20的FindField,它和FindNext以及父view右边缘的间距都是默认宽度。(竖线“|” 表示superview的边缘
2.3 VFL的使用
1  // 使用VFL来创建约束数组
2 + (NSArray *)constraintsWithVisualFormat:(NSString *)format options:(NSLayoutFormatOptions)opts metrics:(NSDictionary *)metrics views:(NSDictionary *)views;
3 format :VFL语句
4 opts :约束类型
5 metrics :VFL语句中用到的具体数值
6 views :VFL语句中用到的控件
7
8 // 创建一个字典(内部包含VFL语句中用到的控件)的快捷宏定义
9 NSDictionaryOfVariableBindings(...)
2.4VFL适配小案例:
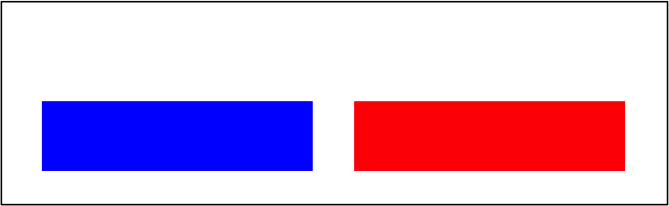
1. 在控制器view底部添加2个view,1个蓝色,1个红色
2个view宽度、高度永远相等
距离父控件左边、右边、下边间距和2个view之间的间距相等
 1 - (void)demo1
 2 {
 3     // 1.创建一个红色View, 并且添加到父控件
 4     UIView *redVeiw = [[UIView alloc] init];
 5     redVeiw.backgroundColor = [UIColor redColor];
 6     [self.view addSubview:redVeiw];
 7
 8     // 2.禁止红色View的Autgoresizing
 9     redVeiw.translatesAutoresizingMaskIntoConstraints = NO;
10
11     // 3.利用VFL添加约束
12     /*
13      VisualFormat: VFL语句
14      options: 对齐方式等
15      metrics: VFL语句中使用到的一些变量
16      views: VFL语句中使用到的一些控件
17      */
18     NSArray *hCos = [NSLayoutConstraint constraintsWithVisualFormat:@"H:|-margin-[xxxVeiw(==width)]" options:kNilOptions metrics:@{@"margin": @(20), @"width":@(100)} views:@{@"xxxVeiw": redVeiw}];
19     [self.view addConstraints:hCos];
20
21     NSArray *vCos = [NSLayoutConstraint constraintsWithVisualFormat:@"V:|-20-[xxxVeiw(==100)]" options:kNilOptions metrics:nil views:@{@"xxxVeiw": redVeiw}];
22     [self.view addConstraints:vCos];
23 }
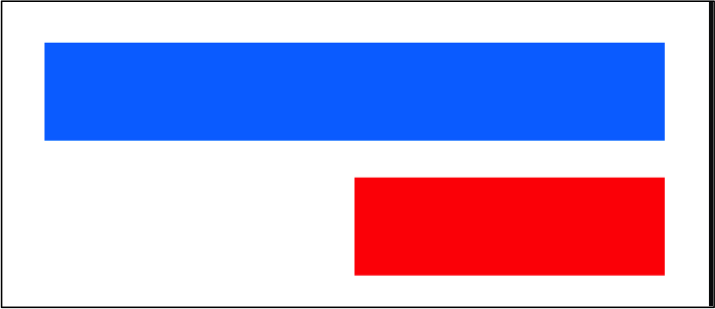
2. 在控制器view顶部添加2个view,1个蓝色,1个红色
2个view高度永远相等
红色view和蓝色view右边对齐
蓝色view距离父控件左边、右边、上边间距相等
蓝色view距离红色view间距固定
红色view的左边和父控件的中点对齐
如下为实现代码:
 1 - (void)viewDidLoad {
 2     [super viewDidLoad];
 3     // 1.创建一个红色View, 并且添加到父控件
 4     UIView *blueVeiw = [[UIView alloc] init];
 5     blueVeiw.backgroundColor = [UIColor blueColor];
 6     [self.view addSubview:blueVeiw];
 7
 8     UIView *redVeiw = [[UIView alloc] init];
 9     redVeiw.backgroundColor = [UIColor redColor];
10     [self.view addSubview:redVeiw];
11
12     // 2.禁止红色View的Autgoresizing
13     blueVeiw.translatesAutoresizingMaskIntoConstraints = NO;
14     redVeiw.translatesAutoresizingMaskIntoConstraints = NO;
15
16     // 3.利用VFL添加约束
17     /*
18      VisualFormat: VFL语句
19      options: 对齐方式等
20      metrics: VFL语句中使用到的一些变量
21      views: VFL语句中使用到的一些控件
22      */
23     // 3.1设置蓝色
24     // 3.1.1水平方向
25     NSArray *blueHCos = [NSLayoutConstraint constraintsWithVisualFormat:@"H:|-20-[blueVeiw]-20-|" options:kNilOptions metrics:nil views:@{@"blueVeiw":blueVeiw}];
26     [self.view addConstraints:blueHCos];
27
28     // 3.1.2垂直方向
29     NSArray *blueVCos = [NSLayoutConstraint constraintsWithVisualFormat:@"V:|-20-[blueVeiw(==50)]" options:kNilOptions metrics:nil views:@{@"blueVeiw":blueVeiw}];
30      [self.view addConstraints:blueVCos];
31
32     // 3.2设置红色
33     // 3.2.1垂直方向
34     NSArray *redVCos = [NSLayoutConstraint constraintsWithVisualFormat:@"V:[blueVeiw]-20-[redVeiw(==50)]" options:NSLayoutFormatAlignAllRight metrics:nil views:@{@"blueVeiw":blueVeiw, @"redVeiw":redVeiw}];
35     [self.view addConstraints:redVCos];
36
37     // 3.2.2水平方向
38 //    NSArray *redHCos = [NSLayoutConstraint constraintsWithVisualFormat:@"H:[redVeiw(==blueVeiw * 0.5)]" options:kNilOptions metrics:nil views:@{@"blueVeiw":blueVeiw, @"redVeiw":redVeiw}];
39 //    [self.view addConstraints:redHCos];
40
41 #warning VFL不支持乘除法
42     NSLayoutConstraint *redHCos =[NSLayoutConstraint constraintWithItem:redVeiw attribute:NSLayoutAttributeWidth relatedBy:NSLayoutRelationEqual toItem:blueVeiw attribute:NSLayoutAttributeWidth multiplier:0.5 constant:0.0];
43     [self.view addConstraint:redHCos];
44
45 }
3. 利用第三方框架Masonry,实现屏幕适配
3.1 Masonry了解:
目前最流行的Autolayout第三方框架
用优雅的代码方式编写Autolayout
省去了苹果官方恶心的Autolayout代码
大大提高了开发效率
3.2 如何使用
1> 导入到项目中,
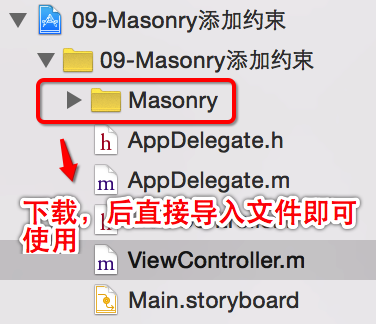
2> 导入头文件:
1 //define this constant if you want to use Masonry without the 'mas_' prefix
2 #define MAS_SHORTHAND
3
4 //define this constant if you want to enable auto-boxing for default syntax
5 #define MAS_SHORTHAND_GLOBALS
6 #import "Masonry.h"
小案例实现代码:
  1 #import "ViewController.h"
  2
  3 //define this constant if you want to use Masonry without the 'mas_' prefix
  4 #define MAS_SHORTHAND
  5 // 只要添加这个宏, 就可以去掉Masonry框架中对象访问对象属性前面的mas_属性, 和方法前的mas_前缀
  6
  7 // 例如添加前的写法
  8 /*
  9  make.left.equalTo(self.view.mas_left).with.offset(20);
 10  */
 11 // 例如添加后的写法
 12 /*
 13  make.left.equalTo(self.view.left).with.offset(20);
 14  */
 15
 16
 17 //define this constant if you want to enable auto-boxing for default syntax
 18 #define MAS_SHORTHAND_GLOBALS
 19 // 只要添加上这个宏, 给equalTo传递参数的时候, 就可以直接传递基本数据类型 ,系统会自动包装
 20 // 如果没有添加上面这个宏, 那么给equalTo传递参数的时候, 必须传递对象
 21 // 如果要传递基本数据类型必须使用mas_equalTo
 22
 23
 24 // 只需要在导入Masonry.h之前, 添加上一上两个宏, 就可以简化代码
 25 #import "Masonry.h"
 26
 27 @interface ViewController ()
 28
 29 @property(nonatomic, weak)UIView *blueVeiw;
 30 @end
 31
 32 @implementation ViewController
 33
 34
 35
 36 - (void)viewDidLoad {
 37     [super viewDidLoad];
 38     // Do any additional setup after loading the view, typically from a nib.
 39
 40     /**
 41      1. 实现红色view是蓝色宽度一半。。。。,如上案例二
 42      */
 43
 44     // 1.创建两个View, 并且添加到父控件
 45     UIView *blueVeiw = [[UIView alloc] init];
 46     blueVeiw.backgroundColor = [UIColor blueColor];
 47     [self.view addSubview:blueVeiw];
 48     self.blueVeiw = blueVeiw;
 49
 50     UIView *redVeiw = [[UIView alloc] init];
 51     redVeiw.backgroundColor = [UIColor redColor];
 52     [self.view addSubview:redVeiw];
 53
 54     // 2.禁止红色View的Autgoresizing
 55     blueVeiw.translatesAutoresizingMaskIntoConstraints = NO;
 56     redVeiw.translatesAutoresizingMaskIntoConstraints = NO;
 57
 58     // 3.添加蓝色的约束
 59     [blueVeiw makeConstraints:^(MASConstraintMaker *make) {
 60         make.left.equalTo(self.view.left).offset(20);
 61         make.right.equalTo(self.view.right).offset(-20);
 62         make.top.equalTo(self.view.top).offset(20);
 63         make.height.equalTo(50);
 64     }];
 65
 66     // 4.添加红色的约束
 67     [redVeiw makeConstraints:^(MASConstraintMaker *make) {
 68         make.top.equalTo(blueVeiw.bottom).offset(20);
 69         make.height.equalTo(blueVeiw.height);
 70         make.right.equalTo(blueVeiw.right);
 71         make.width.equalTo(blueVeiw.width).multipliedBy(0.5);
 72     }];
 73
 74 //    注意: 在Storyboard中约束是可以重复添加的, 通过Masonry添加约束也是可以重复的, 要注意重复添加导致的错误和冲突
 75
 76 }
 77
 78 - (void)touchesBegan:(nonnull NSSet<UITouch *> *)touches withEvent:(nullable UIEvent *)event
 79 {
 80     /*
 81     // 使用makeConstraints, 每次都会添加新的约束, 也就是会导致重复添加
 82 //    [self.blueVeiw makeConstraints:^(MASConstraintMaker *make) {
 83 //        make.height.equalTo(100);
 84 //    }];
 85
 86     // 要更新约束使用updateConstraints
 87     // updateConstraints特点: 如果没有设置过, 就添加一个新的
 88     // 如果已经设置过了, 就更新以前设置的那一个
 89     [self.blueVeiw updateConstraints:^(MASConstraintMaker *make) {
 90         make.height.equalTo(100);
 91     }];
 92      */
 93
 94     // 清空约束 remakeConstraints
 95     [self.blueVeiw remakeConstraints:^(MASConstraintMaker *make) {
 96
 97     }];
 98 }
 99
100 - (void)demo
101 {
102     // 1.创建一个控件
103     UIView *redVeiw = [[UIView alloc] init];
104     redVeiw.backgroundColor = [UIColor redColor];
105     [self.view addSubview:redVeiw];
106
107     // 2.禁止红色View的Autgoresizing
108     redVeiw.translatesAutoresizingMaskIntoConstraints = NO;
109
110     // 3.利用Masonry添加约束
111     /*
112      [redVeiw mas_makeConstraints:^(MASConstraintMaker *make) {
113
114      make.left.equalTo(self.view.mas_left).offset(20);
115      make.top.equalTo(self.view.mas_top).offset(20);
116      make.bottom.equalTo(self.view.mas_bottom).offset(-20);
117      make.right.equalTo(self.view.mas_right).offset(-20);
118      }];
119      */
120
121     /*
122      [redVeiw mas_makeConstraints:^(MASConstraintMaker *make) {
123
124      make.left.equalTo(self.view).offset(20);
125      make.top.equalTo(self.view).offset(20);
126      make.bottom.equalTo(self.view).offset(-20);
127      make.right.equalTo(self.view).offset(-20);
128      }];
129      */
130
131     /*
132      [redVeiw mas_makeConstraints:^(MASConstraintMaker *make) {
133
134      make.left.offset(20);
135      make.top.offset(20);
136      make.bottom.offset(-20);
137      make.right.offset(-20);
138      }];
139      */
140
141     /*
142      [redVeiw mas_makeConstraints:^(MASConstraintMaker *make) {
143      make.edges.insets(UIEdgeInsetsMake(20, 20, 20, 20));
144      }];
145      */
146
147     /*
148      [redVeiw mas_makeConstraints:^(MASConstraintMaker *make) {
149
150      // 注意: 在masonry中with和and这两个单词是为了提高阅读性而存在的, 没有意义
151 //        make.left.equalTo(self.view.mas_left).with.offset(20);
152 //        make.top.equalTo(self.view.mas_top).with.offset(20);
153 //        make.bottom.equalTo(self.view.mas_bottom).with.offset(-20);
154 //        make.right.equalTo(self.view.mas_right).with.offset(-20);
155
156      // 要想这样使用必须加上:#define MAS_SHORTHAND
157      // 否则只能使用 mas_left
158      make.left.equalTo(self.view.left).with.offset(20);
159      make.top.equalTo(self.view.top).with.offset(20);
160 //        make.width.equalTo(@(100));
161
162      // 要想这样使用必须加上:#define MAS_SHORTHAND_GLOBALS
163      make.height.equalTo(100);
164 //        make.width.and.height.equalTo(@(100)); // 只能接收对象
165      // mas_equalTo本质还是接收对象, 还是调用equalTo
166 //        make.width.and.height.mas_equalTo(100); // 可以接收基本数据类型
167
168      }];
169      */
170 }
171
172
173 @end
总结:累并快乐着,明天继续更新,一起进步,困的不行了,晚安,^_^


 308
308

 被折叠的 条评论
为什么被折叠?
被折叠的 条评论
为什么被折叠?
 到【灌水乐园】发言


