


硬件需求
下表是几个硬件配置的示例:
| 名称 | 平台 | CPU/内存 | 数据库 | 监控主机数量 |
| 小型 | CentOS | 虚拟应用 | MySQL InnoDB | 100 |
| 中型 | CentOS | 2 CPU cores/2GB | MySQL InnoDB | 500 |
| 大型 | RedHat Enterprise Linux | 4 CPU cores/8GB | RAID10 MySQL InnoDB or PostgreSQL | >1000 |
| 巨大型 | RedHat Enterprise Linux | 8 CPU cores/16GB | 快速RAID10 MySQL InnoDB or PostgreSQL | >10000 |
数据库管理系统
| 软件 | 版本 | 备注 |
| MySQL | 5.0.3或以上 | 使用MySQL作为Zabbix后端数据库。需要InnoDB引擎。 |
| Oracle | 10g或以上 | 使用Oracle作为Zabbix后端数据库。 |
| PostgreSQL | 8.1或以上 | 使用PostgreSQL作为Zabbix后端数据库。 |
| SQLite | 3.3.5或以上 | 使用SQLite作为Zabbix后端数据库。 |
| IBM DB2 | 9.7或以上 | 使用IBM DB2作为Zabbix后端数据库。 |
Zabbix前端需要使用下列软件:
| 软件 | 版本 | 备注 |
| Apache | 1.3.12或以上 | |
| PHP | 5.4.0或以上 |
zabbix运行环境(LAMP),包括Linux,数据库mysql,前端容器apache和php
zabbix软件,包括server,proxy,agent
一. LAMP环境安装
新建以下三个用户
www 用于运行apache
mysql用于运行Mysql
zabbix用于运行zabbix
[root@localhost etc]# groupadd www
[root@localhost etc]# useradd www -g www
[root@localhost etc]# groupadd mysql
[root@localhost etc]# useradd mysql -g mysql
[root@localhost etc]# groupadd www
[root@localhost etc]# useradd www -g www
[root@localhost etc]# groupadd zabbix
[root@localhost etc]# useradd zabbix -g zabbix
支持包安装
Apache安装需要
yum -y install pcre-devel
yum -y install zlib-devel
从apache网站上下载apr,apr-util,并解压复制到srclib目录中。
cp –rf apr-1.6.3 apr
cp –rf apr-util-1.5.4 apr-util
mysql安装需要
yum -y install autoconf
PHP安装需要
yum -y install libxml2-devel
yum -y install openssl-devel
yum -y install libjpeg-devel
yum -y install libpng-devel
yum -y install openldap-devel
yum -y install bzip2-devel
yum install freetype-devel (不要加-y)
zabbix安装需要
yum -y install net-snmp-devel
yum -y install libevent-devel
yum -y install curl-devel
yum install mysql-devel (不要加 -y )
Apache安装
- 上传介质 httpd-2.4.33.tar.gz
- 解压 [root@localhost softwares]# tar -xzvf httpd-2.4.33.tar.gz
- 编译安装
[root@localhost httpd-2.4.33]# ./configure --prefix=/usr/local/apache2 --with-included-apr --enable-so --enable-deflate=shared --enable-expires=shared --enable-rewrite=shared --enable-static-support --disable-userdir
Make
Make install
apache安装过程中产生的错误
错误:
configure: error: Bundled APR requested but not found at ./srclib/. Download and unpack the corresponding apr and apr-util packages to ./srclib/.
configure: error: Bundled APR-Util requested but not found at ./srclib/. Download and unpack the corresponding apr and apr-util packages to ./srclib/.
解决方法:
下载apr-1.6.3.tar.gz,apr-util-1.5.4.tar.gz
解压
[root@localhost softwares]# tar -xzvf apr-1.6.3.tar.gz
[root@localhost softwares]# tar -xzvf apr-util-1.5.4.tar.gz
复制
[root@localhost httpd-2.4.33]# cd srclib/
[root@localhost srclib]# cp -rf /tmp/softwares/apr-1.6.3 ./apr
[root@localhost srclib]# cp -rf /tmp/softwares/apr-util-1.5.4 apr-util
错误:
configure: error: pcre-config for libpcre not found. PCRE is required and available from http://pcre.org/
解决方法:
安装pcre,pcre-devel
[root@localhost httpd-2.4.33]# yum -y install pcre
[root@localhost httpd-2.4.33]# yum -y install pcre-devel
错误:
checking whether to enable mod_deflate... configure: error: mod_deflate has been requested but can not be built due to prerequisite failures
解决方法:
[root@localhost httpd-2.4.33]# yum -y install zlib
[root@localhost httpd-2.4.33]# yum -y install zlib-devel
错误:
xml/apr_xml.c:35:19: fatal error: expat.h: No such file or directory
#include <expat.h>
^
compilation terminated.
make[3]: *** [xml/apr_xml.lo] Error 1
make[3]: Leaving directory `/tmp/softwares/httpd-2.4.33/srclib/apr-util'
make[2]: *** [all-recursive] Error 1
make[2]: Leaving directory `/tmp/softwares/httpd-2.4.33/srclib/apr-util'
make[1]: *** [all-recursive] Error 1
make[1]: Leaving directory `/tmp/softwares/httpd-2.4.33/srclib'
make: *** [all-recursive] Error 1
解决方法:
[root@localhost httpd-2.4.33]# yum -y install expat-devel
错误:
/tmp/softwares/httpd-2.4.33/srclib/apr-util/.libs/libaprutil-1.so: undefined reference to `XML_GetErrorCode'
/tmp/softwares/httpd-2.4.33/srclib/apr-util/.libs/libaprutil-1.so: undefined reference to `XML_SetEntityDeclHandler'
/tmp/softwares/httpd-2.4.33/srclib/apr-util/.libs/libaprutil-1.so: undefined reference to `XML_ParserCreate'
/tmp/softwares/httpd-2.4.33/srclib/apr-util/.libs/libaprutil-1.so: undefined reference to `XML_SetCharacterDataHandler'
/tmp/softwares/httpd-2.4.33/srclib/apr-util/.libs/libaprutil-1.so: undefined reference to `XML_ParserFree'
/tmp/softwares/httpd-2.4.33/srclib/apr-util/.libs/libaprutil-1.so: undefined reference to `XML_SetUserData'
/tmp/softwares/httpd-2.4.33/srclib/apr-util/.libs/libaprutil-1.so: undefined reference to `XML_StopParser'
/tmp/softwares/httpd-2.4.33/srclib/apr-util/.libs/libaprutil-1.so: undefined reference to `XML_Parse'
/tmp/softwares/httpd-2.4.33/srclib/apr-util/.libs/libaprutil-1.so: undefined reference to `XML_ErrorString'
/tmp/softwares/httpd-2.4.33/srclib/apr-util/.libs/libaprutil-1.so: undefined reference to `XML_SetElementHandler'
collect2: error: ld returned 1 exit status
make[1]: *** [httpd] Error 1
make[1]: Leaving directory `/tmp/softwares/httpd-2.4.33'
make: *** [all-recursive] Error 1
解决方法:
降arp-util版本为1.5.4
[root@localhost srclib]# cp -rf /tmp/softwares/apr-util-1.5.4 ./apr-util
AH00558: httpd: Could not reliably determine the server's fully qualified domain name, using localhost.localdomain. Set the 'ServerName' directive globally to suppress this message
Mysql安装
- 上传介质 mysql-5.6.40-linux-glibc2.12-x86_64.tar.gz
- 解压 tar –zxvf mysql-5.6.40-linux-glibc2.12-x86_64.tar.gz
- 更名到/usr/local/mysql (配置文件中的默认路径)
mv mysql-5.6.40-linux-glibc2.12-x86_64 /usr/local/mysql
- 初始化数据库
cd /usr/local/mysql
mkdir /data/mysql ;
chown -R mysql:mysql /data/mysql
./scripts/mysql_install_db --user=mysql --datadir=/data/mysql
- 配置文件
复制文件到/etc/目录
cp support-files/my-***.cnf /etc/my.cnf
配置my.cnf
[client]
port = 3306
socket = /var/lib/mysql/mysql.sock
[mysql]
#这个配置段设置启动MySQL服务的条件;在这种情况下,no-auto-rehash确保这个服务启动得比较快。
no-auto-rehash
[mysqld]
user = mysql
port = 3306
socket = /var/lib/mysql/mysql.sock
basedir = /usr/local/mysql
datadir = /data/mysql/data
open_files_limit = 10240
- 配置自启动
cp support-files/mysql.server /etc/init.d/mysqld
chmod 755 /etc/init.d/mysqld
修改启动脚本中的参数datadir
vim /etc/init.d/mysqld
修改其中的参数datadir=/data/mysql(前面初始化数据库时定义的目录)
加入系统服务项,并设定开机启动,启动mysql
chkconfig --add mysqld
chkconfig mysqld on
service mysqld start
Mysql安装过程中产生的错误
错误:
[root@localhost mysql]# ./scripts/mysql_install_db --user=mysql --datadir=/data/mysql
FATAL ERROR: please install the following Perl modules before executing ./scripts/mysql_install_db:
Data::Dumper
解决方法:
yum -y install autoconf
错误:
ERROR! The server quit without updating PID file (/data/mysql/ZABBIXT03.pid).
解决方法:
chmod 755 /etc/init.d/mysqld
PHP安装
- 上传介质 php-7.2.5.tar.gz
- 解压 tar –zxcv php-7.2.5.tar.gz
- 复制ldap包 cp -frp /usr/lib64/libldap* /usr/lib/
- 编译 cd php-7.2.5
./configure --prefix=/usr/local/php --with-apxs2=/usr/local/apache2/bin/apxs --with-config-file-path=/usr/local/php/etc --with-mysqli=/usr/local/mysql/bin/mysql_config --with-libxml-dir --with-gd --with-jpeg-dir --with-png-dir --with-freetype-dir --with-iconv-dir --with-zlib-dir --with-bz2 --with-openssl --enable-soap --enable-ftp --enable-mbstring --enable-sockets --enable-exif --disable-ipv6 --enable-bcmath --with-gettext --with-ldap
- 安装
make&&make install
- php配置文件
mkdir /usr/local/php/etc
cp php.ini-dist /usr/local/php/etc/php.ini
PHP安装过程中产生的错误
错误:
configure: error: libxml2 not found. Please check your libxml2 installation.
解决方法:
yum -y install libxml2
yum -y install libxml2-devel
错误:
configure: error: Cannot find OpenSSL's <evp.h>
解决方法:
yum -y install openssl
yum -y install openssl-devel
错误:
configure: error: Please reinstall the BZip2 distribution
解决方法:
yum -y install bzip2-devel
错误:
configure: error: jpeglib.h not found.
解决方法:
yum -y install libjpeg-devel
错误:
configure: error: png.h not found.
解决方法:
yum install libpng
yum -y install libpng-devel
configure: error: freetype-config not found.
yum install freetype-devel
错误:
configure: error: Cannot find ldap.h
解决方法:
yum -y install openldap
yum -y install openldap-devel
错误:
configure: error: Cannot find ldap libraries in /usr/lib.
解决方法:
cp -frp /usr/lib64/libldap* /usr/lib/
错误:
make 过程中的问题
/usr/bin/ld: ext/ldap/.libs/ldap.o: undefined reference to symbol 'ber_scanf'
/usr/bin/ld: note: 'ber_scanf' is defined in DSO /lib64/liblber-2.4.so.2 so try adding it to the linker command line
/lib64/liblber-2.4.so.2: could not read symbols: Invalid operation
collect2: error: ld returned 1 exit status
make: *** [sapi/cli/php] Error 1
解决方法:
-Run your configure command
-edit Makefile
-Find the line that starts with "EXTRA_LIBS ="
-Add the following to the end of the line " -llber"
apache结合php
- 在apache中打开php配置,配置文件为httpd.conf
vim /usr/local/apache2/conf/httpd.conf
在AddType application XXXX最后一行添加如下配置
AddType application/x-httpd-php .php
在dir_module 中增加 index.php
<IfModule dir_module>
DirectoryIndex index.html index.php
</IfModule>
- 已经选项为apache性能配置项,去掉以下行的#
#Include conf/extra/httpd-mpm.conf
#Include conf/extra/httpd-info.conf
#Include conf/extra/httpd-vhosts.conf
#Include conf/extra/httpd-default.conf
配置apache的进程管理以及虚拟主机
配置Apache进程管理
配置文件为:/usr/local/apache2/conf/extra/httpd-mpm.conf
将配置文件中下面一段修改为如下:
<IfModule mpm_prefork_module>
ServerLimit 2048 新添加
StartServers 5
MinSpareServers 5
MaxSpareServers 10
MaxClients 1024 默认最大为256,设置为超过256必须增加有ServerLimit
MaxRequestsPerChild 0
</IfModule>
说明:
配置Apache缺省httpd设置
配置文件为:/usr/local/apache2/conf/extra/httpd-default.conf
将配置文件中下面一段:
将KeepAlive On 改为KeepAlive Off
- 配置Apache的访问权限
vim /usr/local/apache2/conf/httpd.conf
修改成如下
<Directory />
AllowOverride none
Require all granted
</Directory>改成:
- 配置Apache的运行账户
vim /usr/local/apache2/conf/httpd.conf
修改成如下
User www Group www
配置完上述内容之后,启动Apache:
/usr/local/apache2/bin/apachectl start
【测试LAMP是否成功】
在/usr/local/apache2/htdocs 目录中添加如下文件index.php
vim /usr/local/apache2/htdocs /index.php
写入:
<?php
phpinfo();
?>
保存后,然后在浏览器中输入 http://你配置的域名/index.php 看是否能看到php的相关配置信息。
二. Zabbix安装
从源代码安装
1. 上传介质zabbix-3.4.2.tar.gz
2. 解压tar –zxvf zabbix-3.4.2.tar.gz
3. 编译安装
cd zabbix-3.4.2.
./configure --enable-server --enable-agent --with-mysql --enable-ipv6 --with-net-snmp --with-libcurl --with-libxml2 --with-openipmi --prefix=/usr/local/zabbix
安装 server,agent 如需要安装proxy 加参数 --enable-proxy
--with-net-snmp 用于snmp 监控,如交换机,物理机监控
--with-libcurl --with-libxml2 虚拟机监控
--with-openipmi 用于IPMI 监控,如物理机监控
(使用zabbix用户安装,需要先在/usr/local下新建zabbix并chown给zabbix用户。)
Make install
4. 数据库创建
shell> mysql -uroot -p<password>
mysql> create database zabbix character set utf8 collate utf8_bin;
mysql> grant all privileges on zabbix.* to zabbix@localhost identified by '<password>';
mysql> quit;
shell> cd database/mysql
shell> mysql -uzabbix -p<password> zabbix < schema.sql
# stop here if you are creating database for Zabbix proxy
shell> mysql -uzabbix -p<password> zabbix < images.sql
shell> mysql -uzabbix -p<password> zabbix < data.sql
5. 安装前端web
在/usr/local/apache2/htdocs 目录中新建zabbix
mkdir /usr/local/apache2/htdocs/zabbix
cd zbbix-3.4.2/frontends/php
cp -a . /usr/local/apache2/htdocs/zabbix
访问//<server_ip_or_name>/zabbix
调整参数
根据zabbix要求调整php参数,参数文件/usr/local/php/etc/php.ini
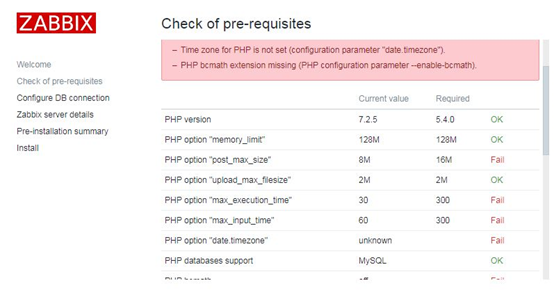
Vim /usr/local/php/etc/php.ini
修改
post_max_size
max_execution_time
max_input_time
date.timezone = Asia/Shanghai
配置文件
cp zabbix.conf.php /usr/local/apache2/htdocs/zabbix/conf/zabbix.conf.php
vi /usr/local/apache2/htdocs/zabbix/conf/zabbix.conf.php
global $DB;
$DB['TYPE'] = 'MYSQL';
$DB['SERVER'] = '10.1.49.130';
$DB['PORT'] = '0';
$DB['DATABASE'] = 'zabbix';
$DB['USER'] = 'zabbix';
$DB['PASSWORD'] = 'zabbix123';
// Schema name. Used for IBM DB2 and PostgreSQL.
$DB['SCHEMA'] = '';
$ZBX_SERVER = '10.1.49.131';
$ZBX_SERVER_PORT = '10051';
$ZBX_SERVER_NAME = 'zabbix server';
Zabbix安装过程中产生的错误
错误:
configure: error: MySQL library not found
解决方法:
yum install mysql-devel
错误:
configure: error: Invalid Net-SNMP directory - unable to find net-snmp-config
解决方法:
yum install -y net-snmp
yum install -y net-snmp-devel
错误:
configure: error: Unable to use libevent (libevent check failed)
解决方法:
yum -y install libevent-devel
错误:
configure: error: Curl library not found
解决方法:
yum -y install curl
yum -y install curl-devel
错误:
zabbix Can't connect to local MySQL server through socket '/tmp/mysql.sock' (2)
解决方法:
有两个方法
- 修改/etc/my.cnf 配置的mysql sock位置改成/tmp/mysql.sock,
[mysql]
socket=/tmp/mysql.sock
- 做连接
ln -s /var/lib/mysql/mysql.sock /tmp/mysql.sock;


 1万+
1万+


 被折叠的 条评论
为什么被折叠?
被折叠的 条评论
为什么被折叠?
 到【灌水乐园】发言


