


一、前言
今天我们开始apk破解的另外一种方式:动态代码调试破解,之前其实已经在一篇文章中说到如何破解apk了:
Android中使用静态方式破解Apk 主要采用的是静态方式,步骤也很简单,首先使用apktool来反编译apk,得到smail源码,然后分析smail代码,采用代码注入技术来跟踪代码,然后找到关键方法进行修改,进而破解,同时还可以使用一些开源的hook框架,比如:Xposed和Cydia Substrate,来进行关键方法的hook。所以这里我们可以看到我们破解的第一步是使用apktool来进行成功的反编译,然后是需要了解smali语法,不过关于smali语法其实很简单,网上有很多教程。
二、知识概要分析
那么今天我们就用另外一种方式来破解apk:动态方式,关于动态方式其实很广义的,因为动态方式相对于静态方式来说,难度大一点,但是他比静态方式高效点,能够针对更过的破解范围。当然动态方式很多,所以这里就分为三篇文章来讲解这块:
1、动态方式破解apk前奏篇(Eclipse动态调试smail源码)
2、动态方式破解apk升级篇(IDA动态调试so源码)
3、动态方式破解apk终极篇(应对加固的apk破解方法)
从这三篇文章能够让我们破解一般的apk没有任何问题,不过不能代表能够破解所有的apk,因为没有绝对的安全,也是没有绝对的破解,两方都在进步,我们只能具体问题具体分析。好了,下面我们就来看第一篇文章,也是今天的重点:Eclipse动态调试smali源码
首先需要解释一下,这里为什么说是调试smali源码,不是Java源码,因为我们弄过反编译的人知道,使用apktool反编译apk之后,会有一个smali文件夹,这里就存放了apk对应的smali源码,关于smali源码这里不解释了,网上有介绍。
三、案例分析
因为这一篇是一个教程篇,所以不能光说,那样会很枯燥的,所以这里用一个例子来介绍一下:
我们就用阿里2014年安全挑战赛的第一题:AliCrack_one.apk

看到这张图了,阿里还挺会制造氛围的,那么其实很简单,我们输入密码就可以破解了,下面我们就来看看如何获取这个密码。
第一步:使用apktool来破解apk
java -jar apktool_2.0.0rc4.jar d -d AliCraceme_1.apk -o out
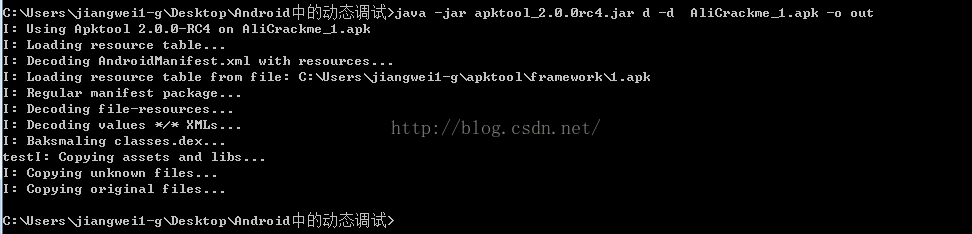
这里的命令不做解释了,但是有一个参数必须带上,那就是:-d
因为这个参数代表我们反编译得到的smali是java文件,这里说的文件是后缀名是java,如果不带这个参数的话,后缀名是smali的,但是Eclipse中是不会识别smali的,而是识别java文件的,所以这里一定要记得加上这个参数。
反编译成功之后,我们得到了一个out目录,如下:
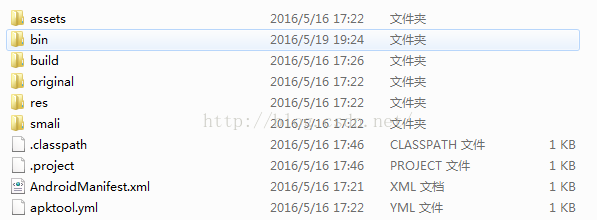
源码都放在smali文件夹中,我们进入查看一下文件:
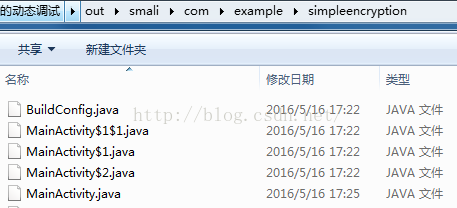
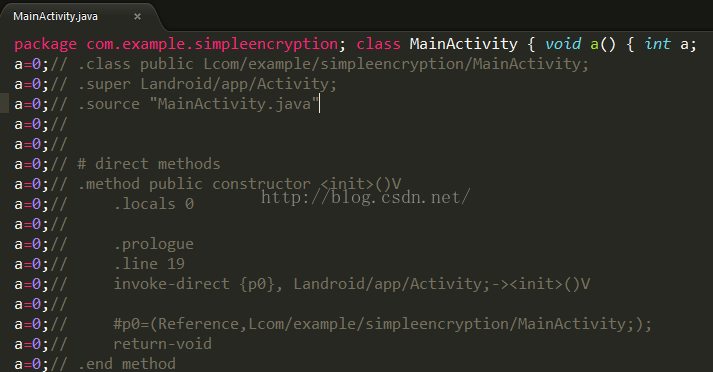
看到了,这里全是Java文件的,其实只是后缀名为java了,内容还是smali的:
2、修改AndroidManifest.xml中的debug属性和在入口代码中添加waitDebug
上面我们反编译成功了,下面我们为了后续的调试工作,所以还是需要做两件事:
1》修改AndroidManifest.xml中的android:debuggable="true"
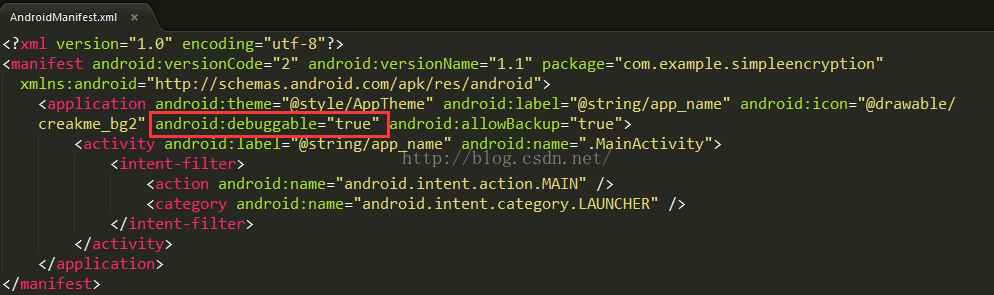
关于这个属性,我们前面介绍run-as命令的时候,也提到了,他标识这个应用是否是debug版本,这个将会影响到这个应用是否可以被调试,所以这里必须设置成true。
2》在入口处添加waitForDebugger代码进行调试等待。
这里说的入口处,就是程序启动的地方,就是我们一般的入口Activity,查找这个Activity的话,方法太多了,比如我们这里直接从上面得到的AndroidManifest.xml中找到,因为入口Activity的action和category是固定的。

当然还有其他方式,比如aapt查看apk的内容方式,或者是安装apk之后用adb dumpsys activity top命令查看都是可以的。
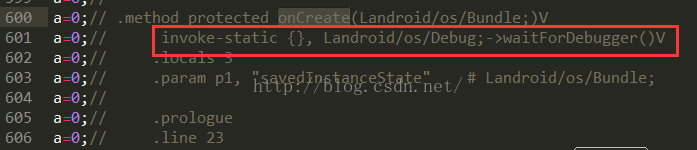
找到入口Activity之后,我们直接在他的onCreate方法的第一行加上waitForDebugger代码即可,找到对应的MainActivity的smali源码:
然后添加一行代码:
invoke-static {}, Landroid/os/Debug;->waitForDebugger()V
这个是smali语法的,其实对应的Java代码就是:android.os.Debug.waitForDebugger();
这里把Java语言翻译成smali语法的,不难,网上有smali的语法解析,这里不想再解释了。
第三步:回编译apk并且进行签名安装
java -jar apktool_2.0.0rc4.jar b -d out -o debug.apk
还是使用apktool进行回编译

编译完成之后,将得到debug.apk文件,但是这个apk是没有签名的,所以是不能安装的,那么下面我们需要在进行签名,这里我们使用Android中的测试程序的签名文件和sign.jar工具进行签名:

关于签名的相关知识,可以看这篇文章:Android中的签名机制详解
java -jar .\sign\signapk.jar .\sign\testkey.x509.pem .\sign\testkey.pk8 debug.apk debug.sig.apk

签名之后,我们就可以进行安装了。
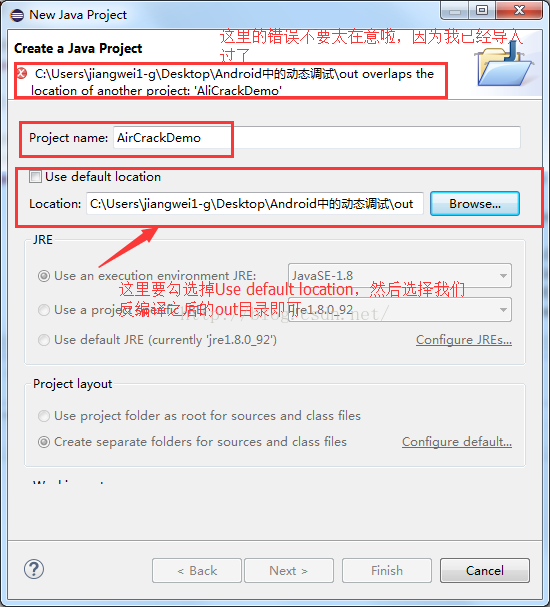
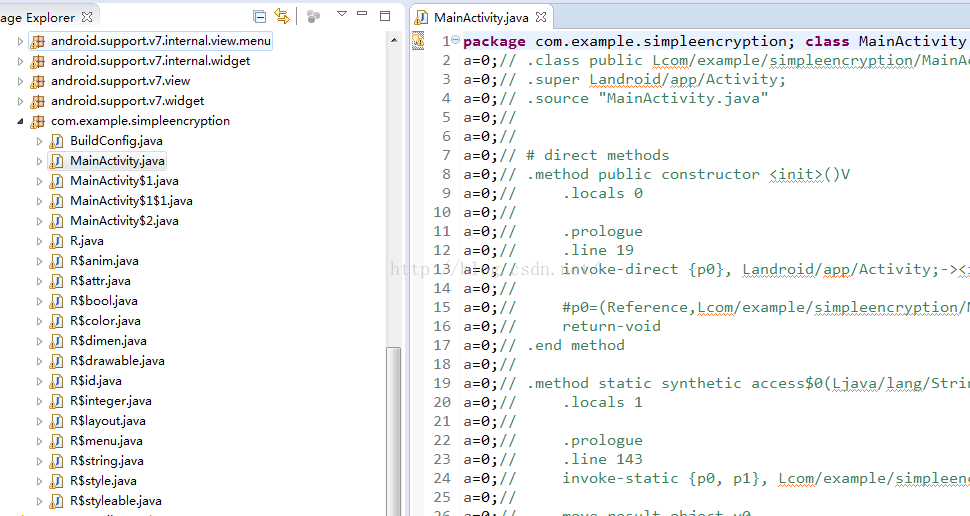
第四步:在Eclipse中新建一个Java工程,导入smali源码
这里我们新建一个Java工程,记住不是Android工程,因为我们最后调试其实是借助于Java的调试器,然后勾选掉Use default location选项,选择我们的smali源码目录,也就是我们上面反编译之后的out目录,点击完成
我们导入源码之后的项目工程结构:
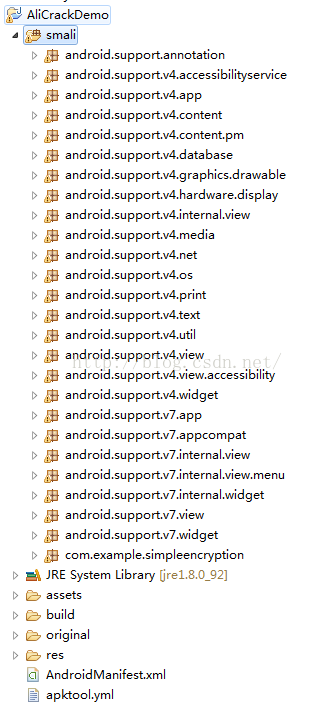
主要看MainActivity类:
第五步:找到关键点,然后打断点
这一步我们看到,其实说的比较广义了,这个要具体问题具体分析了,比如这个例子中,我们知道当我们输入密码之后,肯定要点击按钮,然后触发密码的校验过程,那么这里我们知道找到这个button的定义的地方,然后进入他的点击事件中就可以了。这里分为三步走:
1》使用Eclipse自带的View分析工具找到Button的ResId

点击之后,需要等待一会,分析View之后的结果:
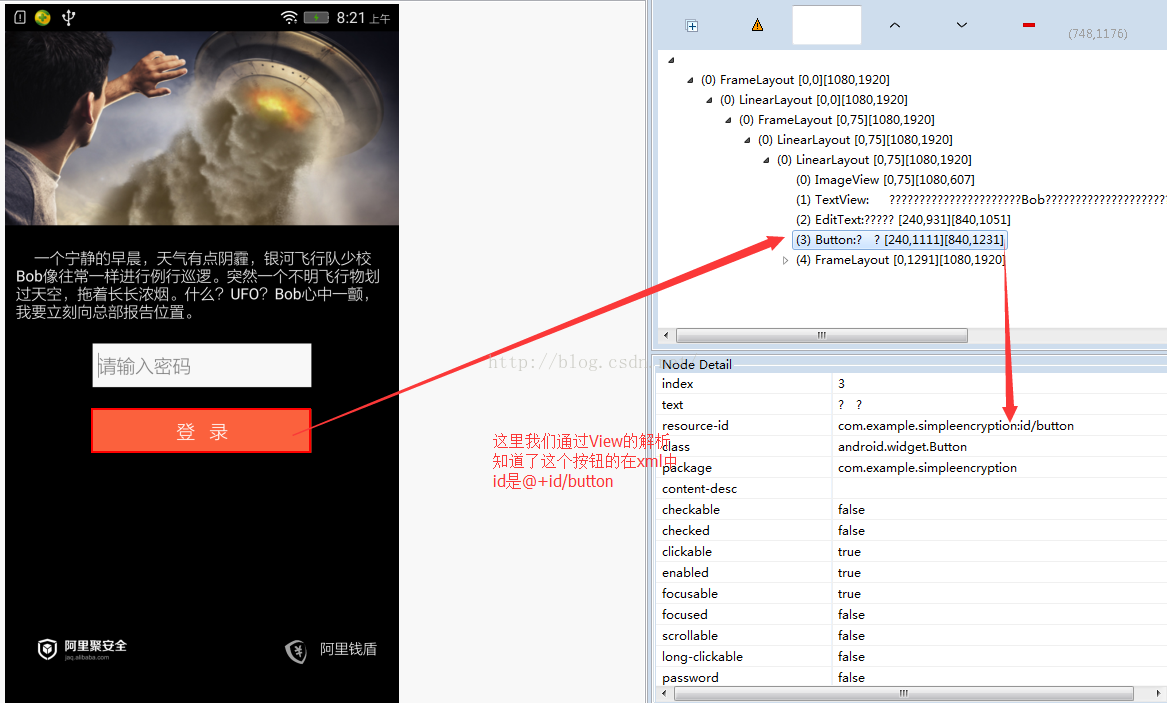
看到了,这里我们能够看到整个当前的页面的全部布局,已经每个控件的属性值,我们需要找到button的resource-id
这里我们看到定义是@+id/button这个值。
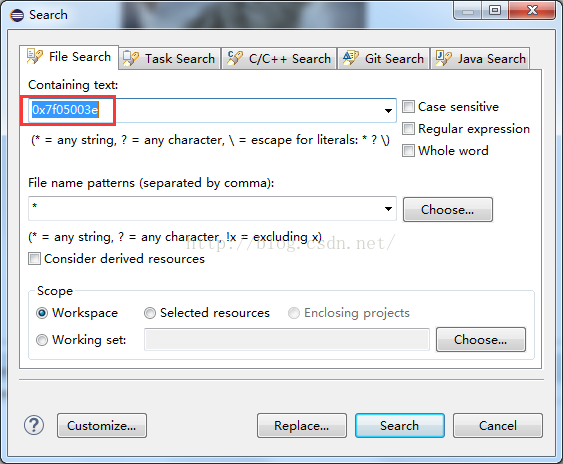
2》我们得到这个resId之后,能否在smali工程中全局搜索这个值,就可以定位到这个button的定义的地方呢?
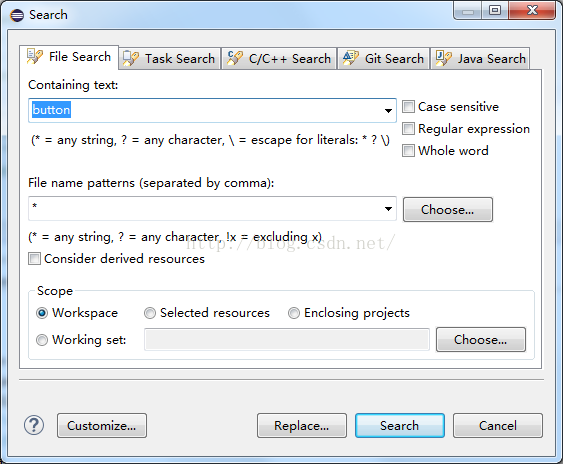
然后我们看看搜到的结果:
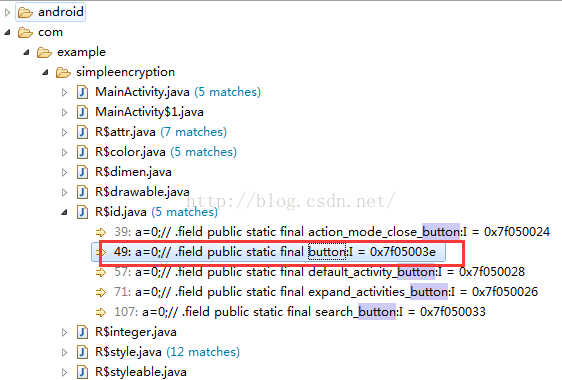
这时候我们其实是在资源文件中搜到了这个id的定义,这个id值对应的是0x7F05003E。
当然除了这种方式,我们还有一种方式能快速找到这个id对应的整型值,那就是在反编译之后的values/public.xml文件中:
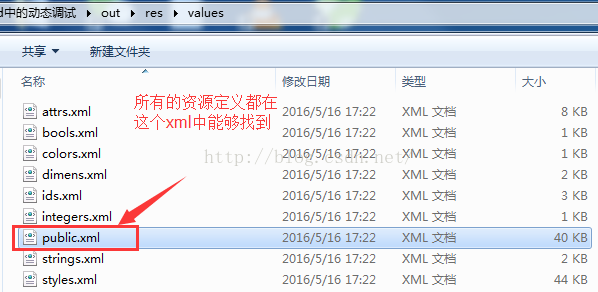
这个文件很有用的,他是真个apk中所有资源文件定义的映射内容,比如drawable/string/anim/attr/id 等这些资源文件定义的值,名字和整型值对应的地方:

这个文件很重要,是我们在寻找突破口的重要关键,比如我们有时候需要通过字符串内容来定位到关键点,这里就可以通过string的定义来找到对应的整型值即可。
当我们找到了button对应的id值了之后,我们就可以用这个id值在一次全局搜索一下,因为我们知道,Android中编译之后的apk,在代码中用到的resId都是用一个整型值代替的,这个整型值就是在R文件中做了定义,将资源的id和一个值对应起来,然后代码里面一般使用R.id.button这样的值,在编译出apk的时候,这个值就会被替换成对应的整型值,所以在全局搜索0x7F05003E
搜索的结果如下:
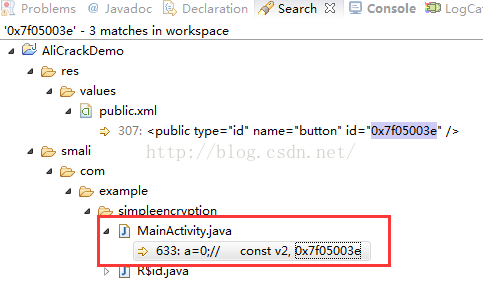
看到了,这里就定位到了代码中用到的这个button,我们进入代码看看:
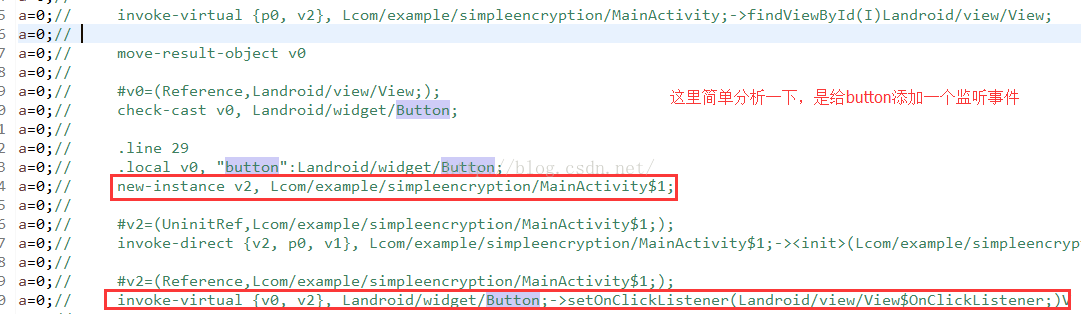
在这里,看到了,使用了findViewById的方式定义Button,我们在往下面简单分析一下smali语法,下面是给button添加一个按钮事件,这里用的是内部类MainActivity$1,我们到这个类看看,他肯定实现了OnClickListener接口,那么直接搜onClick方法:
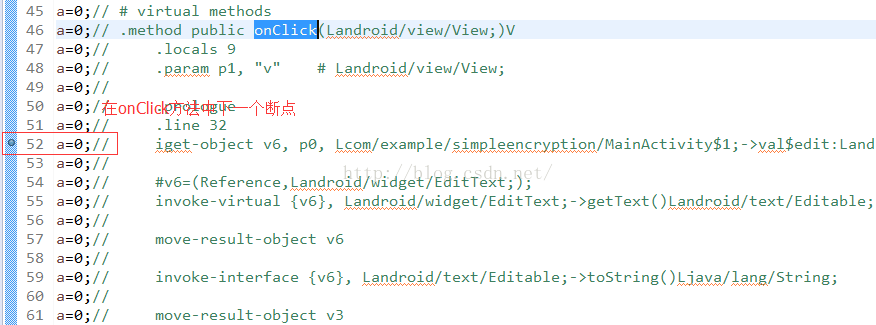
在这里我们就可以下个断点了,这里就是触发密码校验过程。
第六步:运行程序,设置远程调试工程
在第五步中,我们找到了关键点,然后打上断点,下面我们就来运行程序,然后在Eclipse中设置远程调试的工程
首先我们运行程序,因为我们加入了waitForDebug的代码,所以启动的时候会出现一个Wait debug的对话框。不过,我测试的时候,我的手机没有出现这个对话框,而是一个白屏,不过这个不影响,程序运行起来之后,我们看看如何在Eclipse中设置远程调试工程,首先我们找到需要调试的程序对应远程调试服务端对应的端口:
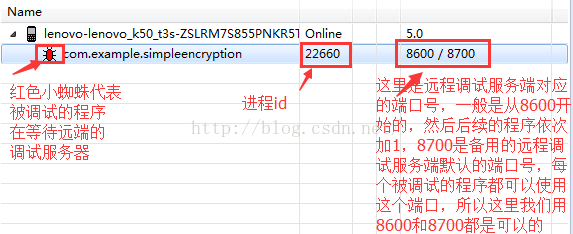
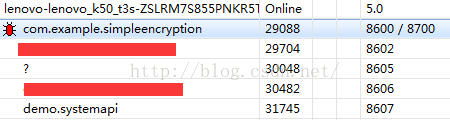
这里我们看到有几个点:
1》在程序等待远程调试服务器的时候,前面会出现一个红色的小蜘蛛
2》在调试服务端这里我们会看到两个端口号:8600/8700,这里需要解释一下,为什么会有两个端口号呢?
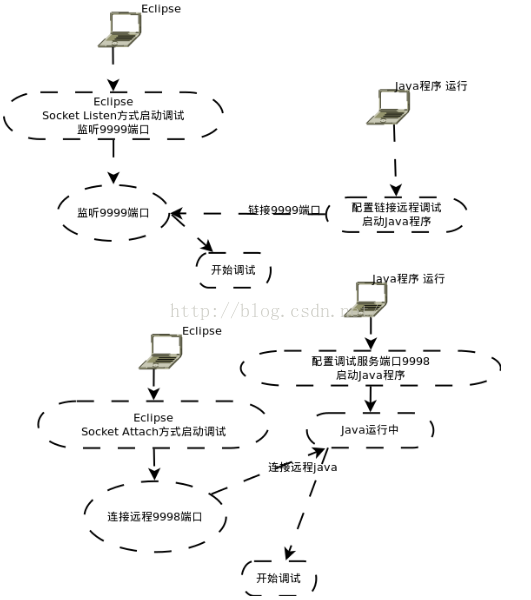
首先在这里的端口号,代表的是,远程调试服务器端的端口,下面在简单来看一下,Java中的调试系统:
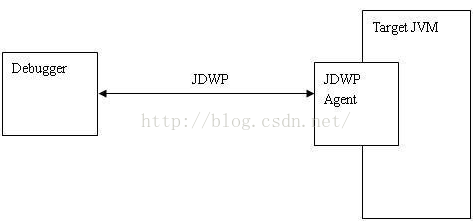
这里我们看到,这里有三个角色:
111》JDB Client端(被调试的客户端),这里我们可以认为我们需要破解的程序就是客户端,如果一个程序可以被调试,当启动的时候,会有一个jdwp线程用来和远程调试服务端进行通信
这里我们看到,我们需要破解的程序启动了JDWP线程,注意这个线程也只有当程序是debug模式下才有的,也就是AndroidManifest.xml中的debug属性值必须是true的时候,也就是一开始为什么我们要修改这个值的原因。
222》JDWP协议(用于传输调试信息的,比如调试的行号,当前的局部变量的信息等),这个就可以说明,为什么我们在一开始的时候,反编译成java文件,因为为了Eclipse导入能够识别的Java文件,然后为什么能够调试呢?因为smali文件中有代码的行号和局部变量等信息,所以可以进行调试的。
333》JDB Server端(远程调试的服务端,一般是有JVM端),就是开启一个JVM程序来监听调试端,这里就可以认为是本地的PC机,当然这里必须有端口用来监听,那么上面的8600端口就是这个作用,而且这里端口是从8600开始,后续的程序端口后都是依次加1的,比如其他调试程序:
那么有了8600端口,为什么还有一个8700端口呢?他是干什么的?
其实他的作用就是远程调试端备用的基本端口,也就是说比如这里的破解程序,我们用8600端口可以连接调试,8700也是可以的,但是其他程序,比如demo.systemapi他的8607端口可以连接调试,8700也是可以的:

所以呀,可以把8700端口想象成大家都可以用于连接调试的一个端口,不过,在实际过程中,还是建议使用程序独有的端口号8600,我们可以查看8600和8700端口在远程调试端(本地pc机)的占用情况:
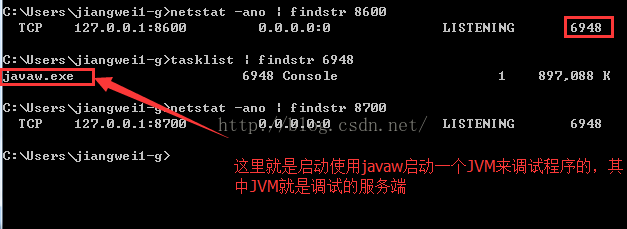
看到了,这里的8600端口和8700端口号都是对应的javaw程序,其实javaw程序就是启动一个JVM来进行监听的。
好了,到这里我们就弄清楚了,Java中的调试系统以及远程调试的端口号。
注意:
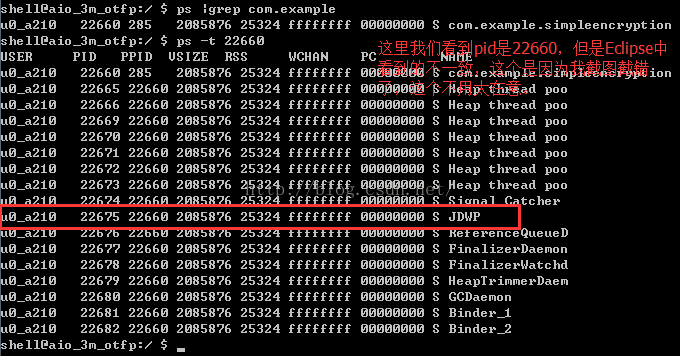
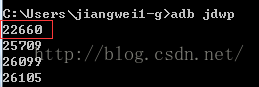
其实我们可以使用adb jdwp命令查看,当前设备中可以被调试的程序的进程号信息:
下面继续,我们知道了远程调试服务端的端口:8600,以及ip地址,这里就是本地ip:localhost/127.0.0.1
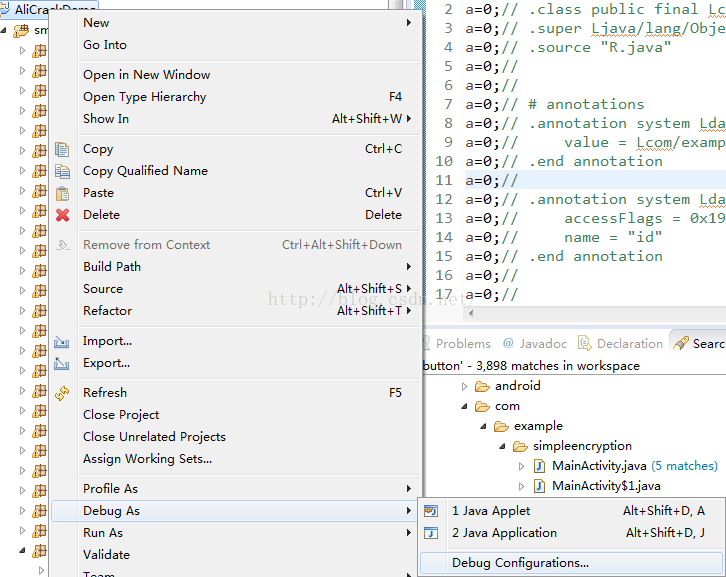
我们可以在Eclipse中新建一个远程调试项目,将我们的smali源码工程和设备中需要调试的程序关联起来:
右击被调试的项目=》选择Debug Configurations:
然后开始设置调试项目
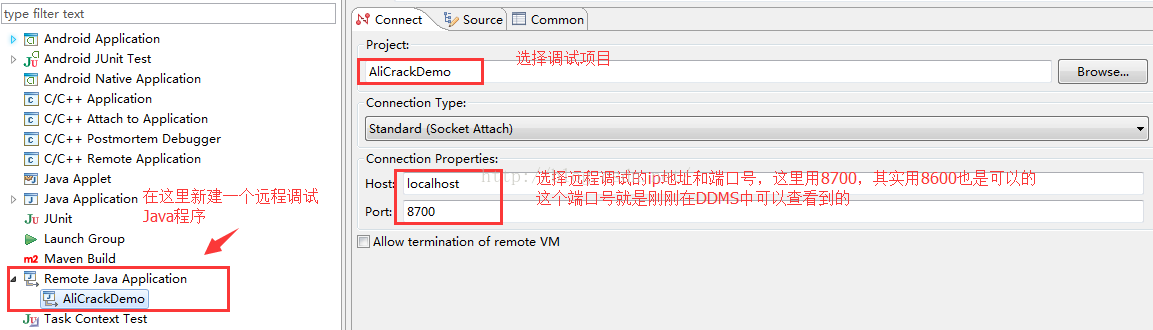
选择Romote Java Application,在Project中选择被调试的smali项目,在Connection Type中选择SocketAttach方式,其实还有一种方式是Listener的,关于这两种方式其实很好理解:
Listner方式:是调试客户端启动就准备好一个端口,当调试服务端准备好了,就连接这个端口进行调试
Attach方式:是调试服务端开始就启动一个端口,等待调试端来连接这个端口
我们一般都是选择Attach方式来进行操作的。
好了,我们设置完远程调试的工程之后,开始运行,擦发现,设备上的程序还是白屏,这是为什么呢?看看DDMS中调试程序的状态:

擦,关联到了这个进程,原因也很简单,我们是上面使用的是8700端口号,这时候我们选中了这个进程,所以就把smali调试工程关联到了这个进程,所以破解的进程没反应了,我们立马改一下,用8600端口:

好了,这下成功了,我们看到红色的小蜘蛛变成绿色的了,说明调试端已经连接上远程调试服务端了。
注意:
我们在设置远程调试项目的时候,一定要注意端口号的设置,不然没有将调试项目源码和调试程序关联起来,是没有任何效果的
第七步:开始运行调试程序,进入调试
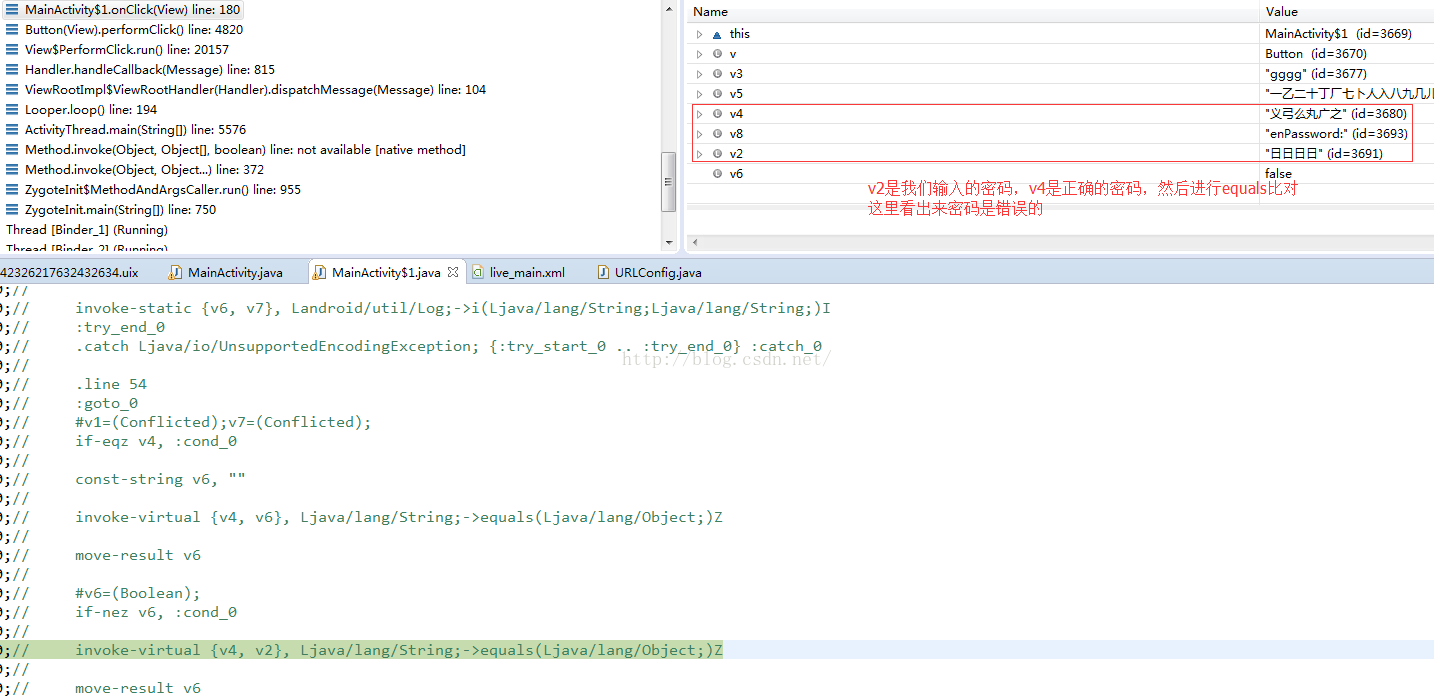
下面我们就开始操作了,在程序的文本框中输入:gggg内容,点击开始:
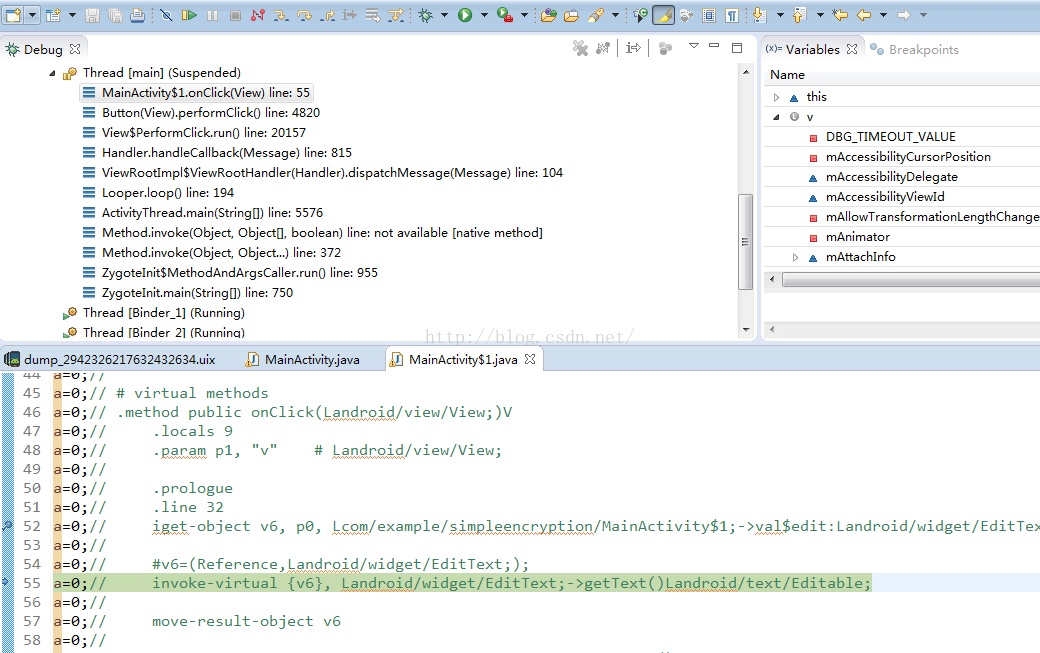
好了,到这里我们看到期待已久的调试界面出来了,到了我们开始的时候加的断点处,这时候我们就可以开始调试了,使用F6单步调试,F5单步跳入,F7单步跳出进行操作:

看到了,这里使用v3变量保存了我们输入的内容
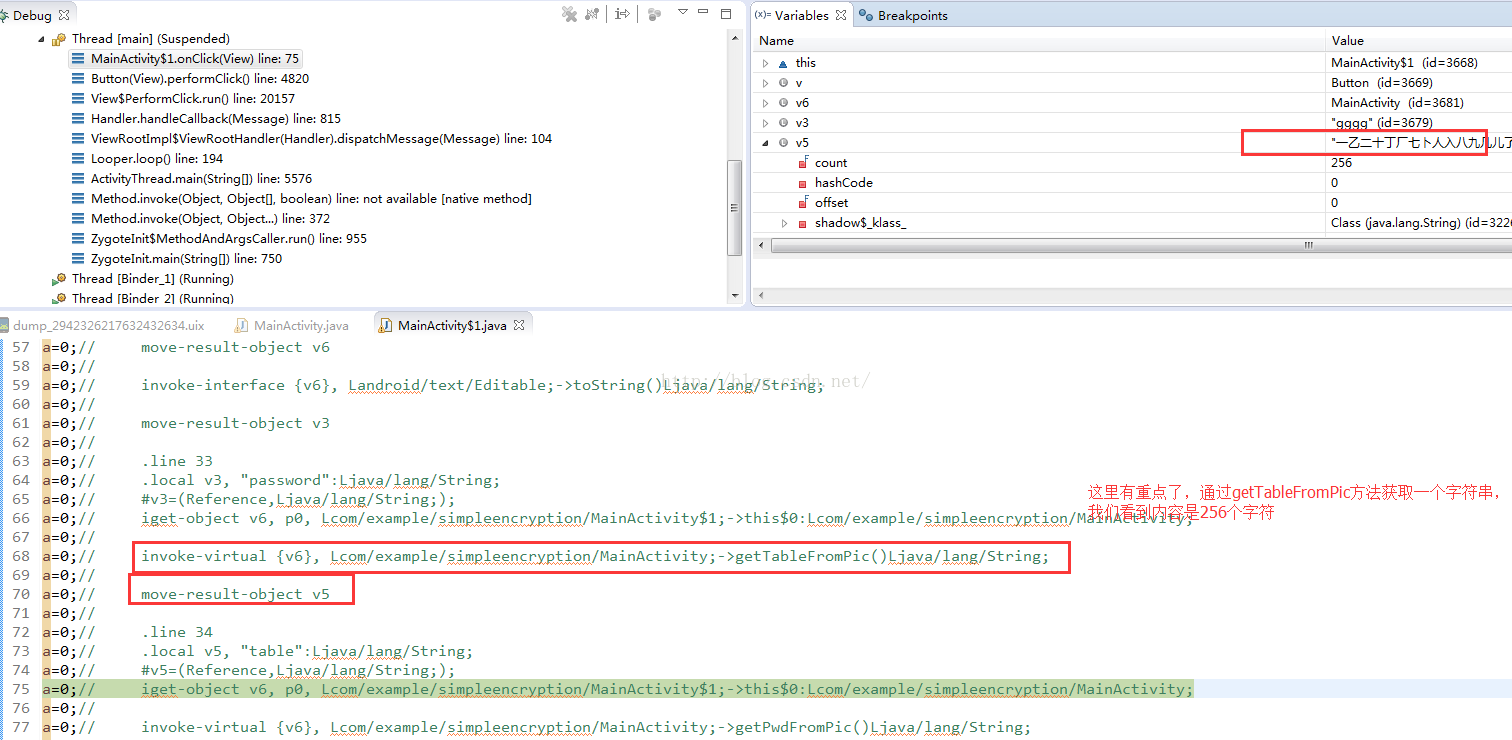
这里有一个关键的地方,就是调用MainActivity的getTableFromPic方法,获取一个String字符串,从变量的值来看,貌似不是规则的字符串内容,这里先不用管了,继续往下走:

这里又遇到一个重要的方法:getPwdFromPic,从字面意义上看,应该是获取正确的密码,用于后面的密码字符串比对。
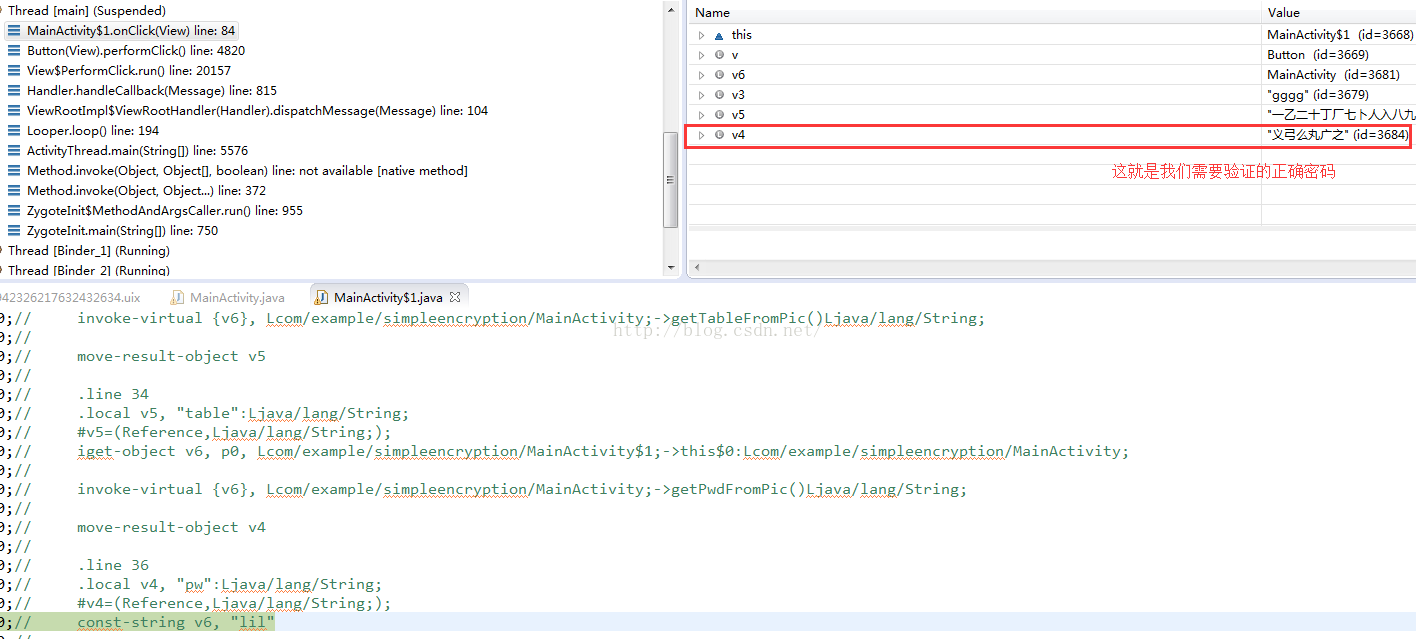
查看一下密码的内容,貌似也是一个不规则的字符串,但是我们可以看到和上面获取的table字符串内容格式很像,接着往下走:
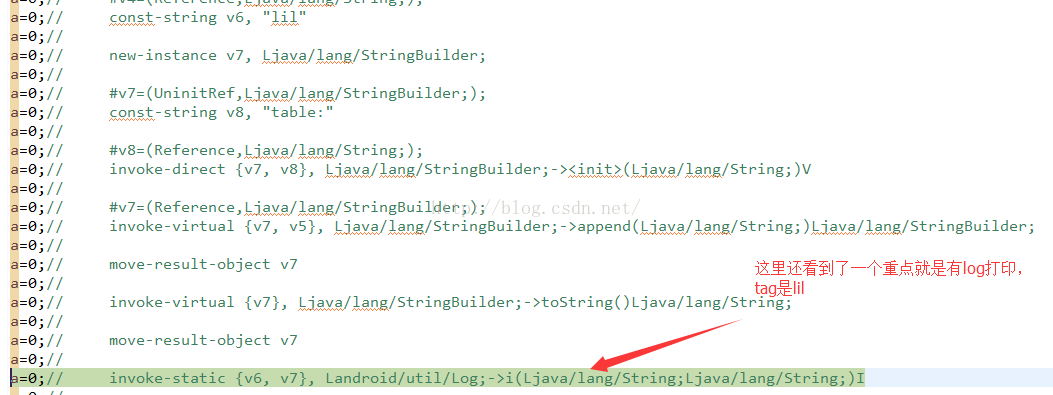
这里还有一个信息就是,调用了系统的Log打印,log的tag就是v6保存的值:lil
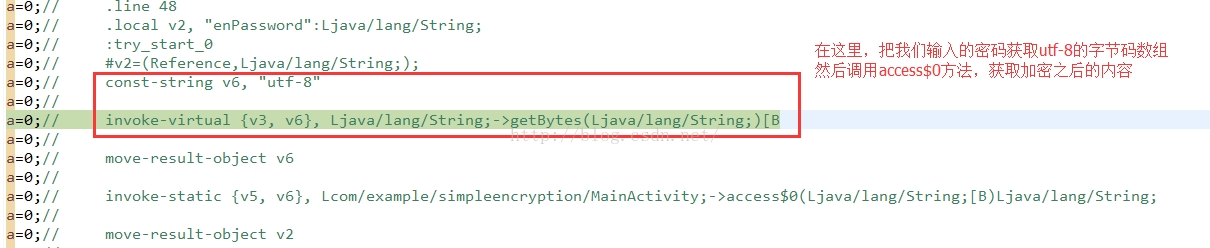
这时候,我们看到v3是保存的我们输入的密码内容,这里使用utf-8获取他的字节数组,然后传递给access$0方法,我们使用F5进入这个方法:
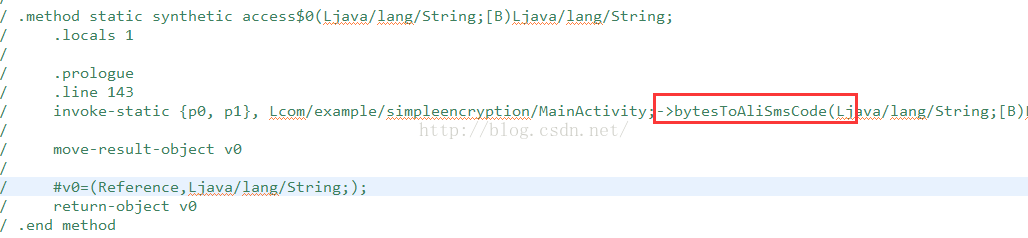
在这个方法中,还有一个bytesToAliSmsCode方法,使用F5进入:

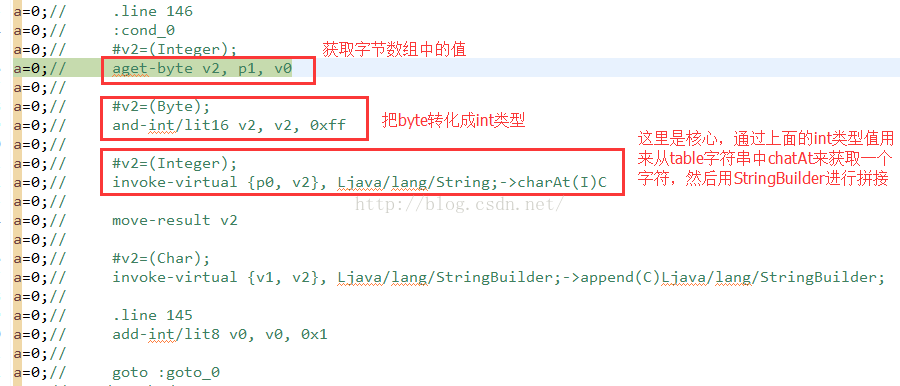
那么这个方法其实看上去还是很简单的,就是把传递进来的字节数组,循环遍历,取出字节值,然后转化成int类型,然后在调用上面获取到的table字符串的chatAt来获取指定的字符,使用StringBuilder进行拼接,然后返回即可。

按F7跳出,查看,我们返回来加密的内容是:日日日日,也就是说gggg=>日日日日
最后再往下走,可以看到是进行代码比对的工作了。
那么上面我们就分析完了所有的代码逻辑,还不算复杂,我们来梳理一下流程:
A>调用MainActivity中的getTableFromPic方法,获取一个table字符串
我们可以进入看看这个方法的实现:

这里可以大体了解了,他是读取asset目录下的一个logo.png图片,然后获取图片的字节码,在进行操作,得到一个字符串,那么我们从上面的分析可以知道,其实这里的table字符串类似于一个密钥库。
B>通过MainActivity中的getPwdFromPic方法,获取正确的密码内容
C>获取我们输入内容的utf-8的字节码,然后调用access$0方法,获取加密之后的内容
D>access$0方法中在调用bytesToAliSmsCode方法,获取加密之后的内容
这个方法是最核心的,我们通过分析知道,他的逻辑是,通过传递进来的字节数组,循环遍历数组,拿到字节转化成int类型,然后在调用密钥库字符串table的charAt得到字符,使用StringBuilder进行拼接。
通过上面的分析之后,我们知道获取加密之后的输入内容和正确的密码内容做比较,那么我们现在有的资源是:
密钥库字符串和正确的加密之后的密码,以及加密的逻辑
那么我们的破解思路其实很简单了,相当于,我们知道了密钥库字符串,也知道了,加密之后的字符组成的字符串,那么可以通过遍历加密之后的字符串,循环遍历,获取字符,然后再去密钥库找到指定的index,然后在转成byte,保存到字节数组,然后用utf-8获取一个字符串,那么这个字符串就是我们要的密码。
下面我们就用代码来实现这个功能:
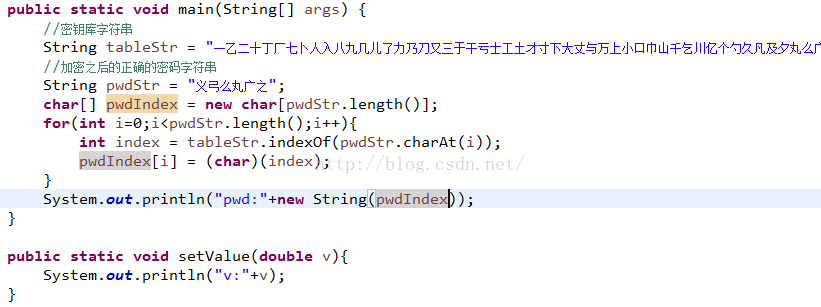
代码逻辑,很简单吧,其实这个函数相当于上面加密函数的bytesToAliSmsCode的反向实现,运行结果:

OK,得到了正确的密码,下面来验证一下:

哈哈,不要太激动,成功啦啦~~。破解成功。
补充:
刚刚我们在断点调试的时候,看到了代码中用了Log来打印日志,tag是lil,那么我们可以打印这个log看看结果:

看到了,这里table是密钥库,pw是正确的加密之后的密码,enPassword是我们输入之后加密的密码。
所以从这里可以看到,这个例子,其实我们在破解apk的时候,有时候日志也是一个非常重要的信息。
破解需要的资料,我已经上传了,下载地址:http://download.csdn.net/detail/jiangwei0910410003/9526113
四、思路整理
1、我们通过apktool工具进行apk的反编译,得到smali源码和AndroidManifest.xml,然后修改AndroidManifest.xml中的debug属性为true,同时在入口处加上waitForDebug代码,进行debug等待,一般入口都是先找到入口Activity,然后在onCreate方法中的第一行这里需要注意的是,apktool工具一定要加上-d参数,这样反编译得到的文件是java文件,这样才能够被Eclipse识别,进行调试。
2、修改完成AndroidManifest.xml和添加waitForDebug之后,我们需要在使用apktool进行回编译,回编译之后得到的是一个没有签名的apk,我们还需要使用signapk.jar来进行签名,签名文件直接使用测试程序的签名文件就可以,最后在进行安装。
3、然后我们将反编译之后的smali源码导入到Eclipse工程中,找到关键点,进行下断点,这里的关键点,一般是我们先大致了解程序运行的结构,然后找到我们需要破解的地方,使用View分析工具,或者是使用jd-gui工具直接查看apk源码(使用dex2jar将dex文件转化成jar文件,然后用jd-gui进行查看),找到代码的大体位置。然后下断点,这里我们可以借助Eclipse的DDMS自带的View分析工具找到对应控件的resid,然后在全局搜索这个控件的resid,或者直接在values/public.xml中查找,最终定位到这个控件位置,在查看他的点击事件即可。
4、设置远程调试工程,首先运行需要调试程序,然后在DDMS中找到对应的调试服务端的端口号,然后在Debug Configurations中设置远程调试项目,设置对应的调试端口和ip地址(一般都是本机pc,那就是localhost),然后红色小蜘蛛变成绿色的,表示我们的远程调试项目连接关联上了调试程序,这里需要注意的是,一定需要关联正确,不然是没有任何效果的,关联成功之后,就可以进行操作。
5、操作的过程中,会进入到关键的断点处,通过F6单步,F5单步进入,F7单步跳出,来进行调试,找到关键方法,然后通过分析smali语法,了解逻辑,如果逻辑复杂的,可以通过查看具体的环境变量的值来观察,这里也是最重要的,也是最复杂的,同时这里也是没有规章可寻的,这个和每个人的逻辑思维以及破解能力有关系,分析关键的加密方法是需要功底的,当然这里还需要注意一个信息,就是Log日志,有时候也是很重要的一个信息。
6、最后一般当我们知道了核心方法的逻辑,要想得到正确的密码,还是需要自己用语言去实现逻辑的,比如本文中的加密方法,我们需要手动的code一下加密的逆向方法,才能得到正确的密码。
五、遗留问题
1、使用apktool工具进行反编译有时候并不是那么顺利,比如像这样的报错:
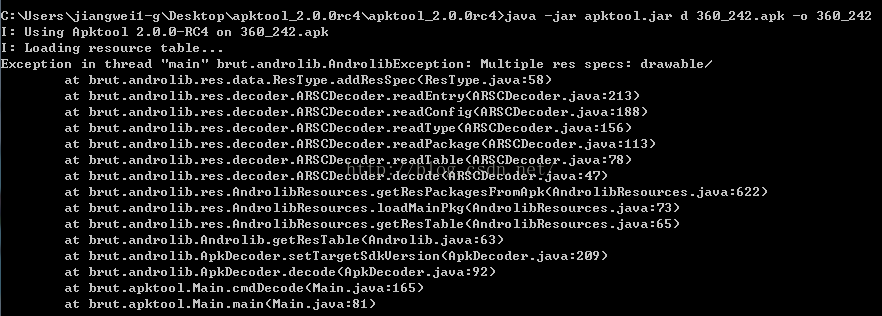
这个一般都是apktool中解析出现了错误,其实这个都是现在apk为了抵抗apktool,做的apk加固策略,这个后面会写一篇文章如何应对这些加固策略,如何进行apk修复,其实原理就是分析apktool源码,找到指定的报错位置,进行apktool代码修复即可。
2、本文中说到了Java的调试系统,但是为了篇幅限制,没有详细的讲解了整个内容,后面会写一篇文章具体介绍Java中的调试系统以及Android的调试系统。
3、有时候我们还会遇到回编译成功了,然后遇到运行不起来的错误,这个就需要使用静态方式先去分析程序启动的逻辑,看看是不是程序做了什么运行限制,比如我们在静态分析那篇文章中,提到了应用为了防止反编译在回编译运行,在程序的入口处作了签名校验,如果校验失败,直接kill掉自己的进程,退出程序了,所以这时候我们还是需要使用静态方式去分析apk。
4、如何做到不修改AndroidManifest.xml中的debug属性就可以进行调试:
1》 修改boot.img,从而打开系统调试,这样就可以省去给app添加android:debuggable="true",再重打包的步骤了。
2.》直接修改系统属性,使用setpropex工具在已经root的设备上修改只读的系统属性。使用此工具来修改ro.secure和ro.debuggable的值。
这个也会在后面详细介绍这两种方法
六、总结
这篇文章我们就介绍了如何使用Eclipse去动态调试反编译之后的smali源码,这种方式比静态方式高效很多的,比如本文中的这个例子,其实我们也可以使用静态方式进行破解的,但是肯定效率没有动态方式高效,所以以后我们又学会了一个技能,就是动态的调试smali源码来跟踪程序的核心点,但是现在市场上的大部分应用没有这么简单就破解了,比如核心的加密算法放到了native层去做,那么这时候就需要我们去动态调试so文件跟踪,这个是我们下一篇文章的内容,也有的时候,apk进行加固了,直接在apktool进行反编译就失败了,这时候我们就需要先进行apk修复,然后才能后续的操作,这个是我们下下篇的文章,如何应对apk的加固策略。通过这篇文章我们可以看到动态方式破解比静态方式高效的多,但是有时候我们还需要使用静态方式先做一些准备工作,所以在破解apk的时候,动静结合,才能做到完美的破解。


 671
671


 被折叠的 条评论
为什么被折叠?
被折叠的 条评论
为什么被折叠?
 到【灌水乐园】发言


