


Android 5.0中引入了很多炫酷的动画效果,Circular Reveal便是其中一种。使用起来很简单,但效果却是意想不到的炫酷,让你的app更有逼格。
一、效果
废话不说,下面的gif图中使用Circular Reveal动画实现跳转到搜索页的效果。gif图压缩宽高比失真了,不过效果还在。源码在最下面,可以下载体验下。

二、Circular Reveal介绍
当您显示或隐藏一组 UI 元素时,揭露动画可为用户提供视觉连续性。
ViewAnimationUtils.createCircularReveal()方法让您能够为裁剪区域添加动画以揭露或隐藏视图。
/* @param view The View will be clipped to the animating circle.
* @param centerX The x coordinate of the center of the animating circle, relative to
* view.
* @param centerY The y coordinate of the center of the animating circle, relative to
* view.
* @param startRadius The starting radius of the animating circle.
* @param endRadius The ending radius of the animating circle.
*/
public static Animator createCircularReveal(View view,
int centerX, int centerY, float startRadius, float endRadius) {
return new RevealAnimator(view, centerX, centerY, startRadius, endRadius);
}
ViewAnimationUtils.createCircularReveal()方法所执行的效果,就是将一个View裁剪成圆,然后从圆心逐渐揭露展现视图。
参数
参数说明
view
要执行动画效果的View
centerX
圆心x坐标
centerY
圆心y坐标
startRadius
开始时的圆半径
endRadius
结束时的圆半径
三、实现
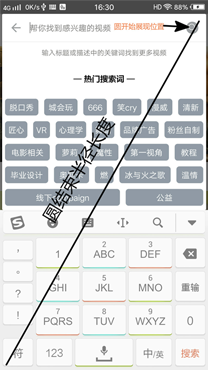
从上图可以看出,需要揭露展现的View是整个视图的根布局。开始的位置就是🔍图标的x,y坐标。开始的半径为0,结束的半径是上面那条斜边的长度。知道了这些参数,那么实现就简单了。
以下代码使用Kotlin实现,不过和java区别不大,不影响看懂原理。
1.动画参数
@SuppressLint("NewApi")
private fun actionOtherVisible(isShow: Boolean, triggerView: View, animView: View) {
//判断API是否大于21
if (android.os.Build.VERSION.SDK_INT < android.os.Build.VERSION_CODES.LOLLIPOP) {
if (isShow) {
animView.visibility = View.VISIBLE
if (mListener != null) mListener!!.onShowAnimationEnd()
} else {
animView.visibility = View.GONE
if (mListener != null) mListener!!.onHideAnimationEnd()
}
return
}
/**
* 计算 triggerView(即搜索按钮) 的中心位置
*/
val tvLocation = IntArray(2)
triggerView.getLocationInWindow(tvLocation)
val tvX = tvLocation[0] + triggerView.width / 2
val tvY = tvLocation[1] + triggerView.height / 2
/**
* 计算 animView(即根布局) 的中心位置
*/
val avLocation = IntArray(2)
animView.getLocationInWindow(avLocation)
val avX = avLocation[0] + animView.width / 2
val avY = avLocation[1] + animView.height / 2
//计算宽高
val rippleW = if (tvX < avX) animView.width - tvX else tvX - avLocation[0]
val rippleH = if (tvY < avY) animView.height - tvY else tvY - avLocation[1]
//勾股定理求斜边
val maxRadius = Math.sqrt((rippleW * rippleW + rippleH * rippleH).toDouble()).toFloat()
val startRadius: Float
val endRadius: Float
//根据展示或隐藏设置起始与结束的半径
if (isShow) {
startRadius = 0f
endRadius = maxRadius
} else {
startRadius = maxRadius
endRadius = 0f
}
val anim = ViewAnimationUtils.createCircularReveal(animView, tvX, tvY, startRadius, endRadius)
animView.visibility = View.VISIBLE
anim.duration = DURATION
anim.interpolator = DecelerateInterpolator()
//监听动画结束,进行回调
anim.addListener(object : AnimatorListenerAdapter() {
override fun onAnimationEnd(animation: Animator) {
super.onAnimationEnd(animation)
if (isShow) {
animView.visibility = View.VISIBLE
if (mListener != null) mListener!!.onShowAnimationEnd()
} else {
animView.visibility = View.GONE
if (mListener != null) mListener!!.onHideAnimationEnd()
}
}
})
anim.start()
}
上述代码中注释清楚解析了动画参数的获取和执行过程。
2.动画调用
fun show(triggerView: View, showView: View) {
actionOtherVisible(true, triggerView, showView)
}
fun hide(triggerView: View, hideView: View) {
actionOtherVisible(false, triggerView, hideView)
}
actionOtherVisible()方法根据传入true/false来确定是执行展示或隐藏动画。
3.动画调用时机
在SearchFragment中,监听第一帧的绘制,开启动画。其中mRootView就是根布局View。
override fun onPreDraw(): Boolean {
iv_search_search.viewTreeObserver.removeOnPreDrawListener(this);
mCircularRevealAnim.show(iv_search_search, mRootView);
return true;
}
动画结束调用时机:①在点击搜索,跳转到搜索结果界面。②物理回退键回退。③点击回退按钮
再以上三个地方都可以调用hide()方法,实现隐藏动画。
4.监听回调
在上面配置动画参数的过程中,对动画结束进行了监听回调。调用了AnimListener接口的onHideAnimationEnd()和onShowAnimationEnd()方法,来实现回调。所有在SearchFragment中实现该接口,来监听回调。
override fun onHideAnimationEnd() {
et_search_keyword.setText("");
dismiss();
}
override fun onShowAnimationEnd() {
if (isVisible) {
KeyBoardUtils.openKeyboard(activity, et_search_keyword);
}
}
监听到隐藏动画结束的时候,调用dismiss()方法关闭该DialogFragment。监听展现动画结束的时候,开启输入法框。
就是这么简单,通过以上方式就可以实现如此炫酷的效果。
以上就是本文的全部内容,希望对大家的学习有所帮助,也希望大家多多支持脚本之家。


 496
496


 被折叠的 条评论
为什么被折叠?
被折叠的 条评论
为什么被折叠?
 到【灌水乐园】发言


