


在我们想XML布局文件转换为View对象的时候.我们都会使用LayoutInflate对象.顾名思义咋一眼就能看出来他是布局填充器.那么接下来看看LayoutInfalte的使用
总体分为
- LayoutInfalter的获取方式
- 加载布局过程中LayoutParams的丢失
LayoutInfalter的获取方式
首先我们看看获取LayoutInfalte的加载方式
- getLayoutInflater();
- LayoutInflater.from(context);
- Context.getSystemService(LAYOUT_INFLATER_SERVICE);
关于1方法是在Activity中使用的.那么我们依次看看他们具体的实现流程
    /**
     * Convenience for calling
     * {@link android.view.Window#getLayoutInflater}.
     */
    public LayoutInflater getLayoutInflater() {
        return getWindow().getLayoutInflater();
    }
Activity.class,显然他是调用了Window类中的getLayoutInflate,那么我们接着看Window中是如何实现的
 /**
     * Quick access to the {@link LayoutInflater} instance that this Window
     * retrieved from its Context.
     *
     * @return LayoutInflater The shared LayoutInflater.
     */
    public abstract LayoutInflater getLayoutInflater();
是一个抽象方法.那么我们就要找他的实现类.那么Window的实现类是什么?已知的实现类是PhoneWindow.class.那么我们去看看PhoneWindow是如何实现的
       private LayoutInflater mLayoutInflater;

            public PhoneWindow(Context context) {
              super(context);
              mLayoutInflater = LayoutInflater.from(context);
            }

             /**
             * Return a LayoutInflater instance that can be used to inflate XML view layout
             * resources for use in this Window.
             *
             * @return LayoutInflater The shared LayoutInflater.
             */
            @Override
            public LayoutInflater getLayoutInflater() {
                return mLayoutInflater;
            }
那么显然我们看到的便是PhoneWindow在初始化的时候通过调用LayoutInfalter类中的from(context)初始化布局加载器.那么请挥挥鼠标移到我们刚刚说的三个方法.是不是惊奇的发现了搞了半天是在调方法二.让我们接下来看看LayoutInfalte类
   /**
     * Obtains the LayoutInflater from the given context.
     */
    public static LayoutInflater from(Context context) {
        LayoutInflater LayoutInflater =
                (LayoutInflater) context.getSystemService(Context.LAYOUT_INFLATER_SERVICE);
        if (LayoutInflater == null) {
            throw new AssertionError("LayoutInflater not found.");
        }
        return LayoutInflater;
    }
看完之后是否顿时又发现了什么?没错就是调用方法三.那么搞了半天说白就是根据一个上下文加载布局的过程中.最终的方法调用方法还是直接调用Context.getSystemService(LAYOUT_INFLATER_SERVICE); 获取布局加载器
好了布局加载器的获取方法暂告一段落.个人习惯来说比较建议使用第三种方式.毕竟少走不少流程.
加载布局过程中LayoutParams的丢失
下面直接贴上Demo
XML文件:
布局文件:
<?xml version="1.0" encoding="utf-8"?>
<LinearLayout xmlns:android="http://schemas.android.com/apk/res/android"
    android:layout_width="match_parent"
    android:layout_height="match_parent"
    android:orientation="vertical" >

    <ListView
        android:id="@+id/listView1"
        android:layout_width="match_parent"
        android:layout_height="wrap_content" >
    </ListView>

</LinearLayout>
ListView内容布局,这里我们把每个内容项设置为100dip的高度
<?xml version="1.0" encoding="utf-8"?>
<LinearLayout xmlns:android="http://schemas.android.com/apk/res/android"
    android:layout_width="match_parent"
    android:layout_height="100dip"
    android:orientation="horizontal" >

    <TextView
        android:layout_width="wrap_content"
        android:layout_height="wrap_content"
        android:text="内容一"
        android:textSize="30sp"/>
    <TextView
        android:layout_width="wrap_content"
        android:layout_height="wrap_content"
        android:text="内容二"
        android:textSize="30sp"/>

</LinearLayout>
代码部分:
public class MainActivity extends Activity {

    private ListView         listView;
    private CustomAdapter    adapter;

    @Override
    protected void onCreate(Bundle savedInstanceState) {
        super.onCreate(savedInstanceState);
        setContentView(R.layout.activity_main);
        listView  = (ListView) findViewById(R.id.listView1);
        adapter   = new CustomAdapter(this);
        listView.setAdapter(adapter);
    }

}
CustomAdapter.java
class CustomAdapter extends BaseAdapter {

    private LayoutInflater inflater;

    public CustomAdapter(Context context) {
        this.inflater = (LayoutInflater) context.getSystemService(Context.LAYOUT_INFLATER_SERVICE);
    }

    @Override
    public int getCount() {
        return 10;
    }

    @Override
    public Object getItem(int position) {
        return null;
    }

    @Override
    public long getItemId(int position) {
        return 0;
    }

    @Override
    public View getView(int position, View convertView, ViewGroup parent) {
        if(convertView == null) {
            convertView = inflater.inflate(R.layout.list_item, null);
        }
        return convertView;
    }

}
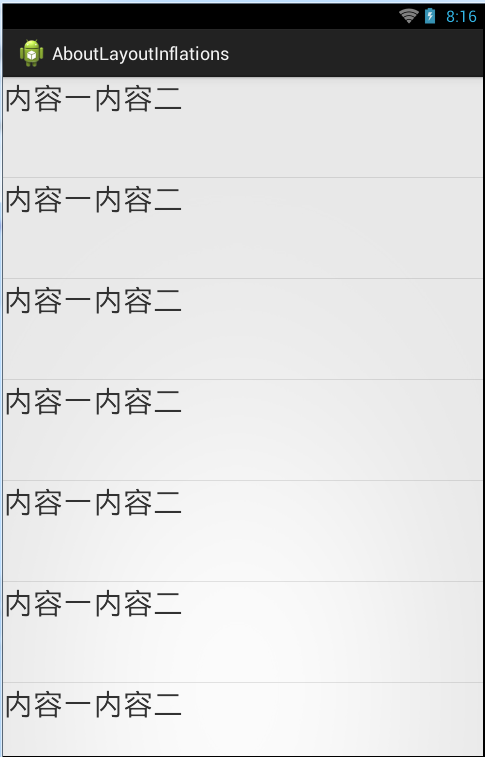
那么我们现在运行看看效果

貌似我们并没有看到我们想要的效果.每个内容项并没有30dip的效果.那么问题出在哪里呢?请看CustomAdapter中的代码的以下片段
    @Override
    public View getView(int position, View convertView, ViewGroup parent) {
        if(convertView == null) {
            convertView = inflater.inflate(R.layout.list_item, null);
        }
        return convertView;
    }
在这里inflate(R.layout.list_item, null);我们并没有指定根布局,那么出现的状况如上图.让我们用工具(hierarchyviewer.bat)看看
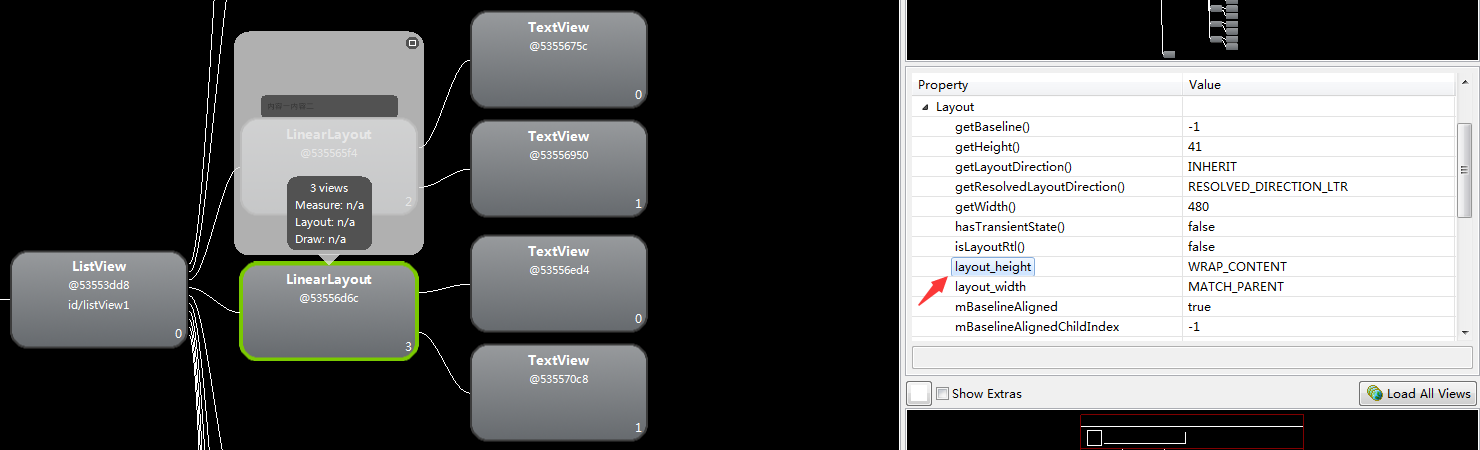
惊奇的发现了.我们原来的XML布局文件中指定的layout_height竟然变成了wrap_content了,那么接下来我们先看看另外一种情况
  @Override
    public View getView(int position, View convertView, ViewGroup parent) {
        if(convertView == null) {
            convertView = inflater.inflate(R.layout.list_item, parent, false);    //修改了这里
        }
        return convertView;
    }
先看看效果图.
奇怪的是我们想要的效果发生了100dip的高度.那么我们通过工具再看看

显而易见我们的布局参数没有丢失了.那么原因到底是什么呢?为什么会出现布局参数丢失呢?其实问题就是出现在inflate()方法的参数上
我们来看看源码,inflate()一共有四个重载方法,以下按照依次调用顺序
- inflate(int resource, ViewGroup root); >> inflate(int resource, ViewGroup root, boolean attachToRoot) ; >> inflate(XmlPullParser parser, ViewGroup root, boolean attachToRoot);
- inflate(XmlPullParser parser, ViewGroup root) >> inflate(XmlPullParser parser, ViewGroup root, boolean attachToRoot);
那么我们直接看最后调用的方法
  public View inflate(XmlPullParser parser, ViewGroup root, boolean attachToRoot) {
        synchronized (mConstructorArgs) {
            final AttributeSet attrs = Xml.asAttributeSet(parser);
            Context lastContext = (Context)mConstructorArgs[0];
            mConstructorArgs[0] = mContext;
            View result = root;

            try {
                // Look for the root node.
                int type;
                while ((type = parser.next()) != XmlPullParser.START_TAG &&
                        type != XmlPullParser.END_DOCUMENT) {
                    // Empty
                }

                if (type != XmlPullParser.START_TAG) {
                    throw new InflateException(parser.getPositionDescription()
                            + ": No start tag found!");
                }

                final String name = parser.getName();

                if (DEBUG) {
                    System.out.println("**************************");
                    System.out.println("Creating root view: "
                            + name);
                    System.out.println("**************************");
                }

                if (TAG_MERGE.equals(name)) {
                    if (root == null || !attachToRoot) {
                        throw new InflateException("<merge /> can be used only with a valid "
                                + "ViewGroup root and attachToRoot=true");
                    }

                    rInflate(parser, root, attrs, false);
                } else {
                    // Temp is the root view that was found in the xml
                    View temp;
                    if (TAG_1995.equals(name)) {
                        temp = new BlinkLayout(mContext, attrs);
                    } else {
                        temp = createViewFromTag(root, name, attrs);
                    }

                    ViewGroup.LayoutParams params = null;

                    if (root != null) {
                        if (DEBUG) {
                            System.out.println("Creating params from root: " +
                                    root);
                        }
                        // Create layout params that match root, if supplied
                        params = root.generateLayoutParams(attrs);
                        if (!attachToRoot) {
                            // Set the layout params for temp if we are not
                            // attaching. (If we are, we use addView, below)
                            temp.setLayoutParams(params);
                        }
                    }

                    if (DEBUG) {
                        System.out.println("-----> start inflating children");
                    }
                    // Inflate all children under temp
                    rInflate(parser, temp, attrs, true);
                    if (DEBUG) {
                        System.out.println("-----> done inflating children");
                    }

                    // We are supposed to attach all the views we found (int temp)
                    // to root. Do that now.
                    if (root != null && attachToRoot) {
                        root.addView(temp, params);
                    }

                    // Decide whether to return the root that was passed in or the
                    // top view found in xml.
                    if (root == null || !attachToRoot) {
                        result = temp;
                    }
                }

            } catch (XmlPullParserException e) {
                InflateException ex = new InflateException(e.getMessage());
                ex.initCause(e);
                throw ex;
            } catch (IOException e) {
                InflateException ex = new InflateException(
                        parser.getPositionDescription()
                        + ": " + e.getMessage());
                ex.initCause(e);
                throw ex;
            } finally {
                // Don't retain static reference on context.
                mConstructorArgs[0] = lastContext;
                mConstructorArgs[1] = null;
            }

            return result;
        }
    }
代码显然有点长.我们挑重点看.
if (root != null) {
    if (DEBUG) {
        System.out.println("Creating params from root: " +
                root);
    }
    // Create layout params that match root, if supplied
    params = root.generateLayoutParams(attrs);
    if (!attachToRoot) {
        // Set the layout params for temp if we are not
        // attaching. (If we are, we use addView, below)
        temp.setLayoutParams(params);
    }
}
我们可以看到只要root不为空且attachToRoot取反为true.那么temp就设置布局参数,temp一个临时变量View,继续走
if (root != null && attachToRoot) {
    root.addView(temp, params);
}
当root != null && attachToRoot往所在的父布局添加一个带参数的temp(View).最后
return result 而 result = root;
同理使用两个参数的便能知道并没有添加布局参数上到根布局.从而导致了默认的使用了WRAP_CONTENT.而不是我们指定的布局参数值
到此LayoutInfalte的使用告一段落.有错误的希望大家提出.菜鸟一枚第一次写博客.难免出现各种错误.大家见谅见谅!


 2741
2741


 被折叠的 条评论
为什么被折叠?
被折叠的 条评论
为什么被折叠?
 到【灌水乐园】发言


