


最新版ssh hibernate spring struts2环境搭建
最新版spring Framework下载地址:spring4.0.0RELEASE环境搭建
http://repo.spring.io/release/org/springframework/spring/4.0.0.RELEASE/
最新版hibernate下载地址:hibernate4.2.21
https://sourceforge.net/projects/hibernate/postdownload?source=dlp
最新版struts2下载地址:struts2 2.5.2
https://struts.apache.org/
上面的版本就是本次搭建环境所用到的版本,如果为了学习使用的可以通过链接下载。因为现在ssh框架跟新,然而网络上最新版的ssh环境搭建的教程还没有,虽然版本变换都差不多,但是还是简单的介绍下,记录自己学习的过程,也作为一种分享。
简单介绍本次教程(适合简单入门):
使用的开发环境是intelliJ Idea
先介绍单个的搭建案例,并且给出小型的Demo
然后再整合框架,例子的话就是简单的测试Demo
在看教程之前,我想您需要了解hibernate Spring struts2都是干什么的,有什么作用,至少要知道定义吧,现在这篇教程只是讲解手动的去搭建环境,没有使用maven等等项目构建工具,之后会写试用项目构架工具构建项目。
1、hibernate
简单说说hibernate,hibernate是一个基于JDBC的封装框架,解决的问题自然就是数据的增删改查所谓的持久化操作,让JDBC操作变得更加面向对象,一切的操作都可以面向对象化。
1)、依赖jar包
        hibernate-release-4.2.21.Final/lib/required/  下面所有的jar
        antlr-2.7.7.jar
        dom4j-1.6.1.jar
        hibernate-commons-annotations-4.0.2.Final.jar
        hibernate-core-4.2.21.Final.jar
        hibernate-jpa-2.0-api-1.0.1.Final.jar
        javassist-3.18.1-GA.jar
        jboss-logging-3.1.0.GA.jar
        jboss-transaction-api_1.1_spec-1.0.1.Final.jar
上面带有jboss的两个jar是需要的,之前测试过,我认为没有使用到jboss所以去掉两个jar之后会报错,除了这些jar我们还需要mysql驱动,上面的jar在hibernate-release-4.2.21.Final/lib/required/路径下,所有的都需要导入。
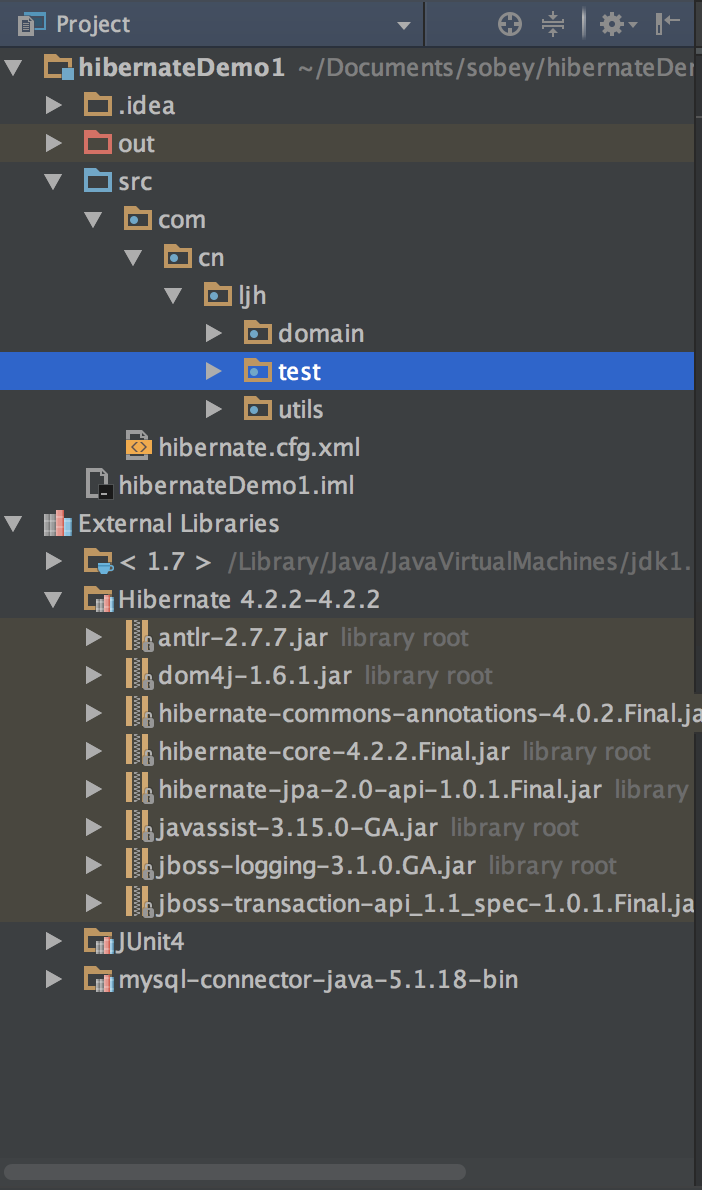
上面这张图就是我的目录结构,非常简单的目录结构,如果你是使用intelliJ Idea那简直就更好了
这里我就不去过多的简绍,每一个jar有什么作用,但是会在spring的时候回去讲,因为这里的jar都比较简单,没有很多,相信只要知道一点单词就能知道jar是什么意思了吧。
好了,如果你是用的是eclipse那么一定记得要把jar变成小奶瓶哦!!
2)、配置
要搭建hibernate还需要配置文件的支持,在这里就稍微讲解hibernate的配置文件:
hibernate.cfg.xml配置文件,这个配置文件再练习的时候放在src目录下面
<?xml version='1.0' encoding='utf-8'?>
<!DOCTYPE hibernate-configuration PUBLIC
    "-//Hibernate/Hibernate Configuration DTD//EN"
        "http://www.hibernate.org/dtd/hibernate-configuration-3.0.dtd">
    <hibernate-configuration>
      <session-factory>
        <!--
            下面两个是使用的数据库连接方式和数据库驱动,固定写法,根据你使用的数据库决定,我使用的是mysql
        -->
        <property name="connection.url">jdbc:mysql://localhost:3306/hibernateDemo1</property>
        <property name="connection.driver_class">com.mysql.jdbc.Driver</property>

        <!--这个是在控制台打印sql语句的时候进行格式化的,程序调试期间建议加上-->
        <property name="format_sql">true</property>
        <property name="hbm2ddl.auto">update</property>
        <!--打印显示sql语句-->
        <property name="show_sql">true</property>
        <!--用户名密码-->
        <property name="connection.username">root</property>
        <property name="connection.password">123</property>

        <!--每新建一个映射文件都需要-->
        <mapping resource="com/cn/ljh/domain/Person.hbm.xml"/>
      </session-factory>
    </hibernate-configuration>
上面这些配置在做简单的搭建环境这里是足够使用的,这里面还有很多参数,作为入门暂时先了解那么多,在将来可能还会降到其他的参数。
下面先看一下我的目录结构:
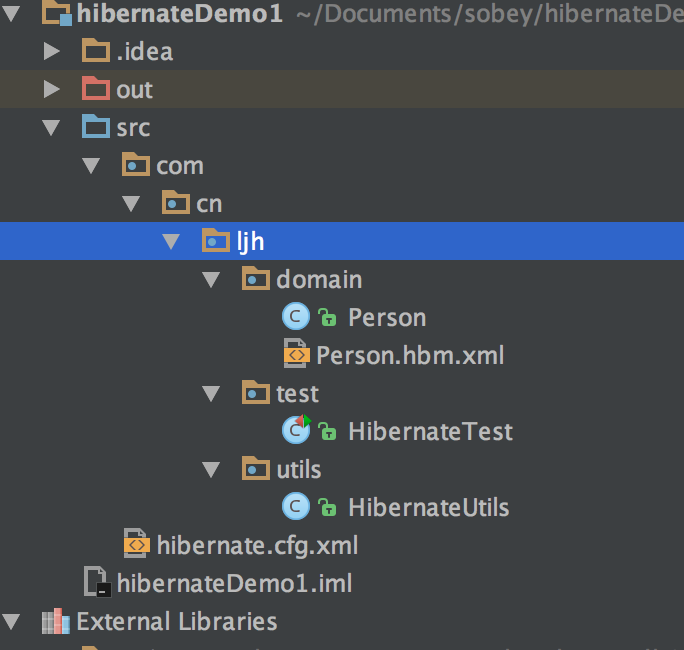
可以看到,这个是非常简单的文件结构,那么只是为了测试搭建是否成功做的测试
创建一个工具类HibernateUtils用于读取hibernate.cfg.xml配置文件,并且获取SessionFactory对象
package com.cn.ljh.utils;

import org.hibernate.SessionFactory;
import org.hibernate.cfg.Configuration;

/**
 * Created by ljh on 16/8/15.
 */
public class HibernateUtils {
    public static SessionFactory sessionFactory;
    static {
        Configuration configuration = new Configuration();
        configuration.configure();
        configuration.buildSessionFactory();
    }
}
上面就是HibernateUtils中的代码,主要用于初始化的时候获取配置文件和sessionfactory对象。
注意:上面读取hibernate.cfg.xml文件的路径是在项目根路径,因为我们将配置文件放在src目录下,所以直接这样写就可以。如果你是放在其他的路径那么就不是这样写。
package com.cn.ljh.utils;

import org.hibernate.SessionFactory;
import org.hibernate.cfg.Configuration;

/**
 * Created by ljh on 16/8/15.
 */
public class HibernateUtils {
    public static SessionFactory sessionFactory;
    static {
        Configuration configuration = new Configuration();
        configuration.configure("(假设文件路径)/com/cn/config");
        configuration.buildSessionFactory();
    }
}
如果你是讲配置文件放在上图中的路径,那么就是上面的写法。
接下来就是创建javaBean对象Person
package com.cn.ljh.domain;

/**
 * Created by ljh on 16/8/15.
 */
public class Person {
    private Long pid;       //id作为主键
    private String username;
    private String password;
    private String sex;

    public Long getPid() {
        return pid;
    }

    public void setPid(Long pid) {
        this.pid = pid;
    }

    public String getUsername() {
        return username;
    }

    public void setUsername(String username) {
        this.username = username;
    }

    public String getPassword() {
        return password;
    }

    public void setPassword(String password) {
        this.password = password;
    }

    public String getSex() {
        return sex;
    }

    public void setSex(String sex) {
        this.sex = sex;
    }
}
上面就是最简单的javaBean,常见好一个javaBean之后我们还需要创建对应的映射文件Person.hbm.xml一般以类名.hbm.xml作为文件名方便管理。
接下来就是创建Person映射文件:
<?xml version="1.0" encoding="UTF-8"?>
<!DOCTYPE hibernate-mapping PUBLIC
        "-//Hibernate/Hibernate Mapping DTD 3.0//EN"
        "http://www.hibernate.org/dtd/hibernate-mapping-3.0.dtd">
    <hibernate-mapping>
       <class name="com.cn.ljh.domain.Person" table="person">
           <id name="pid" type="java.lang.Long" length="10">
               <generator class="increment"/>
           </id>
           <property name="password" type="java.lang.String" length="10"/>
           <property name="username" type="java.lang.String" length="10"/>
           <property name="sex" type="java.lang.String" length="10"/>
       </class>
    </hibernate-mapping>
上面的映射文件算是最简单的映射文件了,没有一对多,多对多,一对一这些内容,自有简单的一张表,简单的设置了id作为主键,并且让主键自动增长,其次是其他字段作为表中的属性,这里就不多解释,如果不知道,那么就跟着动手做起来,慢慢去尝试总会懂得。
最后就是测试环境是否搭建成功:
编写测试类
package com.cn.ljh.test;

import com.cn.ljh.utils.HibernateUtils;
import org.junit.Test;

/**
 * Created by ljh on 16/8/15.
 */
public class HibernateTest extends HibernateUtils{
    @Test
    public void test1(){

    }
}
非常简单的测试类,我们继承HibernateUtils,然后执行一个测试方法,只要文件Hibernateutils被加载,那么就会创建你文件的映射,在数据库中创建person表,那么前提是你得安装了数据库,并且创建好一个空的数据库。
到现在这个简单的测试完成了,结果图:

到这里就说明环境搭建是没有问题的,就可以与开心的学习hibernate了。
2、spring
就简单说说spring,提供了ioc依赖注入、aop面向切面编程,是轻量级的框架,能够管理javaBean的生命周期,可以单独进行使用也可以很很多主流框架结合使用,比如hibernate、struts、Mybatis等等,并且和spring MVC的无缝衔接更是堪称完美。
1)、依赖jar包
        //用于支持aop面向切面编程
        spring-aop-4.0.0.RELEASE.jar
        //提供对AspectJ的支持,以便可以方便的将面向方面的功能集成进IDE中
        spring-aspects-4.0.0.RELEASE.jar
        //这个jar 文件是所有应用都要用到的,它包含访问配置文件、创建和管理bean 以及进行Inversion of Control / Dependency Injection(IoC/DI)操作相关的所有类。如果应用只需基本的IoC/DI 支持,引入spring-core.jar 及spring-beans.jar 文件就可以了。
外部依赖spring-core,(CGLIB)。
        spring-beans-4.0.0.RELEASE.jar
        //这个看名字也该知道吧,build src
        spring-build-src-4.0.0.RELEASE.jar
        //下面两个Spring-context的扩展支持,用于MVC方面
        spring-context-4.0.0.RELEASE.jar
        spring-context-support-4.0.0.RELEASE.jar
        //这个就不用说了spring的核心jar
        spring-core-4.0.0.RELEASE.jar
        //这个看名字也知道,Spring表达式语言
        spring-expression-4.0.0.RELEASE.jar
        //这个是后来随着spring发展才出现的,解决spring多依赖问题,可以去搜索spring bom
        spring-framework-bom-4.0.0.RELEASE.jar
        //spring4.0对服务器的代理接口
        spring-instrument-4.0.0.RELEASE.jar
        //spring4.0对tomcat的集成
        spring-instrument-tomcat-4.0.0.RELEASE.jar
        //对jdbc简单的封装
        spring-jdbc-4.0.0.RELEASE.jar
        //为了简化jms API简单的封装
        spring-jms-4.0.0.RELEASE.jar
        //这个是国际化的支持
        spring-messaging-4.0.0.RELEASE.jar
        //为了整合第三方框架,如hibernate等
        spring-orm-4.0.0.RELEASE.jar
        //spring对object/xml的映射支持
        spring-oxm-4.0.0.RELEASE.jar
        //对Junit等测试框架的简单封装
        spring-test-4.0.0.RELEASE.jar
        //这个是有关事务管理的
        spring-tx-4.0.0.RELEASE.jar
        //下面这三个不就是和web mvc有关的吗
        spring-web-4.0.0.RELEASE.jar
        spring-webmvc-4.0.0.RELEASE.jar
        spring-webmvc-portlet-4.0.0.RELEASE.jar
        //这个是spring和websocket有关的
        spring-websocket-4.0.0.RELEASE.jar
上面这些jar是所有的spring 4.0.0.RELEASE jar,如果只是单独使用的话没有必要将这些jar都加进来,像web这些就不需要,其实我们看名字就能看出很多jar是做什么用的,在spring这里我们还是要详细介绍一下每一个jar具体是什么作用,现在看到jar你还有选择恐惧整嘛,什么是可以缺少的什么是不能缺少的不就一目了然了,如果对上面的解释还还觉得不够详细可以参考:
http://blog.csdn.net/w_wind/article/details/18370715
http://www.cnblogs.com/leehongee/archive/2012/10/01/2709541.html
写的很好的,我也有借鉴他们的很多东西。
下面上一张图,看看我的目录结构是什么样子的吧:
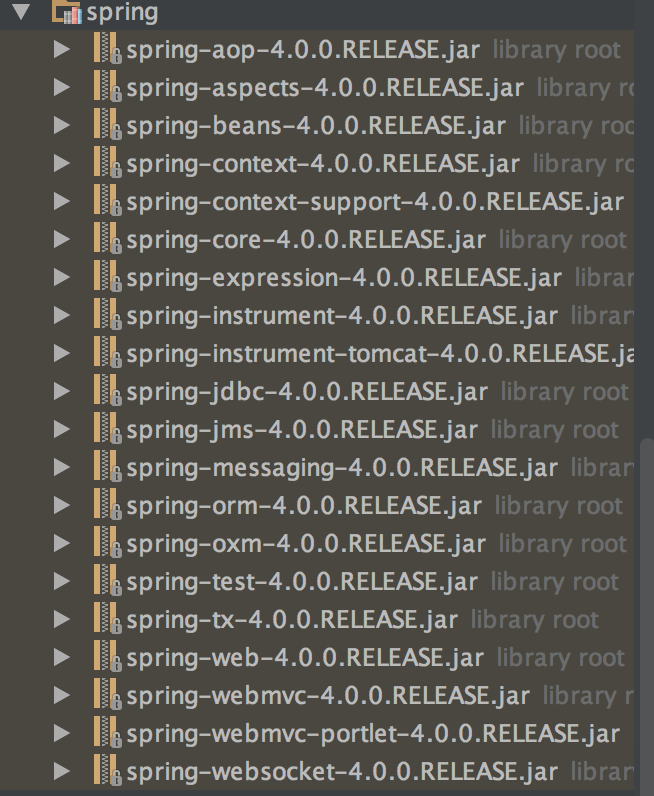
上面我将所有的release的jar都加上了,有些是用不上的,比如websocket这样的,但是看了下真实项目中其实上面这些基本上都能用上,所以还是都加上来吧。
2)、配置
applicationContext.xml
<!--bean.xml或者applicationContext.xml(根据自己的喜好选择Spring的配置文件名字)-->
        <!--spring框架非常灵活,所以该配置文件也非常灵活-->
        <?xml version="1.0" encoding="UTF-8"?>
        <!DOCTYPE beans PUBLIC "-//SPRING//DTD BEAN 2.0//EN"
                "http://www.springframework.org/dtd/spring-beans-2.0.dtd">

        <beans>
            <bean id="..." class="...">
                <property name="isolation">
                    <bean id="java.sql.Connection.TRANSACTION_SERIALIZABLE"
                            class="org.springframework.beans.factory.config.FieldRetrievingFactoryBean" />
                </property>
            </bean>
        </beans>
上面这个只是简单的实例,并不是具体的配置。
接下来,通过我自己简单的例子来
现在来创建dao daoimpl domain,然后通过spring来管理这些对象
dao
public interface StudentDao {

    public void addStudent(Student student);

    public void delStudent(Long pid);

    public void updateStudent(Student student);


}
创建daoimpl
package com.cn.ljh.dao.impl;

import com.cn.ljh.dao.StudentDao;
import com.cn.ljh.domain.Student;

/**
 * Created by ljh on 16/8/17.
 */
public class StudentDaoImpl implements StudentDao {
    @Override
    public void addStudent(Student student) {
        System.out.println("addStudent");
    }

    @Override
    public void delStudent(Long pid) {
        System.out.println("delStudent");
    }

    @Override
    public void updateStudent(Student student) {
        System.out.println("udateStudent");
    }
}
创建javaBean
package com.cn.ljh.domain;

import com.opensymphony.xwork2.ActionSupport;

import java.io.Serializable;

/**
 * Created by ljh on 16/8/17.
 */
public class Student extends ActionSupport implements Serializable {
    private Long sid;
    private String name;
    private String sex;
    private int age;
    private Course course;

    public Long getSid() {
        return sid;
    }

    public void setSid(Long sid) {
        this.sid = sid;
    }

    public String getName() {
        return name;
    }

    public void setName(String name) {
        this.name = name;
    }

    public String getSex() {
        return sex;
    }

    public void setSex(String sex) {
        this.sex = sex;
    }

    public int getAge() {
        return age;
    }

    public void setAge(int age) {
        this.age = age;
    }

    public Course getCourse() {
        return course;
    }

    public void setCourse(Course course) {
        this.course = course;
    }


    @Override
    public String toString() {
        return "Student{" +
                "sid=" + sid +
                ", name='" + name + '\'' +
                ", sex='" + sex + '\'' +
                ", age=" + age +
                ", course=" + course +
                '}';
    }
}
现在想要需要将对象注入到spring容器中,通过spring来进行对象的管理
配置文件applicationContext.xml
<?xml version="1.0" encoding="UTF-8"?>
<beans xmlns="http://www.springframework.org/schema/beans"
       xmlns:xsi="http://www.w3.org/2001/XMLSchema-instance"
       xmlns:tx="http://www.springframework.org/schema/tx"
       xmlns:aop="http://www.springframework.org/schema/aop"
       xmlns:context="http://www.springframework.org/schema/context"
       xsi:schemaLocation="http://www.springframework.org/schema/beans
       http://www.springframework.org/schema/beans/spring-beans.xsd
       http://www.springframework.org/schema/tx
       http://www.springframework.org/schema/tx/spring-tx-4.0.xsd
       http://www.springframework.org/schema/aop
       http://www.springframework.org/schema/aop/spring-aop-4.0.xsd
       http://www.springframework.org/schema/context
       http://www.springframework.org/schema/context/spring-context-4.0.xsd
       ">


    <bean name="student" class="com.cn.ljh.domain.Student">
        <property name="name" value="小红"/>
        <property name="age" value="12"/>
        <property name="sex" value="男"/>
    </bean>

    <bean name="studentDao" class="com.cn.ljh.dao.impl.StudentDaoImpl"/>
</beans>
可能会注意到,beans中有很多头部信息,这些都是自己添加进去的,简单介绍一下:
       xmlns:tx="http://www.springframework.org/schema/tx"
       xmlns:aop="http://www.springframework.org/schema/aop"
       xmlns:context="http://www.springframework.org/schema/context"


       http://www.springframework.org/schema/tx
       http://www.springframework.org/schema/tx/spring-tx-4.0.xsd
       http://www.springframework.org/schema/aop
       http://www.springframework.org/schema/aop/spring-aop-4.0.xsd
       http://www.springframework.org/schema/context
       http://www.springframework.org/schema/context/spring-context-4.0.xsd
上面这些头部信息的作用就是你需要使用到spring什么相关的技术就在上面添加相应的头部请求即可:
那么我在下面整理出spring常用的技术和所对应的头部信息:
我们打开下载好的spring并且解压成文件夹后:
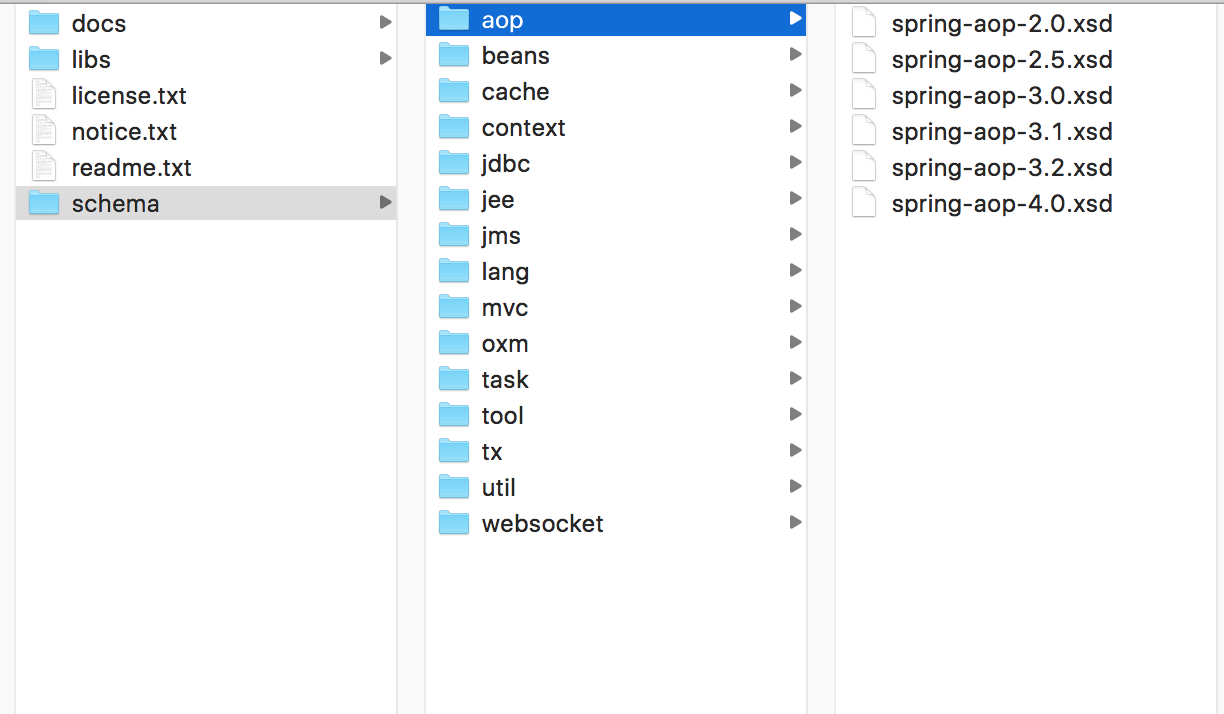
上面这幅图中就是所有spring中的技术,每用到一个组件技术,我们都需要在beans上面去添加头部信息,我们看到还有版本号,spring-aop-4.0.xsd,我建议用什么版本的spring就用什么版本的,这样才能用到新版本的特性,当然你用其他版本也是兼容的,但是在有的时候兼容也不是很好。随便打开一个看看:
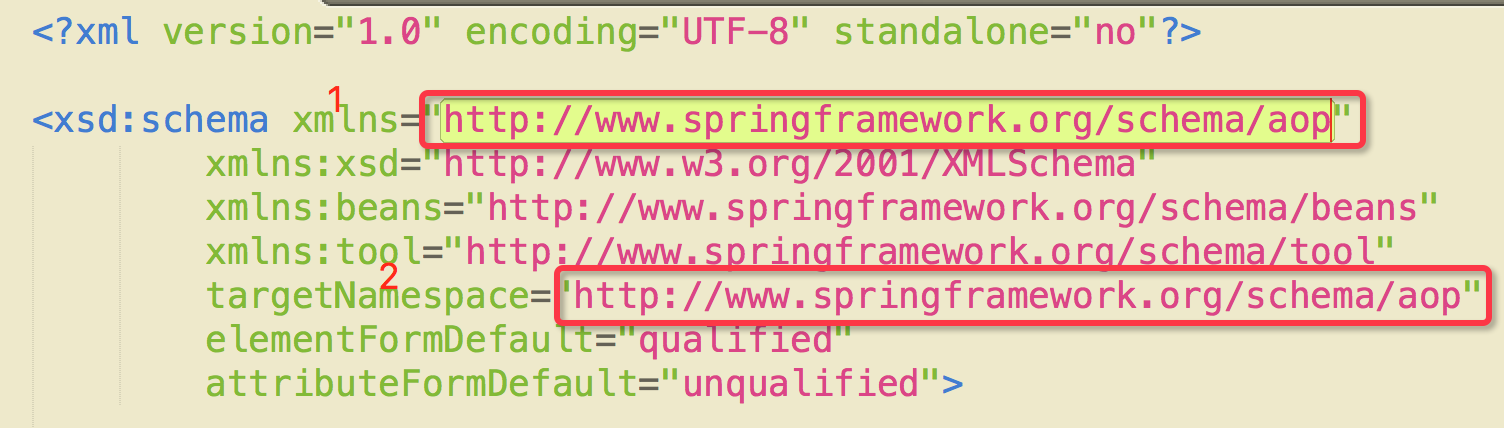
1).这个就是要导入的
2).这个和下面两个消息对比一下你就知道要怎么写啦
       http://www.springframework.org/schema/aop
       http://www.springframework.org/schema/aop/spring-aop-4.0.xsd
对比对比,你在下去尝试打开其他的文件,对比对比我导入的你就会发现,全都是套路,那还怕什么呢。
但是还是整理一下方便自己吧
The util schema
xmlns:util="http://www.springframework.org/schema/util"
http://www.springframework.org/schema/util http://www.springframework.org/schema/util/spring-util-4.0.xsd
The jee schema
xmlns:jee="http://www.springframework.org/schema/jee"
http://www.springframework.org/schema/jee http://www.springframework.org/schema/jee/spring-jee-4.0.xsd
The lang schema
xmlns:lang="http://www.springframework.org/schema/lang"
http://www.springframework.org/schema/lang http://www.springframework.org/schema/lang/spring-lang-4.0.xsd
The jms schema
xmlns:jms="http://www.springframework.org/schema/jms"
http://www.springframework.org/schema/jms http://www.springframework.org/schema/jms/spring-jms-4.0.xsd
The tx (transaction) schema
xmlns:tx="http://www.springframework.org/schema/tx"
http://www.springframework.org/schema/tx http://www.springframework.org/schema/tx/spring-tx-4.0.xsd
The aop schema
xmlns:aop="http://www.springframework.org/schema/aop"
http://www.springframework.org/schema/aop http://www.springframework.org/schema/aop/spring-aop-4.0.xsd
The context schema
xmlns:context="http://www.springframework.org/schema/context
http://www.springframework.org/schema/context http://www.springframework.org/schema/context/spring-context-4.0.xsd
OK,总结结束,接着继续,现在该办的事情都办啦,开始测试我们的环境到底搭建得对不对:
测试类
我的applicationContext.xml是放在src目录下面的
package com.cn.ljh.test;

import com.cn.ljh.dao.StudentDao;
import com.cn.ljh.domain.Student;
import org.hibernate.SessionFactory;
import org.springframework.context.ApplicationContext;
import org.springframework.context.support.ClassPathXmlApplicationContext;
import org.testng.annotations.Test;

/**
 * Created by ljh on 16/8/17.
 */
public class SpringTest {


    @Test
    public void test1(){
        ApplicationContext context = new ClassPathXmlApplicationContext("applicationContext.xml");
        Student student = (Student)context.getBean("student");
        System.out.println(student.toString());
    }

    @Test
    public void test2(){
        ApplicationContext context = new ClassPathXmlApplicationContext("applicationContext.xml");
       StudentDao studentDao = (StudentDao)context.getBean("studentDao");
        studentDao.addStudent(new Student());
    }

}
运行结果:
test1
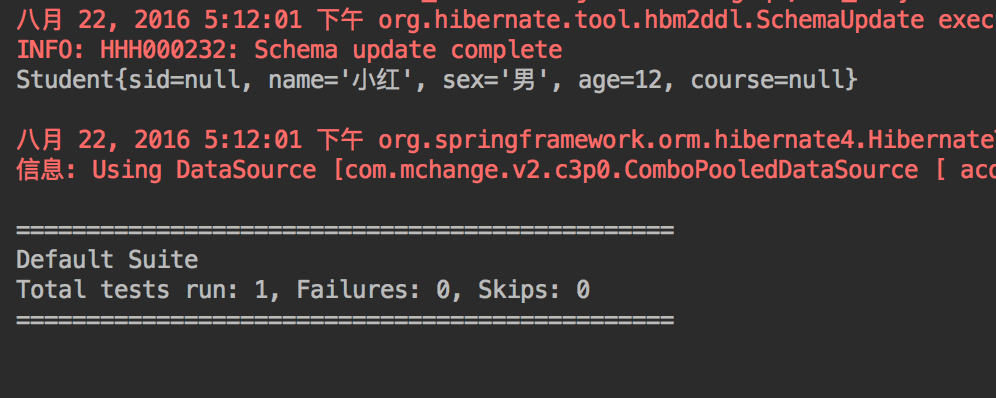
test2
到这里呢,spring的单独搭建基本就完成了。
3、struts2
其实我是故意把struts2放到最后来说的,这货简直是太坑了,你造吗,搭建的时候奶奶个熊的各种报错,其实struts2 2.5.2变动还是有点大的,对于第一次搭建还是走了不少弯路的。
来时老规矩吧,先从jar开始介绍
1)、依赖jar包
```

    asm-3.3.jar
    asm-commons-3.3.jar
    asm-tree-3.3.jar
    commons-beanutils-1.9.2.jar
    commons-connections-3.2.2.jar  (可以去)集合和数据结构的增强包
    commons-digester-2.1.jar
    commons-fileupload-1.3.2.jar
    commons-io-2.4.jar
    commons-lang3-3.4.jar
    commons-logging-1.1.3.jar
    freemarker-2.3.23.jar
    javassist-3.20.0-GA.jar (这里hibernate也有,不用管)
    //这个不用json也可以去
    json-lib-2.3-jdk15.jar          (可以去)
    log4j-api-2.5.jar
    //注意啦:这个jar很重要哦,但是struts2中没有,需要外部导入,并且版本不能比上面的api版本高
    log4j-core-2.3.jar
    ognl-3.1.10.jar
    slf4j-api-1.7.12.jar
    //这个是有关注解的
    struts2-convention-plugin-2.5.2.jar(使用注解配置action)
    struts2-core-2.5.2.jar
    //如果不适用json可以直接去掉就可以
    struts2-json-plugin-2.5.2.jar     (可以去)

```
看到什么不同没有,和之前的版本有什么不一样,其实也是大同小异的,但是xwork那个jar没了,这个还是有点印象的。
下面就开始被坑的道路吧,哦,struts2中的这些jar不讲解啦,其实和之前版本的都差不多,但是这个版本废弃了一些api。
2)、配置
首先是web.xml
<?xml version="1.0" encoding="UTF-8"?>
<web-app xmlns="http://xmlns.jcp.org/xml/ns/javaee"
         xmlns:xsi="http://www.w3.org/2001/XMLSchema-instance"
         xsi:schemaLocation="http://xmlns.jcp.org/xml/ns/javaee http://xmlns.jcp.org/xml/ns/javaee/web-app_3_1.xsd"
         version="3.1">
    <filter>
        <filter-name>struts2</filter-name>
        <filter-class>org.apache.struts2.dispatcher.filter.StrutsPrepareAndExecuteFilter</filter-class>
    </filter>
    <filter-mapping>
        <filter-name>struts2</filter-name>
        <url-pattern>/*</url-pattern>
    </filter-mapping>

    <welcome-file-list>
        <welcome-file>index.jsp</welcome-file>
    </welcome-file-list>
</web-app>
注意:重点来啦,版本改变之后,我说的中央过滤器类变啦,变成org.apache.struts2.dispatcher.filter.StrutsPrepareAndExecuteFilter,原来的类直接被废弃咯。
其次,struts.xml
<?xml version="1.0" encoding="UTF-8"?>

<!DOCTYPE struts PUBLIC
        "-//Apache Software Foundation//DTD Struts Configuration 2.5//EN"
        "http://struts.apache.org/dtds/struts-2.5.dtd">

<struts>
    <!--设置开发者模式-->
    <constant name="struts.devMode" value="true"/>
    <!--设置主题-->
    <constant name="struts.ui.theme" value="simple"/>
    <!--设置请求方式为.dao-->
    <constant name="struts.action.extension" value="dao"/>

    <package name="default" namespace="/" extends="struts-default">

    </package>

</struts>
简单的配置下
接下来,上面的配置基本就完成啦,你可以启动你的tomcat去测试你的环境是否正确,tomcat的配置我就不列出来啦,不会的可以去参考其他文章。创建一个index.jsp作为测试页面,然后启动,没有报错就说明你成功啦。其实很简单,只是因为是新版本,改动还是有的。如果看到测试页面就说明你成功啦

我的经过无数次的折腾成功啦,我相信你也许也会遇到一些或多或少的问题,但是也要面对去解决。
那么接下来就是框架整合啦,首先你必须能够让上面的这些都能单独的跑起来,自己一定要一步一步的测试过来,为了让后面你能安安静静的做一个美男子
4、spring和hibernate整合
框架整合篇呢,重头戏才刚刚开始,上面的问题呢,还是需要你亲自动手的,至少要知道每个框架是可以独立运行的,这样也方便以后面对其他框架上的整合。
三大框架的整合,其实就是两两配对,spring+hibernate、spring+struts2,先整合那个完全取决于你的心情。
好啦,不瞎扯淡啦,开始吧。
1)、依赖jar包
以来的jar呢其实基本就是上面的spring+hibernate的jar,但是为了更加明确,我还是列出来吧:
        hibernate-release-4.2.21.Final/lib/required/  下面所有的jar
        antlr-2.7.7.jar
        dom4j-1.6.1.jar
        hibernate-commons-annotations-4.0.2.Final.jar
        hibernate-core-4.2.21.Final.jar
        hibernate-jpa-2.0-api-1.0.1.Final.jar
        javassist-3.18.1-GA.jar
        jboss-logging-3.1.0.GA.jar
        jboss-transaction-api_1.1_spec-1.0.1.Final.jar


        //用于支持aop面向切面编程
        spring-aop-4.0.0.RELEASE.jar
        //提供对AspectJ的支持,以便可以方便的将面向方面的功能集成进IDE中
        spring-aspects-4.0.0.RELEASE.jar
        //这个jar 文件是所有应用都要用到的,它包含访问配置文件、创建和管理bean 以及进行Inversion of Control / Dependency Injection(IoC/DI)操作相关的所有类。如果应用只需基本的IoC/DI 支持,引入spring-core.jar 及spring-beans.jar 文件就可以了。
外部依赖spring-core,(CGLIB)。
        spring-beans-4.0.0.RELEASE.jar
        //这个看名字也该知道吧,build src
        spring-build-src-4.0.0.RELEASE.jar
        //下面两个Spring-context的扩展支持,用于MVC方面
        spring-context-4.0.0.RELEASE.jar
        spring-context-support-4.0.0.RELEASE.jar
        //这个就不用说了spring的核心jar
        spring-core-4.0.0.RELEASE.jar
        //这个看名字也知道,Spring表达式语言
        spring-expression-4.0.0.RELEASE.jar
        //这个是后来随着spring发展才出现的,解决spring多依赖问题,可以去搜索spring bom
        spring-framework-bom-4.0.0.RELEASE.jar
        //spring4.0对服务器的代理接口
        spring-instrument-4.0.0.RELEASE.jar
        //spring4.0对tomcat的集成
        spring-instrument-tomcat-4.0.0.RELEASE.jar
        //对jdbc简单的封装
        spring-jdbc-4.0.0.RELEASE.jar
        //为了简化jms API简单的封装
        spring-jms-4.0.0.RELEASE.jar
        //这个是国际化的支持
        spring-messaging-4.0.0.RELEASE.jar
        //为了整合第三方框架,如hibernate等
        spring-orm-4.0.0.RELEASE.jar
        //spring对object/xml的映射支持
        spring-oxm-4.0.0.RELEASE.jar
        //对Junit等测试框架的简单封装
        spring-test-4.0.0.RELEASE.jar
        //这个是有关事务管理的
        spring-tx-4.0.0.RELEASE.jar
        //下面这三个不就是和web mvc有关的吗
        spring-web-4.0.0.RELEASE.jar
        spring-webmvc-4.0.0.RELEASE.jar
        spring-webmvc-portlet-4.0.0.RELEASE.jar
        //这个是spring和websocket有关的
        spring-websocket-4.0.0.RELEASE.jar


        //注意这个jar,我后面会详细讲
        aopalliance-.jar

        //千万不要忘了把数据库驱动加进来
        mysql-connector-java-5.1.18-bin.jar
上面就是spring+hibernate需要的jar
2)、配置
2.1 hibernate配置
hibernate.cfg.xml
<?xml version='1.0' encoding='utf-8'?>
<!DOCTYPE hibernate-configuration PUBLIC
        "-//Hibernate/Hibernate Configuration DTD//EN"
        "http://www.hibernate.org/dtd/hibernate-configuration-3.0.dtd">
<hibernate-configuration>
    <session-factory>
        <property name="connection.username">root</property>
        <property name="connection.password">123</property>
        <property name="connection.url">jdbc:mysql://localhost:3306/sshDemo1</property>
        <property name="connection.driver_class">com.mysql.jdbc.Driver</property>

        <!--方言-->
        <property name="hibernate.dialect">org.hibernate.dialect.MySQL5InnoDBDialect</property>

        <property name="hbm2ddl.auto">update</property>
        <property name="show_sql">true</property>


<!--这里的测试类我就先加进来啦-->
        <mapping resource="com/cn/ljh/domain/Student_bean.xml"/>
        <mapping resource="com/cn/ljh/domain/Course_bean.xml"/>
        <mapping resource="com/cn/ljh/domain/User_hbm.xml"/>
    </session-factory>
</hibernate-configuration>
上面的mapping你会发现有Student_bean.xml Course_bean.xml User_hbm.xml 其实名字是不影响的,bean和hbm都是不影响的,但是一般还是用hbm规范些,那么我这里就用User来测试hibernate是否搭建成功。
首先,创建一个数据库,创建数据库之前一定要把所有的编码都设置为UTF-8,一面忘记发生乱码问题:
create database sshdemo;
编码的问题就自己解决吧,这里不再赘述。
接下来创建User类,并且创建映射文件User_hbm.xml
User
package com.cn.ljh.domain;

/**
 * Created by ljh on 16/8/22.
 */
public class User {
    private Long id;

    public Long getId() {
        return id;
    }

    public void setId(Long id) {
        this.id = id;
    }
}
User_hbm.xml
<?xml version="1.0" encoding="UTF-8"?>
<!DOCTYPE hibernate-mapping PUBLIC
        "-//Hibernate/Hibernate Mapping DTD 3.0//EN"
        "http://www.hibernate.org/dtd/hibernate-mapping-3.0.dtd">
<hibernate-mapping>
    <class name="com.cn.ljh.domain.User" table="oa_test_user">
        <id name="id" type="java.lang.Long" length="10">
            <generator class="native"/>
        </id>
    </class>

</hibernate-mapping>
创建一个util类用于测试
package com.cn.ljh.utils;

import org.hibernate.SessionFactory;
import org.hibernate.cfg.Configuration;

/**
 * Created by ljh on 16/8/17.
 */
public class HibernateUtils {

    public static  SessionFactory sessionFactory;

    static {
        Configuration configuration = new Configuration();
        configuration.configure();
        sessionFactory = configuration.buildSessionFactory();
    }
}
ok,就用上面这个简单的实例来测试hibernate是否搭建成功,还是老规矩创建JunitTest测试类:
package com.cn.ljh.test;

import com.cn.ljh.utils.HibernateUtils;
import org.hibernate.cfg.Configuration;
import org.testng.annotations.Test;

/**
 * Created by ljh on 16/8/17.
 */
public class hibernateUtilsTest extends HibernateUtils{

    @Test
    public void test1(){
        Configuration configuration = new Configuration();
        configuration.configure("hibernate.cfg.xml");
        configuration.buildSessionFactory();
    }

}
点击运行吧,看创建表成功没有,我的结果成功啦:
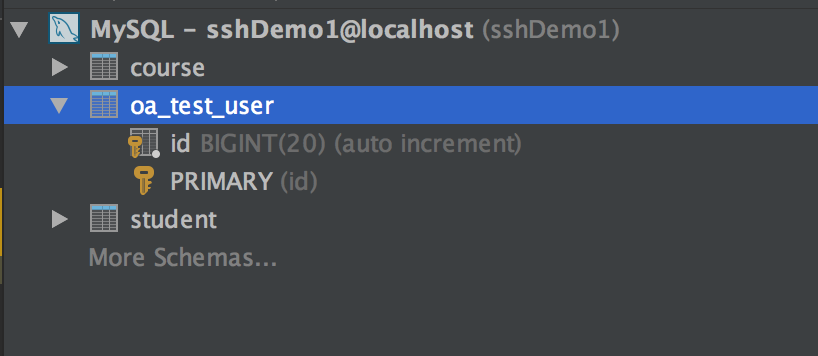
那么就没有问题咯,接下来就是spring
2.2 spring配置加整合
`applicationContext.xml`


```
<?xml version="1.0" encoding="UTF-8"?>
    <beans xmlns="http://www.springframework.org/schema/beans"
           xmlns:xsi="http://www.w3.org/2001/XMLSchema-instance"
           xmlns:tx="http://www.springframework.org/schema/tx"
           xmlns:aop="http://www.springframework.org/schema/aop"
           xmlns:context="http://www.springframework.org/schema/context"
           xsi:schemaLocation="http://www.springframework.org/schema/beans
           http://www.springframework.org/schema/beans/spring-beans.xsd
           http://www.springframework.org/schema/tx
           http://www.springframework.org/schema/tx/spring-tx-4.0.xsd
           http://www.springframework.org/schema/aop
           http://www.springframework.org/schema/aop/spring-aop-4.0.xsd
           http://www.springframework.org/schema/context
           http://www.springframework.org/schema/context/spring-context-4.0.xsd
           ">


<!--自动扫描与装配bean-->
<context:component-scan base-package="com.cn.ljh"/>


<!--加载jdbc配置文件-->
<context:property-placeholder location="classpath:jdbc.properties"/>
<!--配置数据源-->
<bean id="dataSource" class="com.mchange.v2.c3p0.ComboPooledDataSource">
    <property name="jdbcUrl" value="${jdbcUrl}"/>
    <property name="driverClass" value="${driverClass}"/>
    <property name="user" value="${username}"/>
    <property name="password" value="${password}"/>

    <!--初始化时创建三个链接-->
    <property name="initialPoolSize" value="3"/>
    <!--最大链接数量10,默认15-->
    <property name="maxPoolSize" value="10"/>
    <!--最小链接数量3,默认3-->
    <property name="minPoolSize" value="3"/>
    <!--当池中链接数量用完后,一次创建10个链接,默认为3-->
    <property name="acquireIncrement" value="10"/>
    <!--当maxStatements和maxStatementsPerConnection都为0是,则缓存被关闭,默认为0-->
    <property name="maxStatements" value="8"/>
    <property name="maxStatementsPerConnection" value="8"/>
    <!--1000秒没有使用链接则被丢失-->
    <property name="maxIdleTime" value="1000"/>
</bean>

<!--配置spring管理事务-->
<bean id="sessionFactory" class="org.springframework.orm.hibernate4.LocalSessionFactoryBean">
    <property name="dataSource" ref="dataSource"/>
    <property name="configLocation" value="classpath:hibernate.cfg.xml"/>
</bean>

<!--配置申明事务管理(使用注解的方式)-->
<bean id="transactionManager" class="org.springframework.orm.hibernate4.HibernateTransactionManager">
    <property name="sessionFactory" ref="sessionFactory"/>
</bean>


<!--事务aop配置,这里先注释啦,如果你不知道是什么可以去搜怎么配置,这里我们暂时不用配-->
<!--<bean id="txManager" class="org.springframework.jdbc.datasource.DataSourceTransactionManager">-->
    <!--<property name="dataSource" ref="dataSource" />-->
<!--</bean>-->
<!--<tx:advice id="txAdvice" transaction-manager="txManager">-->
    <!--<tx:attributes>-->
        <!--<tx:method name="save*" propagation="REQUIRED"/>-->
        <!--<tx:method name="add*" propagation="REQUIRED"/>-->
        <!--<tx:method name="create*" propagation="REQUIRED"/>-->
        <!--<tx:method name="insert*" propagation="REQUIRED"/>-->
        <!--<tx:method name="*" read-only="true" />-->
    <!--</tx:attributes>-->
<!--</tx:advice>-->

<!--<aop:config proxy-target-class="true">-->
    <!--<aop:advisor advice-ref="txAdvice" pointcut="execution(* com.cn.ljh.dao ..*.*(..))" />-->
<!--</aop:config>-->


<!--采用注解管理事务-->
<tx:annotation-driven transaction-manager="transactionManager"/>

<!--<bean name="student" class="com.cn.ljh.domain.Student">-->
    <!--<property name="name" value="小红"/>-->
    <!--<property name="age" value="12"/>-->
    <!--<property name="sex" value="男"/>-->
<!--</bean>-->

<!--<bean name="studentDao" class="com.cn.ljh.dao.impl.StudentDaoImpl"/>-->
</beans>

```
jdbc.propertise
jdbcUrl     = jdbc:mysql://localhost:3306/sshDemo1
driverClass = com.mysql.jdbc.Driver
username    = root
password    = 123
这个配置是为了使applicationContext.xml中能够找到相应的配置
现在来讲讲我遇到的配置问题:
<context:component-scan base-package="com.cn.ljh"/>
这个配置的意思就是,你需要那个基包的内容被spring容器自动扫描管理,多个基包,用逗号隔开。什么是被spring容器自动扫描管理?
通俗的讲,就是在这个基包下面所能又被创建对象实例的类都会被spring容器管理,不需要在applicationContext.xml中配置bean,这里使用的是注解的形式将类注入到spring中。
注解也是一个重点(简单说几个):@Service 有关service层的类注入@Controller 有关servlet控制器层的类注入@Repository 有关持久化层的注入@Component 其他的一些组件类注入
注解是一个重要内容,这里就不展开,初次介绍简单的一些注解,想要深入可以去参考其他博客
注意:上面这四个注解,其实你用哪一个都是可以的,只是为了给程序员区分,有一个分层的概念,之后查找代码,看到注解也能知道这个类属于那一层的。
通过上面这四个注解注释并且在applicationContext.xml中配置了component-scan,那么你就可以取出对象啦,例如:
建立一个测试dao 和daoimpl
package com.cn.ljh.dao.impl;

import com.cn.ljh.dao.StudentDao;
import com.cn.ljh.domain.Student;
import org.springframework.stereotype.Service;

/**
 * Created by ljh on 16/8/17.
 */
 //注意这里使用的注解(和持久化相关,方便阅读和管理)
@Repository
public class StudentDaoImpl implements StudentDao {
    @Override
    public void addStudent(Student student) {
        System.out.println("addStudent");
    }

    @Override
    public void delStudent(Long pid) {
        System.out.println("delStudent");
    }

    @Override
    public void updateStudent(Student student) {
        System.out.println("udateStudent");
    }
}
package com.cn.ljh.dao;

import com.cn.ljh.domain.Student;

/**
 * Created by ljh on 16/8/17.
 */
public interface StudentDao {

    public void addStudent(Student student);

    public void delStudent(Long pid);

    public void updateStudent(Student student);


}
创建测试类
package com.cn.ljh.test;

import com.cn.ljh.dao.StudentDao;
import com.cn.ljh.dao.impl.StudentDaoImpl;
import com.cn.ljh.domain.Student;
import org.hibernate.SessionFactory;
import org.springframework.context.ApplicationContext;
import org.springframework.context.support.ClassPathXmlApplicationContext;
import org.testng.annotations.Test;

/**
 * Created by ljh on 16/8/17.
 */
public class SpringTest {

//    private ApplicationContext applicationContext = new ClassPathXmlApplicationContext("applicationContext.xml");

    @Test
    public void test2(){
        ApplicationContext context = new ClassPathXmlApplicationContext("applicationContext.xml");
        //这里获取实体对象,bean的id是类名(类名第一个单词小写)
       StudentDao studentDao = (StudentDao)context.getBean("studentDaoImpl");
        studentDao.addStudent(new Student());
    }


}
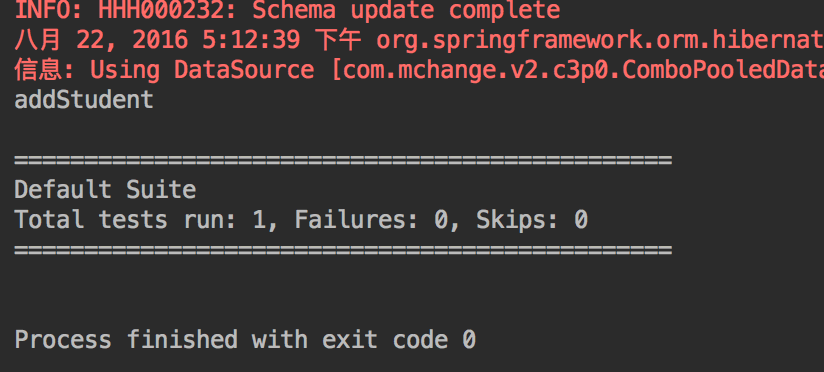
测试之后能够得到StudentDaoImpl对象就说明配置正确,你也可以toString();
这里在测试的时候需要将<tx:annotation-driven transaction-manager="transactionManager"/>注释掉,单独测试看效果。
我的测试结果:
<tx:annotation-driven transaction-manager="transactionManager"/>
上面这个配置是通过注解来管理事务的,很关键的哦,先不去介绍怎么用,先给大家看一个错误:(这也是我在配置的时候遇到的错误)
org.springframework.beans.factory.BeanDefinitionStoreException: Unexpected exception parsing XML document from class path resource [applicationContext.xml]; nested exception is java.lang.NoClassDefFoundError: org/aopalliance/intercept/MethodInterceptor
这个错误我估计会有很多人会遇到,在第一次配置的时候,看上面我讲的有一个很重要的jar,这里就是因为jar没有导入齐全造成的 aopalliance-.jar,这个是第三方的,所以还要去下载,很多人也会忽略这一步。
关于这个错误的一些说法:
http://stackoverflow.com/questions/22282107/noclassdeffounderror-org-aopalliance-intercept-methodinterceptor
现在,开始测试hibernate和spring是否成功(假设现在是service层的代码):
创建一个TestService
package com.cn.ljh.test;

import com.cn.ljh.domain.User;
import org.hibernate.Session;
import org.hibernate.SessionFactory;
import org.springframework.stereotype.Service;
import org.springframework.transaction.annotation.Transactional;

import javax.annotation.Resource;

/**
 * Created by ljh on 16/8/22.
 */
@Service    //service层管理
public class TestService {

    //通过注解获取SessionFactory
    @Resource
    private SessionFactory sessionFactory;
    //通过注解给方法使用事务
    @Transactional
    public void saveUser(){


        Session session = sessionFactory.getCurrentSession();

        session.save(new User());

//        int i = 1/0;  //这里抛出异常

        session.save(new User());
        System.out.println(session);
    }
}
这里就稍微讲解这两个注解的作用:
@Resource :这个注解可以放在字段上,这个时候相当于给这个字段添加了setting,那么通过这个字段的名字去spring容器中获取bean的id为字段名字的bean通过依赖注入对象中,同样也可以在setting方法上面使用,作用刚好相反。@Transactional:这个就是给方法添加事务管理的,可以在类上面使用。
如果想更加深入的去理解,欢迎去搜索新的知识点的博客和文档
创建测试类:
package com.cn.ljh.test;

import com.cn.ljh.dao.StudentDao;
import com.cn.ljh.dao.impl.StudentDaoImpl;
import com.cn.ljh.domain.Student;
import org.hibernate.SessionFactory;
import org.springframework.context.ApplicationContext;
import org.springframework.context.support.ClassPathXmlApplicationContext;
import org.testng.annotations.Test;

/**
 * Created by ljh on 16/8/17.
 */
public class SpringTest {


    /**
     * 测试SessionFactory
     */
    @Test
    public void test3(){
        ApplicationContext context = new ClassPathXmlApplicationContext("applicationContext.xml");
        SessionFactory sessionFactory = (SessionFactory)context.getBean("sessionFactory");
        System.out.println(sessionFactory.openSession());
    }

     /**
     * 测试事务
     */
    @Test
    public void test4(){
        ApplicationContext context = new ClassPathXmlApplicationContext("applicationContext.xml");
        TestService testService = (TestService)context.getBean("testService");
        testService.saveUser();
   }


}
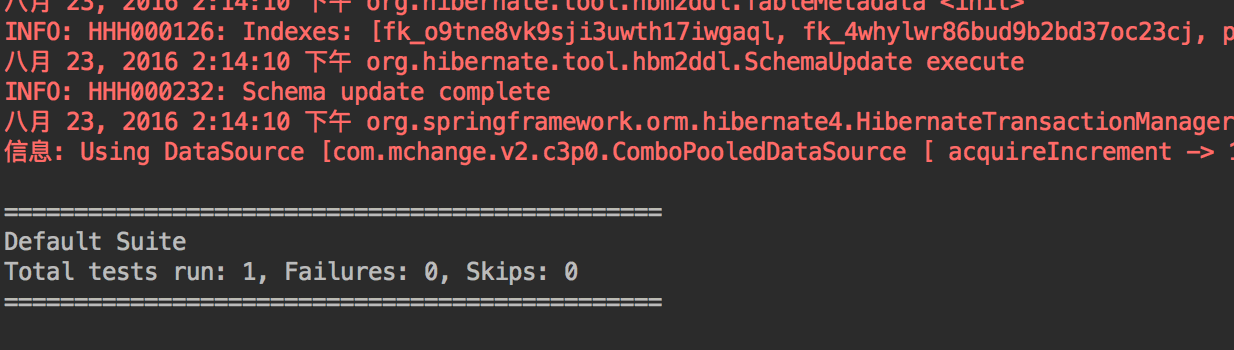
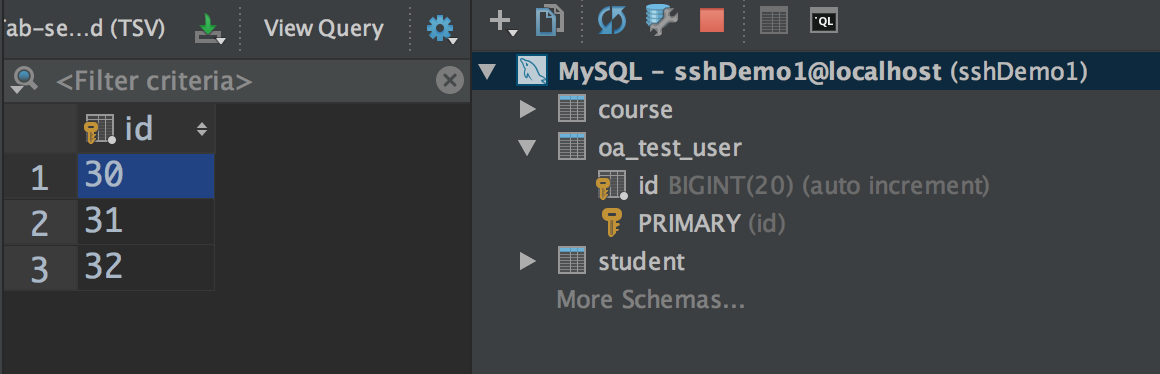
首先测试是否能获取SessionFactory,测试完成后测试事务,将TestService中的异常代码注释测试一次,添加成功,将注释代码解开再进行测试,发现数据库表中没有数据,说明我们的事务是配置正确的,如图是我的测试:
将异常信息注释的测试
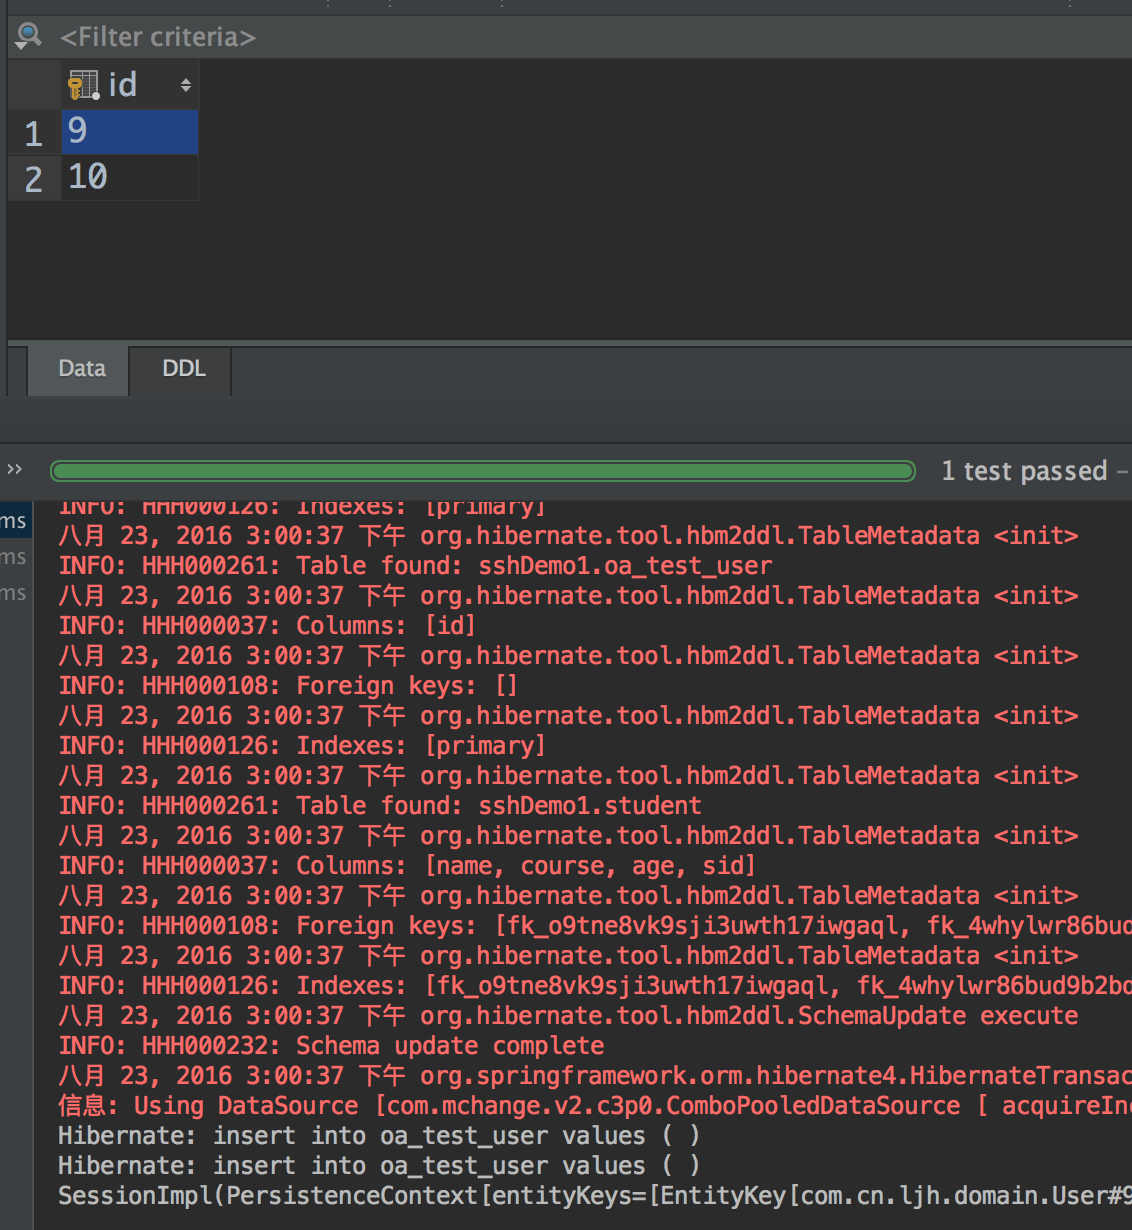
将异常代码注释解开的测试
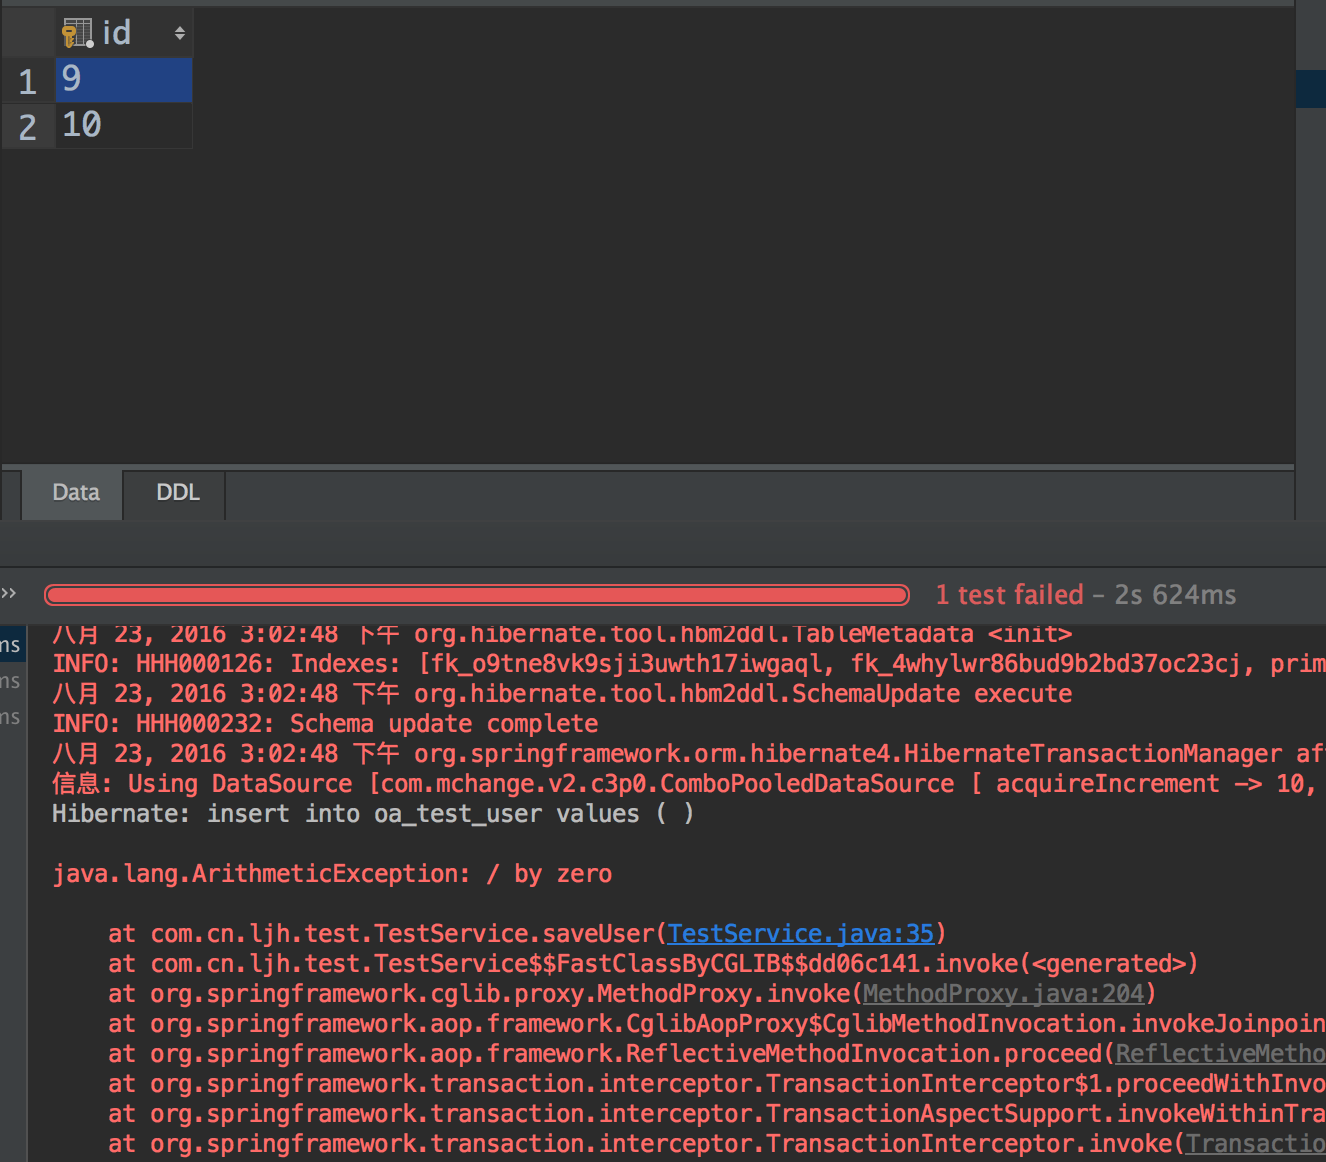
上面数据库中是从9开始的,因为之前我已经走了很多次,所以我删除了数据,但是数据库native还是从9开始。这样就说明配置成功啦。
这里spring和hibernate配置就基本完成。
5、struts2与spring整合
1)、依赖 jar包
这里的依赖jar包基本就是struts中的jar,但是要添加struts2的spring插件的jar
    asm-3.3.jar
        asm-commons-3.3.jar
        asm-tree-3.3.jar
        commons-beanutils-1.9.2.jar
        commons-connections-3.2.2.jar  (可以去)集合和数据结构的增强包
        commons-digester-2.1.jar
        commons-fileupload-1.3.2.jar
        commons-io-2.4.jar
        commons-lang3-3.4.jar
        commons-logging-1.1.3.jar
        freemarker-2.3.23.jar
        javassist-3.20.0-GA.jar (这里hibernate也有,不用管)
        //这个不用json也可以去
        json-lib-2.3-jdk15.jar          (可以去)
        log4j-api-2.5.jar
        //注意啦:这个jar很重要哦,但是struts2中没有,需要外部导入,并且版本不能比上面的api版本高
        log4j-core-2.3.jar
        ognl-3.1.10.jar
        slf4j-api-1.7.12.jar
        //这个是有关注解的
        struts2-convention-plugin-2.5.2.jar(使用注解配置action)
        struts2-core-2.5.2.jar
        //如果不适用json可以直接去掉就可以
        struts2-json-plugin-2.5.2.jar     (可以去)

        //添加struts2的spring插件jar
        struts2-spring-plugin-2.5.2.jar
3)、整合
整合之前你要先测试你的struts2框架单独在访问的时候有没有问题,能不能通过action访问到页面,如果能成功再接着进行框架的整合,千万要记得一步一步来,测试时必不可少的,不然真的全部弄好了之后,你会发现有你好受的。
如果你struts测试通过了,就开始接着整合啦,测试上面讲的单独单独配置struts2的时候就已经讲过啦:
web.xml
<?xml version="1.0" encoding="UTF-8"?>
<web-app xmlns="http://xmlns.jcp.org/xml/ns/javaee"
         xmlns:xsi="http://www.w3.org/2001/XMLSchema-instance"
         xsi:schemaLocation="http://xmlns.jcp.org/xml/ns/javaee http://xmlns.jcp.org/xml/ns/javaee/web-app_3_1.xsd"
         version="3.1">


    <!--配置spring监听对象applicationContext-->
    <listener>
        <listener-class>org.springframework.web.context.ContextLoaderListener</listener-class>
    </listener>
    <context-param>
        <param-name>contextConfigLocation</param-name>
        <param-value>classpath:applicationContext*.xml</param-value>
    </context-param>

    <!--配置struts2-->
    <filter>
        <filter-name>struts2</filter-name>
        <filter-class>org.apache.struts2.dispatcher.filter.StrutsPrepareAndExecuteFilter</filter-class>
    </filter>
    <filter-mapping>
        <filter-name>struts2</filter-name>
        <url-pattern>/*</url-pattern>
    </filter-mapping>

    <welcome-file-list>
        <welcome-file>index.jsp</welcome-file>
    </welcome-file-list>
</web-app>
继续使用之前创建的service
package com.cn.ljh.test;

import com.cn.ljh.domain.User;
import org.hibernate.Session;
import org.hibernate.SessionFactory;
import org.springframework.stereotype.Service;
import org.springframework.transaction.annotation.Transactional;

import javax.annotation.Resource;

/**
 * Created by ljh on 16/8/22.
 */


@Service
public class TestService {


    @Resource
    private SessionFactory sessionFactory;


    @Transactional
    public void saveUser(){


        Session session = sessionFactory.getCurrentSession();

        session.save(new User());

        int i = 1/0;  //这里抛出异常

        session.save(new User());
        System.out.println(session);
    }
}
接着就是创建一个action对象
package com.cn.ljh.action;

import com.cn.ljh.test.TestService;
import com.opensymphony.xwork2.ActionSupport;
import org.springframework.stereotype.Controller;

import javax.annotation.Resource;
import java.io.Serializable;

/**
 * Created by ljh on 16/8/23.
 */
@Controller
public class UserAction extends ActionSupport implements Serializable{

    @Resource
    private TestService testService;


    @Override
    public String execute() throws Exception {
        System.out.println("测试-------action");
        testService.saveUser();
        return "success";
    }
}
接着就是struts.xml的配置啦,要注意和没有整合的区别
<?xml version="1.0" encoding="UTF-8"?>

<!DOCTYPE struts PUBLIC
        "-//Apache Software Foundation//DTD Struts Configuration 2.5//EN"
        "http://struts.apache.org/dtds/struts-2.5.dtd">

<struts>
    <!--设置开发者模式-->
    <constant name="struts.devMode" value="true"/>
    <!--设置主题-->
    <constant name="struts.ui.theme" value="simple"/>

    <constant name="struts.enable.DynamicMethodInvocation" value="true"/>

    <package name="aaa" namespace="" extends="struts-default">
        <!--当spring和struts整合后class就是name的名字(区别主要在这里,class不再是类的全路径,
        你也可以测试到底是类名的首字母小写还是和
        name属性相同,我没有进行测试,但是这里的前提是你一
        定要将插件jar添加进来才能被识别到)-->
        <action name="userAction" class="userAction" method="execute">
            <result name="success">/test.jsp</result>
        </action>
    </package>

</struts>
那么如果到这里基本就算是完成啦,开启tomcat进行测试环境搭建是否成功,上面的TestService使用到的注解上面已经讲过不再解释,测试需要将TestService类中的异常代码注释关闭和打开分别测试,主要是测试事务。
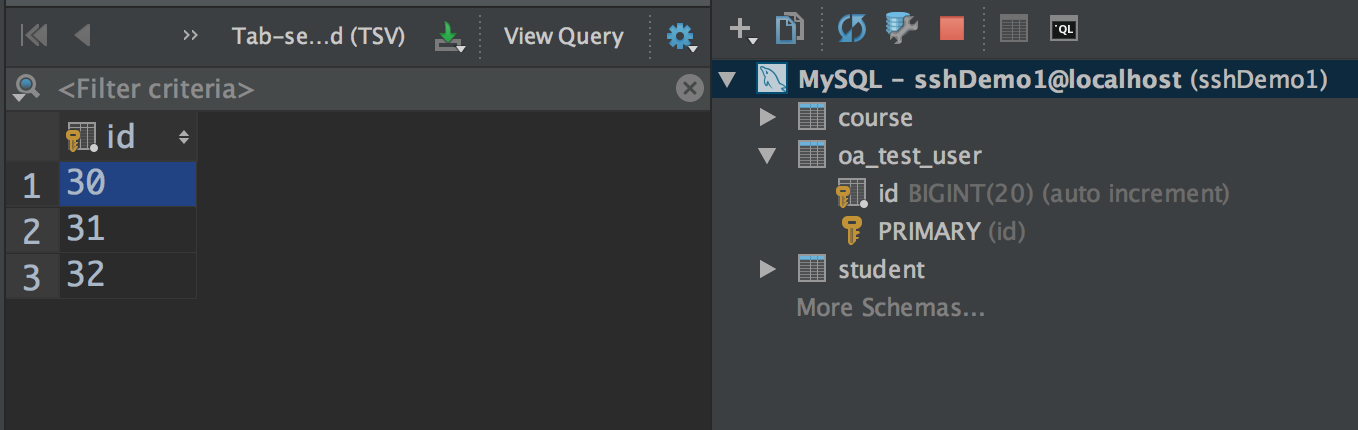
看我的两次测试结果:
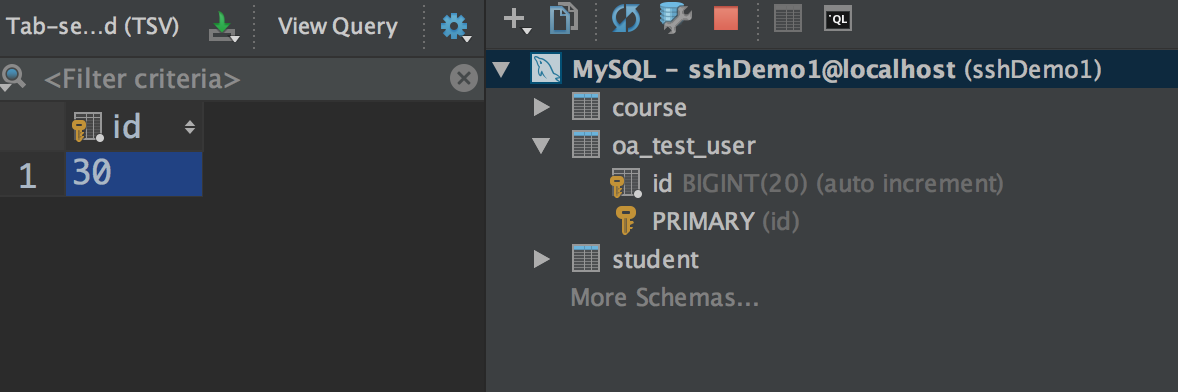
这是我数据库中最新的记录,接下来我们进行两侧测试(我把之前测试的结果都删除啦)
将TestService异常代码注释测试
将TestService中的 int i= 1/0;注释

访问UserAction
测试结果
打开TestService异常代码注释测试
将TestService中的 int i= 1/0;注释解开
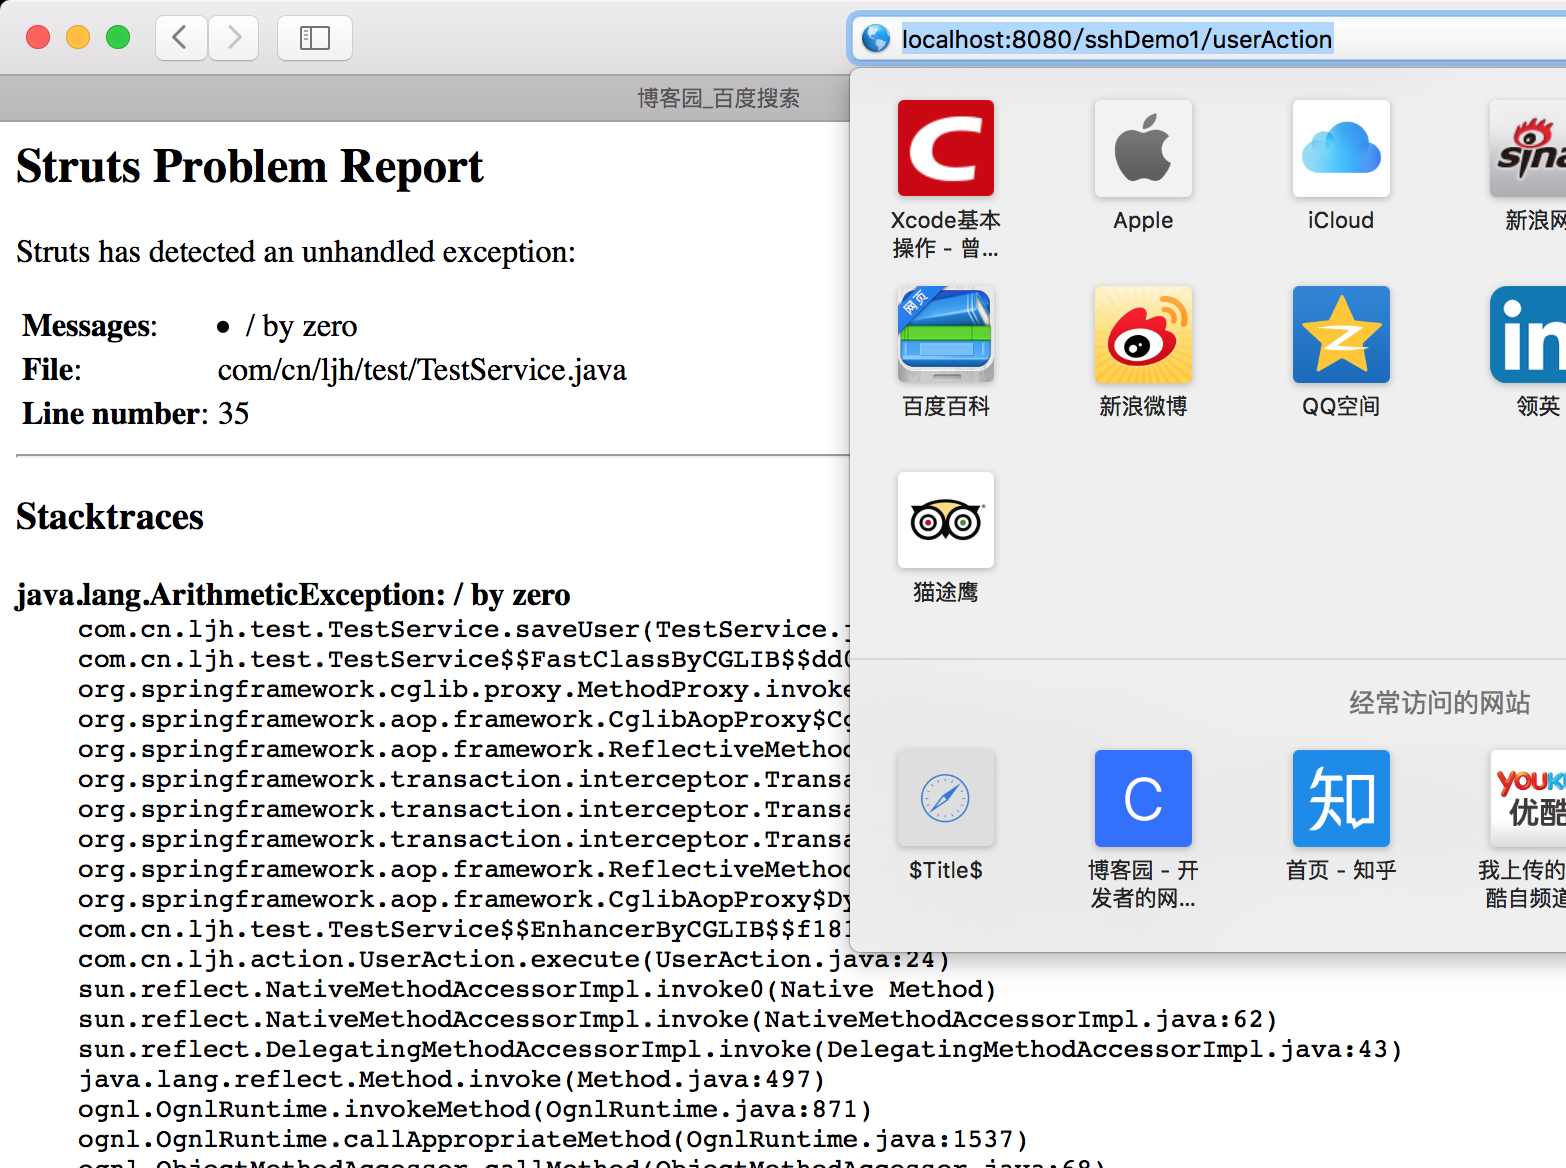
访问UserAction,发现报错
刷新数据库,发现数据库中结果没变,到这里说明我们的事务是没有什么问题的。
最后上一张我的目录结构
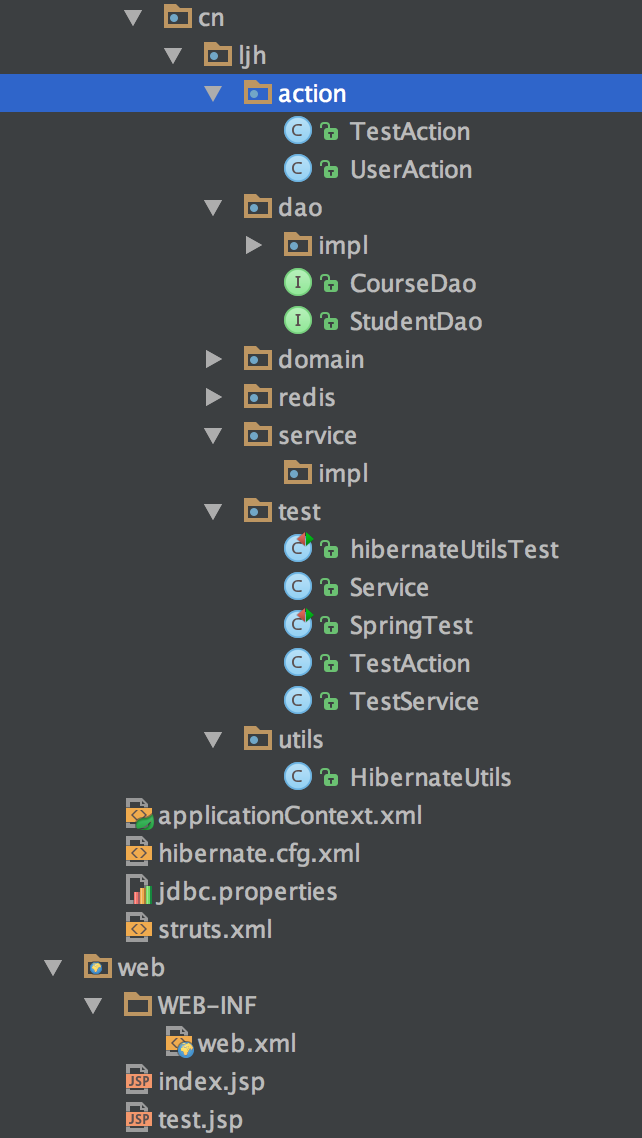
到这里呢基本上是完啦,三大框架的整合而且还是最新版的哦,接下来可以好好的更加深入的研究学习框架吧。。。。
希望对你有所帮助,后边可能还会去写关于使用maven搭建的方式,企业使用自动构建的比较多,但是对于学习还是手动搭建学的知识要多写,并且这里使用的是注解的方式,不代表xml配置的方式不能使用,作为一个合格的框架使用者务必两种方式都要掌握,注解、xml都有好又不好。
加油吧骚年!!!!
记录学习的每一步,记录每一次的成长!!!!


 205
205


 被折叠的 条评论
为什么被折叠?
被折叠的 条评论
为什么被折叠?
 到【灌水乐园】发言


