


一、Android JUnit Runner介绍
1.Android JUnit Runner
1)是一个测试运行器,用于运行Junit3和Junit4的Android测试包
2)替换Instrumentation Test Runner(一个比较旧的测试运行器)
3)支持Instrumentation Test Runner所有特性,但又进行了扩展
4)保持了所有Instrumentation Test Runner的命令格式
2.继承关系
java.lang.Object

    android.app.Instrumentation

        android.support.test.runner.MonitoringInstrumentation

            android.support.test.runner.AndroidJUnitRunner
二、Instrument测试命令
1.命令格式:
am instrument [-r] [-e <NAME> <VALUE>] [-p <FILE>] [-w]
                     [--user <USER_ID>|CURRENT]
                     [--no-window-animation] [--abi <ABI>] <COMPONENT>

//COMPONENT:包名/运行Runner
- 运行所有测试用例命令的例子:
adb shell am instrument
-w com.testDemo.test/android.support.test.runner.AndroidJUnitRunner
2.测试命令
| 参数 | 说明 |
| -r | 打印原始结果(如果不加测试结果信息会很少) 使用[-e perf true]生成原始输出性能度量 |
| -e | 设置参数 为测试运行器常见的形式是: [-e [,…]] |
| 将profiling数据写入到文件中 注:需要先建立一个trace文件 | |
| -w | 等待测试完成(这是一个必需参数) |
| –user | | 指定用户运行,如果不指定则使用当前用户运行 |
| –no-window-animation | 关掉窗口动画(相当于开场动画)再运行 |
| –abi | 通过所选的ABI启动进程,选择支持的CPU架构 可以使用(adb shell getprop |
3.实例(使用Android Studio):
1)在github中搜索android-testing选中googlesamples/android-testing点进去,然后下载.zip压缩包
2)下载完成后进行解压,所有的依赖都在android-testing-master\ui\espresso\BasicSampleBundled\libs路径下
3)file–new–new project(等待工程创建完成)–app–java–[packageName右键]–new–java class
注:点开java后会有两个选项,上面的一个是apk代码,下面是测试代码,我们写测试用例一般都写在测试代码包内
4)复制android-testing-master\ui\espresso\BasicSampleBundled\libs目录下除android-support-v4.jar以外的全部文件到创建的工程的libs文件夹中
5)选中copy进去的所有文件右键—add as library—在弹出的提示窗口中选择app—OK
6)增加完成后可以切换到Android视图,在Gradle Scripts/build.gradle(Module:app)中进行查看,并且注释掉第一行*(注释的那一行表示它会把libs下面所有的jar包编译进去,因为我们已经手动把它添加进去了所以就不需要了),代码显示如下:
dependencies {
    //compile fileTree(include: ['*.jar'], dir: 'libs')
    testCompile 'junit:junit:4.12'
    compile 'com.android.support:appcompat-v7:23.1.1'
    compile 'com.android.support:design:23.1.1'
    compile files('C:/Users/xuzhonghui/AndroidStudioProjects/RunnerDemo/libs/espresso-contrib-2.2-release-no-dep.jar')
    compile files('C:/Users/xuzhonghui/AndroidStudioProjects/RunnerDemo/libs/espresso-core-2.2-release-no-dep.jar')
    compile files('C:/Users/xuzhonghui/AndroidStudioProjects/RunnerDemo/libs/espresso-idling-resource-2.2-release-no-dep.jar')
    compile files('C:/Users/xuzhonghui/AndroidStudioProjects/RunnerDemo/libs/espresso-intents-2.2-release-no-dep.jar')
    compile files('C:/Users/xuzhonghui/AndroidStudioProjects/RunnerDemo/libs/espresso-web-2.2-release-no-dep.jar')
    compile files('C:/Users/xuzhonghui/AndroidStudioProjects/RunnerDemo/libs/exposed-instrumentation-api-publish-0.3-release-no-dep.jar')
    compile files('C:/Users/xuzhonghui/AndroidStudioProjects/RunnerDemo/libs/guava-18.0.jar')
    compile files('C:/Users/xuzhonghui/AndroidStudioProjects/RunnerDemo/libs/hamcrest-core-1.3.jar')
    compile files('C:/Users/xuzhonghui/AndroidStudioProjects/RunnerDemo/libs/hamcrest-integration-1.3.jar')
    compile files('C:/Users/xuzhonghui/AndroidStudioProjects/RunnerDemo/libs/hamcrest-library-1.3.jar')
    compile files('C:/Users/xuzhonghui/AndroidStudioProjects/RunnerDemo/libs/javawriter-2.1.1.jar')
    compile files('C:/Users/xuzhonghui/AndroidStudioProjects/RunnerDemo/libs/javax.annotation-api-1.2.jar')
    compile files('C:/Users/xuzhonghui/AndroidStudioProjects/RunnerDemo/libs/javax.inject-1.jar')
    compile files('C:/Users/xuzhonghui/AndroidStudioProjects/RunnerDemo/libs/jsr305-2.0.1.jar')
    compile files('C:/Users/xuzhonghui/AndroidStudioProjects/RunnerDemo/libs/junit-4.12.jar')
    compile files('C:/Users/xuzhonghui/AndroidStudioProjects/RunnerDemo/libs/rules-0.3-release-no-dep.jar')
    compile files('C:/Users/xuzhonghui/AndroidStudioProjects/RunnerDemo/libs/runner-0.3-release-no-dep.jar')
    compile files('C:/Users/xuzhonghui/AndroidStudioProjects/RunnerDemo/libs/uiautomator-v18-2.1.1-release-no-dep.jar')
}
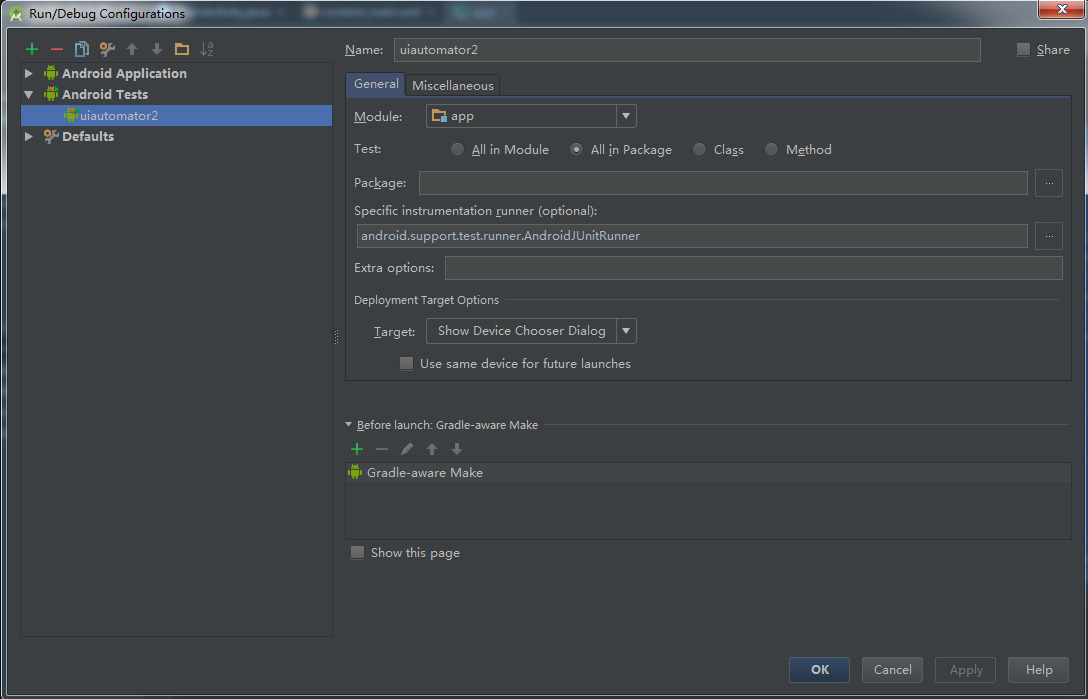
5)点击导航栏Run—Edit Configurations…—点击弹出界面左上角的+号—Android Tests,配置参考下图
-
截图说明:
a.name可以自行设置
b.Target选项请根据实际情况设置,我这边是拿模拟器进行调试的
6)在Gradle Scripts/build.gradle(Module:app)文件的defalutConfig中增加调试器,增加后的代码显示如下:
android {

    compileSdkVersion 23

    buildToolsVersion "23.0.2"


    defaultConfig {

        applicationId "com.example.xuzhonghui.runnerdemo"

        minSdkVersion 15

        targetSdkVersion 23

        versionCode 1 versionName "1.0"

        //引号中的内容为刚刚创建的运行器

        testInstrumentationRunner"android.support.test.runner.AndroidJUnitRunner"

    }

    buildTypes {

        release {

            minifyEnabled false proguardFiles

            getDefaultProguardFile('proguard-android.txt'), 'proguard-rules.pro'

        }

    }

}
7)至此,基本的配置完成了,然后在刚刚创建的类中写测试代码了,代码如下:
package com.example.xuzhonghui.runnerdemo;

import android.app.Instrumentation;
import android.support.test.InstrumentationRegistry;
import android.support.test.runner.AndroidJUnit4;
import android.support.test.uiautomator.UiDevice;

import org.junit.Before;
import org.junit.Test;
import org.junit.runner.RunWith;


//下面一行一定要的,就是指定哪个运行器运行
@RunWith(AndroidJUnit4.class)
//测试用例
public class RunnerTest {
    //初始化设备
    UiDevice device;

    @Before
    public void setip{
        device=UiDevice.getInstance(InstrumentationRegistry.getInstrumentation())
    }
    //用例1
    @Test
    public void  test1(){
        device.pressMenu();
    }
    //用例2
    @Test
    public void  test2(){
        device.pressBack();
    }
    //用例3
    @Test
    public void  test3(){
        device.pressMenu();
    }
    //用例4
    @Test
    public void  test4(){
        device.pressBack();
    }
}
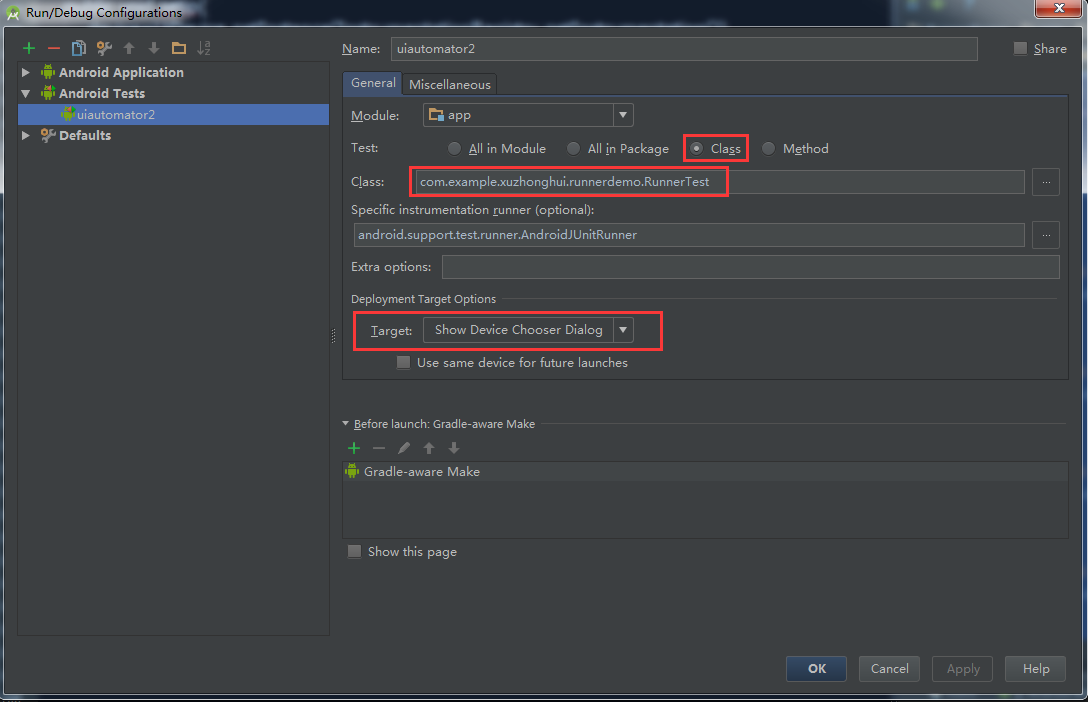
8)代码写好后需要重新配置一下运行器,配置图如下:
-
配置说明:
a.在Test中选中测试类,然后将刚刚写好测试代码的那个类添加进去,也就是标红的位置了
b.show device chooser Dialog表示弹出一个选择目标设备的对话框
9)然后运行即可
- 注意事项:
我第一次按照上述步骤运行的时候就出现了问题,具体原理暂时还没搞清楚,以后明白了补上,问题和解决方案请参考这里:http://blog.csdn.net/qq_26967883/article/details/50477071的第一条:Excution faild for task ‘:app:transformResourcesWithMergeJavaResForDebug’
4.Instrument命令简单使用
#列出手机中所有已安装的包,界面中可以看到刚刚使用Android Studio安装的包
adb shell pm list instrumentation

#该命令中不打印详细日志,-e后面的参数是刚刚Android Studio中创建用例的<packageName>.<className>
adb shell am instrument -w -e class com.example.xuzhonghui.runnerdemo.RunnerTest com.example.xuzhonghui.runnerdemo.test/android.support.test.runner.AndroidJUnitRunner

#跟上一条命令相比,只是多了一个<-r>参数,是让他输出详细的运行日志,相当于eclipes调试uiautomator的时候输出的日志
adb shell am instrument -w -r -e class com.example.xuzhonghui.runnerdemo.RunnerTest com.example.xuzhonghui.runnerdemo.test/android.support.test.runner.AndroidJUnitRunner

#跟上一条相比多了一个-p+file的参数,目的是为了将运行日志保存到.trace文件中。使用该命令要先在adb shell 模式下在设备中使用命令"touch runner.trace"创建一个自定义名称的.trace文件
adb shell am instrument -w -r -p /data/local/tmp/runner.trace -e class com.example.xuzhonghui.runnerdemo.RunnerTest com.example.xuzhonghui.runnerdemo.test/android.support.test.runner.AndroidJUnitRunner
三、Android JUnit Runner过滤与例子
1.过滤器
| 过滤参数 | 说明 |
| -e testFile | 运行文件中指定的用例 |
| -e package | 运行这个包中的所有用例 |
| -e size [small|medium|large] | 运行注释Small/MediumTest/largeTest的用例 |
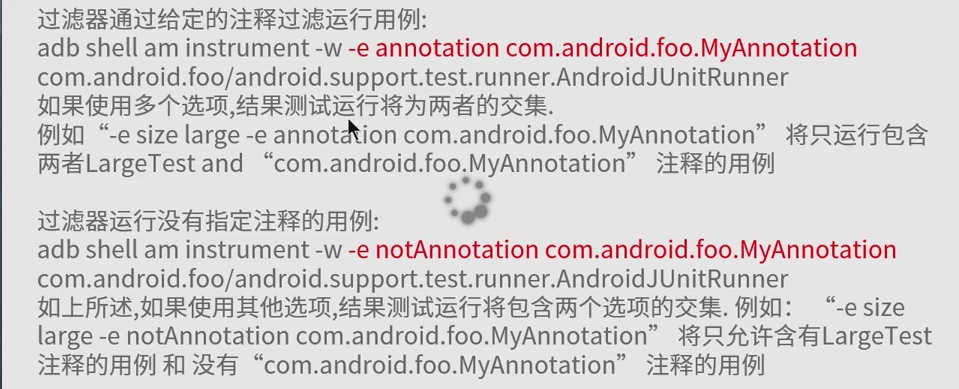
| -e annotation | 运行指定注释的用例 |
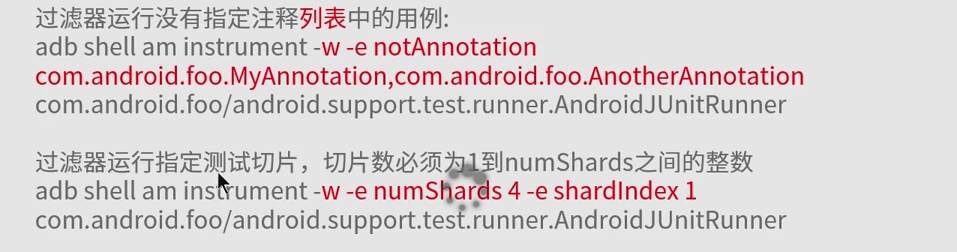
| -e notAnnotation | 运行不包含指定注释的用例 |
| -e numShards | 将用例分割成不同的切片 |
| -e shardIndex | 运行指定切片id的用例 |
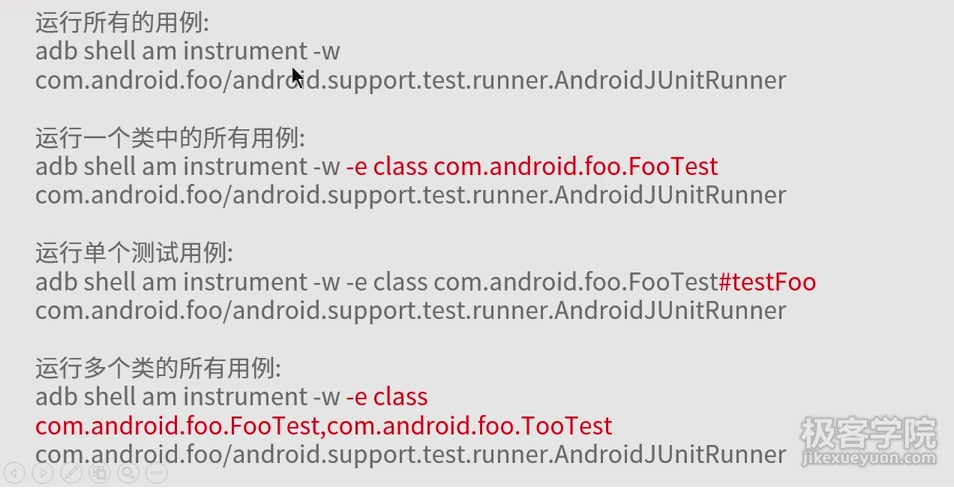
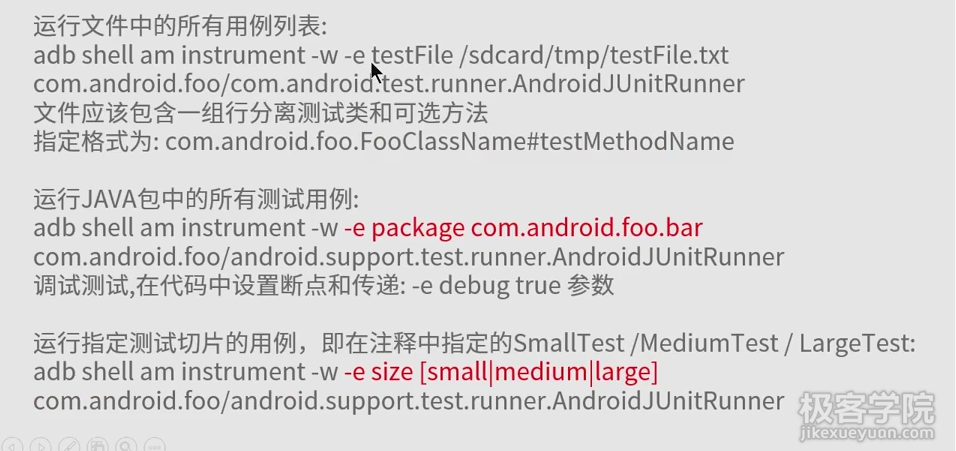
2.例子
3.实例
1)首先修改一下上面使用Android Studio创建的用例代码,多加几个测试方法,我这里加了10个,都是按键信息,加完后记得先跑一次,把包push到手机中
#列出手机中所有已安装的包找到com.example.xuzhonghui.runnerdemo.test/android.support.test.runner.AndroidJUnitRunner就是我们使用Android创建并安装到手机中的包
adb shell pm list instrumentation

#运行全部用例,没有日志信息
C:\Users\xuzhonghui>adb shell am instrument -w com.example.xuzhonghui.runnerdemo.test/android.support.test.runner.AndroidJUnitRunner

#运行全部用例,有日志信息
C:\Users\xuzhonghui>adb shell am instrument -w -r com.example.xuzhonghui.runnerdemo.test/android.support.test.runner.AndroidJUnitRunner

#运行指定类的用例(指定类=包名.类名)
C:\Users\xuzhonghui>adb shell am instrument -w -r -r class com.example.xuzhonghui.runnerdemo.RunnerTest com.example.xuzhonghui.runnerdemo.test/android.support.test.runner.AndroidJUnitRunner

#运行指定类中的某一条用例(在指定类后面加一个"#用例名")
C:\Users\xuzhonghui>adb shell am instrument -w -r -r class com.example.xuzhonghui.runnerdemo.RunnerTest#test3 com.example.xuzhonghui.runnerdemo.test/android.support.test.runner.AndroidJUnitRunner

#运行多个类的用例,运行前先在之前先在Android Studio中多创建一个类并复制几条用例进去方便(这里只演示两个类,多个类同理,加个逗号即可)
C:\Users\xuzhonghui>adb shell am instrument -w -r -r class com.example.xuzhonghui.runnerdemo.RunnerTest,com.example.xuzhonghui.runnerdemo.RunnerTest2 com.example.xuzhonghui.runnerdemo.test/android.support.test.runner.AndroidJUnitRunner
创建一个.txt文档,文档内容如下图,然后使用命令”adb push F:\testFile.txt /data/local/tmp”将文档push到手机中
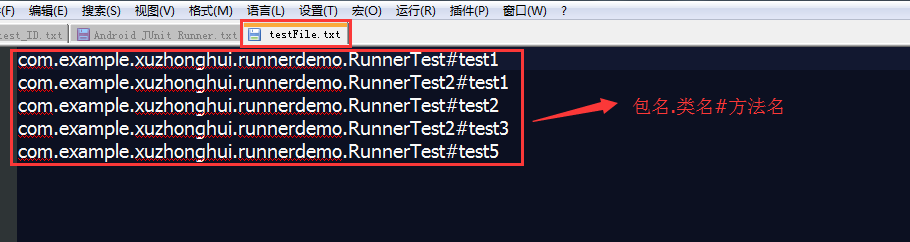
#运行刚刚.txt文件中指定的用例
adb shell am instrument -w -r -e testFile /data/local/tmp/testFile.txt com.example.xuzhonghui.runnerdemo.test/android.support.test.runner.AndroidJUnitRunner

#运行com.example.xuzhonghui.runnerdemo包里的所有用例
adb shell am instrument -w -r -e package com.example.xuzhonghui.runnerdemo com.example.xuzhonghui.runnerdemo.test/android.support.test.runner.AndroidJUnitRunner
修改一下之前在Android Studio中创建的用例,增加几个注释,结果如下图(记得修改完后先在手机上运行一下):
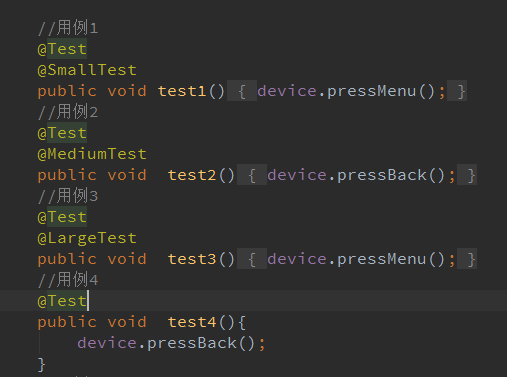
#运行刚刚注释为small的用例
adb shell am instrument -w -r -e size small com.example.xuzhonghui.runnerdemo.test/android.support.test.runner.AndroidJUnitRunner

#运行刚刚注释为medium的用例
adb shell am instrument -w -r -e size medium com.example.xuzhonghui.runnerdemo.test/android.support.test.runner.AndroidJUnitRunner

#运行刚刚注释为large的用例
adb shell am instrument -w -r -e size large com.example.xuzhonghui.runnerdemo.test/android.support.test.runner.AndroidJUnitRunner
修改AndroidStudio中的用例,上一步中的smallText注释的Import找到注释方法的编写,然后根据这个自己来编写注释方法,编写好的方法如下图:
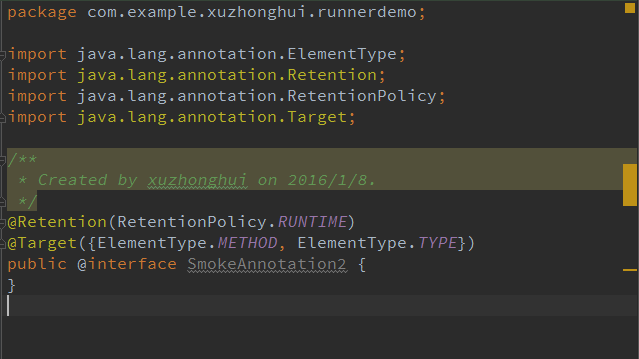
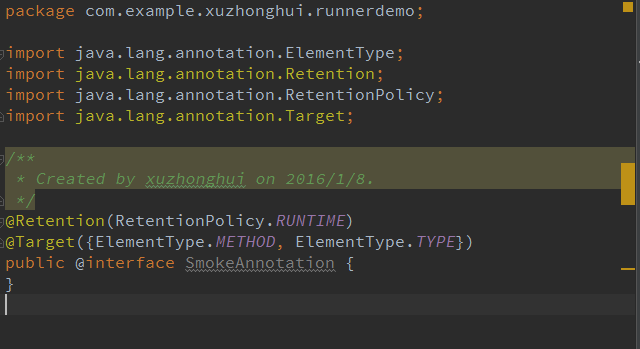
编写好后,按照上一步的方式将注释加入到用例中,修改好用例后记得先运行一次
#运行指定自定义注释SmokeAnnotation的用例(这里需要注意的是annotation后面的跟的是自己编写的注释的<包名>.<类名>)
adb shell am instrument -w -r  -e annotation com.example.xuzhonghui.runnerdemo.SmokeAnnotation com.example.xuzhonghui.runnerdemo.test/android.support.test.runner.AndroidJUnitRunner

#运行除指定自定义注释SmokeAnnotation的所有其他用例
adb shell am instrument -w -r  -e notAnnotation com.example.xuzhonghui.runnerdemo.SmokeAnnotation com.example.xuzhonghui.runnerdemo.test/android.support.test.runner.AndroidJUnitRunner
四、Android JUnit Runner参数
主要是用在白盒测试上的,而不是UiAutomator,有兴趣可以深入研究下
| 参数 | 说明 |
| -e log true | 只在日志模式下运行 这个选项将加载和遍历所有测试的类和方法,但会绕过实际测试执行。用于快速获取信息要执行的测试的仪器命令 |
| -e coverage true | 生成代码覆盖率 这需要一个EMMA的构建。默认情况下,代码覆盖率结果文件将被保存在/data//coverage.ec文件,除非有coverageFile标志 |
| -e coverageFile | 指定代码覆盖率文件保存路径 -e coverageFile /sdcard/myFile.ec |
| -e listener | 指定一个或多个RunListeners观察测试运行 -e listener com.foo.Listener,com.foo.Listener2 |
| -e timeout_mse | 设置超时时间(单位:毫秒)将被应用到每一个测试 -e timeout_mec 5000 |
| -e disableAnlytics true | 禁用谷歌分析 |
- 参数还可以在AndroidMainfest文件中进行指定
如何使用监听器:
实际使用过程中,只需在AndroidManifect清单文件中加入上面代码即可,实际使用参考下图

- 参数通过shell命令传入将覆盖清单指定参数


 1029
1029

 被折叠的 条评论
为什么被折叠?
被折叠的 条评论
为什么被折叠?
 到【灌水乐园】发言


