


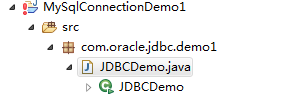
1.java连接MySql数据库
代码区域:
|
1
2
3
4
5
6
7
8
9
10
11
12
13
14
15
16
17
18
19
20
21
22
23
24
25
26
27
28
29
30
31
32
33
34
35
36
37
38
39
40
41
42
43
|
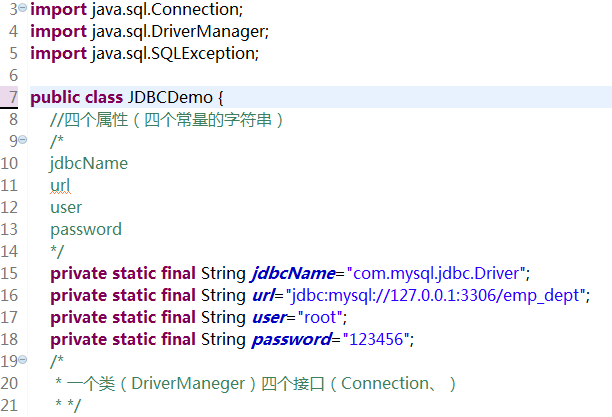
package
com.oracle.jdbc.demo1;
import
java.sql.Connection;
import
java.sql.DriverManager;
import
java.sql.SQLException;
public
class
JDBCDemo {
//四个属性(四个常量的字符串)
/*
jdbcName
url
user
password
*/
private
static
final
String jdbcName=
"com.mysql.jdbc.Driver"
;
private
static
final
String url=
"jdbc:mysql://127.0.0.1:3306/emp_dept"
;
private
static
final
String user=
"root"
;
private
static
final
String password=
"123456"
;
/*
* 一个类(DriverManeger)四个接口(Connection、)
* */
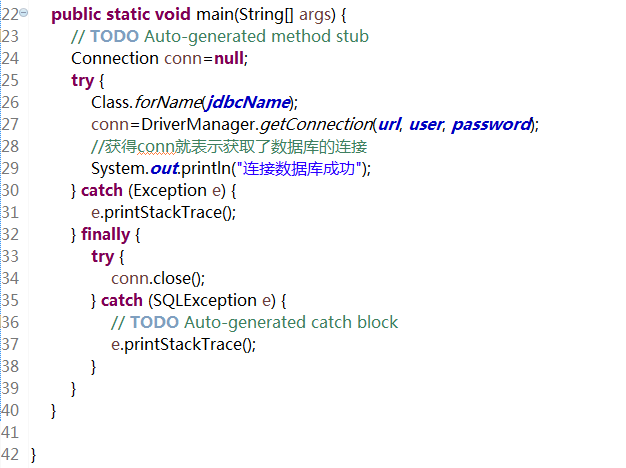
public
static
void
main(String[] args) {
// TODO Auto-generated method stub
Connection conn=
null
;
try
{
Class.forName(jdbcName);
conn=DriverManager.getConnection(url, user, password);
//获得conn就表示获取了数据库的连接
System.out.println(
"连接数据库成功"
);
}
catch
(Exception e) {
e.printStackTrace();
}
finally
{
try
{
conn.close();
}
catch
(SQLException e) {
// TODO Auto-generated catch block
e.printStackTrace();
}
}
}
}
|
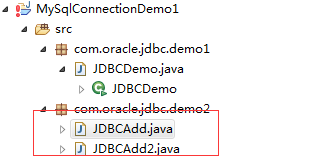
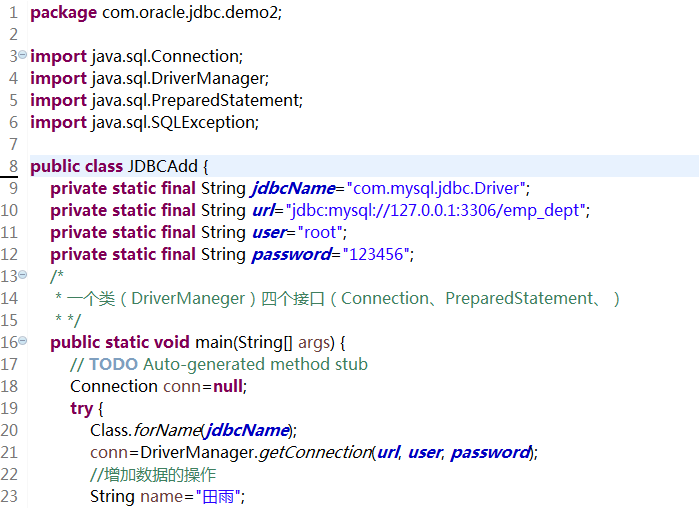
2.在java中向数据库添加数据
第一种方法:添加数据
代码区域:
|
1
2
3
4
5
6
7
8
9
10
11
12
13
14
15
16
17
18
19
20
21
22
23
24
25
26
27
28
29
30
31
32
33
34
35
36
37
38
39
40
41
42
|
package
com.oracle.jdbc.demo2;
import
java.sql.Connection;
import
java.sql.DriverManager;
import
java.sql.PreparedStatement;
import
java.sql.SQLException;
public
class
JDBCAdd {
private
static
final
String jdbcName=
"com.mysql.jdbc.Driver"
;
private
static
final
String url=
"jdbc:mysql://127.0.0.1:3306/emp_dept"
;
private
static
final
String user=
"root"
;
private
static
final
String password=
"123456"
;
/*
* 一个类(DriverManeger)四个接口(Connection、PreparedStatement、)
* */
public
static
void
main(String[] args) {
// TODO Auto-generated method stub
Connection conn=
null
;
try
{
Class.forName(jdbcName);
conn=DriverManager.getConnection(url, user, password);
//增加数据的操作
String name=
"田雨"
;
String sex=
"女"
;
String sql=
"insert into person values(null,'"
+name+
"','"
+sex+
"')"
;
PreparedStatement pst=conn.prepareStatement(sql);
//准备执行sql语句
int
i=pst.executeUpdate();
//返回成功插入数据的行数
System.out.println(
"成功添加了"
+i+
"条记录"
);
}
catch
(Exception e) {
e.printStackTrace();
}
finally
{
try
{
conn.close();
}
catch
(SQLException e) {
// TODO Auto-generated catch block
e.printStackTrace();
}
}
}
}
|
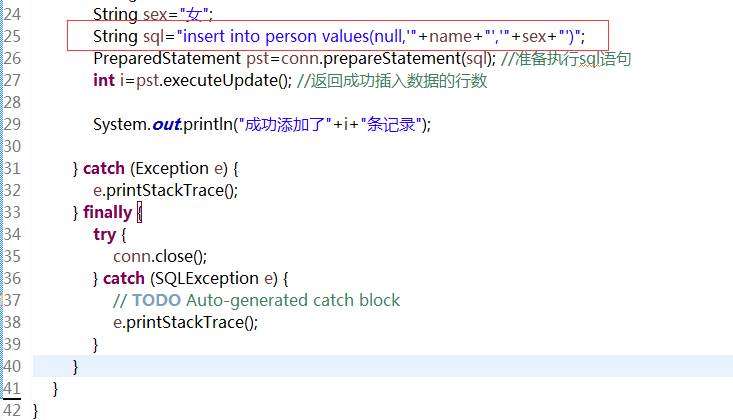
第二中方法:添加数据
代码区域:
|
1
2
3
4
5
6
7
8
9
10
11
12
13
14
15
16
17
18
19
20
21
22
23
24
25
26
27
28
29
30
31
32
33
34
35
36
37
38
39
40
41
42
43
44
45
46
|
package
com.oracle.jdbc.demo2;
import
java.sql.Connection;
import
java.sql.DriverManager;
import
java.sql.PreparedStatement;
import
java.sql.SQLException;
public
class
JDBCAdd2 {
private
static
final
String jdbcName=
"com.mysql.jdbc.Driver"
;
private
static
final
String url=
"jdbc:mysql://127.0.0.1:3306/emp_dept"
;
private
static
final
String user=
"root"
;
private
static
final
String password=
"123456"
;
/*
* 一个类(DriverManeger)四个接口(Connection、PreparedStatement、)
* */
public
static
void
main(String[] args) {
// TODO Auto-generated method stub
Connection conn=
null
;
try
{
Class.forName(jdbcName);
conn=DriverManager.getConnection(url, user, password);
//增加数据的操作
String name=
"田雨2"
;
String sex=
"女"
;
String sql=
"insert into person values(null,?,?)"
;
PreparedStatement pst=conn.prepareStatement(sql);
//准备执行sql语句
pst.setString(
1
, name);
//填充第1个问好
pst.setString(
2
, sex);
//填充第2个问好
int
i=pst.executeUpdate();
//返回成功插入数据的行数
System.out.println(
"成功添加了"
+i+
"条记录"
);
}
catch
(Exception e) {
e.printStackTrace();
}
finally
{
try
{
conn.close();
}
catch
(SQLException e) {
// TODO Auto-generated catch block
e.printStackTrace();
}
}
}
}
|
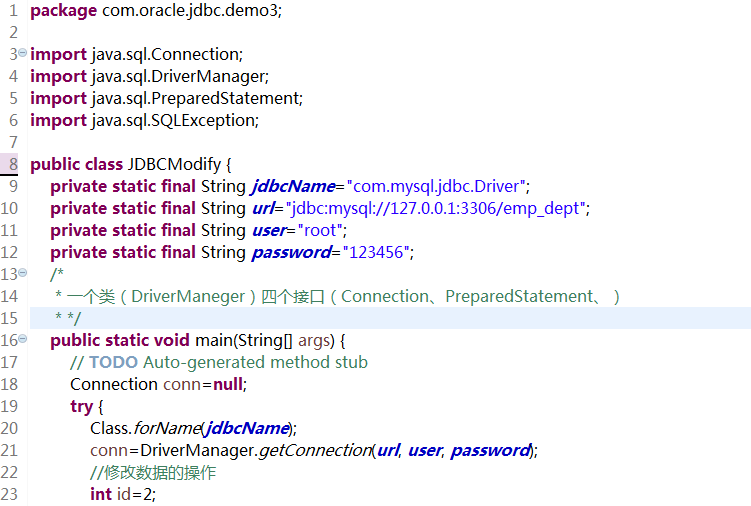
3.在java中修改数据库的内容
代码区域:
|
1
2
3
4
5
6
7
8
9
10
11
12
13
14
15
16
17
18
19
20
21
22
23
24
25
26
27
28
29
30
31
32
33
34
35
36
37
38
39
40
41
42
43
44
|
package
com.oracle.jdbc.demo3;
import
java.sql.Connection;
import
java.sql.DriverManager;
import
java.sql.PreparedStatement;
import
java.sql.SQLException;
public
class
JDBCModify {
private
static
final
String jdbcName=
"com.mysql.jdbc.Driver"
;
private
static
final
String url=
"jdbc:mysql://127.0.0.1:3306/emp_dept"
;
private
static
final
String user=
"root"
;
private
static
final
String password=
"123456"
;
/*
* 一个类(DriverManeger)四个接口(Connection、PreparedStatement、)
* */
public
static
void
main(String[] args) {
// TODO Auto-generated method stub
Connection conn=
null
;
try
{
Class.forName(jdbcName);
conn=DriverManager.getConnection(url, user, password);
//修改数据的操作
int
id=
2
;
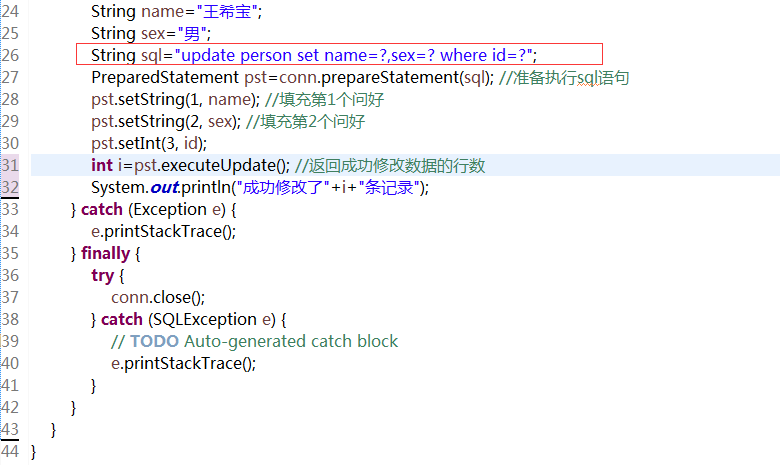
String name=
"王希宝"
;
String sex=
"男"
;
String sql=
"update person set name=?,sex=? where id=?"
;
PreparedStatement pst=conn.prepareStatement(sql);
//准备执行sql语句
pst.setString(
1
, name);
//填充第1个问好
pst.setString(
2
, sex);
//填充第2个问好
pst.setInt(
3
, id);
int
i=pst.executeUpdate();
//返回成功修改数据的行数
System.out.println(
"成功修改了"
+i+
"条记录"
);
}
catch
(Exception e) {
e.printStackTrace();
}
finally
{
try
{
conn.close();
}
catch
(SQLException e) {
// TODO Auto-generated catch block
e.printStackTrace();
}
}
}
}
|
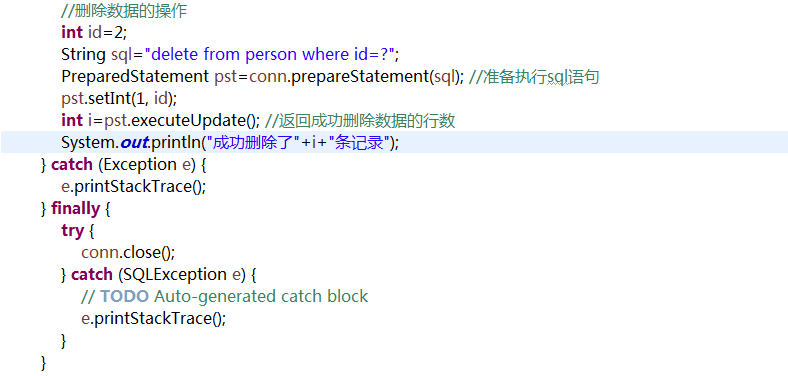
4.在java中删除数据库的内容

代码区域:
|
1
2
3
4
5
6
7
8
9
10
11
12
13
14
15
16
17
18
19
20
21
22
23
24
25
26
27
28
29
30
31
32
33
34
35
36
37
38
39
40
41
42
43
44
45
|
package
com.oracle.jdbc.demo4;
import
java.sql.Connection;
import
java.sql.DriverManager;
import
java.sql.PreparedStatement;
import
java.sql.SQLException;
public
class
JDBCDel {
private
static
final
String jdbcName=
"com.mysql.jdbc.Driver"
;
private
static
final
String url=
"jdbc:mysql://127.0.0.1:3306/emp_dept"
;
private
static
final
String user=
"root"
;
private
static
final
String password=
"123456"
;
/*
* 一个类(DriverManeger)四个接口(Connection、PreparedStatement、)
* */
public
static
void
main(String[] args) {
// TODO Auto-generated method stub
Connection conn=
null
;
try
{
Class.forName(jdbcName);
conn=DriverManager.getConnection(url, user, password);
//删除数据的操作
int
id=
2
;
String sql=
"delete from person where id=?"
;
PreparedStatement pst=conn.prepareStatement(sql);
//准备执行sql语句
pst.setInt(
1
, id);
int
i=pst.executeUpdate();
//返回成功删除数据的行数
System.out.println(
"成功删除了"
+i+
"条记录"
);
}
catch
(Exception e) {
e.printStackTrace();
}
finally
{
try
{
conn.close();
}
catch
(SQLException e) {
// TODO Auto-generated catch block
e.printStackTrace();
}
}
}
}
|
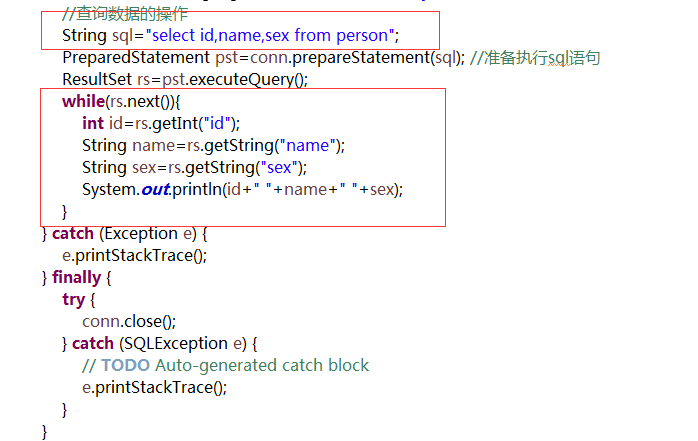
5.在java中查看数据库的内容

代码区域:
|
1
2
3
4
5
6
7
8
9
10
11
12
13
14
15
16
17
18
19
20
21
22
23
24
25
26
27
28
29
30
31
32
33
34
35
36
37
38
39
40
41
42
43
44
45
46
47
|
package
com.oracle.jdbc.demo5;
import
java.sql.Connection;
import
java.sql.DriverManager;
import
java.sql.PreparedStatement;
import
java.sql.ResultSet;
import
java.sql.SQLException;
public
class
JDBCFindAll {
private
static
final
String jdbcName=
"com.mysql.jdbc.Driver"
;
private
static
final
String url=
"jdbc:mysql://127.0.0.1:3306/emp_dept"
;
private
static
final
String user=
"root"
;
private
static
final
String password=
"123456"
;
/*
* 一个类(DriverManeger)四个接口(Connection、PreparedStatement、ResultSet、)
* */
public
static
void
main(String[] args) {
// TODO Auto-generated method stub
Connection conn=
null
;
try
{
Class.forName(jdbcName);
conn=DriverManager.getConnection(url, user, password);
//查询数据的操作
String sql=
"select id,name,sex from person"
;
PreparedStatement pst=conn.prepareStatement(sql);
//准备执行sql语句
ResultSet rs=pst.executeQuery();
while
(rs.next()){
int
id=rs.getInt(
"id"
);
String name=rs.getString(
"name"
);
String sex=rs.getString(
"sex"
);
System.out.println(id+
" "
+name+
" "
+sex);
}
}
catch
(Exception e) {
e.printStackTrace();
}
finally
{
try
{
conn.close();
}
catch
(SQLException e) {
// TODO Auto-generated catch block
e.printStackTrace();
}
}
}
}
|


 1万+
1万+


 被折叠的 条评论
为什么被折叠?
被折叠的 条评论
为什么被折叠?
 到【灌水乐园】发言


