


首先推荐一个链接,这边有视频指导。
http://www.cnblogs.com/niunan/p/6440297.html
我的不是和牛腩一样,我的是在本地vm建立的Centos系统。
首先下载Centos系统。下载地址:http://101.96.10.40/isoredirect.centos.org/centos/7/isos/x86_64/CentOS-7-x86_64-DVD-1708.iso,我选的是阿里云的那个。
vm安装时候若要界面的话。
需要在安装时候修改
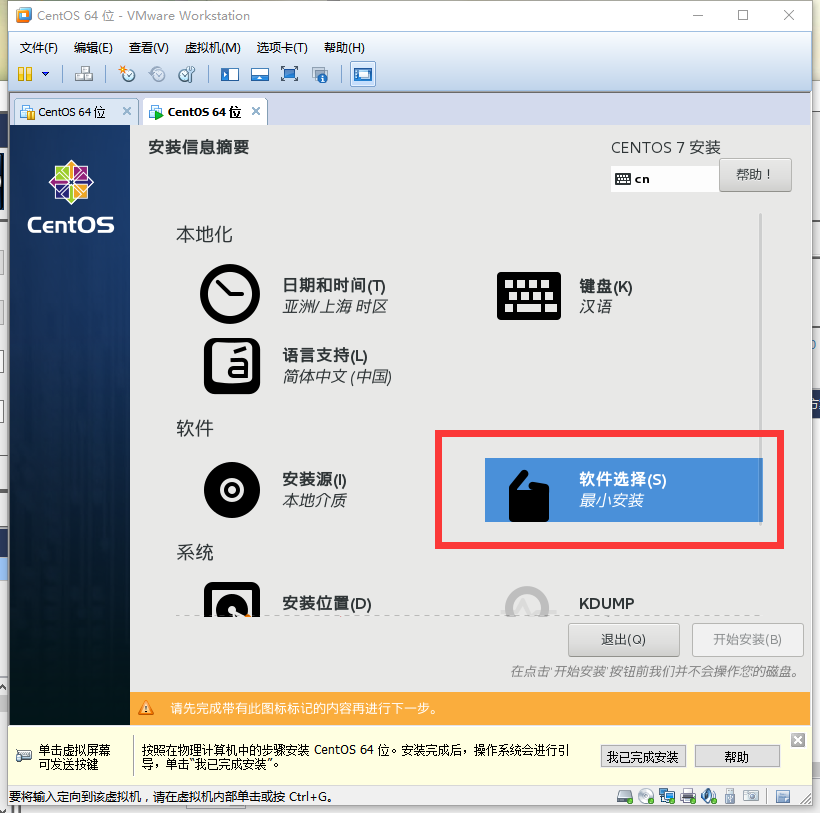
红框里面的选项。
安装完后记得打开系统的网络。

如果出现宿主机,也就是你电脑本身的系统不能访问vm虚拟机里发布的web网站。可以参考:http://blog.csdn.net/u012540337/article/details/16966223
接下来是安装NetCore。
进入命令模式。
登陆root用户。查询本机IP 命令是:ifconfig
然后可以使用
PuTTY连接虚拟机。就没有虚拟机什么事了。哈哈。至于PuTTY自己百度下,就有了。
在PuTTY中输入虚拟机IP。如下图:

端口默认就行。
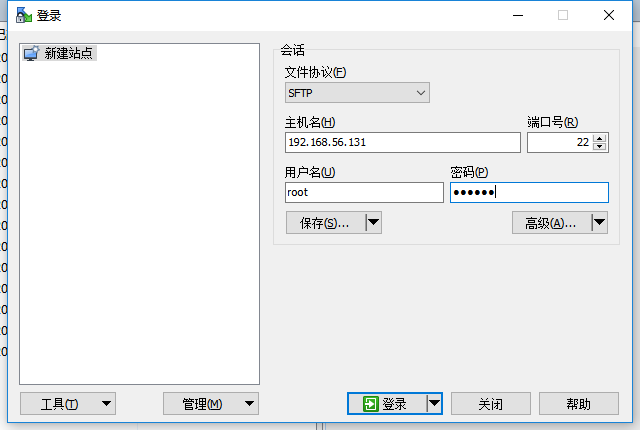
继续下载一个Ftp文件传输工具WinSCP,下载地址:https://sourceforge.net/projects/winscp/files/WinSCP/5.11.2/WinSCP-5.11.2-Setup.exe/download
链接上VM虚拟机。
工具准备好了,开始安装NetCore。
NetCore网址:http://www.microsoft.com/net/learn/get-started/linuxcentos
在网页里复制好了,可以在PuTTY里右键直接就有了,很方便。

2步安装,NetCore。
.Net Core环境搭建好了,可以使用dotnet --version查看版本号。
安装Nginx。(用于代理转发)
可以去这里看。https://www.cnblogs.com/duyao/p/6021912.html
1.添加CentOS 7 EPEL存储库:
yum install epel-release
2.Nginx存储库安装在您的服务器上,使用以下yum命令安装Nginx:
yum install nginx
3.启用Nginx,设置开机启动
systemctl start nginx #启用Nginx

systemctl enable nginx #设置开机启动
4.在虚拟机里用浏览器或者在宿主浏览器输入localhost/http:ip能访问到nginx主页
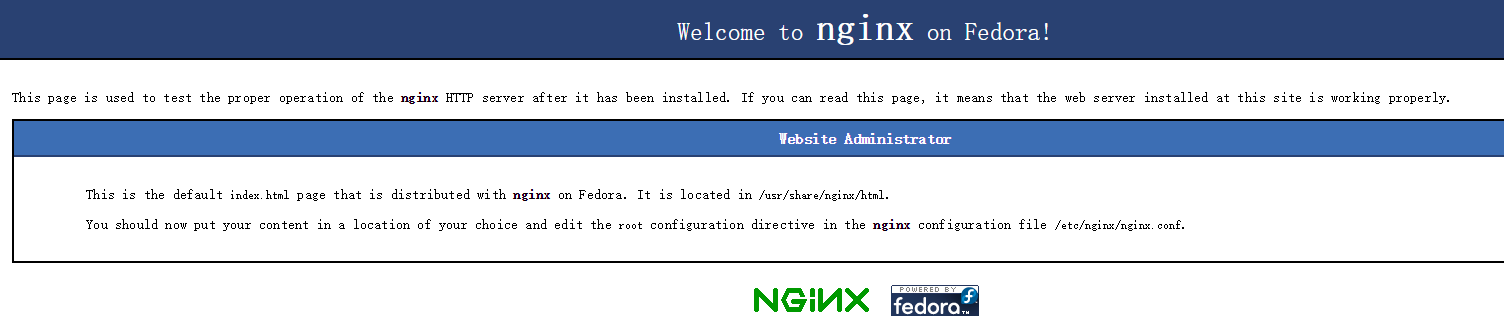
(偷的图...)类似就OK啦。
5.配置转发规则。
修改配置,监听5000端口:路径为:/etc/nginx/nginx.conf
server {
    listen       80;
    server_name  localhost;

    #charset koi8-r;
    #access_log  /var/log/nginx/host.access.log  main;

    location / {
        # 传递真实IP到后端
        proxy_set_header Host $http_host;
        proxy_set_header X-Real-IP $remote_addr;
        proxy_set_header X-Forwarded-For $proxy_add_x_forwarded_for;
        proxy_pass  http://localhost:5000;
    }

    #error_page  404              /404.html;

    # redirect server error pages to the static page /50x.html
    #
    error_page   500 502 503 504  /50x.html;
    location = /50x.html {
        root   /usr/share/nginx/html;
    }

    # proxy the PHP scripts to Apache listening on 127.0.0.1:80
    #
    #location ~ \.php$ {
    #    proxy_pass   http://127.0.0.1;
    #}

    # pass the PHP scripts to FastCGI server listening on 127.0.0.1:9000
    #
    #location ~ \.php$ {
    #    root           html;
    #    fastcgi_pass   127.0.0.1:9000;
    #    fastcgi_index  index.php;
    #    fastcgi_param  SCRIPT_FILENAME  /scripts$fastcgi_script_name;
    #    include        fastcgi_params;
    #}

    # deny access to .htaccess files, if Apache's document root
    # concurs with nginx's one
    #
    #location ~ /\.ht {
    #    deny  all;
    #}
}
嗯,这个是我的。就加了中间那个location那段。
6.验证是否转发成功。
很简单,宿主机直接http://ip看是不是你的web网站。(记得开启netcore。命令 dotnet xxxx.dll)
在配置完后若出现错误可以先尝试用这个命令将selinux关闭。
setsebool -P httpd_can_network_connect 1
安装supervisor
相关介绍参看:http://www.cnblogs.com/savorboard/p/dotnetcore-supervisor.html
1.安装Supervisor 。
yum install python-setuptools

easy_install supervisor

mkdir /etc/supervisor #创建目录

echo_supervisord_conf > /etc/supervisor/supervisord.conf  #配置文件
2.配置Supervisor。
在/etc/supervisor/conf.d/(如果没有,就创建目录)下新建个名字为CentosWebDemo.conf(名字xxx.conf就行)配置,(偷来的)
[program:WebApplication1] #你的项目名称xxx
command=dotnet WebApplication1.dll  #你的项目名称xxx.dll
directory=/root/wwwroot/  #这里是你的web放置的路径
environment=ASPNETCORE__ENVIRONMENT=Production
user=root  #超级用户
stopsignal=INT
autostart=true
autorestart=true
startsecs=1
stderr_logfile=/var/log/WebApplication1.err.log  #你的项目名称xxx.err.log
stdout_logfile=/var/log/WebApplication1.out.log  #你的项目名称xxx.out.log
注意,最好将注释的全部删了,就是#后面的。
3.配置完了之后,需要修改/etc/supervisor/supervisord.conf文件。
最底部的[include]修改为:
[include]
files = /etc/supervisor/conf.d/*.conf
然后需要把supervisord重新加载:
supervisord -c /etc/supervisor/supervisord.conf
4.打开服务。
ps -ef | grep WebApplication1 #WebApplication1 改为你保存在conf.d文件夹下文件的名字。忽略后面的conf。像这边我就是 ps -ef | grep WebApplication1 这个命令

出现这个说明成功了。试试看直接访问http://ip是不是你的.NetCore网站。如果不是,好好看看估计哪里路径啊什么的错误了。(我这边的WebApplication.dll根目录为/root/wwwroot,有的centos版本可以省略/root)
5.Supervisor 的常用命令。
supervisorctl shutdown #关闭所有任务

supervisorctl stop|start program_name  开启或者停止任务

supervisorctl status #查看所有任务状态
6.这时候Supervisor相关配置完了,设置开机启动,这样就不用每次重启服务器还需要启用守护进程了。
在/usr/lib/systemd/system/目录新建个supervisord.service文件,内容如下:
# dservice for systemd (CentOS 7.0+)
  # by ET-CS (https://github.com/ET-CS)
  [Unit]
  Description=Supervisor daemon

  [Service]
  Type=forking
  ExecStart=/usr/bin/supervisord -c /etc/supervisor/supervisord.conf
  ExecStop=/usr/bin/supervisorctl shutdown
  ExecReload=/usr/bin/supervisorctl reload
  KillMode=process
  Restart=on-failure
  RestartSec=42s

  [Install]
  WantedBy=multi-user.target
可以看看路径是否和你配置的一样,可能需要修改。
设置开机启动:
systemctl enable supervisord 设置为开机启动

出现类似这种就说明设置开启成功。
好了,至此全部任务完成。你可以重启你的系统试试,看看重启后能否直接访问,访问到的是不是你.NetCore网站。
谢谢浏览。


 149
149


 被折叠的 条评论
为什么被折叠?
被折叠的 条评论
为什么被折叠?
 到【灌水乐园】发言


