


一直对Asp.Net的MVC中的AuthorizeAttribute控制登录感到很困惑,这几天研究了一下,大概了解了一下整个流程,写出来记录一下。
场景:1.即使没有登录,也可以访问一些可以匿名访问的Action。
2.对于登录来说,如果在某个地方登录成功,那么在缓存没清除或者过期之前,下次再进入该系统的话,正常情况是不需要再次登录的。
3.对于需要登录的Action,如果匿名请求,那么需要跳转到登录页面。
如以下流程图:
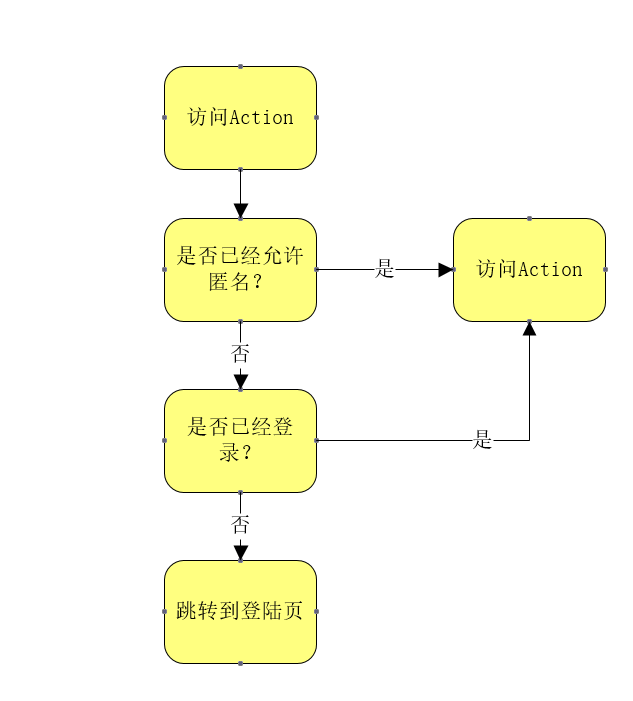
这张流程图只是大概描述了一下登录的过程。还有其他的细节,暂不考虑。
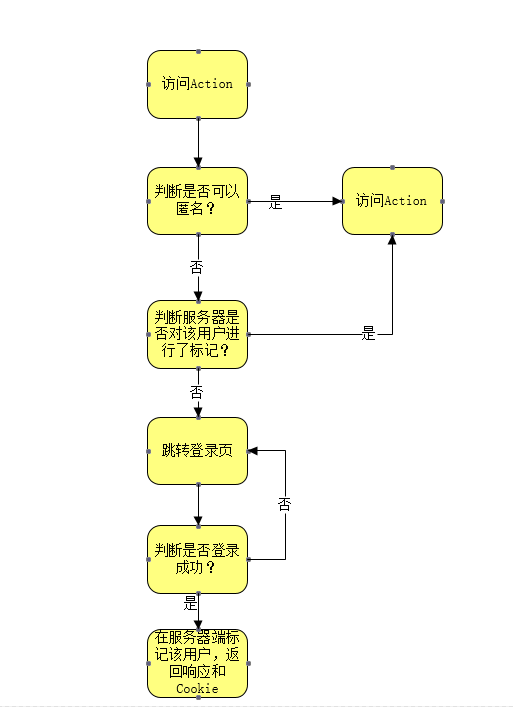
再说一下AuthorizeAttribute的验证原理:
验证登录的机制,无非是根据请求的数据判断用户是否已经登录。AuthorizeAttribute进行权限判断的依据是如果登录成功在浏览器中设置加密Cookie,每次发送请求都把Cookie发送回服务器进行验证。
我根据自己的理解。画了如下流程图。
下面只列出部分关键代码:
1.创建User类,继承自Microsoft.AspNet.Identity.IUser,实现UserName属性。


   public class User : IUser
    {
        public User(List<string> tels, List<string> mails, string password)
        {
            Id = Guid.NewGuid().ToString("N");
            Tels = tels;
            Mails = mails;
            Password = password;
        }

        public string Id { get; set; }

        public string Password { get; set; }

        public string Name { get; set; }

        public string Address { get; set; }

        public List<string> Tels { get; set; }

        public List<string> Mails { get; set; }

        public string Company { get; set; }

        public string Job { get; set; }

        public string Image { get; set; }


        public string UserName
        {
            get
            {
                return Name;
            }
            set
            {
                Name = value;
            }
        }
    }
2.创建了IUserService接口,继承自Microsoft.AspNet.Identity.IUserStore<User>;;
    public interface IUserService : IUserStore<User>
    {
        bool RegisterByTel(string tel, string pwd);

        bool RegisterByMail(string mail, string pwd);

        bool LoginByTel(User user);

        bool LoginByMail(string mail, string pwd);

        bool UpdateUser(LinkMan linkMan);

        bool LoginByMail(User user);
    }
3.创建自定义验证其,继承自AuthorizeAttribute,并且添加到全局过滤:
  public class FilterConfig
    {
        public static void RegisterGlobalFilters(GlobalFilterCollection filters)
        {
            filters.Add(new HandleErrorAttribute());
            filters.Add(new MyAuthorizeAttribute());
        }
    }

    public class MyAuthorizeAttribute : AuthorizeAttribute
    {
        public override void OnAuthorization(AuthorizationContext filterContext)
        {
            if (!filterContext.HttpContext.User.Identity.IsAuthenticated) // 未登录
            {
                var attr = filterContext.ActionDescriptor.GetCustomAttributes(typeof(AllowAnonymousAttribute), true);
                bool allowAnonymous = attr.Any(a => a != null);
                if (allowAnonymous)
                    return;

                var identityName = filterContext.HttpContext.User.Identity.Name;
                if (string.IsNullOrEmpty(identityName))
                {
                    filterContext.Result = new RedirectResult("/Default/Login/Index");
                }
            }
            base.OnAuthorization(filterContext);
        }
    }
该过滤器,只是简单的过滤器,没太复杂的业务逻辑。
4.在登录成功后,设置标记。
   user.UserName = telOrMail;
                var identity = new Microsoft.AspNet.Identity.UserManager<User>(ServiceFactory.NewUserService()).CreateIdentityAsync(user, DefaultAuthenticationTypes.ApplicationCookie).Result;
                HttpContext.GetOwinContext().Authentication.SignIn(new AuthenticationProperties() { IsPersistent = true }, identity);
这里只列出了关键代码,没列出登录的所有代码,
以上的这些步骤就实现了所列出的3个场景。


 1710
1710


 被折叠的 条评论
为什么被折叠?
被折叠的 条评论
为什么被折叠?
 到【灌水乐园】发言


