


虚机准备
模板机准备
查看目前模板机的信息
主机名
[root@mobanji ~]# hostname
mobanji
主机IP
[root@mobanji ~]# ip addr|sed -nr 's#^.*inet (.*)/24.*$#\1#gp'
20.0.0.5 <---net 模式的IP
10.0.0.5 <---host 模式的IP
主机版本
[root@mobanji ~]# cat /etc/redhat-release
CentOS Linux release 7.6.1810 (Core)
内核版本
[root@mobanji ~]# uname -r
3.10.0-957.10.1.el7.x86_64
主机内存
[root@mobanji ~]# free -h
total used free shared buff/cache available
Mem: 1.9G 87M 1.7G 9.5M 105M 1.7G
Swap: 3.0G 0B 3.0G
CPU个数
[root@mobanji ~]# grep 'physical id' /proc/cpuinfo | sort -u | wc -l
2
每个CPU核数
[root@mobanji ~]# grep 'core id' /proc/cpuinfo | sort -u | wc -l
2
内核升级
原因:
CentOS 7.x系统自带的3.10.x内核存在一些Bugs,导致运行的Docker、Kubernetes不稳定,例如:
-> 高版本的 docker(1.13 以后) 启用了3.10 kernel实验支持的kernel memory account功能(无法关闭),当节点压力大如频繁启动和停止容器时会导致 cgroup memory leak;
-> 网络设备引用计数泄漏,会导致类似于报错:"kernel:unregister_netdevice: waiting for eth0 to become free. Usage count = 1";
解决方案如下:
-> 升级内核到 4.4.X 以上;
-> 或者,手动编译内核,disable CONFIG_MEMCG_KMEM 特性;
-> 或者安装修复了该问题的 Docker 18.09.1 及以上的版本。但由于 kubelet 也会设置 kmem(它 vendor 了 runc),所以需要重新编译 kubelet 并指定 GOFLAGS="-tags=nokmem";
这里选择升级内核:
升级内核之前先给模板机做快照
[root@mobanji ~]# init 0
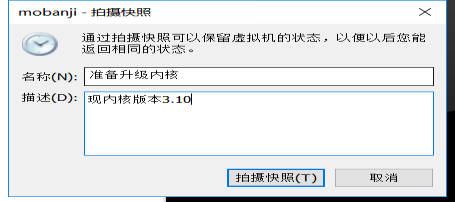
升级内核前的快照
升级内核
升级Centos 7.X内核,启用elrepo
大多数现代发行版提供了一种使用 yum 等包管理系统和官方支持的仓库升级内核的方法
增加epel仓库
升级内核需要先导入elrepo的钥匙,然后安装elrepo的源:
[root@mobanji ~]# rpm --import https://www.elrepo.org/RPM-GPG-KEY-elrepo.org
[root@mobanji ~]# rpm -Uvh http://www.elrepo.org/elrepo-release-7.0-3.el7.elrepo.noarch.rpm
获取http://www.elrepo.org/elrepo-release-7.0-3.el7.elrepo.noarch.rpm
警告:/var/tmp/rpm-tmp.bpj6uB: 头V4 DSA/SHA1 Signature, 密钥 ID baadae52: NOKEY
准备中... ################################# [100%]
正在升级/安装...
1:elrepo-release-7.0-3.el7.elrepo ################################# [100%]
使用下面的命令列出可用的系统内核相关包:
[root@mobanji ~]# yum --disablerepo="*" --enablerepo="elrepo-kernel" list available
已加载插件:fastestmirror
Determining fastest mirrors
* elrepo-kernel: mirrors.tuna.tsinghua.edu.cn
elrepo-kernel | 2.9 kB 00:00:00
elrepo-kernel/primary_db | 1.8 MB 00:00:00
可安装的软件包
kernel-lt.x86_64 4.4.185-1.el7.elrepo elrepo-kernel <---长期维护版本
kernel-lt-devel.x86_64 4.4.185-1.el7.elrepo elrepo-kernel
kernel-lt-doc.noarch 4.4.185-1.el7.elrepo elrepo-kernel
kernel-lt-headers.x86_64 4.4.185-1.el7.elrepo elrepo-kernel
kernel-lt-tools.x86_64 4.4.185-1.el7.elrepo elrepo-kernel
kernel-lt-tools-libs.x86_64 4.4.185-1.el7.elrepo elrepo-kernel
kernel-lt-tools-libs-devel.x86_64 4.4.185-1.el7.elrepo elrepo-kernel
kernel-ml.x86_64 5.2.0-1.el7.elrepo elrepo-kernel <---最新主线稳定版
kernel-ml-devel.x86_64 5.2.0-1.el7.elrepo elrepo-kernel
kernel-ml-doc.noarch 5.2.0-1.el7.elrepo elrepo-kernel
kernel-ml-headers.x86_64 5.2.0-1.el7.elrepo elrepo-kernel
kernel-ml-tools.x86_64 5.2.0-1.el7.elrepo elrepo-kernel
kernel-ml-tools-libs.x86_64 5.2.0-1.el7.elrepo elrepo-kernel
kernel-ml-tools-libs-devel.x86_64 5.2.0-1.el7.elrepo elrepo-kernel
perf.x86_64 5.2.0-1.el7.elrepo elrepo-kernel
python-perf.x86_64 5.2.0-1.el7.elrepo elrepo-kerne
安装最新的主线稳定内核
[root@mobanji ~]# yum --enablerepo=elrepo-kernel install kernel-ml -y
已安装:
kernel-ml.x86_64 0:5.2.0-1.el7.elrepo
完毕!
设置 GRUB 默认的内核版本
为了让新安装的内核成为默认启动选项
需要如下修改 GRUB 配置,打开并编辑 /etc/default/grub 并设置 GRUB_DEFAULT=0
意思是 GRUB 初始化页面的第一个内核将作为默认内核.
通过命令查看默认启动顺序:
[root@mobanji ~]# awk -F\' '$1=="menuentry " {print $2}' /etc/grub2.cfg
CentOS Linux (5.2.0-1.el7.elrepo.x86_64) 7 (Core)
CentOS Linux (3.10.0-957.10.1.el7.x86_64) 7 (Core)
CentOS Linux (3.10.0-957.el7.x86_64) 7 (Core)
CentOS Linux (0-rescue-cd43e647a4aa4f0081ae548bf9fbc043) 7 (Core)
由上面可以看出新内核(5.1.16)目前位置在0,原来的内核(3.10.0)目前位置在1,所以如果想生效最新的内核,还需要我们修改内核的启动顺序为0
编辑/etc/default/grub文件
[root@mobanji ~]# cp /etc/default/grub{,.bak}
[root@mobanji ~]# vim /etc/default/grub
[root@mobanji ~]# diff /etc/default/grub{,.bak}
3c3
< GRUB_DEFAULT=0
---
> GRUB_DEFAULT=saved
运行grub2-mkconfig命令来重新创建内核配置
[root@mobanji ~]# grub2-mkconfig -o /boot/grub2/grub.cfg
Generating grub configuration file ...
Found linux image: /boot/vmlinuz-5.2.0-1.el7.elrepo.x86_64
Found initrd image: /boot/initramfs-5.2.0-1.el7.elrepo.x86_64.img
Found linux image: /boot/vmlinuz-3.10.0-957.10.1.el7.x86_64
Found initrd image: /boot/initramfs-3.10.0-957.10.1.el7.x86_64.img
Found linux image: /boot/vmlinuz-3.10.0-957.el7.x86_64
Found initrd image: /boot/initramfs-3.10.0-957.el7.x86_64.img
Found linux image: /boot/vmlinuz-0-rescue-cd43e647a4aa4f0081ae548bf9fbc043
Found initrd image: /boot/initramfs-0-rescue-cd43e647a4aa4f0081ae548bf9fbc043.img
done
重启系统并查看系统内核
[root@mobanji ~]# reboot
[root@mobanji ~]# uname -r
5.2.0-1.el7.elrepo.x86_64
更新yum源仓库
[root@mobanji ~]# yum -y update
环境初始化准备
安装依赖包
[root@mobanji ~]# yum install -y epel-release
[root@mobanji ~]# yum install -y conntrack ntpdate ntp ipvsadm ipset jq iptables curl sysstat libseccomp wget lsof telnet
查询开机启动项服务
[root@mobanji ~]# systemctl list-unit-files |grep "enabled"
autovt@.service enabled
crond.service enabled
getty@.service enabled
irqbalance.service enabled
ntpd.service enabled
rhel-autorelabel.service enabled
rhel-configure.service enabled
rhel-dmesg.service enabled
rhel-domainname.service enabled
rhel-import-state.service enabled
rhel-loadmodules.service enabled
rhel-readonly.service enabled
rsyslog.service enabled
sshd.service enabled
sysstat.service enabled
systemd-readahead-collect.service enabled
systemd-readahead-drop.service enabled
systemd-readahead-replay.service enabled
tuned.service enabled
default.target enabled
multi-user.target enabled
remote-fs.target enabled
runlevel2.target enabled
runlevel3.target enabled
runlevel4.target enabled
注:如果存在无关的服务可以关闭
关闭防火墙
关闭防火墙,清理防火墙规则,设置默认转发策略
[root@mobanji ~]# systemctl stop firewalld
[root@mobanji ~]# systemctl disable firewalld
[root@mobanji ~]# iptables -F && iptables -X && iptables -F -t nat && iptables -X -t nat
[root@mobanji ~]# iptables -P FORWARD ACCEPT
[root@mobanji ~]# firewall-cmd --state
not running
注:防火墙知识:链接:https://pan.baidu.com/s/151L0w-tP8OExfBNSEzQqdQ
提取码:csk1
关闭SElinux
关闭SELinux,否则后续K8S挂载目录时可能报错 Permission denied:
[root@mobanji ~]# setenforce 0
setenforce: SELinux is disabled
[root@mobanji ~]# sed -i 's/^SELINUX=.*/SELINUX=disabled/' /etc/selinux/config
设置系统时区
调整系统 TimeZone
[root@mobanji ~]# timedatectl set-timezone Asia/Shanghai
将当前的 UTC 时间写入硬件时钟
[root@mobanji ~]# timedatectl set-local-rtc 0
重启依赖于系统时间的服务
[root@mobanji ~]# systemctl restart rsyslog
[root@mobanji ~]# systemctl restart crond
设置rsyslogd 和systemd journald
systemd 的 journald 是 Centos 7 缺省的日志记录工具,它记录了所有系统、内核、Service Unit 的日志。相比 systemd,journald 记录的日志有如下优势:
-> 可以记录到内存或文件系统;(默认记录到内存,对应的位置为 /run/log/jounal);
-> 可以限制占用的磁盘空间、保证磁盘剩余空间;
-> 可以限制日志文件大小、保存的时间;
-> journald 默认将日志转发给 rsyslog,这会导致日志写了多份,/var/log/messages 中包含了太多无关日志,不方便后续查看,同时也影响系统性能。
[root@mobanji ~]# mkdir /var/log/journal <---#持久化保存日志的目录
[root@mobanji ~]# mkdir /etc/systemd/journald.conf.d
[root@mobanji ~]# cat > /etc/systemd/journald.conf.d/99-prophet.conf <<EOF
[Journal]
# 持久化保存到磁盘
Storage=persistent
# 压缩历史日志
Compress=yes
SyncIntervalSec=5m
RateLimitInterval=30s
RateLimitBurst=1000
# 最大占用空间 10G
SystemMaxUse=10G
# 单日志文件最大 200M
SystemMaxFileSize=200M
# 日志保存时间 2 周
MaxRetentionSec=2week
# 不将日志转发到 syslog
ForwardToSyslog=no
EOF
[root@mobanji ~]# systemctl restart systemd-journald
关闭NUMA
numa主要是和swap有关。具体请看:https://www.cnblogs.com/wjoyxt/p/4804081.html
[root@mobanji ~]# cp /etc/default/grub{,.bak01}
[root@mobanji ~]# vim /etc/default/grub
[root@mobanji ~]# diff /etc/default/grub{,.bak01}
6c6
< GRUB_CMDLINE_LINUX="biosdevname=0 net.ifnames=0 rhgb quiet numa=off"
---
> GRUB_CMDLINE_LINUX="biosdevname=0 net.ifnames=0 rhgb quiet"
重新生成grub2配置文件
[root@mobanji ~]# grub2-mkconfig -o /boot/grub2/grub.cfg
Generating grub configuration file ...
Found linux image: /boot/vmlinuz-5.2.0-1.el7.elrepo.x86_64
Found initrd image: /boot/initramfs-5.2.0-1.el7.elrepo.x86_64.img
Found linux image: /boot/vmlinuz-3.10.0-957.21.3.el7.x86_64
Found initrd image: /boot/initramfs-3.10.0-957.21.3.el7.x86_64.img
Found linux image: /boot/vmlinuz-3.10.0-957.10.1.el7.x86_64
Found initrd image: /boot/initramfs-3.10.0-957.10.1.el7.x86_64.img
Found linux image: /boot/vmlinuz-3.10.0-957.el7.x86_64
Found initrd image: /boot/initramfs-3.10.0-957.el7.x86_64.img
Found linux image: /boot/vmlinuz-0-rescue-cd43e647a4aa4f0081ae548bf9fbc043
Found initrd image: /boot/initramfs-0-rescue-cd43e647a4aa4f0081ae548bf9fbc043.img
done
创建科学目录
脚本目录
[root@mobanji ~]# mkdir /service/scripts -p
数据目录
[root@mobanji ~]# mkdir /data
至此模板机优化结束,做快照,克隆。
虚机准备
以k8s-master01为例
克隆模板机

克隆源
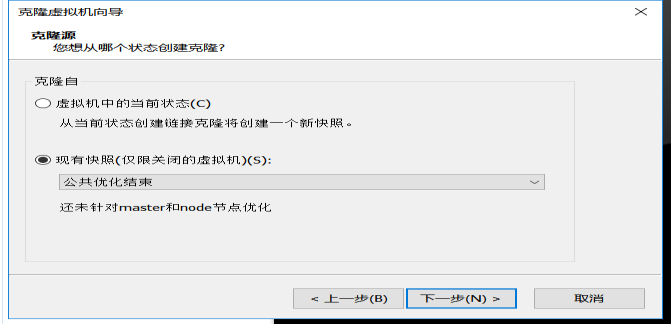
创建链接克隆

虚机名称和位置

以k8s-master01为例配置主机名和IP
配置主机名
[root@mobanji ~]# hostnamectl set-hostname k8s-master01
[root@mobanji ~]# bash
[root@k8s-master01 ~]#
配置IP
[root@k8s-master01 ~]# alias cdn
alias cdn='cd /etc/sysconfig/network-scripts/'
[root@k8s-master01 ~]# cdn
[root@k8s-master01 network-scripts]# cp ifcfg-eth0{,.bak}
[root@k8s-master01 network-scripts]# vim ifcfg-eth0
[root@k8s-master01 network-scripts]# diff ifcfg-eth0{,.bak}
3c3
< IPADDR=20.0.0.201
---
> IPADDR=20.0.0.5
[root@k8s-master01 network-scripts]# cp ifcfg-eth1{,.bak}
[root@k8s-master01 network-scripts]# vim ifcfg-eth1
[root@k8s-master01 network-scripts]# diff ifcfg-eth1{,.bak}
3c3
< IPADDR=10.0.0.201
---
> IPADDR=10.0.0.5
[root@k8s-master01 network-scripts]# systemctl restart network
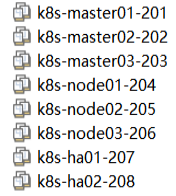
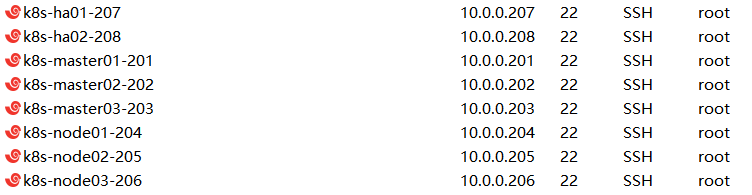
虚机准备完成
暂时准备的虚机信息,后续根据应用服务的增加而变动
Kubernetes集群各节点优化
下面初始化操作在kubernetes集群中的master和node节点上操作,下面所有操作都以k8s-master01为例
在xshell上批量操作:

添加主机名和IP的对应关系
[root@k8s-master01 ~]# cat >> /etc/hosts <<EOF
> 10.0.0.201 k8s-master01
> 10.0.0.202 k8s-master02
> 10.0.0.203 k8s-master03
> 10.0.0.201 k8s-etcd01
> 10.0.0.202 k8s-etcd02
> 10.0.0.203 k8s-etcd03
> 10.0.0.204 k8s-node01
> 10.0.0.205 k8s-node02
> 10.0.0.206 k8s-node03
> EOF
添加docker账号
[root@k8s-master01 ~]# useradd -m docker
无密码ssh信任关系
编写批量分离秘钥脚本
[root@k8s-master01 ~]# cat >> /service/scripts/ssh-copyid.sh << EOF
> #目标主机列表
> IP="
> 10.0.0.201
> 10.0.0.202
> 10.0.0.203
> 10.0.0.204
> 10.0.0.205
> 10.0.0.206
> "
> for node in ${IP};do
> sshpass -p 1 ssh-copy-id ${node} -o StrictHostKeyChecking=no
> if [ $? -eq 0 ];then
> echo "${node} 秘钥copy完成"
> else
> echo "${node} 秘钥copy失败"
> fi
> done
> EOF
查看是否存在sshpass软件包,没有则安装
[root@k8s-master01 ~]# yum list installed | grep "sshpass"
[root@k8s-master01 ~]# yum install sshpass -y
创建公钥
[root@k8s-master01 ~]# ssh-keygen
Generating public/private rsa key pair.
Enter file in which to save the key (/root/.ssh/id_rsa):
Created directory '/root/.ssh'.
Enter passphrase (empty for no passphrase):
Enter same passphrase again:
Your identification has been saved in /root/.ssh/id_rsa.
Your public key has been saved in /root/.ssh/id_rsa.pub.
The key fingerprint is:
SHA256:Jut1q9iNyDTzvUHyS+gPlbrv/Z2lx8E6Y4LvLXLdBNw root@k8s-master01
The key's randomart image is:
+---[RSA 2048]----+
| |
| |
| . . |
| . o E |
| . S + o |
| + B + |
| = = * . +.o|
| + X @ O.* +=|
| = B=#+=o=o.|
+----[SHA256]-----+
执行脚本,分发秘钥
[root@k8s-master01 ~]# bash /service/scripts/ssh-copyid.sh
/usr/bin/ssh-copy-id: INFO: Source of key(s) to be installed: "/root/.ssh/id_rsa.pub"
/usr/bin/ssh-copy-id: INFO: attempting to log in with the new key(s), to filter out any that are already installed
/usr/bin/ssh-copy-id: INFO: 1 key(s) remain to be installed -- if you are prompted now it is to install the new keys
Number of key(s) added: 1
Now try logging into the machine, with: "ssh -o 'StrictHostKeyChecking=no' '10.0.0.201'"
and check to make sure that only the key(s) you wanted were added.
10.0.0.201 秘钥copy完成
/usr/bin/ssh-copy-id: INFO: Source of key(s) to be installed: "/root/.ssh/id_rsa.pub"
/usr/bin/ssh-copy-id: INFO: attempting to log in with the new key(s), to filter out any that are already installed
/usr/bin/ssh-copy-id: INFO: 1 key(s) remain to be installed -- if you are prompted now it is to install the new keys
Number of key(s) added: 1
Now try logging into the machine, with: "ssh -o 'StrictHostKeyChecking=no' '10.0.0.202'"
and check to make sure that only the key(s) you wanted were added.
10.0.0.202 秘钥copy完成
/usr/bin/ssh-copy-id: INFO: Source of key(s) to be installed: "/root/.ssh/id_rsa.pub"
/usr/bin/ssh-copy-id: INFO: attempting to log in with the new key(s), to filter out any that are already installed
/usr/bin/ssh-copy-id: INFO: 1 key(s) remain to be installed -- if you are prompted now it is to install the new keys
Number of key(s) added: 1
Now try logging into the machine, with: "ssh -o 'StrictHostKeyChecking=no' '10.0.0.203'"
and check to make sure that only the key(s) you wanted were added.
10.0.0.203 秘钥copy完成
/usr/bin/ssh-copy-id: INFO: Source of key(s) to be installed: "/root/.ssh/id_rsa.pub"
/usr/bin/ssh-copy-id: INFO: attempting to log in with the new key(s), to filter out any that are already installed
/usr/bin/ssh-copy-id: INFO: 1 key(s) remain to be installed -- if you are prompted now it is to install the new keys
Number of key(s) added: 1
Now try logging into the machine, with: "ssh -o 'StrictHostKeyChecking=no' '10.0.0.204'"
and check to make sure that only the key(s) you wanted were added.
10.0.0.204 秘钥copy完成
/usr/bin/ssh-copy-id: INFO: Source of key(s) to be installed: "/root/.ssh/id_rsa.pub"
/usr/bin/ssh-copy-id: INFO: attempting to log in with the new key(s), to filter out any that are already installed
/usr/bin/ssh-copy-id: INFO: 1 key(s) remain to be installed -- if you are prompted now it is to install the new keys
Number of key(s) added: 1
Now try logging into the machine, with: "ssh -o 'StrictHostKeyChecking=no' '10.0.0.205'"
and check to make sure that only the key(s) you wanted were added.
10.0.0.205 秘钥copy完成
/usr/bin/ssh-copy-id: INFO: Source of key(s) to be installed: "/root/.ssh/id_rsa.pub"
/usr/bin/ssh-copy-id: INFO: attempting to log in with the new key(s), to filter out any that are already installed
/usr/bin/ssh-copy-id: INFO: 1 key(s) remain to be installed -- if you are prompted now it is to install the new keys
Number of key(s) added: 1
Now try logging into the machine, with: "ssh -o 'StrictHostKeyChecking=no' '10.0.0.206'"
and check to make sure that only the key(s) you wanted were added.
10.0.0.206 秘钥copy完成
测试无密码登陆
[root@k8s-master01 ~]# ssh 10.0.0.202
Last login: Mon Jul 15 17:52:42 2019 from 10.0.0.1
[root@k8s-master02 ~]# ssh 10.0.0.203
Last login: Mon Jul 15 17:53:28 2019 from 10.0.0.202
[root@k8s-master03 ~]# ssh 10.0.0.204
Last login: Mon Jul 15 17:52:51 2019 from 10.0.0.1
[root@k8s-node01 ~]# ssh 10.0.0.205
Last login: Mon Jul 15 17:53:45 2019 from 10.0.0.204
[root@k8s-node02 ~]# ssh 10.0.0.206
Last login: Mon Jul 15 17:53:01 2019 from 10.0.0.1
[root@k8s-node03 ~]# exit
登出
Connection to 10.0.0.206 closed.
[root@k8s-node02 ~]# exit
登出
Connection to 10.0.0.205 closed.
[root@k8s-node01 ~]# exit
登出
Connection to 10.0.0.204 closed.
[root@k8s-master03 ~]# exit
登出
Connection to 10.0.0.203 closed.
[root@k8s-master02 ~]# exit
登出
Connection to 10.0.0.202 closed.
关闭swap分区
如果开启了swap分区,kubelet会启动失败(可以通过将参数 --fail-swap-on 设置为false来忽略swap on),故需要在每个node节点机器上关闭swap分区。
这里索性将所有节点的swap分区都关闭,同时注释/etc/fstab中相应的条目,防止开机自动挂载swap分区
[root@k8s-master01 ~]# swapoff -a
[root@k8s-master01 ~]# sed -i '/ swap / s/^\(.*\)$/#\1/g' /etc/fstab
[root@k8s-master01 ~]# free -h
total used free shared buff/cache available
Mem: 1.9G 77M 1.7G 696K 115M 1.7G
Swap: 0B 0B 0B
关闭dnsmasq
linux系统开启了dnsmasq后(如 GUI 环境),将系统DNS Server设置为 127.0.0.1,这会导致docker容器无法解析域名,需要关闭它 (centos7系统可能默认没有安装这个服务)
[root@k8s-master01 ~]# systemctl status dnsmasq
Unit dnsmasq.service could not be found.
如果有:
[root@k8s-master01 ~]# systemctl stop dnsmasq
[root@k8s-master01 ~]# systemctl disable dnsmasq
[root@k8s-master01 ~]# systemctl status dnsmasq
优化内核参数
root@k8s-master01 ~]# cat > /etc/sysctl.d/kubernetes.conf << EOF
> net.bridge.bridge-nf-call-iptables=1
> net.bridge.bridge-nf-call-ip6tables=1
> net.ipv4.ip_forward=1
> net.ipv4.tcp_tw_recycle=0 <--- 由于tcp_tw_recycle与kubernetes的NAT冲突,必须关闭!否则会导致服务不通。
> vm.swappiness=0 <--- 禁止使用 swap 空间,只有当系统 OOM 时才允许使用它
> vm.overcommit_memory=1 <--- 不检查物理内存是否够用
> vm.panic_on_oom=0 <--- 开启 OOM
> fs.inotify.max_user_instances=8192
> fs.inotify.max_user_watches=1048576
> fs.file-max=52706963
> fs.nr_open=52706963
> net.ipv6.conf.all.disable_ipv6=1 <--- 关闭不使用的ipv6协议栈,防止触发docker BUG.
> net.netfilter.nf_conntrack_max=2310720
> EOF
[root@k8s-master01 ~]# systemctl -p /etc/sysctl.d/kubernetes.conf
[root@k8s-master01 ~]# echo $?
0
注意:
必须关闭 tcp_tw_recycle,否则和 NAT 冲突,会导致服务不通;
关闭 IPV6,防止触发 docker BUG;
加载内核模块
[root@k8s-master01 ~]# modprobe ip_vs_rr
[root@k8s-master01 ~]# modprobe br_netfilter
创建k8s相关目录
[root@k8s-master01 modules]#
[root@k8s-master01 modules]# mkdir -p /opt/k8s/{bin,work} /etc/{kubernetes,etcd}/cert
[root@k8s-master01 modules]# tree /opt/
/opt/
└── k8s
├── bin
└── work
3 directories, 0 files
[root@k8s-master01 modules]# tree /etc/kubernetes/
/etc/kubernetes/
└── cert
1 directory, 0 files
[root@k8s-master01 modules]# tree /etc/etcd/
/etc/etcd/
└── cert
1 directory, 0 files
更新PATH变量
将可执行文件目录添加到PATH环境变量中
[root@k8s-master01 modules]# echo 'PATH=/opt/k8s/bin:$PATH' >>/root/.bashrc
[root@k8s-master01 modules]# source /root/.bashrc
[root@k8s-master01 modules]# echo $PATH
/opt/k8s/bin:/usr/local/sbin:/usr/local/bin:/usr/sbin:/usr/bin:/root/bin
变量脚本文件
注:这一步非常关键
[root@k8s-master01 ~]# vim /opt/k8s/bin/environment.sh
[root@k8s-master01 ~]# cat /opt/k8s/bin/environment.sh
##########################################################################
#Author: lixxxn
#QQ: 2********0
#Date: 2019-07-17
#FileName: /opt/k8s/bin/environment.sh
#URL: https://www.cnblogs.com/zisefeizhu/
#Description: The test script
#Copyright (C): 2019 All rights reserved
##########################################################################
#!/usr/bin/bash
PATH=/opt/k8s/bin:/usr/local/sbin:/usr/local/bin:/usr/sbin:/usr/bin:/root/bin
export PATH
# 生成 EncryptionConfig 所需的加密 key
export ENCRYPTION_KEY=$(head -c 32 /dev/urandom | base64)
# 集群中所有节点机器IP数组(master,node,etcd节点)
export NODE_ALL_IPS=(10.0.0.201 10.0.0.202 10.0.0.203 10.0.0.204 10.0.0.205 10.0.0.206)
# 集群中所有节点IP对应的主机名数组
export NODE_ALL_NAMES=(k8s-master01 k8s-master02 k8s-master03 k8s-node01 k8s-node02 k8s-node03)
# 集群中所有master节点集群IP数组
export NODE_MASTER_IPS=(10.0.0.201 10.0.0.202 10.0.0.203)
# 集群中master节点IP对应的主机名数组
export NODE_MASTER_NAMES=(k8s-master01 k8s-master02 k8s-master03)
# 集群中所有node节点集群IP数组
export NODE_NODE_IPS=(10.0.0.204 10.0.0.205 10.0.0.206)
# 集群中node节点IP对应的主机名数组
export NODE_NODE_NAMES=(k8s-node01 k8s-node02 k8s-node03)
# 集群中所有etcd节点集群IP数组
export NODE_ETCD_IPS=(10.0.0.201 10.0.0.202 10.0.0.203)
# 集群中etcd节点IP对应的主机名数组(这里是和master三节点机器共用)
export NODE_ETCD_NAMES=(k8s-etcd01 k8s-etcd02 k8s-etcd03)
# etcd 集群服务地址列表
export ETCD_ENDPOINTS="https://10.0.0.201:2379,https://10.0.0.202:2379,https://10.0.0.203:2379"
# etcd 集群间通信的 IP 和端口
export ETCD_NODES="k8s-etcd01=https://10.0.0.201:2380,k8s-etcd02=https://10.0.0.202:2380,k8s-etcd03=https://10.0.0.203:2380"
# kube-apiserver 的反向代理(地址端口.这里也就是nginx代理层的VIP地址
export KUBE_APISERVER="https://10.0.0.250:8443"
# 节点间互联网络接口名称. 这里我所有的centos7节点机的网卡设备是eth1,而不是eth0
export IFACE="eth1"
# etcd 数据目录
export ETCD_DATA_DIR="/data/k8s/etcd/data"
# etcd WAL 目录,建议是 SSD 磁盘分区,或者和 ETCD_DATA_DIR 不同的磁盘分区
export ETCD_WAL_DIR="/data/k8s/etcd/wal"
# k8s 各组件数据目录
export K8S_DIR="/data/k8s/k8s"
# docker 数据目录
export DOCKER_DIR="/data/k8s/docker"
## 以下参数一般不需要修改
# TLS Bootstrapping 使用的 Token,可以使用命令 head -c 16 /dev/urandom | od -An -t x | tr -d ' ' 生成
BOOTSTRAP_TOKEN="41f7e4ba8b7be874fcff18bf5cf41a7c"
# 最好使用 当前未用的网段 来定义服务网段和 Pod 网段
# 服务网段,部署前路由不可达,部署后集群内路由可达(kube-proxy 保证)
SERVICE_CIDR="10.254.0.0/16"
# Pod 网段,建议 /16 段地址,部署前路由不可达,部署后集群内路由可达(flanneld 保证)
CLUSTER_CIDR="172.30.0.0/16"
# 服务端口范围 (NodePort Range)
export NODE_PORT_RANGE="30000-32767"
# flanneld 网络配置前缀
export FLANNEL_ETCD_PREFIX="/kubernetes/network"
# kubernetes 服务 IP (一般是 SERVICE_CIDR 中第一个IP)
export CLUSTER_KUBERNETES_SVC_IP="10.254.0.1"
# 集群 DNS 服务 IP (从 SERVICE_CIDR 中预分配)
export CLUSTER_DNS_SVC_IP="10.254.0.2"
# 集群 DNS 域名(末尾不带点号)
export CLUSTER_DNS_DOMAIN="cluster.local"
# 将二进制目录 /opt/k8s/bin 加到 PATH 中
export PATH=/opt/k8s/bin:$PATH
至此虚机准备工作结束!!!


 319
319


 被折叠的 条评论
为什么被折叠?
被折叠的 条评论
为什么被折叠?
 到【灌水乐园】发言


