


第3章 Redis数据类型详解
3.1 Redis键/值介绍
Redis key值是二进制安全的,这意味着可以用任何二进制序列作为key值,从形如“foo”的简单字符串到一个JPG文件的内容都可以。空字符串也是有效key值。
关于key的几条规则:
- 太长的键值不是个好主意,例如1024字节的键值就不是个好主意,不仅因为消耗内存,而且在数据中查找这类键值的计算成本很高。
- 太短的键值通常也不是好主意,如果你要用“u:1000:pwd”来代替
user:1000:password,这没有什么问题,但后者更易阅读,并且由此增加的空间消耗相对于key object和value object本身来说很小。当然,没人阻止你一定要用更短的键值节省一丁点儿空间。
- 最好坚持一种模式。例如:"object-type?field"就是个不错的注意,像这样“user:1000:password”。或者一个键值对的字段名中加上一个点,就想这样“comment?reply.to”。
127.0.0.1:6379> set user:01:passwd 99999 OK 127.0.0.1:6379> get user:01:passwd "99999" 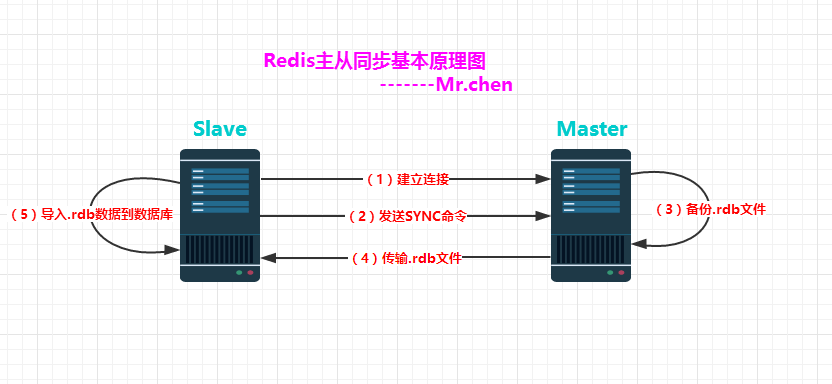
3.2 数据类型
3.2.1 String字符串类型
这是Redis最简单的数据类型之一。如果只使用这种数据类型,那么redis就是一个持久化的memcached服务器(注:memcache的数据仅保存在内存中,服务器重启后,数据将丢失)。当然redis对string类型的功能比memcached还是多很多的,我们来玩儿一下字符串类型:
(1)常规的String字符串类型
[root@redis01 scripts]# redis-cli -a yunjisuan set work ">9000"
OK
[root@redis01 scripts]# redis-cli -a yunjisuan get work
">9000"
- 在redis中,我们通常用set设置一对key/value键值,然后用get来获取字符串的值。
- value值可以是任何类型的字符串(包括二进制数据),例如你可以在一个键下保存一个jpg图片。但值的长度不能超过1GB
- 虽然字符串是Redis的基本值类型,redis还支持更多对字符串的操作功能。
(2)String类型也可以用来存储数字,并支持对数字的加减操作。
[root@redis01 scripts]# redis-cli -a yunjisuan set counter 1
OK
[root@redis01 scripts]# redis-cli -a yunjisuan incr counter #自增1
(integer) 2
[root@redis01 scripts]# redis-cli -a yunjisuan incr counter
(integer) 3 [root@redis01 scripts]# redis-cli -a yunjisuan get counter "3" [root@redis01 scripts]# redis-cli -a yunjisuan incrby counter 2 #自增指定数值 (integer) 5 [root@redis01 scripts]# redis-cli -a yunjisuan incrby counter 2 (integer) 7 [root@redis01 scripts]# redis-cli -a yunjisuan get counter "7" [root@redis01 scripts]# redis-cli -a yunjisuan decr counter #自减1 (integer) 6 [root@redis01 scripts]# redis-cli -a yunjisuan decr counter (integer) 5 [root@redis01 scripts]# redis-cli -a yunjisuan get counter "5" [root@redis01 scripts]# redis-cli -a yunjisuan decrby counter 2 #自减指定数值 (integer) 3 [root@redis01 scripts]# redis-cli -a yunjisuan decrby counter 2 (integer) 1 [root@redis01 scripts]# redis-cli -a yunjisuan get counter "1"
INCR命令将字符串值解析成整型,将其加1,最后将结果保存为新的字符串值,类似的命令如下列表:
| incr | 自动自增加1 | INCR key |
|---|---|---|
| incrby | 自动自增指定数值 | INCRBY key increment |
| decr | 自动自减1 | DECR key |
| decrby | 自动自减指定数值 | DECRBY key decrement |
(3)为key设置新值并且返回原值
对字符串,另一个操作是GETSET命令,行如其名:他为key设置新值并且返回原值。这有什么用处呢?例如:你的系统每当有新用户访问时就用INCR命令操作一个Redis key。
你希望每小时对这个信息收集一次。你就可以GETSET这个key并给其赋值0并读取原值。
[root@redis01 scripts]# redis-cli -a yunjisuan
127.0.0.1:6379> set user01 zhangsan #设置新key-value OK 127.0.0.1:6379> get user01 "zhangsan" 127.0.0.1:6379> getset user01 wangwu #设置新数据并返回旧数据 "zhangsan" 127.0.0.1:6379> getset user01 liliu #设置新数据并返回旧数据 "wangwu" 127.0.0.1:6379> getset user01 gongli #设置新数据并返回旧数据 "liliu" 127.0.0.1:6379> get user01 "gongli"
(4)String类型还支持批量读写操作
127.0.0.1:6379> mset name zhangsan age 44 OK 127.0.0.1:6379> mget name age 1) "zhangsan" 2) "44" (5)string类型还支持对其部分的修改和获取操作
127.0.0.1:6379> set images flower OK 127.0.0.1:6379> get images "flower" 127.0.0.1:6379> append images .jpg #追加字符串 (integer) 10 127.0.0.1:6379> get images "flower.jpg" 127.0.0.1:6379> strlen images (integer) 10 127.0.0.1:6379> substr images 0 6 "flower." 127.0.0.1:6379> substr images 0 5 "flower" 命令使用帮助:
#查看单个命令help+命令名
127.0.0.1:6379> help set SET key value [EX seconds] [PX milliseconds] [NX|XX] summary: Set the string value of a key since: 1.0.0 group: string 127.0.0.1:6379> help mset MSET key value [key value ...] summary: Set multiple keys to multiple values since: 1.0.1 group: string
3.2.2 List类型
- 要说清楚列表数据类型,最好先讲一点理论背景,在信息技术界List这个词常常被使用不当。例如“Python Lists”就名不副实(名为Linked Lists),但它们实际上是数组(同样的数据类型在Ruby中叫数组)
- 一般意义上讲,列表就是有序元素的序列:10,20,1,2,3就是一个列表。但用数组实现的List和用Linked List实现的List,在属性方面大不相同。
- redis lists基于Linked Lists实现。这意味着即使在一个list中有数百万个元素,在头部或尾部添加一个元素的操作,其时间复杂度也是常数级别的。用LPUSH命令在十个元素的list头部添加新元素,和在千万元素list头部添加新元素的速度相同。
- 那么,坏消息是什么?在数组实现的list中利用索引访问元素的速度极快,而同样的操作在linked list实现的list上没有那么快。
- Redis Lists用linked list实现的原因是:对于数据库系统来说,至关重要的特性是:能非常快的在很大的列表上添加元素。另一个重要因素是,正如你将要看到的:Redis lists能在常数时间取得常数长度。
Redis lists入门:
LPUSH命令可向list的左边(头部)添加一个新元素,而RPUSH命令可向list的右边(尾部)添加一个新元素。最后LRANGE命令可从list中取出一定范围的元素。
Redis能够将数据存储成一个列表,并能对这个列表进行丰富的操作:
127.0.0.1:6379> lpush students "zhangsan" #将元素“zhangsan”放在students列表的最左边 (integer) 1 127.0.0.1:6379> lpush students "wangwu" #将元素“wangwu”插入列表的最左边 (integer) 2 127.0.0.1:6379> lpush students "liliu" #将元素“liliu”插入列表的最左边 (integer) 3 127.0.0.1:6379> lrange students 0 2 #查看序列是0到2的元素 1) "liliu" 2) "wangwu" 3) "zhangsan" 127.0.0.1:6379> rpush students "wangyue" #将元素wangyue插入列表的最右边 (integer) 4 127.0.0.1:6379> lrange students 0 3 #查看序列是0到3的元素 1) "liliu" 2) "wangwu" 3) "zhangsan" 4) "wangyue" 127.0.0.1:6379> llen students #查看列表元素的个数 (integer) 4 127.0.0.1:6379> lpop students #移除最左边的元素值 "liliu" 127.0.0.1:6379> rpop students #移除最右边的元素值 "wangyue" 127.0.0.1:6379> lrange students 0 3 #列表里只剩下两个元素了 1) "wangwu" 2) "zhangsan" 127.0.0.1:6379> rpush students zhangsan (integer) 3 127.0.0.1:6379> rpush students zhangsan (integer) 4 127.0.0.1:6379> lrange students 0 3 1) "wangwu" 2) "zhangsan" 3) "zhangsan" 4) "zhangsan" 127.0.0.1:6379> lrem students 2 "zhangsan" #删除列表里是“zhangsan”的元素,删除两次(从左向右删) 127.0.0.1:6379> lrange students 0 3 1) "wangwu" 2) "zhangsan" 127.0.0.1:6379> rpush students zhangsan (integer) 2 127.0.0.1:6379> rpush students zhangsan (integer) 3 127.0.0.1:6379> lrem students 1 "zhangsan" #删除列表里的元素zhangsan一次 127.0.0.1:6379> lrange students 0 3 1) "wangwu" 2) "zhangsan" 3) "zhangsan" 127.0.0.1:6379> lrem students 0 "zhangsan" #清空列表所有的zhangsan元素 127.0.0.1:6379> lrange students 0 3 1) "wangwu"Redis也支持很多修改操作
#linsert 在列表里的某个值的前后插入元素
127.0.0.1:6379> lrange students 0 5
1) "wangwu" 127.0.0.1:6379> lpush students a b c d #左插入元素abcd (integer) 5 127.0.0.1:6379> lrange students 0 5 1) "d" 2) "c" 3) "b" 4) "a" 5) "wangwu" 127.0.0.1:6379> linsert students before b xxxx #在元素b的前边插入元素xxxx (integer) 6 127.0.0.1:6379> lrange students 0 9 1) "d" 2) "c" 3) "xxxx" 4) "b" 5) "a" 6) "wangwu" 127.0.0.1:6379> linsert students after b xxxx #在元素b的后边插入元素xxxx (integer) 7 127.0.0.1:6379> lrange students 0 9 1) "d" 2) "c" 3) "xxxx" 4) "b" 5) "xxxx" 6) "a" 7) "wangwu"
更多操作,请查询help @list
列表list的用途:
- 正如你可以从上面的例子中猜到的,list可被用来实现聊天系统。还可以作为不同进程间传递消息的队列。关键是,你可以每次都以原先添加的顺序访问数据。这不需要任何SQLORDER操作,将会非常快,也会很容易扩展到百万级别的规模。
- 例如在评级系统中,比如社会化新闻网站reddit.com,你可以把每个新提交的链接添加到一个list,用LRANGE可简单的对结果分页。
- 在博客引擎实现中,你可为每篇日志设置一个list,在该list中推入进博客评论,等等。
- 向Redis list压入ID而不是实际的数据。
- 在上面的例子里,我们将“对象”(此例中是简单消息)直接压入Redis list,但通常不应这么做,由于对象可能被多次引用:例如在一个list中维护其时间顺序,在一个集合中保存它的类别,只要有必要,它还会出现在其他list中,等等。
3.2.3 集合(Sets)类型
- Redis集合是未排序的集合,其元素是二进制安全的字符串。SADD命令可以向集合添加一个新元素。和sets相关的操作也有许多,比如检测某个元素是否存在,以及实现交集,并集,差集等等。一例胜千言:
- Redis能够将一系列不重复的值存储成一个集合
127.0.0.1:6379> sadd users laoda    #向集合users里添加一个元素“laoda”
(integer) 1
127.0.0.1:6379> sadd users laoer laosan #向结合users里添加两个元素laoer,laosan (integer) 2 127.0.0.1:6379> smembers users #查看集合里的所有元素 1) "laosan" #可以看到集合里的元素是无序的 2) "laoda" 3) "laoer" #我们向集合中添加了三个元素,并让Redis返回所有元素。现在让我们看一下某个元素是否存在于集合中 127.0.0.1:6379> sismember users laoda #查看元素laoda是否存在于集合users中 (integer) 1 #存在 127.0.0.1:6379> sismember users laoer #查看元素laoer是否存在于集合users中 (integer) 1 #存在 127.0.0.1:6379> sismember users laosan #查看元素laosan是否存在于集合users中 (integer) 1 #存在 127.0.0.1:6379> sismember users laosi ##查看元素laosi是否存在于集合users中 (integer) 0 #不存在
- “laoda”是这个集合的成员,而“laosi”不是。集合特别适合表现对象之间的关系。例如用Redis集合可以很容易实现标签功能。
- 下面是一个简单的方案:对每个想加标签的对象,用一个标签ID集合与之关联,并且对每个已有的标签,一组对象ID与之关联。
- 例如,假设我们的新闻ID1000被加了三个标签tag1,2,5和77,就可以设置下面两个集合:
root@redis-master ~]# redis-cli -a yunjisuan sadd news:1000:tags 1
(integer) 1
[root@redis-master ~]# redis-cli -a yunjisuan sadd news:1000:tags 2
(integer) 1
[root@redis-master ~]# redis-cli -a yunjisuan sadd news:1000:tags 5 (integer) 1 [root@redis-master ~]# redis-cli -a yunjisuan sadd news:1000:tags 77 (integer) 1 [root@redis-master ~]# redis-cli -a yunjisuan sadd tag:1:objects 1000 (integer) 1 [root@redis-master ~]# redis-cli -a yunjisuan sadd tag:2:objects 1000 (integer) 1 [root@redis-master ~]# redis-cli -a yunjisuan sadd tag:5:objects 1000 (integer) 1 [root@redis-master ~]# redis-cli -a yunjisuan sadd tag:27:objects 1000 (integer) 1 #要获取一个对象的所有标签,我们只需要: #获取ID号为1000的所有新闻的题目 [root@redis-master ~]# redis-cli -a yunjisuan smembers news:1000:tags #获取集合为news:1000:tags的所有元素 1) "1" #新闻标题 2) "2" #新闻标题 3) "5" #新闻标题 4) "77" #新闻标题 #查询某个标签的具体内容,我们只需要: #获取某个新闻标题的具体内容 [root@redis-master ~]# redis-cli -a yunjisuan smembers tag:5:objects #获取集合为tag:5:objects的所有元素 1) "1000" #新闻内容
而有些看上去并不简单的操作仍然能使用相应的Redis命令轻松实现。例如我们也许想获得一份同时拥有标签1,2,10和27的对象列表。则可以用SINTER命令来做,他可以在不同集合之间取出交集。因此为达目的我们只需:
[root@redis-master ~]# redis-cli -a yunjisuan sadd tag:1:objects 500 #向集合tag:1:objects里添加元素“500” (integer) 1 [root@redis-master ~]# redis-cli -a yunjisuan smembers tag:1:objects #查看集合tag:1:objects里的所有元素 1) "500" 2) "1000" [root@redis-master ~]# redis-cli -a yunjisuan smembers tag:2:objects #查看集合tag:2:objects里的所有元素 1) "1000" [root@redis-master ~]# redis-cli -a yunjisuan sinter tag:1:objects tag:2:objects tag:5:objects tag:27:objects #求集合tag:1:objects ...tag:27:objects里的所有元素的交集 1) "1000"如何为字符串获取唯一标识:
- 在标签的例子里,我们用到了标签ID,却没有提到ID从何而来。基本上你得为每个加入系统的标签分配一个唯一标识。你也希望在多个客户端同时试着添加同样的标签时不要出现竞争的情况。此外,如果标签已经存在,你希望返回他的ID,否则创建一个新的唯一标识并将其与此标签关联。
- Redis 1.4增加了Hash类型。有了它,字符串和唯一ID关联的事儿将不值一提,但如今我们如何用现有Redis命令可靠的解决它呢?
- 我们首先的尝试(以失败告终)可能如下:
假设我们想为标签“redis”获取一个唯一ID:
- 为了让算法是二进制安全的(只是标签而不考虑utf8,空格等等)我们对用户的注册名做SHA1签名。SHA1(redis)=b840fc02d524045429941cc15f59e41cb7be6c52
- 检查这个标签是否已与一个唯一ID关联(验证用户名是否重复)
用命令GET tag:b840fc02d524045429941cc15f59e41cb7be6c52:id - 如果上面的GET操作返回一个ID,则将其返回给用户。表示用户名已经被注册了。
- 否则...用INCR next.tag.id(自增加1)命令生成一个新的唯一ID(假定它返回123456)
- 最后关联标签和新的ID
SET tag:b840fc02d524045429941cc15f59e41cb7be6c52:id 123456
并将新ID返回给调用者(表示注册成功)。
但是这里会出现一个问题,假如两个客户端同时使用这组指令尝试为标签“redis”获取唯一ID时会发生什么呢?如果时间凑巧,他们俩都会从GET操作获得nil,都将对next.tag.id key做自增操作,这个key会被自增两次。其中一个客户端会将错误的ID返回给调用者。
幸运的是修复这个算法并不难,这是明智的版本:
- 为了让算法是二进制安全的(只是标签而不考虑utf8,空格等等)我们对用户的注册名做SHA1签名。SHA1(redis)=b840fc02d524045429941cc15f59e41cb7be6c52
- 检查这个标签是否已与一个唯一ID关联(验证用户名是否重复)
用命令GET tag:b840fc02d524045429941cc15f59e41cb7be6c52:id - 如果上面的GET操作返回一个ID,则将其返回给用户。表示用户名已经被注册了。
- 否则...用INCR next.tag.id(自增加1)命令生成一个新的唯一ID(假定它返回123456)
- 最后关联标签和新的ID
SETNX tag:b840fc02d524045429941cc15f59e41cb7be6c52:id 123456 (如果另一个客户端比当前客户端更快,SETNX将不会设置key。而且,当key被成功设置时SETNX返回1,否则返回0.那么...让我们再做最后一步运算) - 如果SETNX返回1(key设置成功)则将123456返回给调用者,这就是我们的用户名ID,否则执行GET tag:b840fc02d524045429941cc15f59e41cb7be6c52:id 并将结果返回给调用者(表示注册成功)。
3.2.4 有序集合(Sorted Sets)类型
Sorted Sets和Sets结构相似,不同的是存在Sorted Sets中的数据会有一个score属性,并会在写入时就按这个score拍好序。
#向一个有序集合里添加元素
127.0.0.1:6379> ZADD days 0 mon #days是有序集合名,0是序号,mon是值
(integer) 1 127.0.0.1:6379> ZADD days 1 tue (integer) 1 127.0.0.1:6379> ZADD days 2 web (integer) 1 127.0.0.1:6379> ZADD days 3 thu (integer) 1 127.0.0.1:6379> ZADD days 4 fri (integer) 1 127.0.0.1:6379> ZADD days 5 sat (integer) 1 127.0.0.1:6379> ZADD days 6 sun (integer) 1 127.0.0.1:6379> zrange days 0 6 #查看集合索引0到6的元素 1) "mon" 2) "tue" 3) "web" 4) "thu" 5) "fri" 6) "sat" 7) "sun" #从上面我们可以看出,ZADD创建的集合是有序集合。 #查看有序集合days的具体值的排序 127.0.0.1:6379> zscore days mon "0" 127.0.0.1:6379> zscore days web "2" 127.0.0.1:6379> zscore days fri "4" root@redis-master ~]# redis-cli -a yunjisuan 127.0.0.1:6379> zscore days mon "0" 127.0.0.1:6379> zscore days web "2" 127.0.0.1:6379> zscore days fri "4" 127.0.0.1:6379> zcount days 3 6 (integer) 4 127.0.0.1:6379> ZRANGEBYSCORE days 3 6 1) "thu" 2) "fri" 3) "sat" 4) "sun"
- 集合是使用频率很高的数据类型,但是...对许多问题来说他们也有点太不讲顺序了;因此Redis1.2引入了有序集合。它和集合非常相似,也是二进制安全的字符串集合,但是这次带有关联的score,以及一个类似LRANGE的操作可以返回有序元素,此操作只能作用于有序集合,它就是,ZRANGE命令。
- 基本上有序集合从某种程度上说是SQL世界的索引在Redis中的等价物。例如在上面提到的reddit.com例子中,并没有提到如何根据用户投票和时间因素将新闻组合生成首页。我们将看到有序集合如何解决这个问题,但最好先从更简单的事情开始,阐明这个高级数据类型是如何工作的。让我们添加几个黑客,并将他们的生日作为“score”。
127.0.0.1:6379> zadd hackers 1940 "1940-Alan Kay" (integer) 1 127.0.0.1:6379> zadd hackers 1953 "1953-Richard Stallman" (integer) 1 127.0.0.1:6379> zadd hackers 1965 "1965-Yukihiro Matsumoto" (integer) 1 127.0.0.1:6379> zadd hackers 1916 "1916-Claude Shannon" (integer) 1 127.0.0.1:6379> zadd hackers 1969 "1969-Linus Torvalds" (integer) 1 127.0.0.1:6379> zadd hackers 1912 "1912-Alan Turing" (integer) 1对有序集合来说,按生日排序返回这些黑客易如反掌,因为他们已经是有序的。有序集合是通过一个dual-ported数据结构实现的,它包含一个精简的有序列表和一个hash table,因此添加一个元素的时间复杂度是O(log(N))。这还行,但当我们需要访问有序的元素时,Redis不必再做任何事情,它已经是有序的了:
127.0.0.1:6379> zadd hackers 1940 "1940-Alan Kay"
(integer) 1
127.0.0.1:6379> zadd hackers 1953 "1953-Richard Stallman" (integer) 1 127.0.0.1:6379> zadd hackers 1965 "1965-Yukihiro Matsumoto" (integer) 1 127.0.0.1:6379> zadd hackers 1916 "1916-Claude Shannon" (integer) 1 127.0.0.1:6379> zadd hackers 1969 "1969-Linus Torvalds" (integer) 1 127.0.0.1:6379> zadd hackers 1912 "1912-Alan Turing" (integer) 1 #利用zrange进行排序查询 127.0.0.1:6379> zrange hackers 0 6 1) "1912-Alan Turing" 2) "1916-Claude Shannon" 3) "1940-Alan Kay" 4) "1953-Richard Stallman" 5) "1965-Yukihiro Matsumoto" 6) "1969-Linus Torvalds" #利用zrevrange进行反向查询 127.0.0.1:6379> zrevrange hackers 0 -1 1) "1969-Linus Torvalds" 2) "1965-Yukihiro Matsumoto" 3) "1953-Richard Stallman" 4) "1940-Alan Kay" 5) "1916-Claude Shannon" 6) "1912-Alan Turing"
3.2.5 Hash类型
Redis能够存储key对多个属性的数据(比如user1,uname user1.passwd)
#存储一个hash类型test,他的属性是name,属性数据是yunjisuan
127.0.0.1:6379> hset test name yunjisuan
(integer) 1
#存储一个hash类型test,他的属性是age,属性数据是35
127.0.0.1:6379> hset test age 35 (integer) 1 #存储一个hash类型test,他的属性是sex,属性数据是non 127.0.0.1:6379> hset test sex nan (integer) 1 #查看hash类型test的所有属性的值 127.0.0.1:6379> hvals test 1) "yunjisuan" 2) "35" 3) "nan" #查看hash类型test的所有属性及属性所对应的值 127.0.0.1:6379> hgetall test 1) "name" 2) "yunjisuan" 3) "age" 4) "35" 5) "sex" 6) "nan"
参考文档:http://doc.redisfans.com/
第4章 redis多实例实战
4.1 创建redis的存储目录
#创建redis存储目录
[root@redis-master redis]# cat -n /usr/local/redis/conf/redis.conf | sed -n '187p'
   187  dir ./                      #修改本行的存储路径配置路径
[root@redis-master redis]# cat -n /usr/local/redis/conf/redis.conf | sed -n '187p' 187 dir /usr/local/redis/data/ #改成这个 [root@redis-master redis]# redis-cli -a yunjisuan shutdown #关闭redis服务 [root@redis-master redis]# mkdir /usr/local/redis/data #创建redis存储目录 [root@redis-master redis]# redis-server /usr/local/redis/conf/redis.conf & #后台启动redis进程 #向redis里写入数据,并保存 [root@redis-master redis]# redis-cli -a yunjisuan 127.0.0.1:6379> set name2 yunjisuan OK 127.0.0.1:6379> save #保存数据 [3456] 08 Oct 04:39:05.169 * DB saved on disk OK 127.0.0.1:6379> quit [root@redis-master redis]# ll /usr/local/redis/ total 12 drwxr-xr-x. 2 root root 4096 Oct 7 16:53 bin drwxr-xr-x. 2 root root 4096 Oct 8 04:33 conf drwxr-xr-x. 2 root root 4096 Oct 8 04:39 data [root@redis-master redis]# ll /usr/local/redis/data/ total 4 -rw-r--r--. 1 root root 49 Oct 8 04:39 dump.rdb #保存的rdb文件
4.2 创建redis多实例的存储目录及文件
#创建redis多实例存储目录
[root@redis-master redis]# mkdir -p /data/6380/data
[root@redis-master redis]# mkdir -p /data/6381/data #创建redis多实例配置文件 [root@redis-master redis]# cp /usr/local/redis/conf/redis.conf /data/6380/ [root@redis-master redis]# cp /usr/local/redis/conf/redis.conf /data/6381/ #修改多实例配置文件的数据存储路径 [root@redis-master redis]# sed -n '187p' /data/6380/redis.conf dir /data/6380/data #照此修改存储路径 [root@redis-master redis]# sed -n '187p' /data/6381/redis.conf dir /data/6381/data #照此修改存储路径 #修改多实例配置文件的占用端口 [root@redis-master redis]# sed -n '45p' /data/6380/redis.conf port 6380 #照此修改启动端口 [root@redis-master redis]# sed -n '45p' /data/6381/redis.conf port 6381 #照此修改启动端口 #修改多实例配置文件的pid文件位置 [root@redis-master redis]# sed -n '41p' /data/6380/redis.conf pidfile /data/6380/redis.pid #照此修改 [root@redis-master redis]# sed -n '41p' /data/6381/redis.conf pidfile /data/6381/redis.pid #照此修改 #开启多实例配置文件的持久化日志 [root@redis-master redis]# sed -n '449p' /data/6380/redis.conf appendonly yes #照此修改 [root@redis-master redis]# sed -n '449p' /data/6381/redis.conf appendonly yes #照此修改
4.3 启动redis多实例进程
[root@redis-master redis]# redis-server /data/6380/redis.conf &
[root@redis-master redis]# redis-server /data/6381/redis.conf &
4.4 查看redis多实例的进程启动情况
[root@redis-master redis]# netstat -antup | grep redis
tcp        0      0 0.0.0.0:6379 0.0.0.0:* LISTEN 3456/redis-server * tcp 0 0 0.0.0.0:6380 0.0.0.0:* LISTEN 3493/redis-server * tcp 0 0 0.0.0.0:6381 0.0.0.0:* LISTEN 3496/redis-server * tcp 0 0 :::6379 :::* LISTEN 3456/redis-server * tcp 0 0 :::6380 :::* LISTEN 3493/redis-server * tcp 0 0 :::6381 :::* LISTEN 3496/redis-server *
4.5 查看多实例文件夹目录树一览
[root@redis-master data]# tree /data
/data
├── 6380    #redis实例6380启动目录
│   ├── data #redis实例6380数据目录 │   │   ├── appendonly.aof #redis实例6380的数据持久化日志(记录了数据库的修改,类似binlog) │   │   └── dump.rdb #redis实例6380数据存储文件 │   └── redis.conf #redis实例6380配置文件 └── 6381 #redis实例6381启动目录 ├── data #redis实例6381数据目录 │   ├── appendonly.aof #redis实例6381的数据持久化日志(记录了数据库的修改,类似binlog) │   └── dump.rdb #redis实例6381数据存储文件 └── redis.conf #redis实例6381配置文件 4 directories, 6 files
或许有些同学会迷糊,appendonly.aof是做什么用的呢?
我们打开文件的内容查看如下:
[root@redis-master data]# cat /data/6380/data/appendonly.aof
*2
$6
SELECT
$1
0
*3
$3 set $4 name $9 yunjisuan *1 $4 save
我们发现appendonly.aof实际上里面记录的是我们对redis数据库的修改记录,这点类似于MySQL的binlog日志。
第5章 Redis主从同步
5.1 Redis主从同步特点
- 一个master可以拥有多个slave
- 多个slave可以连接同一个master,还可以连接到其他slave
- 主从复制不会阻塞master,在同步数据时,master可以继续处理client请求。
- 提高系统的伸缩性
5.2 Redis主从同步的过程
- 配置好slave服务器连接master后,slave会建立和master的连接,然后发送sync命令。
- 无论是第一次同步建立的连接还是连接断开后的重新连接,master都会启动一个后台进程,将数据库快照保存到磁盘文件中,同时master主进程会开始收集新的写命令并缓存起来。
- 当后台进程完成写磁盘文件后,master就将快照文件发送给slave,slave将文件保存到磁盘上,然后加载到内存将数据库快照恢复到slave上。
- slave完成快照文件的恢复后,master就会把缓存的命令都转发给slave,slave更新内存数据库。
- 后续master收到的写命令都会通过开始建立的连接发送给slave。从master到slave的同步数据的命令和从client到master发送的命令使用相同的协议格式。当master和slave的连接断开时,slave可以自动重新建立连接。如果master同时收到多个slave发来的同步连接命令,只会使用启动一个进程来写数据库镜像,然后发送给所有slave。
(1)Slave服务器连接到Master
服务器
(2)Slave服务器发送SYNC命令
(3)Master服务器备份数据库到.rdb文件
(4)Master服务器把.rdb文件传输给Slave服务器
(5)Slave服务器把.rdb文件数据导入到数据库中。
上面的这5步是同步的第一阶段,接下来在Master服务器上调用每一个命令都使用replicationFeedSlaves()来同步到Slave服务器。
Redis的主从同步具有明显的分布式缓存特点:
(1)一个master可以有多个slave,一个slave下面还可以有多个slave
(2)slave不仅可以连接到master,slave也可以连接其他slave形成树状。
(3)主从同步不会阻塞master,但是会阻塞slave。也就是说当一个或多个slave与master进行初次同步数据时,master可以继续处理client发来的请求。相反slave在初次同步数据时则会阻塞不能处理client的请求。
(4)主从同步可以同来提高系统的可伸缩性,我们可以用多个slave专门处理client端的读请求,也可以用来做简单的数据冗余或者只在slave上进行持久化从而提升集群的整体性能。
(5)对于老版本的redis,每次重连都会重新发送所有数据。
5.3 Redis主动同步设置方法
有两种方式可以用来完成进行主从Redis服务器的同步设置。都需要在slave服务器上进行,指定slave需要连接的Redis服务器(可能是master,也可能是slave)。
5.3.1 在redis.conf配置文件中设置
通过简单的配置slave(master端无需配置),用户就能使用redis的主从复制
我们让端口6379的redis做master;端口6380的redis做slave
#我们修改/data/6380/redis.conf的配置文件
[root@redis-master ~]# cat -n /data/6380/redis.conf | sed -n '189,215p'
   189  ################################# REPLICATION ################################# 190 191 # Master-Slave replication. Use slaveof to make a Redis instance a copy of 192 # another Redis server. Note that the configuration is local to the slave 193 # so for example it is possible to configure the slave to save the DB with a 194 # different interval, or to listen to another port, and so on. 195 # 196 # slaveof <masterip> <masterport> 197 slaveof 192.168.0.135 6379 在此处添加本行内容,指定主master的IP和端口 198 # If the master is password protected (using the "requirepass" configuration 199 # directive below) it is possible to tell the slave to authenticate before 200 # starting the replication synchronization process, otherwise the master will 201 # refuse the slave request. 202 # 203 # masterauth <master-password> 204 masterauth yunjisuan 在此处添加本行内容,指定验证的密码 205 # When a slave loses its connection with the master, or when the replication 206 # is still in progress, the slave can act in two different ways: 207 # 208 # 1) if slave-serve-stale-data is set to 'yes' (the default) the slave will 209 # still reply to client requests, possibly with out of date data, or the 210 # data set may just be empty if this is the first synchronization. 211 # 212 # 2) if slave-serve-stale-data is set to 'no' the slave will reply with 213 # an error "SYNC with master in progress" to all the kind of commands 214 # but to INFO and SLAVEOF. 215 #
接下来我们重启redis的服务进程
[root@redis-master ~]# redis-cli -p 6380 -a yunjisuan shutdown #关闭6380redis进程 [3558] 08 Oct 09:03:10.218 # User requested shutdown... [3558] 08 Oct 09:03:10.218 * Calling fsync() on the AOF file. [3558] 08 Oct 09:03:10.218 * Saving the final RDB snapshot before exiting. [3558] 08 Oct 09:03:10.220 * DB saved on disk [3558] 08 Oct 09:03:10.220 # Redis is now ready to exit, bye bye... [3]+ Done redis-server /data/6380/redis.conf (wd: /data) (wd now: ~) [root@redis-master ~]# redis-server /data/6380/redis.conf & #后台启动当再次启动从库时出现如下信息:
[3616] 08 Oct 09:07:50.955 # Server started, Redis version 2.8.9 [3616] 08 Oct 09:07:50.965 * DB saved on disk [3616] 08 Oct 09:07:50.965 * DB loaded from append only file: 0.010 seconds [3616] 08 Oct 09:07:50.965 * The server is now ready to accept connections on port 6380 [3616] 08 Oct 09:07:51.958 * Connecting to MASTER 192.168.0.135:6379 #连接master [3616] 08 Oct 09:07:51.958 * MASTER <-> SLAVE sync started #开始发送sync [3616] 08 Oct 09:07:51.958 * Non blocking connect for SYNC fired the event. #这是一个不阻塞事件 [3616] 08 Oct 09:07:51.958 * Master replied to PING, replication can continue... #master应答了ping,同步开始 [3616] 08 Oct 09:07:51.959 * Partial resynchronization not possible (no cached master) #重新进行同步不可能(master没有缓存内容) [3616] 08 Oct 09:07:51.961 * Full resync from master: #从master同步全部数据 933d3b0123f2d72cf106d901434898aab24d2a6e:1 [3616] 08 Oct 09:07:52.052 * MASTER <-> SLAVE sync: receiving 49 bytes from master #从master接收到49字节数据 [3616] 08 Oct 09:07:52.052 * MASTER <-> SLAVE sync: Flushing old data #刷新旧数据 [3616] 08 Oct 09:07:52.053 * MASTER <-> SLAVE sync: Loading DB in memory #数据放到内存 [3616] 08 Oct 09:07:52.053 * MASTER <-> SLAVE sync: Finished with success #同步完成 [3616] 08 Oct 09:07:52.054 * Background append only file rewriting started by pid 3620 #AOF重写 [3620] 08 Oct 09:07:52.060 * SYNC append only file rewrite performed [3620] 08 Oct 09:07:52.060 * AOF rewrite: 6 MB of memory used by copy-on-write [3616] 08 Oct 09:07:52.159 * Background AOF rewrite terminated with success #AOF重写成功 [3616] 08 Oct 09:07:52.159 * Parent diff successfully flushed to the rewritten AOF (0 bytes) [3616] 08 Oct 09:07:52.159 * Background AOF rewrite finished successfully #AOF重写完毕5.3.2 进行redis主从同步测试
[root@redis-master ~]# redis-cli -a yunjisuan -p 6380 get name      #获取redis6380的键name的值
"benet"
[root@redis-master ~]# redis-cli -a yunjisuan -p 6379 set name xxxxx    #向redis6379里存一个key=name,value=xxxxx的数据
OK
[root@redis-master ~]# redis-cli -a yunjisuan -p 6380 get name  #获取redis6380的键name的值
"xxxxx"
综上所示:redis主从同步成功
5.3.3 redis主从同步相关配置参数解释
[root@redis-master ~]# cat -n /data/6380/redis.conf | sed -n "189,324p"
189 ################################# REPLICATION ################################# 190 191 # Master-Slave replication. Use slaveof to make a Redis instance a copy of 192 # another Redis server. Note that the configuration is local to the slave 193 # so for example it is possible to configure the slave to save the DB with a 194 # different interval, or to listen to another port, and so on. 195 # 196 # slaveof <masterip> <masterport> 197 slaveof 192.168.0.135 6379 用于标识master的连接IP及端口号 198 # If the master is password protected (using the "requirepass" configuration 199 # directive below) it is possible to tell the slave to authenticate before 200 # starting the replication synchronization process, otherwise the master will 201 # refuse the slave request. 202 # 203 # masterauth <master-password> 204 masterauth yunjisuan 如果master设置了连接密码,这里要写上 205 # When a slave loses its connection with the master, or when the replication 206 # is still in progress, the slave can act in two different ways: 207 # 208 # 1) if slave-serve-stale-data is set to 'yes' (the default) the slave will 209 # still reply to client requests, possibly with out of date data, or the 210 # data set may just be empty if this is the first synchronization. 211 # 212 # 2) if slave-serve-stale-data is set to 'no' the slave will reply with 213 # an error "SYNC with master in progress" to all the kind of commands 214 # but to INFO and SLAVEOF. 215 # 216 slave-serve-stale-data yes 如果设置yes,那么一旦从库连接不上主库,从库继续响应客户端发来的请求并回复,但是回复的内容有可能是过期的。如果no,那么slave会应答一个错误提示,就不提供访问了。 217 218 # You can configure a slave instance to accept writes or not. Writing against 219 # a slave instance may be useful to store some ephemeral data (because data 220 # written on a slave will be easily deleted after resync with the master) but 221 # may also cause problems if clients are writing to it because of a 222 # misconfiguration. 223 # 224 # Since Redis 2.6 by default slaves are read-only. 225 # 226 # Note: read only slaves are not designed to be exposed to untrusted clients 227 # on the internet. It's just a protection layer against misuse of the instance. 228 # Still a read only slave exports by default all the administrative commands 229 # such as CONFIG, DEBUG, and so forth. To a limited extent you can improve 230 # security of read only slaves using 'rename-command' to shadow all the 231 # administrative / dangerous commands. 232 slave-read-only yes yes:从库被设置为只能读 233 234 # Slaves send PINGs to server in a predefined interval. It's possible to change 235 # this interval with the repl_ping_slave_period option. The default value is 10 236 # seconds. 237 # 238 # repl-ping-slave-period 10 239 240 # The following option sets the replication timeout for: 241 # 242 # 1) Bulk transfer I/O during SYNC, from the point of view of slave. 243 # 2) Master timeout from the point of view of slaves (data, pings). 244 # 3) Slave timeout from the point of view of masters (REPLCONF ACK pings). 245 # 246 # It is important to make sure that this value is greater than the value 247 # specified for repl-ping-slave-period otherwise a timeout will be detected 248 # every time there is low traffic between the master and the slave. 249 # 250 # repl-timeout 60 251 252 # Disable TCP_NODELAY on the slave socket after SYNC? 253 # 254 # If you select "yes" Redis will use a smaller number of TCP packets and 255 # less bandwidth to send data to slaves. But this can add a delay for 256 # the data to appear on the slave side, up to 40 milliseconds with 257 # Linux kernels using a default configuration. 258 # 259 # If you select "no" the delay for data to appear on the slave side will 260 # be reduced but more bandwidth will be used for replication. 261 # 262 # By default we optimize for low latency, but in very high traffic conditions 263 # or when the master and slaves are many hops away, turning this to "yes" may 264 # be a good idea. 265 repl-disable-tcp-nodelay no 266 267 # Set the replication backlog size. The backlog is a buffer that accumulates 268 # slave data when slaves are disconnected for some time, so that when a slave 269 # wants to reconnect again, often a full resync is not needed, but a partial 270 # resync is enough, just passing the portion of data the slave missed while 271 # disconnected. 272 # 273 # The biggest the replication backlog, the longer the time the slave can be 274 # disconnected and later be able to perform a partial resynchronization. 275 # 276 # The backlog is only allocated once there is at least a slave connected. 277 # 278 \# repl-backlog-size 1mb 用于同步的backlog大小,用于从库增量同步 279 280 # After a master has no longer connected slaves for some time, the backlog 281 # will be freed. The following option configures the amount of seconds that 282 # need to elapse, starting from the time the last slave disconnected, for 283 # the backlog buffer to be freed. 284 # 285 # A value of 0 means to never release the backlog. 286 # 287 \# repl-backlog-ttl 3600 当主从连接断开,backlog的生存周期 288 289 # The slave priority is an integer number published by Redis in the INFO output. 290 # It is used by Redis Sentinel in order to select a slave to promote into a 291 # master if the master is no longer working correctly. 292 # 293 # A slave with a low priority number is considered better for promotion, so 294 # for instance if there are three slaves with priority 10, 100, 25 Sentinel will 295 # pick the one with priority 10, that is the lowest. 296 # 297 # However a special priority of 0 marks the slave as not able to perform the 298 # role of master, so a slave with priority of 0 will never be selected by 299 # Redis Sentinel for promotion. 300 # 301 # By default the priority is 100. 302 slave-priority 100 slave的优先级 303 304 # It is possible for a master to stop accepting writes if there are less than 305 # N slaves connected, having a lag less or equal than M seconds. 306 # 307 


 125
125


 被折叠的 条评论
为什么被折叠?
被折叠的 条评论
为什么被折叠?
 到【灌水乐园】发言


