


php 命令行应用库
简洁的php命令行应用库。提供控制台参数解析, 颜色风格输出, 用户信息交互, 特殊格式信息显示
命令行应用, 命令行的选项参数解析
命令行 input/output
颜色风格输出支持
特殊格式信息显示
用户信息交互支持
其他功能
项目地址
注意:
master 分支是要求 php >= 7 的(推荐使用)。
php5 是 php 5 的分支,但有些时间没更新了(但是基本的功能都支持)。
安装
使用 composer
编辑 composer.json,在 require 添加
"inhere/console": "dev-master",
然后执行: composer update
直接拉取
git clone https://git.oschina.net/inhere/php-console.git // git@osc
git clone https://github.com/inhere/php-console.git // github
快速开始
如下,新建一个入口文件。 就可以开始使用了
// file: examples/app
use inhere\console\io\Input;
use inhere\console\io\Output;
use inhere\console\App;
$config = [];
$input = new Input;
$output = new Output;
$app = new App($config, $input, $output);
// add command routes
$app->command('demo', function (Input $in, Output $out) {
$cmd = $in->getCommand();
$out->info('hello, this is a test command: ' . $cmd);
});
// ... ...
// run
$app->run();
然后在命令行里执行 php examples/app, 立即就可以看到如下输出了:
$php examples/app
Usage:
examples/app [route|command] [arg1=value1 arg2=value ...] [-v|-h ...]
Example:
examples/app test
examples/app home/index
There are all console controllers and independent commands.
Group Commands:(by Controller)
... No register any group command
Independent Commands:
demo A Closure // 这就是我们添加的一个独立命令
Internal Commands:
helpShow application helpinformation
list List all group and independent commands
version Show application version information
more please see: examples/app [controller|command]
添加命令
添加命令的方式有三种
如上所示,使用闭包可以快速的添加一个简单的命令
通过继承 inhere\console\Command 添加独立命令
use inhere\console\utils\AnsiCode;
/**
* Class Test
* @package app\console\commands
*/
class TestCommand extends Command
{
/**
* execute
* @param inhere\console\io\Input $input
* @param inhere\console\io\Output $output
* @return int
*/
public function execute($input, $output)
{
$output->write('hello, this in ' . __METHOD__);
}
}
注册命令,在 $app->run() 之前通过 $app->command('test', TestCommand::class) 注册独立命令。
通过继承 inhere\console\Controller 添加一组命令(命令行的控制器类)
use inhere\console\Controller;
/**
* default command controller. there are some command usage examples
*/
class HomeController extends Controller
{
const DESCRIPTION = 'default command controller. there are some command usage examples';
/**
* this is a command's description message
* the second line text
* @usage usage message
* @example example text one
* the second line example
*/
public function indexCommand()
{
$this->write('hello, welcome!! this is ' . __METHOD__);
}
}
注册命令,在 $app->run() 之前通过 $app->controller('home', HomeController::class) 注册命令组。
说明:
命令组(eg HomeController) 中的命令(eg: indexCommand)上注释是可被解析的。
当你使用 php examples/app home -h 时,可以查看到 HomeController::indexCommand 的描述注释文本
当使用 php examples/app home/index -h 时,可以查看到关于 HomeController::indexCommand 更详细的信息。包括描述注释文本、@usage 、@example
小提示:注释里面同样支持带颜色的文本输出 eg: this is a command's description message
更多请查看 examples 中的示例代码
输入
输入对象是 inhere\console\io\Input 的实例
在终端中执行如下命令,用于演示参数选项等信息的解析:
$php examples/app home/useArg status=2 name=john arg0 -s=test --page=23 --id=154 -e dev -v vvv -d -rf --debug --test=false
一点说明:
没有 - 开头的都认为是参数 (eg: status=2 arg0)
反之,以 - 开头的则是选项数据
-- 开头的是长选项(long-option)
一个 - 开头的是短选项(short-option)
支持混合式选项的赋值 --id=154 和 --id 154 是等效的
注意: 输入如下的字符串将会认为是布尔值
on|yes|true -- true
off|no|false -- false
获取命令基本信息:
echo $input->getScript(); // 'examples/app' 执行的入口脚本文件
echo $input->getCommand(); // 'home/useArg' 解析到的第一个参数将会被认为是命令名称,并且不会再存入到 参数列表中
echo $input->getFullScript(); // 命令行输入的原样字符串
获取解析后的参数信息
通常的参数如 arg0 只能根据 index key 来获取值。但是提供以等号(=)连接的方式来指定参数名(eg: status=2)
打印所有的参数信息:
var_dump($input->getArgs());
output:
array(3) {
'status' => string(1) "2"
'name' => string(4) "john"
[0] => string(4) "arg0"
}
扩展方法:
// argument
$first = $input->getFirstArg(); // 'arg0'
$status = $input->get('status', 'default value'); // '2'
获取解析后的选项信息
没有值的选项,将设置默认值为 bool(true)
短选项不仅仅只是以一个 - 开头,而且名称 只能是一个字符
多个(默认值的)短选项可以合并到一起写。如 -rf 会被解析为两个短选项 'r' => bool(true) 'f' => bool(true)
打印所有的选项信息:
var_dump($input->getOpts());
// var_dump($input->getLOpts()); // 只打印长选项信息
// var_dump($input->getSOpts()); // 只打印短选项信息
output:
array(10) {
's' => string(4) "test"
'e' => string(3) "dev"
'v' => string(3) "vvv"
'd' => bool(true)
'r' => bool(true)
'f' => bool(true)
'page' => string(2) "23"
'id' => string(3) "154"
'debug' => bool(true)
'test' => bool(false)
}
扩展方法:
// option
$page = $input->getOpt('page') // '23'
$debug = $input->boolOpt('debug') // True
$test = $input->boolOpt('test') // False
$d = $input->boolOpt('d') // True
$d = $input->sBoolOpt('d') // True
$showHelp = $input->sameOpt(['h','help']) // 获取到一个值就返回,适合同一个含义的选项
读取用户输入
echo "Your name:";
$name = $input->read();
// in terminal
// Your name: simon
echo $name; // 'simon'
也可以直接将消息文本放入参数 $name = $input->read("Your name:");
输出
输出对象是 inhere\console\io\Output 的实例
基本输出:
public function write(mixed $messages = '', $nl = true, $quit = false)
$messages mixed 要输出的消息。可以是字符串或数组。
$nl bool 输出后是否换行。 默认 true
$quit bool|int 输出后是否退出脚本。默认 false, 其它值都会转换为 int 作为退出码(true 会转换为 0)。
$output->write('hello');
$output->write(['hello', 'world']);
格式化的输出
带颜色风格的输出
$output 的 write() 方法支持带颜色风格的输出(当然得终端支持才行)
$output->write('hello world');
已经内置了常用的风格:
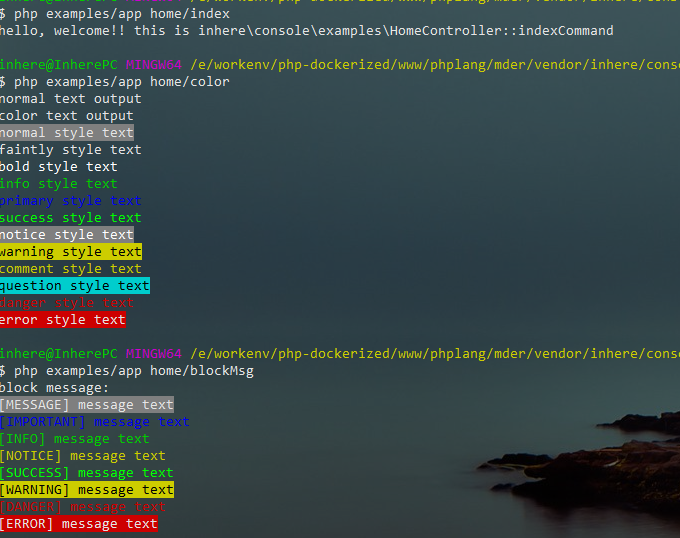
更多特殊格式化输出
来自于类 inhere\console\utils\Show。
output 实例拥有 inhere\console\utils\Show 的所有格式化输出方法。不过都是通过对象式访问的。
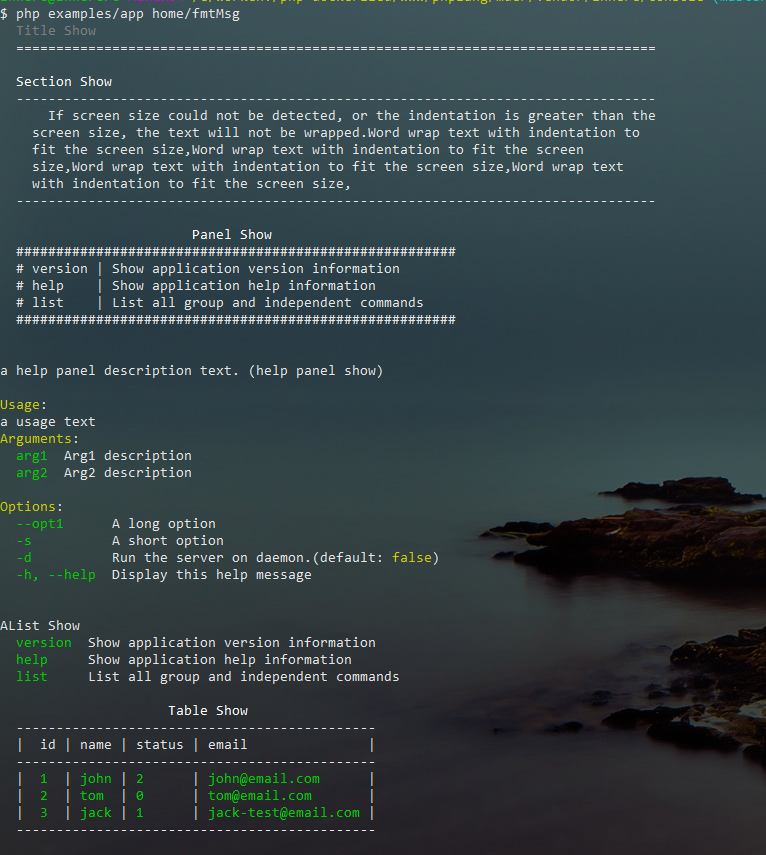
标题文本输出
使用 Show::title()/$output->title()
public static function title(string $title, array $opts = [])
段落式文本输出
使用 Show::section()/$output->section()
public static function section(string $title, string|array $body, array $opts = [])
列表数据展示输出
public static function aList(array $data, string $title, array $opts = [])
使用 Show::aList()/$output->aList()
$title = 'list title';
$data = [
'name' => 'value text',
'name2' => 'value text 2',
];
Show::aList($data, $title);
多列表数据展示输出
public static function mList(array $data, array $opts = [])
使用 Show::mList()/$output->mList() 别名方法 Show::multiList()
$data = [
'list1 title' => [
'name' => 'value text',
'name2' => 'value text 2',
],
'list2 title' => [
'name' => 'value text',
'name2' => 'value text 2',
],
// ... ...
];
Show::mList($data);
面板展示信息输出
public static function panel(mixed $data, $title = 'Information Panel', $borderChar = '*')
使用 Show::panel()/$output->panel()
数据表格信息输出
public static function table(array $data, $title = 'Data Table', array $opts = [])
使用 Show::table()/$output->table()
可直接渲染从数据库拉取的数据(会自动提取字段名作为表头)
// like from database query's data.
$data = [
[ col1 => value1, col2 => value2, col3 => value3, ... ], // first row
[ col1 => value4, col2 => value5, col3 => value6, ... ], // second row
... ...
];
Show::table($data, 'a table');
自己构造数据时,还要写字段名就有些麻烦了。so, 可以通过选项配置 $opts 手动配置表头字段列表
// use custom head
$data = [
[ value1, value2, value3, ... ], // first row
[ value4, value5, value6, ... ], // second row
// ... ...
];
$opts = [
'showBorder' => true,
'tHead' => [col1, col2, col3, ...]
];
Show::table($data, 'a table', $opts);
快速的渲染一个帮助信息面板
public static function helpPanel(array $config, $showAfterQuit = true)
使用 Show::helpPanel()/$output->helpPanel()
Show::helpPanel([
Show::HELP_DES => 'a help panel description text. (help panel show)',
Show::HELP_USAGE => 'a usage text',
Show::HELP_ARGUMENTS => [
'arg1' => 'arg1 description',
'arg2' => 'arg2 description',
],
Show::HELP_OPTIONS => [
'--opt1' => 'a long option',
'-s' => 'a short option',
'-d' => 'Run the server on daemon.(default: false)',
'-h, --help' => 'Display this help message'
],
], false);
渲染效果预览
用户交互方法
需引入类 inhere\console\utils\Interact
从给出的列表中选择一项
public static function select($description, $options, $default = null, $allowExit=true)
public static function choice($description, $options, $default = null, $allowExit=true) // alias method
使用 Interact::select() (alias Interact::chioce())
示例 1: 只有值,没有选项key
$select = Interact::select('Your city is ?', [
'chengdu', 'beijing', 'shanghai'
]);
渲染结果(in terminal):
Your city is ?
0) chengdu
1) beijing
2) shanghai
q) Quit // quit option. is auto add. can setting it by 4th argument.
You choice: 0
echo "$select"; // '0'
示例 2:
有选项key, 并且设置了一个默认值.
$select = Interact::select('Your city is ?', [
'a' => 'chengdu',
'b' => 'beijing',
'c' => 'shanghai'
], 'a');
渲染结果(in terminal):
Your city is?
a) chengdu
b) beijing
c) shanghai
q) Quit // quit option. is auto add. can setting it by 4th argument.
You choice[default:a] : b
echo $select; // 'b'
要求确认是否继续执行
public static function confirm($question, $default = true) bool
使用 Interact::confirm() :
$result = Interact::confirm('Whether you want to continue ?');
渲染结果(in terminal):
Whether you want to continue ?
Please confirm (yes|no) [default:yes]: n
结果:
var_dump($result); // bool(false)
询问,并返回用户的回答
public static function ask($question, $default = null, \Closure $validator = null)
public static function question($question, $default = null, \Closure $validator = null)
使用 Interact::question()/Interact::ask()
$answer = Interact::ask('Please input your name?', null, function ($answer) {
if (!preg_match('/\w+/', $answer)) {
Interact::error('The name must match "/\w+/"');
return false;
}
return true;
});
有次数限制的询问
public static function limitedAsk($question, $default = null, \Closure $validator = null, $times = 3)
有次数限制的询问,提出问题
若输入了值且验证成功则返回 输入的结果
否则,会连续询问 $times 次,若仍然错误,退出
// no default value
$answer = Interact::limitedAsk('please input you age?', null, function($age)
{
if ($age<1 || $age>100) {
Interact::error('Allow the input range is 1-100');
return false;
}
return true;
});
License
MIT


 326
326


 被折叠的 条评论
为什么被折叠?
被折叠的 条评论
为什么被折叠?
 到【灌水乐园】发言


