


原标题: Android学习笔记五之Service
1、什么是Service?
什么是Service?Service是系统的四大组件之一,官方文档是这样描述Service的:
A Service is an application component that can perform long-running operations in the background and does not provide a user interface. Another application component can start a service and it will continue to run in the background even if the user switches to another application. Additionally, a component can bind to a service to interact with it and even perform interprocess communication (IPC). For example, a service might handle network transactions, play music, perform file I/O, or interact with a content provider, all from the background.
翻译过来就是:服务是一个应用程序组件,可以在后台执行长时间运行的操作,不提供用户界面。另一个应用程序组件可以启动一个服务,它将继续在后台运行,即使用户切换到另一个应用程序。此外,一个组件可以绑定到一个服务的互动,甚至执行进程间通信(IPC)。例如,一个服务可以处理网络交互、播放音乐、执行文件I/O、或与内容提供者进行交互,都来自后台。
2、Service的分类
按运行地点分:
本地服务(LocalService):本地服务依附在主线程上而不是一个独立的进程,这样节约了内存资源,LocalService在同一进程中,不需要IPC和AIDL。但是LocalService当主进程被kill掉之后,服务也会停止。例如用于音乐播放等
远程服务(RemoteService):RemoteService是一个独立的进程,当Activity所在的进程被kill掉之后,还会存在,可以为多个进程服务,不受进程影响。对应进程名格式为所在包名加上你指定的android:process字符串。一般是系统提供的服务,这种服务会常驻内存,占用一定的资源。RemoteService一般非常少见,并且一般都是系统服务。
按运行类型分:
前台服务:在Notification显示正在运行图标,当服务被kill掉的时候,Notification显示的图标也会消失,对用户有一定的通知作用,例如音乐播放服务。
后台服务:默认的服务就是后台服务,不会再通知栏显示正在运行图标,当服务被终止的时候,用户看不到效果。某些不需要运行或者终止提示的服务,例如天气更新等
后台服务创建运行图标并且调用startForeground方法,才会使后台服务变成前台服务。
按使用方式分类:
startService 启动的服务:主要用于启动一个服务执行后台任务,不进行通信。停止服务使用stopService,启动之后,关联的Activity销毁并不会影响Service。
bindService 启动的服务:该方法启动的服务要进行通信。停止服务使用unbindService。当绑定的Activity销毁的时候,Service也会销毁。
startService 同时也 bindService 启动的服务:停止服务应同时使用stepService与unbindService
3、Service与Thread的区别
很多时候,我们都觉得用Thread比用Service简单的多,但是为什么还会使用Service呢?
Thread:Thread是比进程更小的单元,Thread 是程序执行的最小单元,它是分配CPU的基本单位。可以用 Thread 来执行一些异步的操作。一个进程里面可以有多个Thread,Thread必须运行在进程里面
Service:Service 是Android的一种机制,当它运行的时候如果是LocalService,那么对应的 Service 是运行在主进程上的。如:onCreate,onStart 这些函数在被系统调用的时候都是在主进程上运行的。如果是RemoteService,那么对应的 Service 则是运行在独立进程上。
Thread是独立于Activity运行的,当一个Activity启动一个Thread的时候,只要Thread的run方法还没有执行完或者不是在Activity中停止Thread,Thread会一直执行。这样就会产生一个问题:当Thread还在运行,但是Activity被Finish掉了,其他的Activity不能持有当前Thread。
举个例子:如果你的 Thread 需要不停地隔一段时间就要连接服务器做同步的话,该 Thread 需要在 Activity 没有启动的时候也在运行。这个时候当你启动一个新Activity 就没有办法在该 Activity 里面控制之前创建的Thread。因此你便需要创建并启动一个 Service ,在 Service 里面创建、运行并控制该 Thread,这样便解决了该问题(因为任何 Activity 都可以控制同一 Service,而系统也只会创建一个对应 Service 的实例)。
可以把 Service 想象成一种消息服务,我们可以在任何有 Context 的地方调用 Context.startService、Context.stopService、Context.bindService,Context.unbindService,来控制它,你也可以在 Service 里注册 BroadcastReceiver,在其他地方通过发送 broadcast 来控制它,当然这些都是 Thread 做不到的。所以我们需要Service。
4、Service的生命周期
与Activity一样,Service也有一系列的生命周期方法,我们可以实现它们来监测service状态的变化,并且在适当的时候执行适当的工作。如下图就是Service的生命周期图

由上图可以知道,Android使用Service有两种方式,绑定启动bindService和startService。还有一种就启动后之后绑定Service。
Service生命周期方法详解:
public class ExampleService extends Service { int mStartMode; // indicates how to behave if the service is killed IBinder mBinder; // interface for clients that bind boolean mAllowRebind; // indicates whether onRebind should be used @Override public void onCreate() { // The service is being created } @Override public int onStartCommand(Intent intent, int flags, int startId) { // The service is starting, due to a call to startService() return mStartMode; } @Override public IBinder onBind(Intent intent) { // A client is binding to the service with bindService() return mBinder; } @Override public boolean onUnbind(Intent intent) { // All clients have unbound with unbindService() return mAllowRebind; } @Override public void onRebind(Intent intent) { // A client is binding to the service with bindService(), // after onUnbind() has already been called } @Override public void onDestroy() { // The service is no longer used and is being destroyed } }
onCreate()方法:当Service第一次被创建后立即回调该方法,该方法在Service整个生命周期中之调用一次
onStartCommand(Intent intent, int flags, int startId)方法:当客户端调用startService(Intent)方法时会回调,可多次调用StartService方法, 但不会再创建新的Service实例,而是继续复用前面产生的Service实例,但会继续回调 onStartCommand()方法!
onBind(Intent intent)方法:此方法是Service都必须实现的方法,该方法会返回一个 IBinder对象,app通过该对象与Service组件进行通信!
onUnbind(Intent intent)方法:当该Service上绑定的所有客户端都断开时会回调该方法!
onDestroy()方法:当Service被销毁的时候会回调该方法,该方法只会回调一次!
onRebind(Intent intent)方法:此方法在app调用onUnbind()方法之后需要重新绑定Service的时候调用。
StartService启动Service
第一次启动会创建一个Service实例,依次调用onCreate()(onCreate方法只会调用一次)和onStartCommand()方法,此时Service 进入运行状态,如果再次调用StartService启动Service,将不会再创建新的Service对象, 系统会直接复用前面创建的Service对象,调用它的onStartCommand()方法!该Service将会一直在后台运行,而不管对应程序的Activity是否在运行,直到被调用stopService,或自身的stopSelf方法。当然如果系统资源不足,android系统也可能结束服务。
BindService启动Service
如果一个Service被某个Activity 调用 Context.bindService 方法绑定启动,此后如果再次使用bindService绑定Service,系统不会创建新的Sevice实例,也不会再调用onBind()方法,只会直接把IBinder对象传递给其他后来增加的客户端!不管调用 bindService 调用几次,onCreate方法都只会调用一次,同时onStart方法始终不会被调用。当连接建立之后,Service将会一直运行,除非调用Context.unbindService 断开连接或者之前调用bindService 的 Context 不存在了(如Activity被finish的时候),系统将会自动停止Service,对应onDestroy将被调用。
StartService启动Service后bindService绑定
如果一个Service又被启动又被绑定,则该Service将会一直在后台运行。并且不管如何调用,onCreate始终只会调用一次,对应startService调用多少次,Service的onStart便会调用多少次。调用unbindService将不会停止Service,而必须调用 stopService 或 Service的 stopSelf 来停止服务。
特别注意
当调用bindService绑定Service的时候,必须要在某处调用unbindService解绑Service
当使用startService的时候,必须要使用stopService停止服务
当同时用startService和bindService时,要终止Service,必须要同时调用unbindService和stopService,不管 startService 与 bindService 的调用顺序,如果先调用 unbindService 此时服务不会自动终止,再调用 stopService 之后服务才会停止,如果先调用 stopService 此时服务也不会终止,而再调用 unbindService 或者 之前调用 bindService 的 Context 不存在了(如Activity 被 finish 的时候)之后服务才会自动停止;
旋转手机屏幕的时候,默认状态下bindService会断开
当想要使用Service的时候,必须要在AndroidManifest.xml中注册。
5、IntentService
由于Service和Activity一样,都是运行在主线程中的,如果直接在Service里面执行耗时操作会ANR,所以谷歌提供了一个IntentService来处理耗时操作。简单来说,IntentService是继承于Service并处理异步请求的一个类,在IntentService内有一个工作线程来处理耗时操作,启动IntentService的方式和启动传统Service一样,同时,当任务执行完后,IntentService会自动停止,而不需要我们去手动控制。另外,可以启动IntentService多次,而每一个耗时操作会以worker queue的方式在IntentService的onHandleIntent回调方法中执行,并且,每次只会执行一个worker Thread,执行完第一个再执行第二个,以此类推。而且,所有请求都在一个单线程中,不会阻塞应用程序的主线程(UI Thread),同一时间只处理一个请求。
IntentService在处理事务时,还是采用的Handler方式,创建一个名叫ServiceHandler的内部Handler,并把它直接绑定到HandlerThread所对应的子线程。 ServiceHandler把处理一个intent所对应的事务都封装到叫做onHandleIntent的虚函数;因此我们直接实现虚函数onHandleIntent,再在里面根据Intent的不同进行不同的事务处理就可以了。另外,IntentService默认实现了Onbind()方法,返回值为null。
使用IntentService需要两个步骤:
1、写构造函数
2、实现虚函数onHandleIntent,并在里面根据Intent的不同进行不同的事务处理。
这样做的好处是:处理异步请求的时候可以减少写代码的工作量,比较轻松地实现项目的需求
注意:IntentService的构造函数一定是参数为空的构造函数,然后再在其中调用super(“name”)这种形式的构造函数。因为Service的实例化是系统来完成的,而且系统是用参数为空的构造函数来实例化Service的
public class MyIntentService extends IntentService { final static String TAG="robin"; public MyIntentService() { super("com.lenovo.robin.test.MyIntentService"); Log.i(TAG,this+" is constructed"); } @Override protected void onHandleIntent(Intent arg0) { Log.i(TAG,"begin onHandleIntent() in "+this); try { Thread.sleep(10*1000); } catch (InterruptedException e) { e.printStackTrace(); } Log.i(TAG,"end onHandleIntent() in "+this); } public void onDestroy() { super.onDestroy(); Log.i(TAG,this+" is destroy"); } }
IntentService源码
package android.app; import android.content.Intent; import android.os.Handler; import android.os.HandlerThread; import android.os.IBinder; import android.os.Looper; import android.os.Message; public abstract class IntentService extends Service { private volatile Looper mServiceLooper; private volatile ServiceHandler mServiceHandler; private String mName; private boolean mRedelivery; private final class ServiceHandler extends Handler { public ServiceHandler(Looper looper) { super(looper); } @Override public void handleMessage(Message msg) { onHandleIntent((Intent)msg.obj); stopSelf(msg.arg1); } } public IntentService(String name) { super(); mName = name; } public void setIntentRedelivery(boolean enabled) { mRedelivery = enabled; } @Override public void onCreate() { // TODO: It would be nice to have an option to hold a partial wakelock // during processing, and to have a static startService(Context, Intent) // method that would launch the service & hand off a wakelock. super.onCreate(); HandlerThread thread = new HandlerThread("IntentService[" + mName + "]"); thread.start(); mServiceLooper = thread.getLooper(); mServiceHandler = new ServiceHandler(mServiceLooper); } @Override public void onStart(Intent intent, int startId) { Message msg = mServiceHandler.obtainMessage(); msg.arg1 = startId; msg.obj = intent; mServiceHandler.sendMessage(msg); } /** * You should not override this method for your IntentService. Instead, * override {@link #onHandleIntent}, which the system calls when the IntentService * receives a start request. * @see android.app.Service#onStartCommand */ @Override public int onStartCommand(Intent intent, int flags, int startId) { onStart(intent, startId); return mRedelivery ? START_REDELIVER_INTENT : START_NOT_STICKY; } @Override public void onDestroy() { mServiceLooper.quit(); } @Override public IBinder onBind(Intent intent) { return null; } protected abstract void onHandleIntent(Intent intent); }
5、Service实战
通过startService启动的Service:
新建一个类继承Service
public class FirstService extends Service { @Nullable @Override public IBinder onBind(Intent intent) { return null; }
在清单文件中注册Service
在Activity中调用startService方法
btn_start_service = (Button) findViewById(R.id.btn_start_service); btn_start_service.setOnClickListener(new View.OnClickListener() { @Override public void onClick(View v) { Intent intent = new Intent(getApplicationContext(), FirstService.class); startService(intent); } });
这样,就完成了一个简单的Service的创建和启动,通过startService启动的Service不会因为Activity的销毁而销毁,所以我们必须要调用stopService方法。
与Activity绑定的Service:
SecondService
public class SecondService extends Service { private final String TAG = "SecondService"; private int count; private boolean quit; private MyBinder binder = new MyBinder(); public class MyBinder extends Binder { public int getCount() { return count; } } @Override public IBinder onBind(Intent intent) { System.out.println("onBind方法被调用!"); return binder; } @Override public void onCreate() { super.onCreate(); } @Override public boolean onUnbind(Intent intent) { System.out.println("onUnbind方法被调用"); return true; } @Override public void onDestroy() { super.onDestroy(); this.quit = true; System.out.println("onDestroy方法被调用"); } @Override public void onRebind(Intent intent) { System.out.println("onRebind方法被调用"); super.onRebind(intent); } }
清单文件注册
MainActivity
public class MainActivity extends AppCompatActivity { Button btn_start_service; Button btn_bind_service; @Override protected void onCreate(Bundle savedInstanceState) { super.onCreate(savedInstanceState); setContentView(R.layout.activity_main); btn_start_service = (Button) findViewById(R.id.btn_start_service); btn_start_service.setOnClickListener(new View.OnClickListener() { @Override public void onClick(View v) { Intent intent = new Intent(getApplicationContext(), FirstService.class); startService(intent); } }); btn_bind_service = (Button) findViewById(R.id.btn_bind_service); btn_bind_service.setOnClickListener(new View.OnClickListener() { @Override public void onClick(View v) { Intent intent = new Intent(getApplicationContext(), SecondService.class); getApplicationContext().bindService(intent, mServiceConnection, Service.BIND_AUTO_CREATE); } }); } ServiceConnection mServiceConnection = new ServiceConnection() { @Override public void onServiceConnected(ComponentName name, IBinder service) { System.out.println("------->>service connected"); } @Override public void onServiceDisconnected(ComponentName name) { System.out.println("--------------->>service dis connected"); } }; }
IntentService
Service
public class ThridService extends IntentService { public ThridService() { super(""); System.out.println("intent Service"); } @Override protected void onHandleIntent(Intent intent) { String flag = intent.getExtras().getString("flag"); if (flag.equals("t1")) { System.out.println("startServiceT1"); } else if (flag.equals("t2")) { System.out.println("startServiceT2"); } try { Thread.sleep(2000); } catch (InterruptedException e) { e.printStackTrace(); } } }
清单文件
MainActivity
btn_intent_service = (Button) findViewById(R.id.btn_intent_service); btn_intent_service.setOnClickListener(new View.OnClickListener() { @Override public void onClick(View v) { Intent it1 = new Intent(getApplicationContext(), ThridService.class); Bundle b1 = new Bundle(); b1.putString("flag", "t1"); it1.putExtras(b1); Intent it2 = new Intent(getApplicationContext(), ThridService.class); Bundle b2 = new Bundle(); b2.putString("flag", "t2"); it2.putExtras(b2); getApplicationContext().startService(it1); getApplicationContext().startService(it2); } });
这里只是简单的描述怎么启动一个Service,其他复杂的并没有实现。
6、Binder机制
6.1、什么是Binder?
我们知道,AndroidOS是基于内核的,但是AndroidOS没有采用Linux内核提供的各种进程间通信机制(IPC),而是采用Binder机制。Android应用都是运行在独立的进程中,这样确保程序之间不会相互影响,但是,很多情况下,我们开发的程序中的Activity需要与系统Service进行通信,它们肯定不是在同一个进程,AndroidOS为我们提供了实现进程之间通信的方式,Binder就是其中的一种。
AndroidOS中的Binder机制,是由client、Server、ServiceManager和Binder驱动程序,其中Client、Server和Service Manager运行在用户空间,Binder驱动程序运行内核空间。下图是这四个组件的关系:
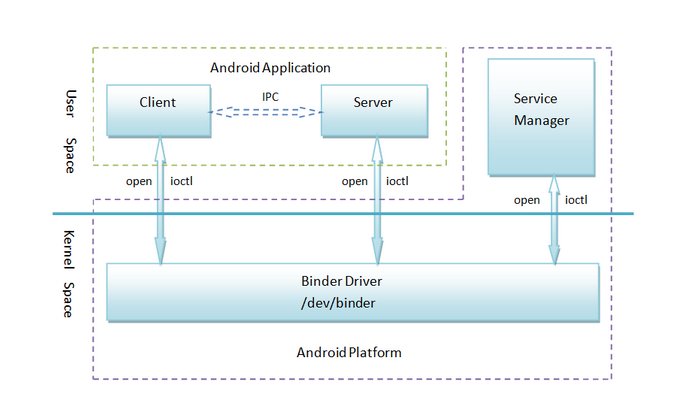
(ps:这是老罗的图)
6.1.1、Client端
客户端要想访问Binder的远程服务,就必须获取远程服务的Binder对象在binder驱动层对应的mRemote引用。当获取到mRemote对象的引用后,就可以调用相应Binder对象的服务了。
6.1.2、Service端
一个Binder服务器端就是一个Binder类的对象。当创建一个Binder对象后,内部就会开启一个线程,这个线程用于接收binder驱动发送的信息,收到消息后,会执行相关的服务代码。
6.1.3、ServiceManager
Service Manager是一个守护进程,用来管理Server,并向Client提供查询Server接口的能力
6.1.4、Binder驱动
当服务端成功创建一个Binder对象后,Binder驱动也会相应创建一个mRemote对象,该对象的类型也是Binder类。客户就可以借助这个mRemote对象来访问远程服务。
6.2、使用AIDL实现两个进程的简单通信
使用Android studio实现
在main下新建aidl文件夹,在aidl文件夹中新建和aidl包名相同的包,新建aidl file。
aidl
// IPerson.aidl package com.example.devin.helloservice.aidl; // Declare any non-default types here with import statements interface IPerson { String findPersion(int num); }
在build\generated\source\aidl下可以找到编译生成的代码
/* * This file is auto-generated. DO NOT MODIFY. * Original file: H:\\AndroidStudioIDE\\workspace\\HelloService\\app\\src\\main\\aidl\\com\\example\\devin\\helloservice\\aidl\\IPerson.aidl */ package com.example.devin.helloservice.aidl; // Declare any non-default types here with import statements public interface IPerson extends android.os.IInterface { /** Local-side IPC implementation stub class. */ public static abstract class Stub extends android.os.Binder implements com.example.devin.helloservice.aidl.IPerson { private static final java.lang.String DEOR = "com.example.devin.helloservice.aidl.IPerson"; /** Construct the stub at attach it to the interface. */ public Stub() { this.attachInterface(this, DEOR); } /** * Cast an IBinder object into an com.example.devin.helloservice.aidl.IPerson interface, * generating a proxy if needed. */ public static com.example.devin.helloservice.aidl.IPerson asInterface(android.os.IBinder obj) { if ((obj==null)) { return null; } android.os.IInterface iin = obj.queryLocalInterface(DEOR); if (((iin!=null)&&(iin instanceof com.example.devin.helloservice.aidl.IPerson))) { return ((com.example.devin.helloservice.aidl.IPerson)iin); } return new com.example.devin.helloservice.aidl.IPerson.Stub.Proxy(obj); } @Override public android.os.IBinder asBinder() { return this; } @Override public boolean onTransact(int code, android.os.Parcel data, android.os.Parcel reply, int flags) throws android.os.RemoteException { switch (code) { case INTERFACE_TRANSACTION: { reply.writeString(DEOR); return true; } case TRANSACTION_findPersion: { data.enforceInterface(DEOR); int _arg0; _arg0 = data.readInt(); java.lang.String _result = this.findPersion(_arg0); reply.writeNoException(); reply.writeString(_result); return true; } } return super.onTransact(code, data, reply, flags); } private static class Proxy implements com.example.devin.helloservice.aidl.IPerson { private android.os.IBinder mRemote; Proxy(android.os.IBinder remote) { mRemote = remote; } @Override public android.os.IBinder asBinder() { return mRemote; } public java.lang.String getInterfaceDeor() { return DEOR; } @Override public java.lang.String findPersion(int num) throws android.os.RemoteException { android.os.Parcel _data = android.os.Parcel.obtain(); android.os.Parcel _reply = android.os.Parcel.obtain(); java.lang.String _result; try { _data.writeInterfaceToken(DEOR); _data.writeInt(num); mRemote.transact(Stub.TRANSACTION_findPersion, _data, _reply, 0); _reply.readException(); _result = _reply.readString(); } finally { _reply.recycle(); _data.recycle(); } return _result; } } static final int TRANSACTION_findPersion = (android.os.IBinder.FIRST_CALL_TRANSACTION + 0); } public java.lang.String findPersion(int num) throws android.os.RemoteException; }
自定义一个Service类,继承IPerson.Stub类 就是实现了IPerson接口和IBinder接口
package com.example.devin.helloservice.Service; import android.app.Service; import android.content.Intent; import android.os.IBinder; import android.os.RemoteException; import android.support.annotation.Nullable; import com.example.devin.helloservice.aidl.IPerson; /** * Created by Devin on 2016/6/15. */ public class AIDLService extends Service { private String[] names = {"张三", "李四", "王五", "赵六", "孙七"}; private IBinder mIBinder = new PersionBinder(); @Nullable @Override public IBinder onBind(Intent intent) { return mIBinder; } @Override public int onStartCommand(Intent intent, int flags, int startId) { System.out.println("start service"); return super.onStartCommand(intent, flags, startId); } private class PersionBinder extends IPerson.Stub { @Override public String findPersion(int num) throws RemoteException { if (num > 0 && num < 6) { return names[num - 1]; } return "222"; } } }
在清单文件中注册
在客户端中使用
package com.example.devin.helloservice; import android.app.Service; import android.content.ComponentName; import android.content.Intent; import android.content.ServiceConnection; import android.os.Bundle; import android.os.IBinder; import android.os.RemoteException; import android.support.v7.app.AppCompatActivity; import android.view.View; import android.widget.Button; import android.widget.EditText; import android.widget.TextView; import com.example.devin.helloservice.Service.AIDLService; import com.example.devin.helloservice.aidl.IPerson; /** * Created by Devin on 2016/6/15. */ public class SecondActivity extends AppCompatActivity implements View.OnClickListener { EditText et_num; Button btn_find; TextView tv_name; IPerson mIPerson; PersionConnect mPersionConnect = new PersionConnect(); @Override public void onCreate(Bundle savedInstanceState) { super.onCreate(savedInstanceState); setContentView(R.layout.activity_aidl); et_num = (EditText) findViewById(R.id.et_num); btn_find = (Button) findViewById(R.id.btn_find); tv_name = (TextView) findViewById(R.id.tv_name); Intent intent = new Intent(this, AIDLService.class); startService(intent); this.bindService(intent, mPersionConnect, Service.BIND_AUTO_CREATE); btn_find.setOnClickListener(this); } @Override public void onClick(View v) { String etNum = et_num.getText().toString().trim(); int num = Integer.valueOf(etNum); try { tv_name.setText(mIPerson.findPersion(num)); } catch (RemoteException e) { e.printStackTrace(); } et_num.setText(""); } private class PersionConnect implements ServiceConnection { @Override public void onServiceConnected(ComponentName name, IBinder service) { mIPerson = IPerson.Stub.asInterface(service); } @Override public void onServiceDisconnected(ComponentName name) { mIPerson = null; } } }
这样可以完成简单的通信。
深入学习Binder机制,推荐如下大神的博文:
责任编辑:


 4379
4379


 被折叠的 条评论
为什么被折叠?
被折叠的 条评论
为什么被折叠?
 到【灌水乐园】发言


