


SlidingDrawer类就是抽屉样式的显示效果,是自SDK 1.5 才新加入的成员。
按下一个按钮,就能展开一个"程序集"菜单,里面包含了各式各样的程序,而SlidingDrawer.Widget 正是为了这样的效果所准备的,当你在布局有限的UI Layout 时,可以应用SlidingDrawaer 来在可视范围内放置更多组件,在需要的时候才拉出"抽屉"里的"子功能图标"。
SlidingDrawer 配置上采用了水平展开或垂直展开两种(android:orientation)方式。
在XML里必须指定其使用的android:handle 与android:content,前者委托要展开的图片(Layout 配置),后者则是要展开的Layout Content。handle和content是最重要的两个属性。
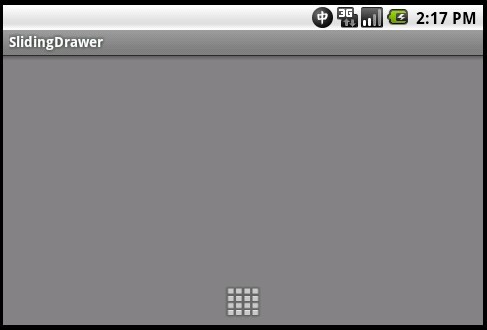
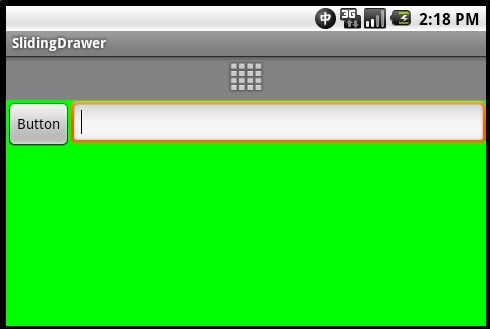
运行结果如下
SlidingDrawer 的使用,并不需复杂的设置才能启用,关键在于XML 里的属性设置,稍后将会看到XML 里的描述。在主程序中所建立的SlidingDrawer 对象,为了捕捉"打开完毕"与"已经关闭"这两个事件,所设置的Listener 为SlidingDrawer.setOnDrawerOpenListener()与SlidingDrawer.setOnDrawerCloseListener()。
先来看个XML例子
中的main.xml中填写布局的时候
[java] view plaincopy
<?xml version="1.0" encoding="utf-8"?>
<LinearLayout xmlns:android="http://schemas.android.com/apk/res/android"
    android:orientation="vertical"
    android:layout_width="fill_parent"
    android:layout_height="fill_parent"
    android:background="#808080"
    >
<SlidingDrawer
    android:id="@+id/slidingdrawer"
    android:layout_width="fill_parent"
    android:layout_height="fill_parent"
    android:orientation="vertical"
    android:handle="@+id/handle"
    android:content="@+id/content">
    <Button
            android:id="@+id/handle"
            android:layout_width="88dip"
            android:layout_height="44dip"
            android:background="@drawable/handle"
        />
    <LinearLayout
        android:id="@+id/content"
        android:layout_width="fill_parent"
        android:layout_height="fill_parent"
        android:background="#00ff00">
        <Button
            android:id="@+id/button"
            android:layout_width="wrap_content"
            android:layout_height="wrap_content"
            android:text="Button"
        />
        <EditText
            android:id="@+id/editText"
            android:layout_width="fill_parent"
            android:layout_height="wrap_content"
        />
    </LinearLayout>
</SlidingDrawer>
</LinearLayout>
再来看看handle,在drawable中写入,当抽屉在不同的情况下显示不同的图标。
<?xml version="1.0" encoding="utf-8"?>
<selector xmlns:android="http://schemas.android.com/apk/res/android">
    <item android:state_window_focused="false" android:state_enabled="true" android:drawable="@drawable/handle_normal" />
    <item android:state_pressed="true" android:drawable="@drawable/handle_pressed" />
    <item android:state_focused="true" android:state_enabled="true" android:drawable="@drawable/handle_focused" />
    <item android:state_enabled="true" android:drawable="@drawable/handle_normal" />
    <item android:state_focused="true" android:drawable="@drawable/handle_focused" />
</selector>
显示的效果就是,不触发的情况下收起来的,只看到抽屉。点击之后就会展开,看到一个按钮和一个输入框
下面来看看完整的使用例子:
首先来个简单好懂的:
XML文件:
<?xml version="1.0" encoding="utf-8"?>
<LinearLayout xmlns:android="http://schemas.android.com/apk/res/android"
android:layout_width="fill_parent" android:layout_height="fill_parent"
android:orientation="vertical" android:background="@drawable/default_bg">
<SlidingDrawer android:layout_width="fill_parent"
android:layout_height="fill_parent" android:handle="@+id/handle"
android:content="@+id/content" android:orientation="vertical"
android:id="@+id/slidingdrawer">
<ImageButton android:id="@id/handle" android:layout_width="50dip"
android:layout_height="44dip" android:src="@drawable/up" />
<LinearLayout android:id="@id/content"
android:layout_width="fill_parent" android:layout_height="fill_parent"
android:background="#ffffff">
<TextView android:text="这是一个滑动式抽屉的示例"
android:id="@+id/tv"
android:textSize="18px"
android:textColor="#000000"
android:gravity="center_vertical|center_horizontal"
android:layout_width="match_parent"
android:textStyle="bold"
android:layout_height="match_parent"></TextView>
</LinearLayout>
</SlidingDrawer>
</LinearLayout>
然后是Activity内容:
package com.wjq;
import android.app.Activity;
import android.os.Bundle;
import android.widget.ImageButton;
import android.widget.SlidingDrawer;
import android.widget.TextView;

public class SlidingDrawerDemo extends Activity {
private SlidingDrawer mDrawer;
private ImageButton imbg;
private Boolean flag=false;
private TextView tv;
/* (non-Javadoc)
  * @see android.app.Activity#onCreate(android.os.Bundle)
  */
@Override
protected void onCreate(Bundle savedInstanceState) {
  // TODO Auto-generated method stub
  super.onCreate(savedInstanceState);
  setContentView(R.layout.sildingdrawer);

  imbg=(ImageButton)findViewById(R.id.handle);
  mDrawer=(SlidingDrawer)findViewById(R.id.slidingdrawer);
  tv=(TextView)findViewById(R.id.tv);

  mDrawer.setOnDrawerOpenListener(new SlidingDrawer.OnDrawerOpenListener()
  {
   @Override
   public void onDrawerOpened() {
    flag=true;
    imbg.setImageResource(R.drawable.down);
   }
  });

  mDrawer.setOnDrawerCloseListener(new SlidingDrawer.OnDrawerCloseListener(){
   @Override
   public void onDrawerClosed() {
    flag=false;
    imbg.setImageResource(R.drawable.up);
   }
  });

  mDrawer.setOnDrawerScrollListener(new SlidingDrawer.OnDrawerScrollListener(){
   @Override
   public void onScrollEnded() {
    tv.setText("结束拖动");
   }
   @Override
   public void onScrollStarted() {
   tv.setText("开始拖动");
   }
  });
}
}
很简单的,只要在
setOnDrawerOpenListener()和setOnDrawerCloseListener()来进行处理就行了
再来看个复杂点的例子:
先看看XML文件:
 1.   <?xml version="1.0" encoding="utf-8"?>
   2.   <RelativeLayout
   3.      xmlns:android="http://schemas.android.com/apk/res/android"
   4.      android:layout_width="fill_parent"
   5.      android:layout_height="fill_parent"
   6.    >
   7.     <TextView
   8.        android:layout_width="fill_parent"
   9.        android:layout_height="wrap_content"
   10.       android:text="@string/hello"
   11.       android:textSize="16sp"
   12.     />
   13.    <SlidingDrawer  //这个就是抽屉里面的布局了
   14.       android:id="@+id/drawer1"
   15.       android:layout_width="fill_parent"
   16.       android:layout_height="fill_parent"
   17.       android:handle="@+id/layout1"
   18.       android:content="@+id/myContent1"
   19.       android:orientation="horizontal"
   20.     >
   21.      <LinearLayout
   22.         android:id="@id/layout1"
   23.         android:layout_width="35px"
   24.         android:layout_height="fill_parent"
   25.         android:background="@drawable/black"
   26.         android:gravity="center"
   27.       >
   28.        <ImageView
   29.           android:id="@+id/myImage1"
   30.           android:layout_width="wrap_content"
   31.          android:layout_height="wrap_content"
   32.          android:src="@drawable/open"
   33.        />
   34.      </LinearLayout>
   35.      <GridView
   36.        android:id="@id/myContent1"
   37.        android:layout_width="wrap_content"
   38.        android:layout_height="wrap_content"
   39.        android:numColumns="2"
   40.        android:background="@drawable/black"
   41.        android:gravity="center"
   42.      />
   43.    </SlidingDrawer>
   44.  </RelativeLayout>
然后再来看看Activity:
 1.
 2.   import android.widget.GridView;
 3.   import android.widget.ImageView;
 4.    import android.widget.SlidingDrawer;
   5.
   6.   public class EX04_27 extends Activity
   7.    {
   8.     private GridView gv;
   9.     private SlidingDrawer sd;
   10.    private ImageView im;
   11.    private int[] icons={R.drawable.alarm,R.drawable.calendar,
   12.                         R.drawable.camera,R.drawable.clock,
   13.                         R.drawable.music,R.drawable.tv};
   14.    private String[] items=
   15.     {
   16.       "Alarm","Calendar","Camera","Clock","Music","TV"
   17.     };
   18.
   19.
   20.     @Override
   21.    public void onCreate(Bundle savedInstanceState)
   22.     {
   23.       super.onCreate(savedInstanceState);
   24.
   25.       setContentView(R.layout.main);
   26.
   27.       gv = (GridView)findViewById(R.id.myContent1);.//抽屉SlidingDrawing打开之后,布局就是GirdView来分布控件
   28.       sd = (SlidingDrawer)findViewById(R.id.drawer1);
   29.       im=(ImageView)findViewById(R.id.myImage1);
   30.
   31.
   32.      MyGridViewAdapter adapter=new MyGridViewAdapter(this,items,icons);
   33.       gv.setAdapter(adapter);
   34.
   35.
   36.       sd.setOnDrawerOpenListener
   37.       (new SlidingDrawer.OnDrawerOpenListener()
    {
    39.         @Override
    40.         public void onDrawerOpened()
    41.          {
    42.            im.setImageResource(R.drawable.close);//触及的图标变换
    43.          }
    44.       });
    45.
    46.       sd.setOnDrawerCloseListener
    47.        (new SlidingDrawer.OnDrawerCloseListener()
    48.       {
    49.         @Override
    50.         public void onDrawerClosed()
    51.          {
    52.            im.setImageResource(R.drawable.open);
    53.          }
    54.       });
    55.     }
    56.   }
  MyGridViewAdapter 在本范例中,是为了"拉开SlindingDrawer"所要显示的GridView 配置
的图标,以下是自定义继承自BaseAdapter 的类。
    1.
    2.
    3.
    4.    public class MyGridViewAdapter extends BaseAdapter
    5.    {
    6.      private Context _con;
    7.      private String[] _items;
    8.      private int[] _icons;
    9.
    10.     public MyGridViewAdapter(Context con,String[] items,int[] icons)
    11.     {
    12.      _con=con;
    13.      _items=items;
    14.      _icons=icons;
    15.     }
     16.
     17.     @Override
     18.     public int getCount()
     19.     {
     20.       return _items.length;
     21.     }
     22.
     23.     @Override
     24.     public Object getItem(int arg0)
     25.     {
     26.       return _items[arg0];
     27.     }
     28.
     29.     @Override
     30.     public long getItemId(int position)
     31.     {
     32.       return position;
     33.     }
     34.
     35.     @Override
     36.     public View getView(int position, View convertView, ViewGroup parent)
     37.     {
     38.       LayoutInflater factory = LayoutInflater.from(_con);
     39.
     40.       View v = (View) factory.inflate(R.layout.grid, null);
     41.
     42.       ImageView iv = (ImageView) v.findViewById(R.id.icon);
     43.       TextView tv = (TextView) v.findViewById(R.id.text);
     44.
     45.       iv.setImageResource(_icons[position]);
     46.       tv.setText(_items[position]);
     47.       return v;
     48.     }
     49.   }
显示结果:
的应用")
的应用")


 1587
1587

 被折叠的 条评论
为什么被折叠?
被折叠的 条评论
为什么被折叠?
 到【灌水乐园】发言


