电子商务网站产品详细页-实现产品图片放大镜效果(jQuery)
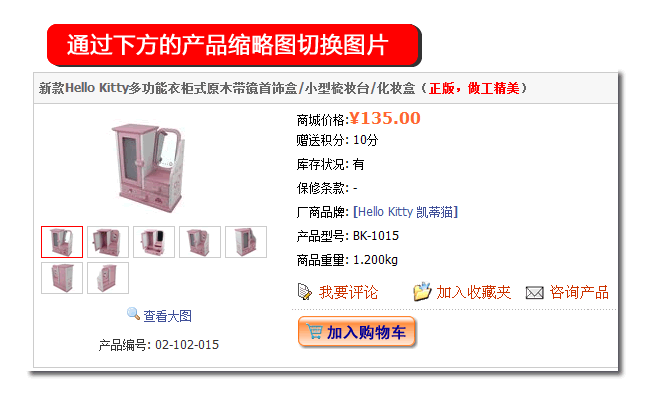
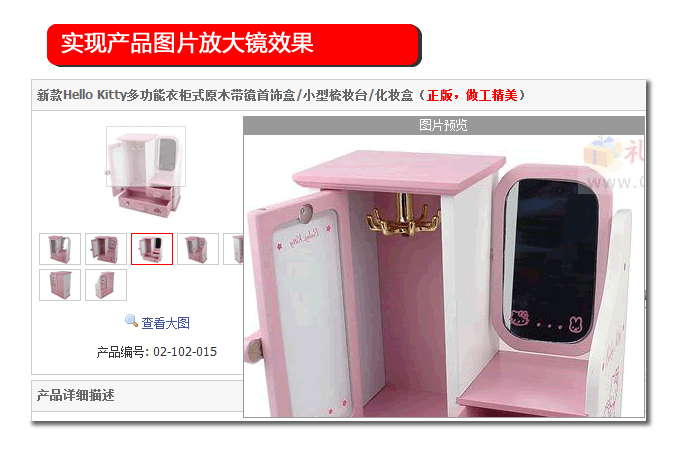
在电子商务网站的产品介绍页面,实现如下图所示的效果。


使用的相关技术:
jQuery 下载地址:
http://jquery.com/
jQuery 插件 – jqzoom 下载地址:
http://www.mind-projects.it/
实现方法及其相关的脚本:
首先,需要下载并引用jQuery 和 jqzoom 插件。
<
script
type
='text/javascript'
src
='js/jquery.js'
></
script
>
< script type ='text/javascript' src ='js/jquery.jqzoom-1.0.1.js' ></ script >
< script type ='text/javascript' src ='js/jquery.jqzoom-1.0.1.js' ></ script >
当然,还需要添加对jqzoom.cs 的引用:
<link rel="stylesheet" type="text/css" href="css/jqzoom.css" />
另外,还可以将jqzoom 下载包中的 zoomloader.gif也放置到 images 目录下。
看看怎么使用jqzoom 插件:
使用jqzoom是非常简单的,你只需要设计如下的HTML元素,其中a 元素中href 是放大的图片,img 元素中 src 是鼠标放置的小图片。

 代码
代码
<
a
href
="http://www.giftcenter.cn/giftcenterpictures/img640/02/102/02-102-015.jpg"
id
="jqzoomBox"
class
="jqzoom"
title
="图片预览"
>
< img src ="http://www.giftcenter.cn/giftcenterpictures/img126/02/102/02-102-015.jpg" id ="imgMedium" />
</ a >
< img src ="http://www.giftcenter.cn/giftcenterpictures/img126/02/102/02-102-015.jpg" id ="imgMedium" />
</ a >
对应的脚本,调用jqzoom插件:

 代码
代码
$(
function
() {
var options = {
zoomWidth: 400 ,
zoomHeight: 300 ,
xOffset: 30 ,
yOffset: - 10 ,
position: " right "
};
$( " .jqzoom " ).jqzoom(options);
});
var options = {
zoomWidth: 400 ,
zoomHeight: 300 ,
xOffset: 30 ,
yOffset: - 10 ,
position: " right "
};
$( " .jqzoom " ).jqzoom(options);
});
为了实现更好的效果,另外编写了jquery 脚本如下:

 代码
代码
$(
function
() {
$( " #product-img ul li img " ).hover( function () {
var imgsrc = $( this ).attr( " src " );
var imgmedium = imgsrc.replace( " img80 " , " img126 " );
var imglarge = imgsrc.replace( " img80 " , " img640 " );
$( this ).parent().addClass( " selected " )
.siblings().removeClass( " selected " );
$( " #imgMedium " ).attr({ " src " : imgmedium });
$( " a.jqzoom " ).attr({ " href " : imglarge });
});
});
上述脚本首先获取小图片的 src 属性值,然后通过字符串replace 操作方法,得到大图片的路径,并分别赋值给 imgMedium 元素和jqzoom 元素。上述代码不仅实现了图片正常切换,而且实现放大镜的效果。
$(
this
).parent()
--
获取当前元素的父元素。
$( this ).parent().addClass( " selected " ) –通过 addClass 和 removeClass 方法来实现效果的切换。
.siblings().removeClass( " selected " );
$( this ).parent().addClass( " selected " ) –通过 addClass 和 removeClass 方法来实现效果的切换。
.siblings().removeClass( " selected " );
最后,看看HTML 脚本:

 代码
代码
<
div
id
="medium-img-box"
>
< a href ="http://www.giftcenter.cn/giftcenterpictures/img640/02/102/02-102-015.jpg" id ="jqzoomBox" class ="jqzoom" title ="图片预览" >
< img src ="http://www.giftcenter.cn/giftcenterpictures/img126/02/102/02-102-015.jpg" id ="imgMedium" />
</ a >
</ div >
< div >
< ul >
< li >
< img src ="http://www.giftcenter.cn/giftcenterpictures/img80/02/102/02-102-015.jpg" alt ="" width ="40" height ="30" /></ li >
< li >
< img src ="http://www.giftcenter.cn/giftcenterpictures/img80/02/102/02-102-015-01.jpg" alt ="" width ="40" height ="30" /></ li >
< li >
< img src ="http://www.giftcenter.cn/giftcenterpictures/img80/02/102/02-102-015-02.jpg" alt ="" width ="40" height ="30" /></ li >
< li >
< img src ="http://www.giftcenter.cn/giftcenterpictures/img80/02/102/02-102-015-03.jpg" alt ="" width ="40" height ="30" /></ li >
< li >
< img src ="http://www.giftcenter.cn/giftcenterpictures/img80/02/102/02-102-015-04.jpg" alt ="" width ="40" height ="30" /></ li >
< li >
< img src ="http://www.giftcenter.cn/giftcenterpictures/img80/02/102/02-102-015-05.jpg" alt ="" width ="40" height ="30" /></ li >
< li >
< img src ="http://www.giftcenter.cn/giftcenterpictures/img80/02/102/02-102-015-06.jpg" alt ="" width ="40" height ="30" /></ li >
</ ul >
</ div >
感谢Jacky 大师的帮助!完整的演示效果,请访问如下地址:
在线演示网站。


 270
270

 被折叠的 条评论
为什么被折叠?


