WPF控件内容模型主要指派生于System.Windows.Controls.Control类的各种控件,其主要分为四部分:
- ContentControl
- HeaderedContendControl
- ItemsControl
- HeaderedItemsControl
其继承关系请参考我上一篇博客的内容。
这四个类用作为 WPF 中大多数控件的基类。使用这些内容模型的类可以包含相同类型的内容,并以相同的方式处理该内容;可以放置在某个 ContentControl(或从 ContentControl 继承的类)中的任何类型的对象都可以放置在具有其他三个内容模型中的任何一个的控件中。如:
1: <Window x:Class="WPFControlContentModule.winOverView"
2: xmlns="http://schemas.microsoft.com/winfx/2006/xaml/presentation"
3: xmlns:x="http://schemas.microsoft.com/winfx/2006/xaml"
4: Title="控件内容模型概述" Height="300" Width="400">
5: <Grid>
6: <Grid.ColumnDefinitions>
7: <ColumnDefinition />
8: <ColumnDefinition />
9: </Grid.ColumnDefinitions>
10: <Grid.RowDefinitions>
11: <RowDefinition />
12: <RowDefinition />
13: </Grid.RowDefinitions>
14:
15: <!--ContentControl示例(Button)-->
16: <TextBlock Text="ContentControl" Grid.Row="0" Grid.Column="0"/>
17: <Button Margin="5,20,5,5" Grid.Row="0" Grid.Column="0">
18: <Button.Content>
19: <StackPanel VerticalAlignment="Center" HorizontalAlignment="Center">
20: <Image Source="Images/DVD.png" Width="48" Height="48" />
21: <TextBlock Text="DVD" HorizontalAlignment="Center" />
22: </StackPanel>
23: </Button.Content>
24: </Button>
25:
26: <!--HeaderedContentControl示例(GroupBox)-->
27: <TextBlock Text="HeaderedContentControl" Grid.Row="0" Grid.Column="1"/>
28: <GroupBox Margin="5,20,5,5" Grid.Row="0" Grid.Column="1">
29: <GroupBox.Header>
30: <TextBlock Text="Header Text" />
31: </GroupBox.Header>
32: <GroupBox.Content>
33: <StackPanel VerticalAlignment="Center" HorizontalAlignment="Center">
34: <Image Source="Images/DVD.png" Width="48" Height="48" />
35: <TextBlock Text="DVD" HorizontalAlignment="Center" />
36: </StackPanel>
37: </GroupBox.Content>
38: </GroupBox>
39:
40: <!--ItemsControl示例(ListBox)-->
41: <TextBlock Text="ItemsControl" Grid.Row="1" Grid.Column="0"/>
42: <ListBox Margin="5,20,5,5" Grid.Row="1" Grid.Column="0">
43: <ListBox.Items>
44: <TextBlock Text="List Item A" />
45: <Button Content="List Item B" />
46: <StackPanel Orientation="Horizontal" VerticalAlignment="Center">
47: <Image Source="Images/DVD.png" Width="48" Height="48" />
48: <TextBlock Text="DVD" HorizontalAlignment="Center" VerticalAlignment="Center" />
49: </StackPanel>
50: </ListBox.Items>
51: </ListBox>
52:
53: <!--HeaderedItemsControl示例(TreeView)-->
54: <TextBlock Text="HeaderedItemsControl" Grid.Row="1" Grid.Column="1"/>
55: <TreeView Margin="5,20,5,5" Grid.Row="1" Grid.Column="1">
56: <TreeViewItem>
57: <TreeViewItem.Header>
58: Tree Node A
59: </TreeViewItem.Header>
60: <TreeViewItem.Items>
61: <TextBlock Text="Node A - 1" />
62: <Button Content="Node A - 2" />
63: <StackPanel Orientation="Horizontal" VerticalAlignment="Center">
64: <Image Source="Images/DVD.png" Width="48" Height="48" />
65: <TextBlock Text="DVD" HorizontalAlignment="Center" VerticalAlignment="Center" />
66: </StackPanel>
67: </TreeViewItem.Items>
68: </TreeViewItem>
69: <TreeViewItem>
70: <TreeViewItem.Header>
71: Tree Node B
72: </TreeViewItem.Header>
73: <TreeViewItem.Items>
74: <TextBlock Text="Node B - 1" />
75: <Button Content="Node B - 2" />
76: </TreeViewItem.Items>
77: </TreeViewItem>
78: </TreeView>
79: </Grid>
80: </Window>
应用程序执行的结果如下:
一、ContentControl模型
ContentControl模型的类型具有一个 Content 属性。Content 属性的类型为 Object,因此,对于您在 ContentControl 中可以放置的内容没有任何限制。可以使用可扩展应用程序标记语言 (XAML) 或代码来设置 Content。
以下控件使用 ContentControl 内容模型:
Button、ButtonBase、CheckBox、ComboBoxItem、ContentControl、Frame、GridViewColumnHeader、GroupItem、Label、ListBoxItem、ListViewItem、NavigationWindow、RadioButton、RepeatButton、ScrollViewer、StatusBarItem、ToggleButton、ToolTip、UserControl、Window
在Content中只能放置一个控件(可以放置一个容器,然后再在容器中放置多个控件)。
严格地说,Content的内容应该放置于<XXX.Content></XXX.Content>内部,但也可以省略此标记。如在按钮中放置一图片可以有以下几种写法:
1: <!--方法一-->
2: <Button Margin="5">
3: <Button.Content>
4: <Image Source="Images/DVD.png" Width="48" Height="48" />
5: </Button.Content>
6: </Button>
7:
8: <!--方法二-->
9: <Button Margin="5">
10: <Image Source="Images/DVD.png" Width="48" Height="48" />
11: </Button>
12:
13: <!--如果是字符串,或者是数组绑定、资源引用还可以-->
14: <Button Margin="5" Content="Button Text" />
1: TextBlock date = new TextBlock();
2: date.Text = DateTime.Now.ToString("yyyy-MM-dd");
3:
4: TextBlock time = new TextBlock();
5: time.Text = DateTime.Now.ToString("hh:mm:ss");
6:
7: StackPanel panel = new StackPanel();
8: panel.Children.Add(date);
9: panel.Children.Add(time);
10:
11: btn.Content = panel;
二、HeaderedContentControl模型
HeaderedContentControl类继承ContentControl类,表示带有Header的ContentControl,其除了具有ContentControl的Content属性外,还具有一个Header属性,Header的类型也是Object对象,与Content属性的用法类似。
从 HeaderedContentControl 继承的控件有:Expander、GroupBox、TabItem。
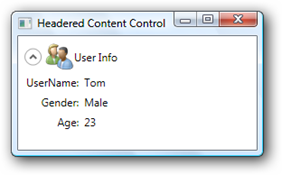
如定义一个带有图片和文字标题的Expander:
1: <Window x:Class="WPFControlContentModule.winHeaderedContentControl"
2: xmlns="http://schemas.microsoft.com/winfx/2006/xaml/presentation"
3: xmlns:x="http://schemas.microsoft.com/winfx/2006/xaml"
4: Title="Headered Content Control" Height="200" Width="300">
5: <Canvas>
6: <Expander Margin="5" HorizontalAlignment="Center">
7: <Expander.Header>
8: <StackPanel Orientation="Horizontal">
9: <Image Source="Images/Users.png" Width="32" Height="32" />
10: <TextBlock Text="User Info" VerticalAlignment="Center" />
11: </StackPanel>
12: </Expander.Header>
13: <Expander.Content>
14: <Grid>
15: <Grid.RowDefinitions>
16: <RowDefinition />
17: <RowDefinition />
18: <RowDefinition />
19: </Grid.RowDefinitions>
20: <Grid.ColumnDefinitions>
21: <ColumnDefinition />
22: <ColumnDefinition />
23: </Grid.ColumnDefinitions>
24:
25: <TextBlock Text="UserName:" HorizontalAlignment="Right"
26: Grid.Row="0" Grid.Column="0" Margin="3"/>
27: <TextBlock Text="Tom" HorizontalAlignment="Left"
28: Grid.Row="0" Grid.Column="1" Margin="3"/>
29: <TextBlock Text="Gender:" HorizontalAlignment="Right"
30: Grid.Row="1" Grid.Column="0" Margin="3"/>
31: <TextBlock Text="Male" HorizontalAlignment="Left"
32: Grid.Row="1" Grid.Column="1" Margin="3"/>
33: <TextBlock Text="Age:" HorizontalAlignment="Right"
34: Grid.Row="2" Grid.Column="0" Margin="3"/>
35: <TextBlock Text="23" HorizontalAlignment="Left"
36: Grid.Row="2" Grid.Column="1" Margin="3"/>
37: </Grid>
38: </Expander.Content>
39: </Expander>
40: </Canvas>
41: </Window>

三、ItemsControl模型
从 ItemsControl 继承的控件包含一个对象集合。 ItemsControl 的一个示例是 ListBox。可以使用 ItemsSource 属性或 Items 属性来填充一个 ItemsControl。
1、使用ItemSource属性
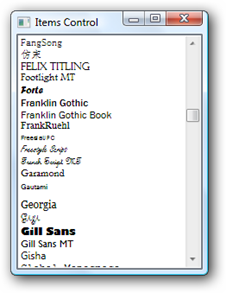
使用ItemSource属性,需将其绑定到一个实现IEnumerable接口的类型的实例上,系统会枚举其成员做为ItemsControl的Item。如在一个ListBox中列出系统的所有字体,并在每一项中显示字体的样式(类似于Office系列中的字体下拉菜单):
1: <Window x:Class="WPFControlContentModule.winItemsControl"
2: xmlns="http://schemas.microsoft.com/winfx/2006/xaml/presentation"
3: xmlns:x="http://schemas.microsoft.com/winfx/2006/xaml"
4: Title="Items Control" Height="300" Width="300">
5: <Grid>
6: <ListBox x:Name="lstFont"/>
7: </Grid>
8: </Window>
1: using System.Collections.Generic;
2: using System.Windows;
3: using System.Windows.Controls;
4: using System.Windows.Data;
5: using System.Windows.Markup;
6: using System.Windows.Media;
7:
8: namespace WPFControlContentModule
9: {
10: /// <summary>
11: /// Interaction logic for winItemsControl.xaml
12: /// </summary>
13: public partial class winItemsControl : Window
14: {
15: public winItemsControl()
16: {
17: InitializeComponent();
18:
19: // 设置绑定的数据源
20: Binding binding = new Binding();
21: binding.Source = Items;
22:
23: // 绑定
24: lstFont.SetBinding(ListBox.ItemsSourceProperty, binding);
25: }
26:
27: private List<TextBlock> Items
28: {
29: get
30: {
31: List<TextBlock> result = new List<TextBlock>();
32:
33: // 遍历系统的所有字体
34: foreach (FontFamily family in Fonts.SystemFontFamilies)
35: {
36: foreach (KeyValuePair<XmlLanguage, string> pair in family.FamilyNames)
37: {
38: TextBlock t = new TextBlock();
39: // 设置字体名称
40: t.Text = pair.Value;
41:
42: // 设置字体样式
43: t.FontFamily = family;
44: t.FontSize = 12;
45:
46: result.Add(t);
47: }
48: }
49:
50: // 返回一个TextBlock的控件对象集合
51: return result;
52: }
53: }
54: }
55: }

2、使用Items属性
随 WPF 附带的每个 ItemsControl 具有一个对应的类,该类代表 ItemsControl 中的一个项。下表列出了随 WPF 附带的 ItemsControl 对象及其相应的项容器。
| ItemsControl | 项容器 |
| ComboBox | ComboBoxItem |
| ContextMenu | MenuItem |
| ListBox | ListBoxItem |
| ListView | ListViewItem |
| Menu | MenuItem |
| StatusBar | StatusBarItem |
| TabControl | TabItem |
| TreeView | TreeViewItem |
在做相应的项的时候可以有三种做法:
1: <!--方法一-->
2: <ListBox>
3: <ListBox.Items>
4: <ListBoxItem>
5: Item A
6: </ListBoxItem>
7: <ListBoxItem>
8: <TextBlock Text="Item B" />
9: </ListBoxItem>
10: </ListBox.Items>
11: </ListBox>
12:
13: <!--方法二,省略ListBox.Items-->
14: <ListBox>
15: <ListBoxItem>
16: Item A
17: </ListBoxItem>
18: <ListBoxItem>
19: <TextBlock Text="Item B" />
20: </ListBoxItem>
21: </ListBox>
22:
23: <!--方法三,省略ListBoxItem-->
24: <ListBox>
25: <ListBox.Items>
26: Item A
27: <TextBlock Text="Item B" />
28: </ListBox.Items>
29: </ListBox>
四、HeaderedItemsControl模型
HeaderedItemsControl 从 ItemsControl 类继承。HeaderedItemsControl 定义 Header 属性,该属性遵从相同的规则,因为 HeaderedContentControl. WPF 的 Header 属性附带三个从 HeaderedItemsControl 继承的控件:MenuItem、ToolBar、TreeViewItem
HeaderedItemsControl模型可以理解为如下结构:一个HeaderedItemsControl包含一个Items集合,每一个Item包含一个Header属性,一个子Items集合,以TreeView和TreeViewItem为例:
1: <TreeView>
2: <TreeView.Items>
3: <TreeViewItem>
4: <TreeViewItem.Header>
5: <TextBlock Text="Root Node A" />
6: </TreeViewItem.Header>
7: <TreeViewItem.Items>
8: <TextBlock Text="A - 1" />
9: <TreeViewItem>
10: <TreeViewItem.Header>
11: <TextBlock Text="A - 2" />
12: </TreeViewItem.Header>
13: <TreeViewItem.Items>
14: <TextBlock Text="A - 2 - 1" />
15: <TextBlock Text="A - 2 - 2" />
16: <TextBlock Text="A - 2 - 3" />
17: </TreeViewItem.Items>
18: </TreeViewItem>
19: </TreeViewItem.Items>
20: </TreeViewItem>
21: <TreeViewItem>
22: <TreeViewItem.Header>
23: <TextBlock Text="Root Node B" />
24: </TreeViewItem.Header>
25: <TreeViewItem.Items>
26: <TreeViewItem>
27: <TreeViewItem.Header>
28: <TextBlock Text="B - 1" />
29: </TreeViewItem.Header>
30: <TreeViewItem.Items>
31: <TextBlock Text="B - 1 - 1" />
32: <TextBlock Text="B - 1 - 2" />
33: <TextBlock Text="B - 1 - 3" />
34: </TreeViewItem.Items>
35: </TreeViewItem>
36: <TreeViewItem>
37: <TreeViewItem.Header>
38: <TextBlock Text="B - 2" />
39: </TreeViewItem.Header>
40: <TreeViewItem.Items>
41: <TextBlock Text="B - 2 - 1" />
42: <TextBlock Text="B - 2 - 2" />
43: <TextBlock Text="B - 2 - 3" />
44: </TreeViewItem.Items>
45: </TreeViewItem>
46: </TreeViewItem.Items>
47: </TreeViewItem>
48: </TreeView.Items>
49: </TreeView>


 259
259

 被折叠的 条评论
为什么被折叠?


