


1.什么叫路由?
2.什么叫路由器?
3 路由表中的路由分为表态路由和动态路由
动态路由协议 rip ospf bgp
4.linux系统本身可以作个路由器,由内核维护了一个静态路由表
route -n / netstat -rn
5 内核路由判断的依据
规则1 子网掩码长度越长越优先
规则2 子网掩码长度一样的情况下,条目越靠前越优先
自己理解
1.路由查看路由表优先查看子网掩码越长的越长越先查看(越精确)
2..路由查看路由表是从上往下一个一个匹配,网段一致长度一致,路由条目越上越优先
网关:网络的出口,默认路由
6.有必要的情况下,需要人为干涉路由条目的设定
添加到网络的路由
]#route add -net 192.168.0.0/24 netmask 255.255.255.0 dev eth0
或者简写# route add -net 192.168.0.0/24 dev eth0
]# route del -net 192.168.1.0/24netmask 255.255.255.0 dev eth0
或者简写# route add -net 192.168.1.0/24 dev eth0
添加到主机的路由
]#route add -host 192.168.1.1/32 dev eth0
]#route del -host 192.168.1.1/32 dev eth0
或者
]# route add -host 192.168.0.188 dev eth0
]# route del -host 192.168.0.188 dev eth0
添加到默认路由 -;
]#route del default
]#route add default gw 192.168.0.5
# grep GATEWAY /etc/sysconfig/network
GATEWAY=192.168.0.5
[root@localhost ~]# ping 192.168.2.1
connect: Network is unreachable 这种信息表示没有到达指定网络的路由//没有默认路由或者没有规则
[root@localhost ~]# ping 192.168.1.5
PING 192.168.1.5 (192.168.1.5) 56(84) bytes of data.
From 192.168.1.254 icmp_seq=2 Destination Host Unreachable 这种信息味着有路由,但是目标主机可能不存在
U ---up
UG---网关
UH---主机路由
如何添加删除路由条目:(不会永久生效)
[root@localhost ~]# route add default gw 192.168.1.254 dev eth0
[root@localhost ~]# route del default
[root@localhost ~]# route add -net 192.168.2.0 netmask 255.255.255.0 dev eth0
[root@localhost ~]# route del -net 192.168.2.0 netmask 255.255.255.0 dev eth0
[root@localhost ~]# route add -host 192.168.1.1/32 dev eth0
[root@localhost ~]# route add -host 192.168.1.2 dev eth0
[root@localhost ~]# route -n
Kernel IP routing table
Destination Gateway Genmask Flags Metric Ref Use Iface
192.168.1.1 0.0.0.0 255.255.255.255 UH 0 0 0 eth0
192.168.1.2 0.0.0.0 255.255.255.255 UH 0 0 0 eth0
192.168.1.0 0.0.0.0 255.255.255.0 U 0 0 0 eth0
169.254.0.0 0.0.0.0 255.255.0.0 U 0 0 0 eth0
永久生效
如何配置两个网卡的IP,对应的配置文件。
[root@localhost ~]# cd /etc/sysconfig/network-scripts/
[root@localhost network-scripts]# vim ifcfg-eth0
[root@GW1 ~]# cat /etc/sysconfig/network-scripts/ifcfg-eth0
# Realtek Semiconductor Co., Ltd. RTL-8139/8139C/8139C+
DEVICE=eth0
BOOTPROTO=none
HWADDR=00:e0:4c:43:d7:ec
ONBOOT=yes
NETMASK=255.255.255.0
IPADDR=192.168.1.2
[root@localhost network-scripts]# vim ifcfg-eth1
[root@GW1 ~]# cat /etc/sysconfig/network-scripts/ifcfg-eth1
# Realtek Semiconductor Co., Ltd. RTL8101E/RTL8102E PCI Express Fast Ethernet controller
DEVICE=eth1
BOOTPROTO=none
HWADDR=00:24:1d:9a:e6:e3
ONBOOT=yes
HOTPLUG=no
NETMASK=255.255.255.0
IPADDR=192.168.2.1
TYPE=Ethernet
]# cat /etc/sysconfig/network
NETWORKING=yes
NETWORKING_IPV6=no
HOSTNAME=localhost.localdomain
GATEWAY=192.168.1.254
重启网络服务
以上就是从UNIX上继承的功能
策略路由
内网的用户中 不同用户走不同的带宽
策略路由;不同用户用不同的路由表
系统中其实有多张路由表!默认看到的表是main
++++++实际上系统不只一张路由表,需要通过IP命令查看更多+++++++++
我们可以在查看路由条目 时,指定 表名字或者表ID
]# ip route show table default
]# ip route show table 253
默认情况下,ip route show实际上是查看名为main的表
]# ip route show table 254
]# ip route show table main
]# ip route show
]# ip route show table 254 //查看路由表可以写名字或者ID号
192.168.2.0/24 dev eth1 proto kernel scope link src 192.168.2.1
192.168.1.0/24 dev eth0 proto kernel scope link src 192.168.1.2
169.254.0.0/16 dev eth1 scope link
]# ip route show table main
192.168.2.0/24 dev eth1 proto kernel scope link src 192.168.2.1
192.168.1.0/24 dev eth0 proto kernel scope link src 192.168.1.2
169.254.0.0/16 dev eth1 scope link
]# ip route show
192.168.2.0/24 dev eth1 proto kernel scope link src 192.168.2.1
192.168.1.0/24 dev eth0 proto kernel scope link src 192.168.1.2
169.254.0.0/16 dev eth1 scope link
以上的输出是一致的说明平时查看的是默认表是main
]# vim /etc/iproute2/rt_tables 4-7行是有效的行
]# grep ^[^#] /etc/iproute2/rt_tables
255 local
254 main
253 default
0 unspec//不是表
-------------
二、策略路由----流量分割---- ip rule show/ip rule add
实现流量分割
1.首创建2张不同的路由表,
定义配置文件
vim /etc/iproute2/rt_tables
[root@GW1 ftp]# grep ^[^#] /etc/iproute2/rt_tables
255 local
254 main
253 default
200 table_10M
100 table_2M
0 unspec
]# ip route show table table_2M
]# ip route show table table_10M
]# ip route show table 100
]# ip route show table 200
2.分别往两个表中各自添加对应的默认路
]# ip route add default via 1.1.1.1 dev eth0 table table_2M
RTNETLINK answers: Network is unreachable
]# ip addr add 1.1.1.11/24 dev eth0
]# ip route add default via 1.1.1.1 dev eth0 table table_2M
]# ip addr add 2.2.2.22/24 dev eth1
]# ip route add default via 2.2.2.2 dev eth1 table table_10M
----------------------
3、定义路由策略,规定从哪个源网络来,按照 哪个表进行路由即指定一批客户端用一张路由表,别一批客户端用另一张路由表。
]# ip rule show //路由规则表
0: from all lookup 255
32766: from all lookup main
32767: from all lookup default
数值越小优先级越高
[root@GW1 ftp]# ip rule help
Usage: ip rule [ list | add | del | flush ] SELECTOR ACTION
SELECTOR := [ from PREFIX ] [ to PREFIX ] [ tos TOS ] [ fwmark FWMARK ]
[ dev STRING ] [ pref NUMBER ]
ACTION := [ table TABLE_ID ]
[ prohibit | reject | unreachable ]
[ realms [SRCREALM/]DSTREALM ]
TABLE_ID := [ local | main | default | NUMBER ]
[root@GW1 ftp]# ip rule add from 192.168.0.0/24 table table_10M
[root@GW1 ftp]# ip rule add from 192.168.1.0/24 table table_2M
[root@GW1 ftp]# ip rule show
0: from all lookup 255
32764: from 192.168.1.0/24 lookup table_2M
32765: from 192.168.0.0/24 lookup table_10M
32766: from all lookup main
32767: from all lookup default
后添加的优先级越高
_如果想删除路由策略,通过如下 方式____
]# ip rule del from 192.168.1.0/24
]# ip rule del from 192.168.0.0/24
]# ip rule show
0: from all lookup 255
32766: from all lookup main
32767: from all lookup default
如果有跟多的匹配想描述想通过IPTANLE标志打标记。然后让IP工具按照标记匹配
ttl值为64 按照 10M走
ttl值为128 按照 2M走
]# iptables -t mangle -A PREROUTING -m ttl --ttl-eq 64 -j MARK --set-mark 64
]# iptables -t mangle -A PREROUTING -m ttl --ttl-eq 128 -j MARK --set-mark 128
]# ip rule add fwmark 64 table table_10m
]# ip rule add fwmark 128 table table_2m
iptables -t mangle -A PREROUTING -m range --src-range 192.168.0.1-192.168.0.254 -j MARK --set-mark 190
iptables -t mangle -A PREROUTING -m range --src-range 192.168.1.1-192.168.1.254 -j MARK --set-mark 191
ip rule add fwmark 190 table table_10m
ip rule add fwmark 191 table table_2m
双线备用
监控脚本模型,借助任务计划
vim double.sh
#!/bin/bash
GW1_2M=2.2.2.254
GW2_10M=1.1.1.254
IF1=eth0
IF2=eth1
while :
do
ip route del default //删除默认路由
ip route add default via $GW2_10M dev $IF2=eth1 //添加默认路由规则
while ping -c 1 -W 1$GW2_10M &> /dev/null
do
sleep 1
done
ip route del default
ip route add default via $ GW1_2M dev $IF1=eth0
until ping -c 1 -W 1 $GW2_10M &> /dev/null //条件成立退出循环
do
sleep 1
done
done
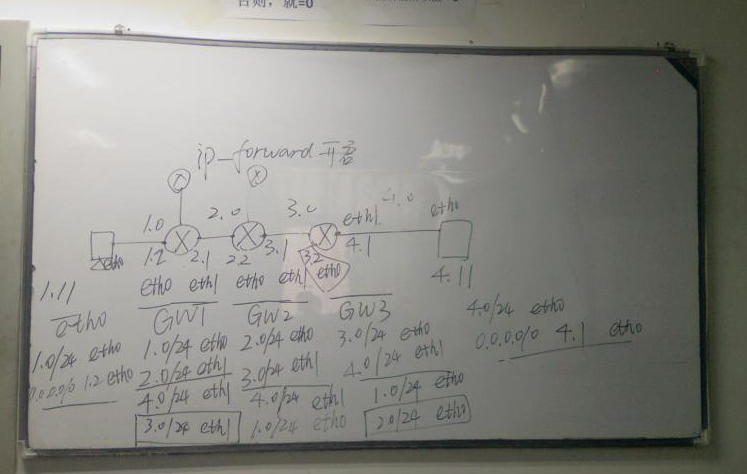
目标:实现主机1 -- 192.168.1.11可以跟主机2 -- 192.168.4.11 通讯
学习如何在路由器上配置路由条
学习如何在主机上配置默认路由
GW1
[root@GW1 ~]# route -n
Kernel IP routing table
Destination Gateway Genmask Flags Metric Ref Use Iface
192.168.2.0 0.0.0.0 255.255.255.0 U 0 0 0 eth1
192.168.1.0 0.0.0.0 255.255.255.0 U 0 0 0 eth0
[root@GW1 ~]# cat /proc/sys/net/ipv4/ip_forward
1
[root@GW1 ~]# route add -net 192.168.4.0/24 dev eth1
[root@GW1 ~]# route add -net 192.168.3.0/24 dev eth1
[root@GW1 ~]# route -n
Kernel IP routing table
Destination Gateway Genmask Flags Metric Ref Use Iface
192.168.4.0 0.0.0.0 255.255.255.0 U 0 0 0 eth1
192.168.3.0 0.0.0.0 255.255.255.0 U 0 0 0 eth1
192.168.2.0 0.0.0.0 255.255.255.0 U 0 0 0 eth1
192.168.1.0 0.0.0.0 255.255.255.0 U 0 0 0 eth0
GW2
[root@GW2 ~]# route -n
Kernel IP routing table
Destination Gateway Genmask Flags Metric Ref Use Iface
192.168.3.0 0.0.0.0 255.255.255.0 U 0 0 0 eth1
192.168.2.0 0.0.0.0 255.255.255.0 U 0 0 0 eth0
[root@GW2 ~]# cat /proc/sys/net/ipv4/ip_forward
1
[root@GW2 ~]# route add -net 192.168.4.0/24 dev eth1
[root@GW2 ~]# route add -net 192.168.1.0/24 dev eth0
[root@GW2 ~]# route -n
Kernel IP routing table
Destination Gateway Genmask Flags Metric Ref Use Iface
192.168.4.0 0.0.0.0 255.255.255.0 U 0 0 0 eth1
192.168.3.0 0.0.0.0 255.255.255.0 U 0 0 0 eth1
192.168.2.0 0.0.0.0 255.255.255.0 U 0 0 0 eth0
192.168.1.0 0.0.0.0 255.255.255.0 U 0 0 0 eth0
GW3
[root@GW3 ~]# route -n
Kernel IP routing table
Destination Gateway Genmask Flags Metric Ref Use Iface
192.168.4.0 0.0.0.0 255.255.255.0 U 0 0 0 eth1
192.168.3.0 0.0.0.0 255.255.255.0 U 0 0 0 eth0
[root@GW3 ~]# cat /proc/sys/net/ipv4/ip_forward
1
[root@GW3 ~]# route add -net 192.168.1.0/24 dev eth0
[root@GW3 ~]# route add -net 192.168.2.0/24 dev eth0
[root@GW3 ~]# route -n
Kernel IP routing table
Destination Gateway Genmask Flags Metric Ref Use Iface
192.168.4.0 0.0.0.0 255.255.255.0 U 0 0 0 eth1
192.168.3.0 0.0.0.0 255.255.255.0 U 0 0 0 eth0
192.168.2.0 0.0.0.0 255.255.255.0 U 0 0 0 eth0
192.168.1.0 0.0.0.0 255.255.255.0 U 0 0 0 eth0
主机1 -- 192.168.1.11
[root@11 ~]# route add default gw 192.168.1.2 dev eth0
[root@11 ~]# route -n
Kernel IP routing table
Destination Gateway Genmask Flags Metric Ref Use Iface
192.168.1.0 0.0.0.0 255.255.255.0 U 0 0 0 eth0
169.254.0.0 0.0.0.0 255.255.0.0 U 0 0 0 eth0
0.0.0.0 192.168.1.2 0.0.0.0 UG 0 0 0 eth0
主机2 -- 192.168.4.11
[root@11 ~]# route add default gw 192.168.4.1 dev eth0
[root@11 ~]# route -n
Kernel IP routing table
Destination Gateway Genmask Flags Metric Ref Use Iface
192.168.4.0 0.0.0.0 255.255.255.0 U 0 0 0 eth0
169.254.0.0 0.0.0.0 255.255.0.0 U 0 0 0 eth0
0.0.0.0 192.168.4.1 0.0.0.0 UG 0 0 0 eth0
ECMP(负载均衡)
内核等值多路功能------带宽并用 ecmp
应用场合:内核等值多路功能
负载均衡
第二个问题是如何对于通过两个 ISP 流出的数据进行负载均衡。
与选择两个 ISP 中的一个作为缺省路由不同,这次是设置缺省路由为多路路由。
在缺省内核中,这会均衡两个 ISP 的路由。象下面这样做(基于前面的流量分割实验):
ip route add default nexthop(下一条) via $P1 dev $IF1 \
nexthop via $P2 dev $IF2
这样就可以均衡两个 ISP 的路由。通过调整“weight”参数我们可以指定其中一个 ISP 的优先权高于另一个。
应该指出,由于均衡是基于路由进行的,而路由是经过缓冲的,所以这样的均衡并不是 100%精确。 也就是说对于一个经常访问的站点,总是会使用同一个 ISP。进而,
如果你对此不满意,
你可能需要参考以下 Julian Anastasov 的内核补丁:
http://www.linuxvirtualserver.org/~julian/#routes
Julian 的路由补丁会弥补上述缺陷。
ip route add default via 1.1.1.254 dev eth1
]# ip route show
]# ip route del default
]# ip route add default nexthop via 1.1.1.254 dev eth0 nexthop via 2.2.2.254 dev eth1
]# ip route show
192.168.2.0/24 dev eth1 proto kernel scope link src 192.168.2.1
192.168.1.0/24 dev eth0 proto kernel scope link src 192.168.1.2
169.254.0.0/16 dev eth1 scope link
default
nexthop via 192.168.1.254 dev eth0 weight 1
nexthop via 192.168.2.254 dev eth1 weight 1
cd /usr/src/kernels/2.6.18-194.el5-i686
make menuconfig
ecmp


 1672
1672


 被折叠的 条评论
为什么被折叠?
被折叠的 条评论
为什么被折叠?
 到【灌水乐园】发言


