今天,一起学习下原子操作类(基础数据的数组类型)。
主要有以下几个类:
AtomicIntegerArray,AutomicLongArray,另一个AtomicReferenceArray在引用类型的原子操作类中再说。
AtomicIntegerArray和AutomicLongArray两个类类似,我们使用AtomicIntegerArray举个栗子。
方法详细信息:
public final int length()
返回该数组的长度。
返回:该数组的长度
public final int get(int i)
获取位置 i 的当前值。
参数:i - 索引
返回:当前值
public final voidset(int i, int newValue)
将位置 i 的元素设置为给定值。
参数:i - 索引 newValue - 新值
public final voidlazySet(int i,int newValue)
最后将位置 i 的元素设置为给定值。
参数:i - 索引 newValue - 新值
从以下版本开始:1.6
public final int getAndSet(int i,int newValue)
将位置 i 的元素以原子方式设置为给定值,并返回旧值。
参数:i - 索引 newValue - 新值
返回:以前的值
public final boolean compareAndSet(int i, int expect, int update)
如果当前值 == 预期值,则以原子方式将位置 i 的元素设置为给定的更新值。
参数:i - 索引 expect - 预期值 update - 新值
返回:如果成功,则返回 true。返回 false 指示实际值与预期值不相等。
public final boolean weakCompareAndSet(int i,int expect,int update)
如果当前值 == 预期值,则以原子方式将位置 i 的元素设置为给定的更新值。
可能意外失败并且不提供排序保证,所以只是在很少的情况下才对 compareAndSet 进行适当地选择。
参数:i - 索引 expect - 预期值 update - 新值
返回:如果成功,则返回 true。
public final int getAndIncrement(int i)
以原子方式将索引 i 的元素加 1。
参数:i - 索引
返回:以前的值
public final int getAndDecrement(int i)
以原子方式将索引 i 的元素减 1。
参数:i - 索引
返回:以前的值
public final intgetAndAdd(int i,int delta)
以原子方式将给定值与索引 i 的元素相加。
参数:i - 索引 delta - 要加上的值
返回:以前的值
public final int incrementAndGet(int i)
以原子方式将索引 i 的元素加 1。
参数:i - 索引
返回:更新的值
public final int decrementAndGet(int i)
以原子方式将索引 i 的元素减 1。
参数:i - 索引
返回:更新的值
public final int addAndGet(int i, int delta)
以原子方式将给定值与索引 i 的元素相加。
参数:i - 索引 delta - 要加上的值
返回:更新的值
public String toString()
返回数组当前值的字符串表示形式。
覆盖:类 Object 中的 toString
返回:数组当前值的字符串表示形式。
大部分操作,都是找到数组中对应的int索引值,然后调用compareAndSwapInt方法实现。
如下源码所示:
/**
* Atomically adds the given value to the element at index {@code i}.
*
* @param i the index
* @param delta the value to add
* @return the updated value
*/
//以原子方式将给定值与索引 i 的元素相加
public final int addAndGet(int i, int delta) {
long offset = checkedByteOffset(i);
while (true) {
int current = getRaw(offset);
int next = current + delta;
if (compareAndSetRaw(offset, current, next))
return next;
}
/**
* Atomically sets the element at position {@code i} to the given
* updated value if the current value {@code ==} the expected value.
*
* @param i the index
* @param expect the expected value
* @param update the new value
* @return true if successful. False return indicates that
* the actual value was not equal to the expected value.
*/
public final boolean compareAndSet(int i, int expect, int update) {
return compareAndSetRaw(checkedByteOffset(i), expect, update);
}
private boolean compareAndSetRaw(long offset, int expect, int update) {
return unsafe.compareAndSwapInt(array, offset, expect, update);
}
//检查越界并返回对应索引的内存位置
private long checkedByteOffset(int i) {
if (i < 0 || i >= array.length)
throw new IndexOutOfBoundsException("index " + i);
return byteOffset(i);
}
//根据索引值找到对应内存位置
private static long byteOffset(int i) {
return ((long) i << shift) + base;
}
如上面源码看到的,最终调用的方法是compareAndSwapInt,在上一章做过仔细学习,最终调用的是cpu指令,具体详情如下:
传送门:
https://www.jianshu.com/p/46c4458754f8
与前一章的AtomicInteger类唯一不同的地方,在于数组的方法需要根据数组索引值找到该数据在该数组中的相对位置。
那么,AtomicIntegerArray类是如何获得数组对应索引值的内容的内存地址的呢?
很简单:
1.获取数组的起始内存地址,就是base。
2.获取本版本中int型数据类型的字节长度(目前是4),就是scale值
3.使用31-(00000000 00000000 00000000 00000100(4的二进制) 前面的0的个数),就是2,就是shift值
4.假设操作数组第i个值,那么这个值的位置就是 i<
如下源码所示:
private static final int base = unsafe.arrayBaseOffset(int[].class);
private static final int shift;
private final int[] array;
//计算位移的shift值,注意使用static代码块,类加载时候执行一次即可,因为shift值再类加载时即可确定。
static {
int scale = unsafe.arrayIndexScale(int[].class);
if ((scale & (scale - 1)) != 0)
throw new Error("data type scale not a power of two");
//numberOfLeadingZeros()该函数的功能 在指定 int 值的二进制补码表示形式中最高位(最左边)的 1 位之前,返回零位的数量。
shift = 31 - Integer.numberOfLeadingZeros(scale);
}
//得到数组的起始位置的内存地址
private long checkedByteOffset(int i) {
if (i < 0 || i >= array.length)
throw new IndexOutOfBoundsException("index " + i);
return byteOffset(i);
}
//计算我们需要的数组第i个元素的内存地址
private static long byteOffset(int i) {
return ((long) i << shift) + base;
}
这个实现兜兜转转,为何不直接把shift值写成2呢,我想是因为可扩展性,如果在这个java中,int型使用了8个字节,那么用这种实现一样可以得到shift=3,从而得到正确的内存地址。
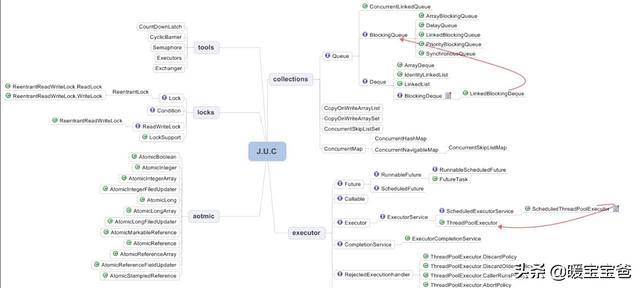
附图:JUC包的主要内容

感兴趣的小伙伴请关注本人公众号:暖爸的java家园


 506
506

 被折叠的 条评论
为什么被折叠?


