


本文中将会用infa简称代替informatica
1.安装前准备
介质名称
版本信息
描述
Informatica Powercenter
9.5.1 for Linux 64 bit
必须
Java Jdk
1.6.0_45 for Linux 64 bit
可选,如果想图形安装INFA就需要安装
Oracle Client
11G R2 for Linux 64 bit
必须(或者安装oracle server)
服务器
操作系统
IP
用途
linux
127.0.0.1
安装oralce、infa server端
windows
127.0.0.2
安装infa client
2. 创建Informatica资源库用户infa_domain与infa_rep
create userinfa_rep identifiedby infa_rep;create userinfa_domain identifiedby infa_domain;grant connect,resource, create view to infa_rep,infa_domain;
3. 安装Oracle server
见其它文章:https://www.cnblogs.com/champaign/p/7211662.html
oracle 中创建以下两个用户:
infa_domain:用于 infa的demain
infa_rep : 用于infa 的存储库
4、创建infa用户与oinstall组。
groupadd -g 1023 oinstall --使用root用户创建组
useradd -m infa -g1023 --使用root用户创建用户并且指定相应组
5. 配置环境变量
su - infa --切换到infa用户下配置java环境变量
vi .bash_profile--编辑.bash_profile文件
配置内容如下:
PATH=$PATH:$HOME/bin
export PATH
export JAVA_HOME=/usr/lib/jvm/java-1.7.0-openjdk-1.7.0.131.x86_64/jre
export PATH=$PATH:$HOME/bin:$JAVA_HOME/bin
export PM_CODEPAGENAME="MS936"export ORACLE_BASE=/u01/app/oracle
export ORACLE_HOME=/u01/app/oracle/product/11.2.0.4/dbhome_1
export ORACLE_SID=newedm
export ORACLE_TERM=vt100
export INFA_HOME=/home/infa/Informatica/9.5.1export PATH=$ORACLE_HOME/bin:$ORACLE_HOME/OPatch:$PATHexport LD_LIBRARY_PATH=$INFA_HOME/server/bin:$INFA_HOME/ODBC7.0/lib:$ORACLE_HOME/lib:/lib:/usr/lib:$LD_LIBRARY_PATHexport INFA_CODEPAGENAME="MS936"export INFA_DOMAINS_FILE=$INFA_HOME/domains.infa
export NLS_LANG="SIMPLIFIED CHINESE_CHINA".ZHS16GBK
注意:上面的环境变量需要根据实际安装目录进行调整,特别注意NLS_LANG需要和oracle server中的保持一致
source .bash_profile --使用.bash_profile文件生效
java –version--测试java环境变量是否生效
exit--退出infa用户到root用户
6. 开始安装infa
tar –xvf chmod -R 775 951HF2_Server_Installer_linux-x64.tar –C /user/local/src --解压infa安装包chmod -R 775 951HF2_Server_Installer_linux-x64 --赋予安装介质相应权限
chown -R infa:oinstall 951HF2_Server_Installer_linux-x64 --赋予安装介质归属用户与组
su - infa --切换到infa用户准备安装infa工具
cd /usr/local/src/951HF2_Server_Installer_linux-x64
./install.sh --安装,
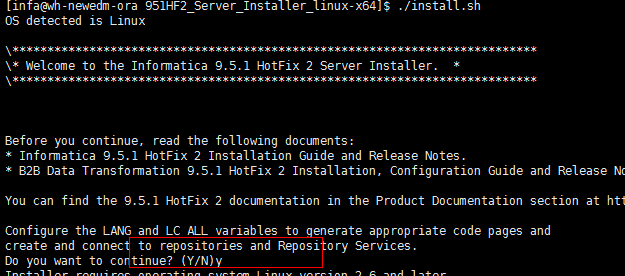
根据提示选择 y
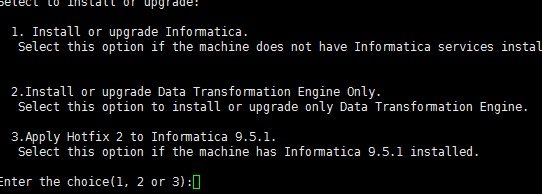
这里我们选择1,安装或者更新infa
其它环节在安装时忘记截图,可以根据提示选择。这里使用的是非图形化界面安装。中间有一个步骤是指定License文件,忘记截图了,可以去百度上搜索一下。
7. 配置域资源库
******************************************************************************************************Domain Configuration Repository- Step 5B of 7
******************************************************************************************************[ Type 'back' to go to the previous panel or 'quit' to cancel the installation at any time. ]
Configure the databaseforthe domain configuration repository:
Database type:* 1->Oracle2->SQLServer3->DB24->Sybase
这步选1.(本例使用oracle)
Database user ID: (default :-info_domain) :infa_domain //前创建的oracle用户:infa_domain
User password: (default :-) :
Configure the database connection* 1->JDBC URL2->Custom JDBC Connection String
:1Database address: (default :- localhost:1521) : //oracle server 的地址
Database service name: (default :-newedm) : //oracle service name
Configure JDBC parameters1->Yes* 2->No
:2
接下来配置infa的域信息:
******************************************************************************************************Domain and Node Configuration- Step 6 of 7
******************************************************************************************************[ Type 'back' to go to the previous panel or 'quit' to cancel the installation at any time. ]
Enter the following informationforthe Informatica domain.
Domain name: (default :- Domain_wh-newedm-ora) :NGDP //infa client 连接时使用的域名
Node host name: (default :- wh-newedm-ora) : //默认即可
Node name: (default :- node01_wh-newedm-ora) : //默认即可
Node port number: (default :- 6005) :
Domain user name: (default :-Administrator) :
Domain password: (default :-) :
Confirm password: (default :-) :
Display advanced port configuration page //回车选择不显示* 1->No2->Yes
继续。。。。显示如下内容则安装成功完成
******************************************************************************************************Post-Installation Summary - Step 7 of 7
******************************************************************************************************Installation Status Success
The Informatica9.5.1 HotFix 2installation is complete.Formore information, see the debug log file:/home/infa/Informatica/9.5.1/Informatica_9.5.1_Services_HotFix2.log
Installation Type :Fresh Installation
Informatica Administrator Home Page::http://wh-newedm-ora:6008Product Name: Informatica9.5.1 HotFix 2Services
Press to continue ...
1.其中的Informatica_9.5.1_Services_HotFix2.log是服务端的日志,对于后面的错误有很大的益处,需要注意。
2. http://wh-newedm-ora:6008 管理平台的地址,实际上端口是8443。使用6008也会自动跳转到8443上,估计是厂商懒得更新这个安装包的提示信息。
到这里infa的server已经安装完成。
服务会自动启动,停止和启动的命令如下:
cd /home/infa/Informatica/9.5.1/server/tomcat/bin
./infaservice.sh shutdown
./infaservice.sh startup
补充:
安装过程中遇到最多的是无法连接oracle的问题,通常是由于环境变量引起的。如果有错误多看日志和检查环境变量。


 170
170


 被折叠的 条评论
为什么被折叠?
被折叠的 条评论
为什么被折叠?
 到【灌水乐园】发言


