


当app上线后发现紧急bug,如果重新发布版本周期比较长,并且对用户体验不好,此时热修复就派上用场了。热修复就是为紧急bug而生,能够快速修复bug,并且用户无感知。针对热修复,阿里系先后推出AndFix、HotFix、SophFix,腾讯系也推出QQ空间超级补丁、微信Tinker。在这里,主要讨论是注入dex实现热修复。
注入dex的前提是需要dex分包,这里使用MultiDex进行分包,具体操作步骤如下:
1、导入依赖
compile 'com.android.support:multidex:1.0.1'
2、使能dex分包
multiDexEnabled true
3、编辑分包文件
com.frank.fix/MainActivity.class
com.frank.fix/MyApplication.class
4、调用文件进行分包
    buildTypes {
        release {
            multiDexKeepFile file('dex.keep')
        }
    }
5、在Application重写attachBaseContext方法
    @Override
    protected void attachBaseContext(Context base) {
        MultiDex.install(base);
        FixUtil.loadFixedDex(base);
        super.attachBaseContext(base);
    }
有两个ClassLoader(DexClassLoader和PathClassLoader)在注入dex发挥重要作用。其中,DexClassLoader用于加载指定的dex文件,PathClassLoader用于加载主dex文件,两者都继承于BasedDexClassLoader,都保存于它的私有变量pathList的dexElements里面。这就需要反射得到pathList和dexElements:
    private static Object getField(Object obj, Class<?> clazz, String field) {
        Field localField;
        try {
            localField = clazz.getDeclaredField(field);
            localField.setAccessible(true);
            return localField.get(obj);
        } catch (NoSuchFieldException | IllegalAccessException e) {
            e.printStackTrace();
        }
        return null;
    }

    private static Object getPathList(Object baseDexClassLoader) throws Exception {
            return getField(baseDexClassLoader,Class.forName("dalvik.system.BaseDexClassLoader"), "pathList");
    }

    private static Object getDexElements(Object obj) throws Exception {
            return getField(obj,obj.getClass(),"dexElements");
    }
在得到pathList和dexElements后,就可以加载主dex和修复bug的dex,然后合并dex数组:
    private static void dexInject(final Context appContext, File filesDir,HashSet<File> loadedDex) {
        String optimizeDir = filesDir.getAbsolutePath()+File.separator+"opt_dex";
        File optimizedFile = new File(optimizeDir);
        if(!optimizedFile.exists()){
            boolean hasDir = optimizedFile.mkdirs();
            if(!hasDir){
                Log.e(TAG, "make directory fail...");
                return;
            }
        }
        //1.加载应用程序的dex
        try {
            PathClassLoader pathLoader = (PathClassLoader) appContext.getClassLoader();

            for (File dex : loadedDex) {
                //2.加载指定的修复的dex文件。
                DexClassLoader classLoader = new DexClassLoader(dex.getAbsolutePath(),
                        optimizedFile.getAbsolutePath(), null, pathLoader);
                Object dexObj = getPathList(classLoader);
                Object pathObj = getPathList(pathLoader);
                Object mDexElementsList = getDexElements(dexObj);
                Object pathDexElementsList = getDexElements(pathObj);
                //3.合并dex
                Object dexElements = combineArray(mDexElementsList,pathDexElementsList);
                //4.重新赋值给PathList里面的dexElements
                Object pathList = getPathList(pathLoader);
                setField(pathList,pathList.getClass(),"dexElements",dexElements);
            }
        } catch (Exception e) {
            e.printStackTrace();
        }
    }
dex一般保存在/data/data/packageName/odex路径下,我们需要做的是从这个路径找到修复bug的dex文件,然后调用上面方法来合并dex:
    public static void loadFixedDex(Context context){
        if(context == null){
            return ;
        }
        File fileDir = context.getDir(DEX_DIR,Context.MODE_PRIVATE);
        File[] listFiles = fileDir.listFiles();
        for(File file:listFiles){
            //找到对应格式的dex文件
            if(file.getName().startsWith(PREFIX)&&file.getName().endsWith(SUFFIX)){
                loadedDex.add(file);
            }
        }
        //dex合并
        dexInject(context,fileDir,loadedDex);
    }
为了验证是否修复bug,可以把修改bug后的代码编译成class文件,再使用dx.bat批处理工具编译成dex文件。把编译好的dex文件拷贝到sd卡根目录(项目中是从服务器下载dex文件),然后把dex拷贝到app私有路径下。android studio的class路径见下图: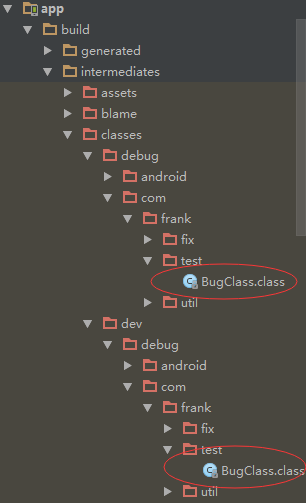
在打包dex文件时,注意:class文件需要存放在绝对路径下。例如,我这里放置的文件夹是/com/frank/test/BugClass.class。dx.bat工具在Android/sdk/build-tools/xxx(API版本)路径,可以设置系统环境变量,也可以直接使用cmd命令行cd到该路径,使用命令
dx --dex --output D:\dex\class2.dex D:\dex进行打包dex:


 1600
1600


 被折叠的 条评论
为什么被折叠?
被折叠的 条评论
为什么被折叠?
 到【灌水乐园】发言


