1 facebook
https://www.facebook.com/notes/facebook-engineering/under-the-hood-dalvik-patch-for-facebook-for-android/10151345597798920
Facebook is one of the most feature-rich apps available for Android. With features like push notifications, news feed, and an embedded version of Facebook Messenger (a complete app in its own right) all working together in real-time, the complexity and volume of code creates technical challenges that few, if any, other Android developers face–especially on older versions of the platform. (Our latest apps support Android versions as old as Froyo–Android version 2.2–which is almost three years old.)
One of these challenges is related to the way Android’s runtime engine, the Dalvik Virtual Machine, handles Java methods. Late last year we completed a major rebuild of our Android app (https://www.facebook.com/notes/facebook-engineering/under-the-hood-rebuilding-facebook-for-android/10151189598933920), which involved moving a lot of our code from JavaScript to Java, as well as using newer abstractions that encouraged large numbers of small methods (generally considered a good programming practice). Unfortunately, this caused the number of Java methods in our app to drastically increase.
As we were testing, the problem first showed up as described in this bug (http://code.google.com/p/android/issues/detail?id=22586) , which caused our app installation to fail on older Android phones. During standard installation, a program called “dexopt” runs to prepare your app for the specific phone it’s being installed on. Dexopt uses a fixed-size buffer (called the “LinearAlloc” buffer) to store information about all of the methods in your app. Recent versions of Android use an 8 or 16 MB buffer, but Froyo and Gingerbread (versions 2.2 and 2.3) only have 5 MB. Because older versions of Android have a relatively small buffer, our large number of methods was exceeding the buffer size and causing dexopt to crash.
After a bit of panic, we realized that we could work around this problem by breaking our app into multiple dex files, using the technique described here (http://android-developers.blogspot.com/2011/07/custom-class-loading-in-dalvik.html), which focuses on using secondary dex files for extension modules, not core parts of the app.
However, there was no way we could break our app up this way–too many of our classes are accessed directly by the Android framework. Instead, we needed to inject our secondary dex files directly into the system class loader. This isn’t normally possible, but we examined the Android source code and used Java reflection to directly modify some of its internal structures. We were certainly glad and grateful that Android is open source—otherwise, this change wouldn’t have been possible.
But as we came closer to launching our redesigned app, we ran into another problem. The LinearAlloc buffer doesn’t just exist in dexopt–it exists within every running Android program. While dexopt uses LinearAlloc to to store information about all of the methods in your dex file, the running app only needs it for methods in classes that you are actually using. Unfortunately, we were now using too many methods for Android versions up to Gingerbread, and our app was crashing shortly after startup.
There was no way to work around this with dex files since all of our classes were being loaded into one process, and we weren’t able to find any information about anyone who had faced this problem before (since it is only possible once you are already using multiple dex files, which is a difficult technique in itself). We were on our own.
We tried various techniques to reclaim space, including aggressive use of ProGuard and source code transformations to reduce our method count. We even built a profiler for LinearAlloc usage to figure out what the biggest consumers were. Nothing we tried had a significant impact, and we still needed to write many more methods to support all of the rich content types in our new and improved news feed and timeline.
As it stood, the release of the much-anticipated Facebook for Android 2.0 was at risk. It seemed like we would have to choose between cutting significant features from the app or only shipping our new version to the newest Android phones (ICS and up). Neither seemed acceptable. We needed a better solution.
Once again, we looked to the Android source code. Looking at the definition of the LinearAlloc buffer (https://github.com/android/platform_dalvik/blob/android-2.3.7_r1/vm/LinearAlloc.h#L33), we realized that if we could only increase that buffer from 5 MB to 8 MB, we would be safe!
That’s when we had the idea of using a JNI extension to replace the existing buffer with a larger one. At first, this idea seemed completely insane. Modifying the internals of the Java class loader is one thing, but modifying the internals of the Dalvik VM while it was running our code is incredibly dangerous. But as we pored over the code, analyzing all the uses of LinearAlloc, we began to realize that it should be safe as long as we did it at the start of our program. All we had to do was find the LinearAllocHdr object, lock it, and replace the buffer.
Finding it turned out to be the hard part. Here’s where it’s stored (https://github.com/android/platform_dalvik/blob/android-2.3.7_r1/vm/Globals.h#L519), buried within the DvmGlobals object, over 700 bytes from the start. Searching the entire object would be risky at best, but fortunately, we had an anchor point: the vmList object just a few bytes before. This contained a value that we could compare to the JavaVM pointer available through JNI.
The plan was finally coming together: find the proper value for vmList, scan the DvmGlobals object to find a match, jump a few more bytes to the LinearAlloc header, and replace the buffer. So we built the JNI extension, embedded it in our app, started it up, and…we saw the app running on a Gingerbread phone for the first time in weeks.The plan had worked.
But for some reason it failed on the Samsung Galaxy S II…
The most popular Gingerbread phone…
Of all time…
It seems that Samsung made a small change to Android that was confusing our code. Other manufacturers might have done the same, so we realized we needed to make our code more robust.
Manual inspection of the GSII revealed that the LinearAlloc buffer was only 4 bytes from where we expected it, so we adjusted our code to look a few bytes to each side if it failed to find the LinearAlloc buffer in the expected location. This required us to parse our process’s memory map to ensure we didn’t make any invalid memory references (which would crash the app immediately) and also build some strong heuristics to make sure we would recognize the LinearAlloc buffer when we found it. As a last resort, we found a (mostly) safe way to scan the entire process heap to search for the buffer.
Now we had a version of the code that worked on a few popular phones–but we needed more than just a few. So we bundled our code up into a test app that would run the same procedure we were using for the Facebook app, then just display a large green or red box, indicating success or failure.
We used manual testing, DeviceAnywhere, and a test lab that Google let us borrow to run our test app on 70 different phone models, and fortunately, it worked on every single one!
We released this code with Facebook for Android 2.0 in December. It’s now running on hundreds of different phone models, and we have yet to find one where it doesn’t work. The great speed improvements in that release would not have been possible without this crazy hack. And needless to say, without Android’s open platform, we wouldn’t have had the opportunity to ship our best version of the app. There’s a lot of opportunity for building on Android, and we’re excited to keep bringing the Facebook experience to more people and devices.
2 Android dex分包技术
当一个app的功能越来越复杂,代码量越来越多,也许有一天便会突然遇到 下列现象 :
生成的apk在2.3以前的机器无法安装,提示INSTALL_FAILED_DEXOPT
方法数量过多,编译时出错,提示:
Conversion to Dalvik format failed:Unable to execute dex: method ID not in [0, 0xffff]: 65536
出现这种问题的原因是 :
Android2.3及以前版本用来执行dexopt( 用于优化dex文件 )的内存只分配了5M
一个dex文件最多只支持65536个方法。
针对上述问题,也出现了诸多解决方案,使用的最多的是插件化,即将一些独立的功能做成一个单独的apk,当打开的时候使用DexClassLoader动态加载,然后使用反射机制来调用插件中的类和方法。这固然是一种解决问题的方案:但这种方案存在着以下两个问题:
插件化只适合一些比较独立的模块;
必须通过反射机制去调用插件的类和方法,因此,必须搭配一套插件框架来配合使用;
由于上述问题的存在,通过不断研究,便有了dex分包的解决方案。简单来说,其原理是将编译好的class文件拆分打包成两个dex,绕过dex方法数量的限制以及安装时的检查,在运行时再动态加载第二个dex文件中。faceBook曾经遇到相似的问题,具体可参考:
文中有这么一段话:
However, there was no way we could break our app up this way–too many of our classes are accessed directly by the Android framework. Instead, we needed to inject our secondary dex files directly into the system class loader。
文中说得比较简单,我们来完善一下该方案:除了第一个dex文件(即正常apk包唯一包含的Dex文件),其它dex文件都以资源的方式放在安装包中,并在Application的onCreate回调中被注入到系统的ClassLoader。因此,对于那些在注入之前已经引用到的类(以及它们所在的jar),必须放入第一个Dex文件中。
下面通过一个简单的demo来讲述dex分包方案,该方案分为两步执行:

整个demo的目录结构是这样,我打算将SecondActivity,MyContainer以及DropDownView放入第二个dex包中,其它保留在第一个dex包。
整个demo的目录结构是这样,我打算将SecondActivity,MyContainer以及DropDownView放入第二个dex包中,其它保留在第一个dex包。
一、编译时分包
整个编译流程如下:

除了框出来的两Target,其它都是编译的标准流程。而这两个Target正是我们的分包操作。 首先来看看spliteClasses target。

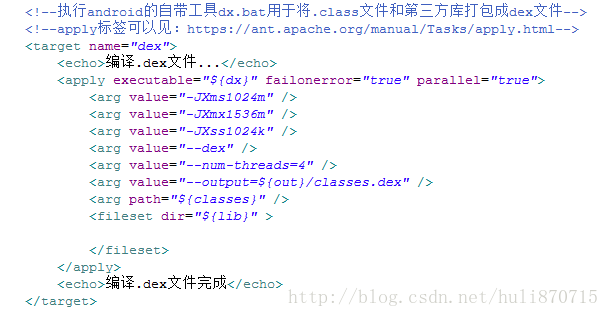
由于我们这里仅仅是一个demo,因此放到第二个包中的文件很少,就是上面提到的三个文件。分好包之后就要开始生成dex文件,首先打包第一个dex文件:

由这里将${classes}(该文件夹下都是要打包到第一个dex的文件)打包生成第一个dex。接着生成第二个dex,并将其打包到资资源文件中:

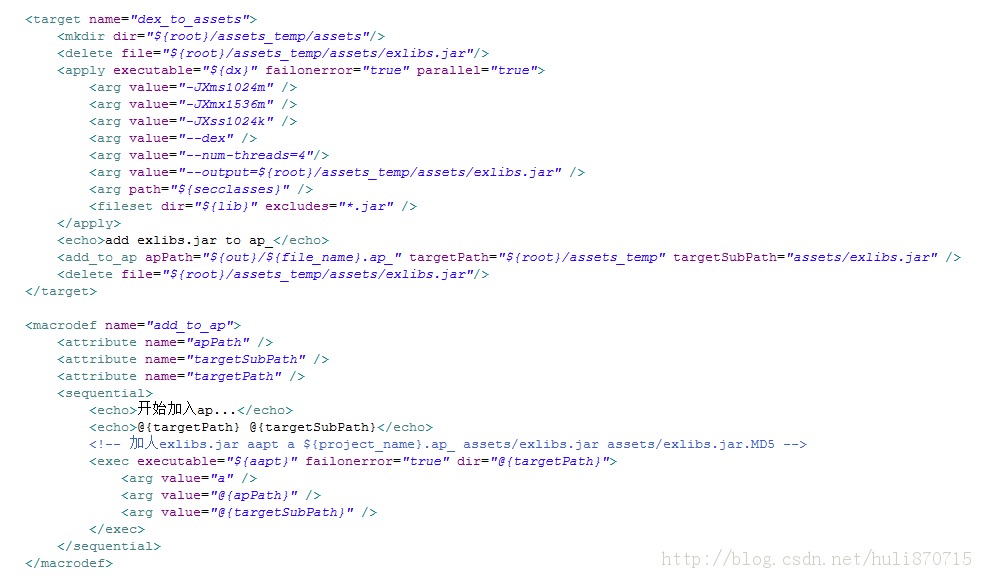
可以看到,此时是将${secclasses}中的文件打包生成dex,并将其加入ap文件(打包的资源文件)中。到此,分包完毕,接下来,便来分析一下如何动态将第二个dex包注入系统的ClassLoader。
二、将dex分包注入ClassLoader
这里谈到注入,就要谈到Android的ClassLoader体系。

由上图可以看出,在叶子节点上,我们能使用到的是DexClassLoader和PathClassLoader,通过查阅开发文档,我们发现他们有如下使用场景:
- 关于PathClassLoader,文档中写到: Android uses this class for its system class loader and for its application class loader(s),
由此可知,Android应用就是用它来加载;
2. DexClass可以加载apk,jar,及dex文件,但PathClassLoader只能加载已安装到系统中(即/data/app目录下)的apk文件。
知道了两者的使用场景,下面来分析下具体的加载原理,由上图可以看到,两个叶子节点的类都继承BaseDexClassLoader中,而具体的类加载逻辑也在此类中:
BaseDexClassLoader:
@Override
protected Class<?> findClass(String name) throws ClassNotFoundException {
  List<Throwable> suppressedExceptions = new ArrayList<Throwable>();
  Class c = pathList.findClass(name, suppressedExceptions);
  if (c == null) {
    ClassNotFoundException cnfe = new ClassNotFoundException("Didn't find class \"" + name + "\" on path: " + pathList);
    for (Throwable t : suppressedExceptions) {
      cnfe.addSuppressed(t);
     }
    throw cnfe;
  }
   return c;
}
由上述函数可知,当我们需要加载一个class时,实际是从pathList中去需要的,查阅源码,发现pathList是DexPathList类的一个实例。ok,接着去分析DexPathList类中的findClass函数,
DexPathList:
public Class findClass(String name, List<Throwable> suppressed) {
    for (Element element : dexElements) {
      DexFile dex = element.dexFile;

      if (dex != null) {
        Class clazz = dex.loadClassBinaryName(name, definingContext, suppressed);
        if (clazz != null) {
          return clazz;
        }
      }
     }
    if (dexElementsSuppressedExceptions != null) {
      suppressed.addAll(Arrays.asList(dexElementsSuppressedExceptions));
    }
    return null;
  }
上述函数的大致逻辑为:遍历一个装在dex文件(每个dex文件实际上是一个DexFile对象)的数组(Element数组,Element是一个内部类),然后依次去加载所需要的class文件,直到找到为止。
看到这里,注入的解决方案也就浮出水面, 假如我们将第二个dex文件放入Element数组中,那么在加载第二个dex包中的类时,应该可以直接找到。
带着这个假设,来完善demo。
在我们自定义的BaseApplication的onCreate中,我们执行注入操作:
public String inject(String libPath) {
    boolean hasBaseDexClassLoader = true;
    try {
      Class.forName("dalvik.system.BaseDexClassLoader");
    } catch (ClassNotFoundException e) {
      hasBaseDexClassLoader = false;
    }
    if (hasBaseDexClassLoader) {
      PathClassLoader pathClassLoader = (PathClassLoader)sApplication.getClassLoader();
      DexClassLoader dexClassLoader = new DexClassLoader(libPath, sApplication.getDir("dex", 0).getAbsolutePath(), libPath, sApplication.getClassLoader());
      try {
        Object dexElements = combineArray(getDexElements(getPathList(pathClassLoader)), getDexElements(getPathList(dexClassLoader)));
        Object pathList = getPathList(pathClassLoader);
        setField(pathList, pathList.getClass(), "dexElements", dexElements);
        return "SUCCESS";
      } catch (Throwable e) {
        e.printStackTrace();
        return android.util.Log.getStackTraceString(e);
      }
    }
    return "SUCCESS";
  }
这是注入的关键函数,分析一下这个函数:
参数libPath是第二个dex包的文件信息(包含完整路径,我们当初将其打包到了assets目录下),然后将其使用DexClassLoader来加载(这里为什么必须使用DexClassLoader加载,回顾以上的使用场景),然后通过反射获取PathClassLoader中的DexPathList中的Element数组(已加载了第一个dex包,由系统加载),以及DexClassLoader中的DexPathList中的Element数组(刚将第二个dex包加载进去),将两个Element数组合并之后,再将其赋值给PathClassLoader的Element数组,到此,注入完毕。
现在试着启动app,并在TestUrlActivity(在第一个dex包中)中去启动SecondActivity(在第二个dex包中),启动成功。这种方案是可行。
但是使用dex分包方案仍然有几个注意点:
由于第二个dex包是在Application的onCreate中动态注入的,如果dex包过大,会使app的启动速度变慢,因此,在dex分包过程中一定要注意,第二个dex包不宜过大。
由于上述第一点的限制,假如我们的app越来越臃肿和庞大,往往会采取dex分包方案和插件化方案配合使用,将一些非核心独立功能做成插件加载,核心功能再分包加载。
3 Android 使用android-support-multidex解决Dex超出方法数的限制问题,让你的应用不再爆棚
如有转载,请声明出处: 时之沙: http://blog.csdn.net/t12x3456 (来自时之沙的csdn博客)
随着应用不断迭代,业务线的扩展,应用越来越大(比如集成了各种第三方sdk或者公共支持的jar包,项目耦合性高,重复作用的类越来越多),相信很多人都遇到过如下的错误:
UNEXPECTED TOP-LEVEL EXCEPTION:
java.lang.IllegalArgumentException: method ID not in [0, 0xffff]: 65536
at com.android.dx.merge.DexMerger$6.updateIndex(DexMerger.java:501)
at com.android.dx.merge.DexMerger$IdMerger.mergeSorted(DexMerger.java:282)
at com.android.dx.merge.DexMerger.mergeMethodIds(DexMerger.java:490)
at com.android.dx.merge.DexMerger.mergeDexes(DexMerger.java:167)
at com.android.dx.merge.DexMerger.merge(DexMerger.java:188)
at com.android.dx.command.dexer.Main.mergeLibraryDexBuffers(Main.java:439)
at com.android.dx.command.dexer.Main.runMonoDex(Main.java:287)
at com.android.dx.command.dexer.Main.run(Main.java:230)
at com.android.dx.command.dexer.Main.main(Main.java:199)
at com.android.dx.command.Main.main(Main.java:103)
没错,你的应用中的Dex 文件方法数超过了最大值65536的上限,简单来说,应用爆棚了.
那么让我们看一下为什么会引起这种错误:
在Android系统中,一个App的所有代码都在一个Dex文件里面。Dex是一个类似Jar的存储了多有Java编译字节码的归档文件。因为Android系统使用Dalvik虚拟机,所以需要把使用Java Compiler编译之后的class文件转换成Dalvik能够执行的class文件。这里需要强调的是,Dex和Jar一样是一个归档文件,里面仍然是Java代码对应的字节码文件。当Android系统启动一个应用的时候,有一步是对Dex进行优化,这个过程有一个专门的工具来处理,叫DexOpt。DexOpt的执行过程是在第一次加载Dex文件的时候执行的。这个过程会生成一个ODEX文件,即Optimised Dex。执行ODex的效率会比直接执行Dex文件的效率要高很多。但是在早期的Android系统中,DexOpt有一个问题,也就是这篇文章想要说明并解决的问题。DexOpt会把每一个类的方法id检索起来,存在一个链表结构里面。但是这个链表的长度是用一个short类型来保存的,导致了方法id的数目不能够超过65536个。当一个项目足够大的时候,显然这个方法数的上限是不够的。尽管在新版本的Android系统中,DexOpt修复了这个问题,但是我们仍然需要对低版本的Android系统做兼容.
目前比较常用的方法:(1) 应用插件化,比如使用我正在参与开发的插件化框架 : https://github.com/singwhatiwanna/dynamic-load-apk ,如果有建议或者相关的问题,欢迎到Github上积极参与. (2) 分割Dex,多工程: 把所需要的.class文件或者是Jar文件和一些源码一起编译生成一个Jar文件。然后使用Android SDK提供的dx工具把Jar文件转成Dex文件。我们可以提前对它进行ODex操作,让它在被DexClassLoader加载的时候,跳过DexOpt的部分工作,从而加快加载的过程.(可参考facebook:https://www.facebook.com/notes/facebook-engineering/under-the-hood-dalvik-patch-for-facebook-for-android/10151345597798920,这里边还可以看到在2.3上动态改变LinearAlloc缓冲的解决思路) 这两种方法并不冲突,插件化除了解决应用爆棚,还有很多其他的优点,可以看我之前的文章,不再复述.
当然,Google看来也意识到了目前应用方法数爆棚的问题, 目前在已经在API 21中提供了通用的解决方案,那就是android-support-multidex.jar. 这个jar包最低可以支持到API 4的版本(Android L及以上版本会默认支持mutidex).
让我们看一下如何应用android-support-multidex.jar(以下都以在Anroid studio中的使用为例,使用eclipse开发需要安装gradle插件,其他基本上相同):
首先可以用–multi-dex配置(build.gradle)进行解决,生成的Apk中将包含多个dex文件,比如classes.dex, classes2.dex. 如下,需要对build.gradle进行修改:
afterEvaluate {
    tasks.matching {
        it.name.startsWith('dex')
    }.each { dx ->
        if (dx.additionalParameters == null) {
            dx.additionalParameters = []
        }
        dx.additionalParameters += '--multi-dex' // enable multidex

        // optional
        // dx.additionalParameters += "--main-dex-list=$projectDir/<filename>".toString() // enable the main-dex-list
    }
}
但是默认的Dalvik 类加载器只会寻找classes.dex,所以需要将它们进行合并才能使得被识别
当然,现在有了android.support.multidex.jar的支持,一切都会变得非常简单,首先我们看一下相关源码的目录,具体的原理分析我会在之后的文章中进行讲解:
android/support/multidex/BuildConfig.class
android/support/multidex/MultiDex$V14.class
android/support/multidex/MultiDex$V19.class
android/support/multidex/MultiDex$V4.class
android/support/multidex/MultiDex.class
android/support/multidex/MultiDexApplication.class
android/support/multidex/MultiDexExtractor$1.class
android/support/multidex/MultiDexExtractor.class
android/support/multidex/ZipUtil$CentralDirectory.class
android/support/multidex/ZipUtil.class
具体集成:
将如下配置加入工程 classPath中
repositories {
  jcenter()
}

dependencies {
  compile 'com.google.android:multidex:0.1'
}
MultiDex实现原理:
Apk在运行的时候,有一个dexpathlist,而Multidex的源码中,会根据你的系统版本号对dexpathlist做修改,将所有的dex都添加到dexpathlist中.
接下来集成有两个步骤:
一. 从sdk\extras\android\support\multidex\library\libs 目录将android-support-multidex.jar导入工程中
二. 如果你的工程中已经含有Application类,那么让它继承android.support.multidex.MultiDexApplication类,
如果你的Application已经继承了其他类并且不想做改动,那么还有另外一种使用方式,覆写attachBaseContext()方法:
public class MyApplication extends FooApplication {
    @Override
    protected void attachBaseContext(Context base) {
        super.attachBaseContext(base);
        MultiDex.install(this);
    }
}
最后给出build.gradle中的完整配置:
android {
    compileSdkVersion 21
    buildToolsVersion "21.1.0"

    defaultConfig {
        ...
        minSdkVersion 14
        targetSdkVersion 21
        ...

        // Enabling multidex support.
        multiDexEnabled true
    }
    ...
}

dependencies {
  compile 'com.android.support:multidex:1.0.0'
}
使用MutiDex的主意事项
一. 如果你继承了MutiDexApplication或者覆写了Application中的attachBaseContext()方法.
Application类中逻辑的注意事项:
Application 中的静态全局变量会比MutiDex的 instal()方法优先加载,所以建议避免在Application类中使用静态变量引用main classes.dex文件以外dex文件中的类,可以根据如下所示的方式进行修改:
@Override
    public void onCreate() {
        super.onCreate();

        final Context mContext = this;
        new Runnable() {

            @Override
            public void run() {
                // put your logic here!
                // use the mContext instead of this here
            }
        }.run();
    }
二. 虽然Google解决了应用总方法数限制的问题,但并不意味着开发者可以任意扩大项目规模。Multidex仍有一些限制:
DEX文件安装到设备的过程非常复杂,如果第二个DEX文件太大,可能导致应用无响应。此时应该使用ProGuard减小DEX文件的大小。
由于Dalvik linearAlloc的Bug,应用可能无法在Android 4.0之前的版本启动,如果你的应用要支持这些版本就要多执行测试。
同样因为Dalvik linearAlloc的限制,如果请求大量内存可能导致崩溃。Dalvik linearAlloc是一个固定大小的缓冲区。在应用的安装过程中,系统会运行一个名为dexopt的程序为该应用在当前机型中运行做准备。dexopt使用LinearAlloc来存储应用的方法信息。Android 2.2和2.3的缓冲区只有5MB,Android 4.x提高到了8MB或16MB。当方法数量过多导致超出缓冲区大小时,会造成dexopt崩溃。
Multidex构建工具还不支持指定哪些类必须包含在首个DEX文件中,因此可能会导致某些类库(例如某个类库需要从原生代码访问Java代码)无法使用。
避免应用过大、方法过多仍然是Android开发者要注意的问题。Mihai Parparita的开源项目dex-method-counts可以用于统计APK中每个包的方法数量。
通常开发者自己的代码很难达到这样的方法数量限制,但随着第三方类库的加入,方法数就会迅速膨胀。因此选择合适的类库对Android开发者来说尤为重要。
开发者应该避免使用Google Guava这样的类库,它包含了13000多个方法。尽量使用专为移动应用设计的Lite/Android版本类库,或者使用小类库替换大类库,例如用Google-gson替换Jackson JSON。而对于Google Protocol Buffers这样的数据交换格式,其标准实现会自动生成大量的方法。采用Square Wire的实现则可以很好地解决此问题。
常见问题
DexException: Library dex files are not supported in multi-dex mode,你可能会见到如下的错误:
Error:Execution failed for task ':app:dexDebug'.
> com.android.ide.common.internal.LoggedErrorException: Failed to run command:
    $ANDROID_SDK/build-tools/android-4.4W/dx --dex --num-threads=4 --multi-dex
    ...
  Error Code:
    2
  Output:
    UNEXPECTED TOP-LEVEL EXCEPTION:
    com.android.dex.DexException: Library dex files are not supported in multi-dex mode
        at com.android.dx.command.dexer.Main.runMultiDex(Main.java:322)
        at com.android.dx.command.dexer.Main.run(Main.java:228)
        at com.android.dx.command.dexer.Main.main(Main.java:199)
        at com.android.dx.command.Main.main(Main.java:103)
对于dex 的–multi-dex 选项设置与预编译的library工程有冲突,因此如果你的应用中包含引用的lirary工程,需要将预编译设置为false:
android {
    // ...
    dexOptions {
        preDexLibraries = false
    }
}
OutOfMemoryError: Java heap space
当运行时如果看到如下错误:
UNEXPECTED TOP-LEVEL ERROR:
java.lang.OutOfMemoryError: Java heap space
在dexOptions中有一个字段用来增加java堆内存大小:
android {
    // ...
    dexOptions {
        javaMaxHeapSize "2g"
    }
}
使用eclipse的开发人员可以参考Google官方文档
https://developer.android.com/tools/building/multidex.html#mdex-gradle
需要安装支持gradle构建的插件,下载地址:
http://dist.springsource.com/release/TOOLS/gradle (目前可能需要翻墙)
参考相关资料:
1. MutiDex 官方文档: https://developer.android.com/reference/android/support/multidex/MultiDex.html
2. http://blog.osom.info/2014/10/multi-dex-to-rescue-from-infamous-65536.html
另附android -support-mutidex.jar下载地址: http://download.csdn.net/detail/t12x3456/8143383
补充注意事项:
com.android.dex.DexException: Multiple dex files define L{package}/BuildConfig; 如果遇到这个错误请进行如下检查:
1. 主工程与依赖library工程包名是否重复
2. 检查主工程与依赖library工程是否含有重复的support.jar或者其他jar包
解决方案:
1. 修改library工程包名
2. 删除重复jar包
3.手工添加lib包,增加如下配置
dependencies {
            compile fileTree(dir: 'libs', include: ['*.jar'])
            compile project(':lib-project-module')
} 


 6045
6045

 被折叠的 条评论
为什么被折叠?


