


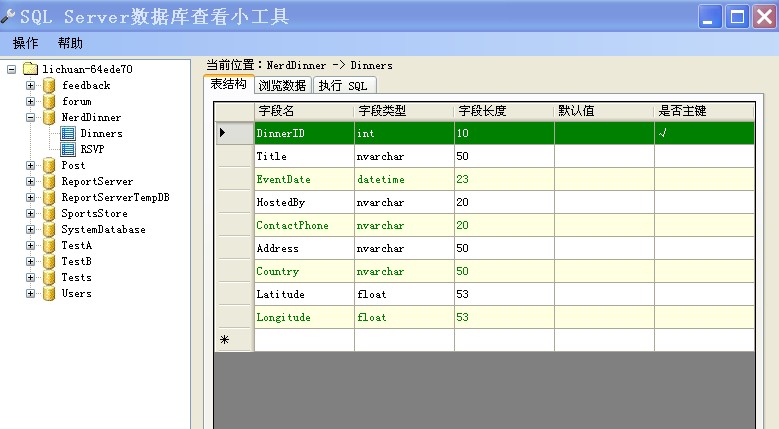
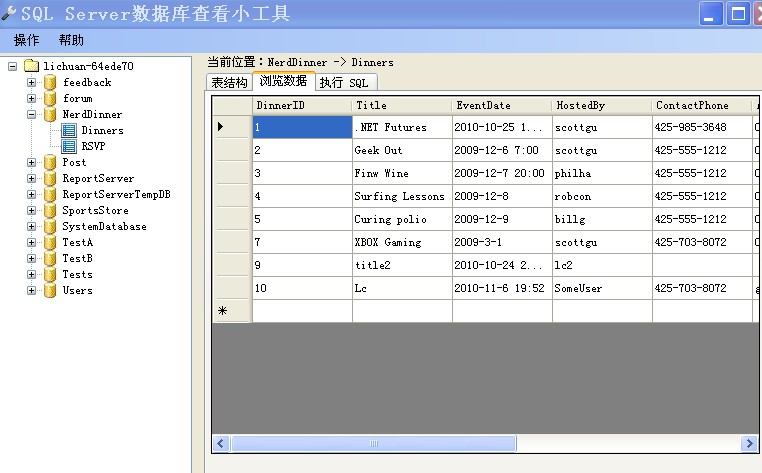
闲来无事,利用WinForm做了个查看SQL Server所有数据库表信息的小工具。
总结一下:
1、只允许运行应用程序的一个实例

 View Code
///
<summary>
/// 应用程序的主入口点。
/// </summary>
[STAThread]
static void Main()
{
bool createNew;
try
{
using (System.Threading.Mutex m = new System.Threading.Mutex( true , " Global\\ " + Application.ProductName, out createNew))
{
if (createNew)
{
Application.EnableVisualStyles();
Application.SetCompatibleTextRenderingDefault( false );
Application.Run( new Form1());
}
else
{
MessageBox.Show( " Only one instance of this application is allowed! " );
}
}
}
catch
{
MessageBox.Show( " 只允许运行该应用程序的一个实例! " );
}
}
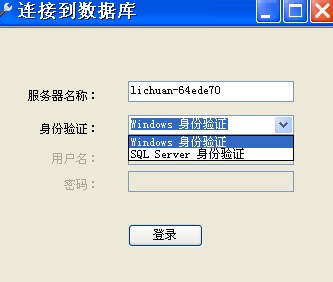
2、给ComboBox添加项
View Code
///
<summary>
/// 选择项类,用于ComboBox或者ListBox添加项
/// </summary>
public class ListItem
{
public ListItem( string sid, string sname)
{
ID = sid;
Name = sname;
}
public override string ToString()
{
return this .Name;
}
public string ID { get ; set ; }
public string Name { get ; set ; }
}
// 使用:
cboLoginType.Items.Add( new Comm.ListItem( " 0 " , " Windows 身份验证 " ));
cboLoginType.Items.Add( new Comm.ListItem( " 1 " , " SQL Server 身份验证 " ));
3、窗体传值
View Code
//
利用构造方法,LoginFM窗体传值给MainFM窗体
// LoginFM.cs代码:
MainFM f1 = new MainFM(txtServerName.Text.Trim());
f1.Show();
// MainFM.cs代码:
public MainFM()
{
InitializeComponent();
}
public MainFM( string name)
: this ()
{
serverName = name;
}
// LoginFM.cs代码:
MainFM f1 = new MainFM(txtServerName.Text.Trim());
f1.Show();
// MainFM.cs代码:
public MainFM()
{
InitializeComponent();
}
public MainFM( string name)
: this ()
{
serverName = name;
}
4、窗体伸缩时控制窗体内控件按比例自动伸缩
View Code
public
MainFM(
string
name)
: this ()
{
serverName = name;
SetControlWH( this );
}
private void MainFM_Resize( object sender, EventArgs e)
{
SetControl2( this );
}
double formoldwidth; // 窗体原始宽度
double formoldheight; // 窗体原始高度
private void SetControlWH(Control c)
{
double scalewh; // 控件宽高比
formoldwidth = ( double ) this .Width;
formoldheight = ( double ) this .Height;
foreach (Control ctrl in c.Controls)
{
scalewh = ( double )ctrl.Width / ( double )ctrl.Height;
ctrl.Tag = ctrl.Left + " " + ctrl.Top + " " + ctrl.Width
+ " " + scalewh.ToString() + " " ; // 将控件的Left,Top,Width,宽高比放入控件的Tag内
if (ctrl != null )
SetControlWH(ctrl);
}
}
private void SetControl2(Control c)
{
double scalex; // 水平伸缩比
double scaley; // 垂直伸缩比
long i;
int temppos;
string temptag;
double [] pos = new double [ 4 ];
// pos数组保存当前控件的left,top,width,height
scalex = ( double ) this .Width / formoldwidth;
scaley = ( double ) this .Height / formoldheight;
foreach (Control ctrl in c.Controls)
{
temptag = ctrl.Tag.ToString();
for (i = 0 ; i <= 3 ; i ++ )
{
temppos = temptag.IndexOf( " " );
if (temppos > 0 )
{
pos[i] = Convert.ToDouble(temptag.Substring( 0 ,
temppos)); // 从Tag中取出参数
temptag = temptag.Substring(temppos + 1 );
}
else
pos[i] = 0 ;
}
ctrl.Left = ( int )(pos[ 0 ] * scalex);
ctrl.Top = ( int )(pos[ 1 ] * scaley);
ctrl.Width = ( int )(pos[ 2 ] * scalex);
ctrl.Height = ( int )(( double )ctrl.Width / pos[ 3 ]);
// 高度由宽高比算出
SetControl2(ctrl);
}
}
5、设置DataGridView行变色
View Code
private
void
dataGridView1_DataBindingComplete(
object
sender, DataGridViewBindingCompleteEventArgs e)
{
for ( int i = 0 ; i < this .dataGridView1.Rows.Count; i ++ )
{
if (i % 2 == 0 )
{
this .dataGridView1.Rows[i].DefaultCellStyle.BackColor = System.Drawing.SystemColors.Info; // 背景颜色
this .dataGridView1.Rows[i].DefaultCellStyle.ForeColor = System.Drawing.Color.Green; // 字体颜色
}
this .dataGridView1.Rows[i].DefaultCellStyle.SelectionBackColor = System.Drawing.Color.Green; // 选择行的颜色
}
}
{
for ( int i = 0 ; i < this .dataGridView1.Rows.Count; i ++ )
{
if (i % 2 == 0 )
{
this .dataGridView1.Rows[i].DefaultCellStyle.BackColor = System.Drawing.SystemColors.Info; // 背景颜色
this .dataGridView1.Rows[i].DefaultCellStyle.ForeColor = System.Drawing.Color.Green; // 字体颜色
}
this .dataGridView1.Rows[i].DefaultCellStyle.SelectionBackColor = System.Drawing.Color.Green; // 选择行的颜色
}
}
6、让TreeView的节点不管有没子节点都默认“+”号:
View Code
private
void
InitTreeList(DataTable dataTable)
{
this .treeView1.ImageIndex = 0 ;
TreeNode root = new TreeNode(serverName, 0 , 0 );
foreach (System.Data.DataRow row in dataTable.Rows)
{
TreeNode node = new TreeNode(row[ " name " ].ToString(), 1 , 1 );
node.Tag = row[ " name " ].ToString();
// 以下生成一个子节点以让节点显示“+”号
TreeNode n = new TreeNode( " n " );
node.Nodes.Add(n);
root.Nodes.Add(node);
}
this .treeView1.Nodes.Add(root);
this .treeView1.Nodes[ 0 ].Expand();
}
// 选择节点时再生成子节点数据
private void treeView1_AfterSelect( object sender, TreeViewEventArgs e)
{
// 其它代码.....
// 点击“+”号生成节点数据时先删除原先的子节点
if ( this .treeView1.SelectedNode.Nodes.Count > 0 )
{
this .treeView1.SelectedNode.Nodes.Clear();
}
// 其它代码.....
}
{
this .treeView1.ImageIndex = 0 ;
TreeNode root = new TreeNode(serverName, 0 , 0 );
foreach (System.Data.DataRow row in dataTable.Rows)
{
TreeNode node = new TreeNode(row[ " name " ].ToString(), 1 , 1 );
node.Tag = row[ " name " ].ToString();
// 以下生成一个子节点以让节点显示“+”号
TreeNode n = new TreeNode( " n " );
node.Nodes.Add(n);
root.Nodes.Add(node);
}
this .treeView1.Nodes.Add(root);
this .treeView1.Nodes[ 0 ].Expand();
}
// 选择节点时再生成子节点数据
private void treeView1_AfterSelect( object sender, TreeViewEventArgs e)
{
// 其它代码.....
// 点击“+”号生成节点数据时先删除原先的子节点
if ( this .treeView1.SelectedNode.Nodes.Count > 0 )
{
this .treeView1.SelectedNode.Nodes.Clear();
}
// 其它代码.....
}
7、设置TreeView点击节点前面“+”、“-”号自动选择相应节点
View Code
private
void
treeView1_AfterExpand(
object
sender, TreeViewEventArgs e)
{
SetSelectNode(e.Node);
}
private void treeView1_AfterCollapse( object sender, TreeViewEventArgs e)
{
SetSelectNode(e.Node);
}
private void SetSelectNode(TreeNode tn)
{
if (tn == null )
return ;
if (tn.Tag == null )
return ;
treeView1.SelectedNode = tn;
}
{
SetSelectNode(e.Node);
}
private void treeView1_AfterCollapse( object sender, TreeViewEventArgs e)
{
SetSelectNode(e.Node);
}
private void SetSelectNode(TreeNode tn)
{
if (tn == null )
return ;
if (tn.Tag == null )
return ;
treeView1.SelectedNode = tn;
}
8、窗体监听热键
View Code
private
void
MainFM_Activated(
object
sender, EventArgs e)
{
HotKey.RegisterHotKey(Handle, 100 , HotKey.KeyModifiers.None, Keys.F5);
}
private void MainFM_Leave( object sender, EventArgs e)
{
HotKey.UnRegisterHotKey(Handle, 100 );
}
/// <summary>
/// 监视Windows消息,重载WndProc方法,用于实现热键响应
/// </summary>
/// <param name="m"></param>
protected override void WndProc( ref Message m)
{
const int WM_HOTKEY = 0x0312 ;
switch (m.Msg)
{
case WM_HOTKEY:
switch (m.WParam.ToInt32())
{
case 100 :
// 这里快捷键响应代码
// ......
break ;
}
break ;
}
base .WndProc( ref m);
}
{
HotKey.RegisterHotKey(Handle, 100 , HotKey.KeyModifiers.None, Keys.F5);
}
private void MainFM_Leave( object sender, EventArgs e)
{
HotKey.UnRegisterHotKey(Handle, 100 );
}
/// <summary>
/// 监视Windows消息,重载WndProc方法,用于实现热键响应
/// </summary>
/// <param name="m"></param>
protected override void WndProc( ref Message m)
{
const int WM_HOTKEY = 0x0312 ;
switch (m.Msg)
{
case WM_HOTKEY:
switch (m.WParam.ToInt32())
{
case 100 :
// 这里快捷键响应代码
// ......
break ;
}
break ;
}
base .WndProc( ref m);
}
9、点击窗体右上角“关闭”按钮时最小化并托盘提示信息
View Code
/*
(1)在窗体设计界面添加一个NotifyIcon控件notifyIcon1,添加一个ContextMenuStrip控件contextMenuStrip1;
(2)设置notifyIcon1的ContextMenuStrip属性为contextMenuStrip1、为Icon属性添加一个图标文件;
(3)在contextMenuStrip1的Items属性中添加两个菜单选项toolStripMenuItem_Show和toolStripMenuItem_Exit,名称分别为“打开”和“退出”;
下面为事件
*/
// 点击窗体右上角“关闭”按钮时最小化并托盘提示信息
private void MainFM_FormClosing( object sender, FormClosingEventArgs e)
{
e.Cancel = true ; // 取消关闭窗体
this .Hide();
this .notifyIcon1.Visible = true ; // 显示托盘图标
this .notifyIcon1.Text = " 打开程序 " ;
notifyIcon1.ShowBalloonTip( 3000 , " 程序最小化提示 " , " 程序已经缩小到托盘,打开窗口请双击图标即可。 " , ToolTipIcon.Info);
}
// 双击打开程序
private void notifyIcon1_DoubleClick( object sender, EventArgs e)
{
ShowForm();
}
// 右键点击“打开”打开程序
private void toolStripMenuItem_Show_Click( object sender, EventArgs e)
{
ShowForm();
}
// 右键点击“退出”退出程序
private void toolStripMenuItem_Exit_Click( object sender, EventArgs e)
{
this .ShowInTaskbar = false ;
Application.Exit();
}
private void ShowForm()
{
this .Show();
if ( this .WindowState == FormWindowState.Minimized)
this .WindowState = FormWindowState.Normal;
this .Activate();
}


 2318
2318

 被折叠的 条评论
为什么被折叠?
被折叠的 条评论
为什么被折叠?
 到【灌水乐园】发言


