


如果使用javax.jws内容编写webservice,则只能通过将程序打成jar包的形式运行,如果要想通过web容器进行发布,则需要使用其他webservice框架。下面介绍jaxws与spring集成配置过程。
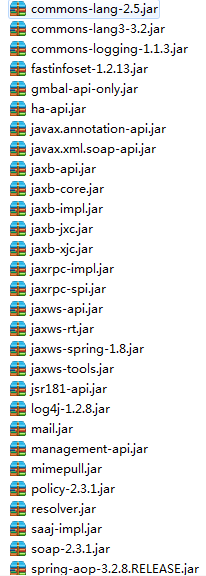
1,导入jar包,jaxws相关,spring相关:在我的测试程序中使用到的相关jar包如下,根据自己的需要对spring的jar进行增减。

2,创建webservice接口(红色部分为自定义内容,根据实际情况更改):
import javax.jws.WebMethod;
import javax.jws.WebParam;
import javax.jws.WebService;
import javax.jws.soap.SOAPBinding;
@WebService(name = "CopSecWebService", targetNamespace = "http://ws.copsec.com/")
@SOAPBinding(style = SOAPBinding.Style.RPC)
public interface CopsecWsServiceItf {
/**
* 获取用户对象
* @param userid
* @return
* returns testjws.client.WsUser
*/
@WebMethod
public String getUser(
@WebParam(name = "userid", partName = "userid")
String userid);
}
3,实现webservice接口(该文件使用spring注解配置):
import javax.jws.WebService;
import org.springframework.stereotype.Component;
@WebService(endpointInterface="com.copsec.ws.CopsecWsServiceItf",
serviceName="CopSecWebService",
portName="CopSecWebServicePort",
targetNamespace="http://ws.copsec.com/")
//该对象交由spring管理
@Component("copsecWsServiceImpl")
public class CopsecWsServiceImpl implements CopsecWsServiceItf{
public String getUser(String id) {
return "say hi "+id;
}
}
4,编辑application.xml文件
1)在<beans>标签当中添加对应的应用,对应的schema应用。我的项目中<beans>的配置如下:
<beans xmlns="http://www.springframework.org/schema/beans"
xmlns:xsi="http://www.w3.org/2001/XMLSchema-instance" xmlns:ws="http://jax-ws.dev.java.net/spring/core"
xmlns:wss="http://jax-ws.dev.java.net/spring/servlet" xmlns:p="http://www.springframework.org/schema/p"
xmlns:context="http://www.springframework.org/schema/context"
xsi:schemaLocation="http://www.springframework.org/schema/beans
http://www.springframework.org/schema/beans/spring-beans-3.0.xsd
http://www.springframework.org/schema/context http://www.springframework.org/schema/context/spring-context-3.2.xsd
http://jax-ws.dev.java.net/spring/core
http://jax-ws.dev.java.net/spring/core.xsd
http://jax-ws.dev.java.net/spring/servlet
http://jax-ws.dev.java.net/spring/servlet.xsd">
2) 配置webservice
<context:annotation-config/> <!--由于使用注解方式,所以配置-->
<context:component-scan base-package="com.copsec"/> <!--配置扫描包的位置-->
<wss:binding url="/jaxws-spring">
<wss:service>
<ws:service bean="#copsecWsServiceImpl"></ws:service> <!-- 此处引用的bean前务必加上"#"号标识-->
</wss:service>
</wss:binding>
5, 修改web.xml:需增加的内容如下(基于servlet,java net):
<listener>
<listener-class>org.springframework.web.context.ContextLoaderListener</listener-class>
</listener>
<servlet>
<servlet-name>springWsServlet</servlet-name>
<servlet-class>com.sun.xml.ws.transport.http.servlet.WSSpringServlet</servlet-class>
</servlet>
<servlet-mapping>
<servlet-name>springWsServlet</servlet-name>
<url-pattern>/jaxws-spring</url-pattern>
</servlet-mapping>
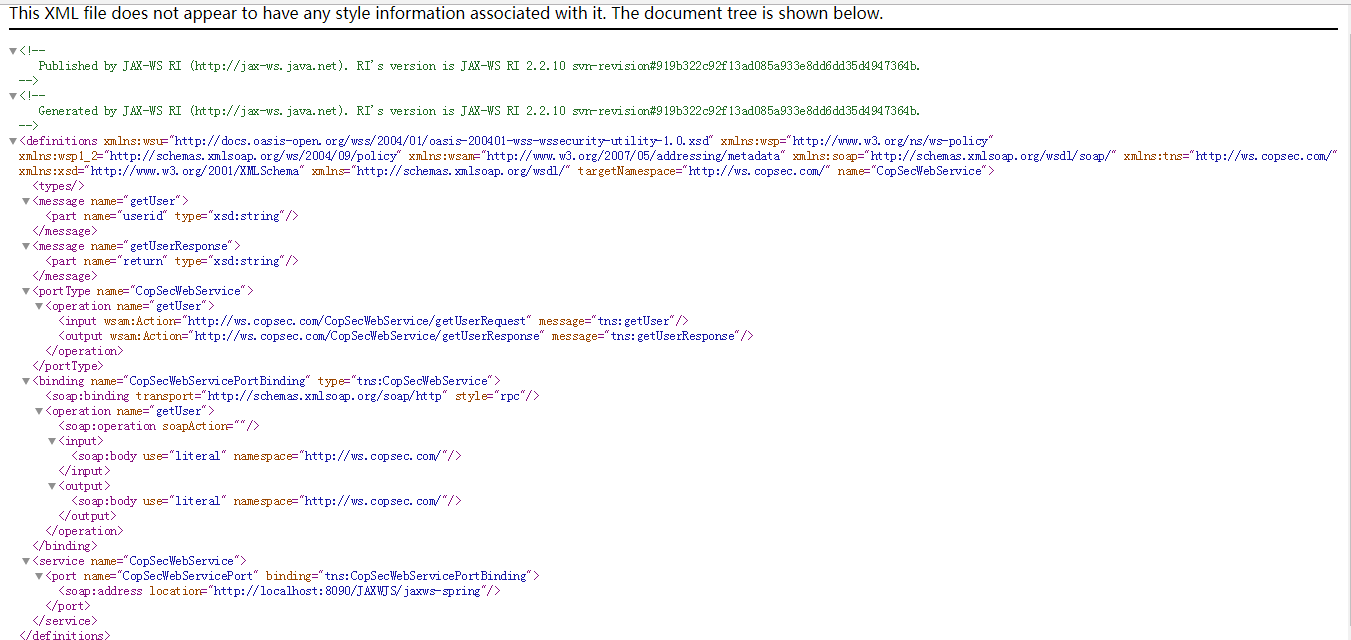
以上配置过程完成后,webservice就可部署到web容器进行发布,测试使用的是tomcat服务器,通过http://localhost:8090/JAXWJS/jaxws-spring访问,内容如下:

点击wsdl可看到如下内容:
由于jaxws也是基于java .net,所以他的调用方式和使用非继承的调用方式相同。下面几种不同的调用方式,可根据自己的需求进行选择:
在此之前也需要把webservice接口文件导出到本地(使用wsimport导出即可),并下载wsdl到本带。
public class Main {
static String wsdlLocation = "http://localhost:8090/JAXWJS/jaxws-spring?wsdl";
static String wsdlFileLocation = "file:D:\\service\\com\\jaxws\\service\\service.wsdl";
static String nameSpaces="http://ws.copsec.com/";
static String serviceName = "CopSecWebService";
static String servicePort = "CopSecWebServicePort";
public static void main(String[] args) {
//使用soap方式调用,才能通过hanlder拦截到soap请求
System.out.println(soapInvoke());
//System.out.println(PRCinvoke());
//System.out.println(serviceInvoke());
}
//通过rpc方式调用
public static String PRCinvoke(){
String result = null;
try {
ServiceFactory serviceFactory = ServiceFactory.newInstance();
Service service = serviceFactory.createService(new URL(wsdlFileLocation), new QName(nameSpaces,
serviceName));
CopSecWebService myProxyItf = (CopSecWebService) service.getPort(new QName(nameSpaces,
servicePort), CopSecWebService.class);
result = myProxyItf.getUser("huyaozhong");
} catch (ServiceException e) {
// TODO Auto-generated catch block
e.printStackTrace();
} catch (MalformedURLException e) {
// TODO Auto-generated catch block
e.printStackTrace();
}
return result;
}
public static String soapInvoke(){
CopSecWebService_Service service;
String result = null;
try {
service = new CopSecWebService_Service(new URL(wsdlFileLocation));
CopSecWebService serviceItf = service.getCopSecWebServicePort();
result = serviceItf.getUser("test");
} catch (MalformedURLException e) {
// TODO Auto-generated catch block
e.printStackTrace();
}
return result;
}
public static String serviceInvoke(){
javax.xml.ws.Service service;
String result = null;
try {
service = javax.xml.ws.Service.create(new URL(wsdlFileLocation),new QName(nameSpaces, serviceName));
CopSecWebService proxy = service.getPort(CopSecWebService.class);
result = proxy.getUser("lalalal");
} catch (MalformedURLException e) {
// TODO Auto-generated catch block
e.printStackTrace();
}
return result;
}
}
jaxws-spring集成过程大致如上。


 441
441


 被折叠的 条评论
为什么被折叠?
被折叠的 条评论
为什么被折叠?
 到【灌水乐园】发言


