


http://blog.csdn.net/huangwenyi1010/article/details/51637439
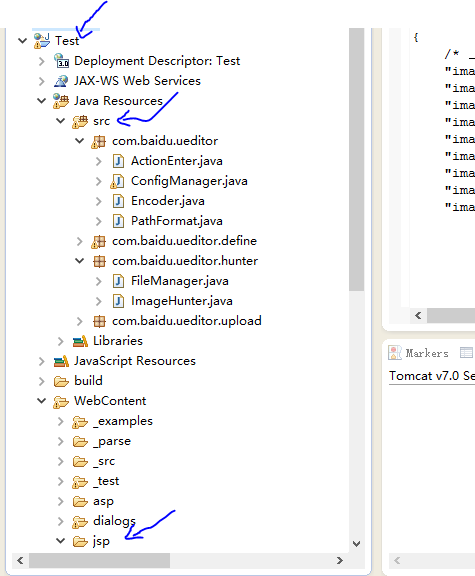
这是我的项目目录
1.从访问路径http://localhost:8081/Test/_examples/simpleDemo.html,我们主要是要看看,富文本框被加载出来之前,会调用哪些代码,
不卖关子,很明显,会调用后端的controller.jsp代码,因为我们已经在ueditor.config配置了:
// 服务器统一请求接口路径
, serverUrl: URL + "jsp/controller.js
看看controller.jsp代码,上一篇文章我们已经讲了,要把这些代码看作是后端代码,很重要很重要的:
<%@ page language="java" contentType="text/html; charset=UTF-8"
import="com.baidu.ueditor.ActionEnter"
pageEncoding="UTF-8"%>
<%@ page trimDirectiveWhitespaces="true" %>
<%

    request.setCharacterEncoding( "utf-8" );
    response.setHeader("Content-Type" , "text/html");
    /** 项目根路径 **/
    String rootPath = application.getRealPath( "/" );
    /** 调用后端的ActionEnter类,并执行exec方法 **/
    out.write( new ActionEnter( request, rootPath ).exec() );

%>
我们就到ActionEnter.Java看看吧,这个类就是前端调用后端的唯一入口,也只有这个入口了,记住第一章有讲了,要把源码复制到src下,进行调试哦!不知道先看第一章吧!!!!!
package com.baidu.ueditor;

import java.util.Map;

import javax.servlet.http.HttpServletRequest;

import com.baidu.ueditor.define.ActionMap;
import com.baidu.ueditor.define.AppInfo;
import com.baidu.ueditor.define.BaseState;
import com.baidu.ueditor.define.State;
import com.baidu.ueditor.hunter.FileManager;
import com.baidu.ueditor.hunter.ImageHunter;
import com.baidu.ueditor.upload.Uploader;

public class ActionEnter {

private HttpServletRequest request = null;

private String rootPath = null;
private String contextPath = null;

private String actionType = null;

private ConfigManager configManager = null;
/** action统一入口 **/
public ActionEnter ( HttpServletRequest request, String rootPath ) {

    this.request = request;
    /** rootPath = /Test/ **/
    this.rootPath = rootPath;
    /** actionType = config **/
    this.actionType = request.getParameter( "action" );
    /** contextPath = /Test **/
    this.contextPath = request.getContextPath();
    /** 调用ConfigManager **/
    this.configManager = ConfigManager.getInstance( this.rootPath, this.contextPath, request.getRequestURI() );

}
2.ConfigManager类主要用来读取后端的配置文件,就是config.json这个文件,事实上这个文件应该放在后端的。
/**
 * 配置管理器
 * @author hancong03@baidu.com
 *
 */
public final class ConfigManager {

private final String rootPath;
private final String originalPath;
private final String contextPath;
/** 存放备注文件 **/
private static final String configFileName = "config.json";
private String parentPath = null;
private JSONObject jsonConfig = null;
// 涂鸦上传filename定义
private final static String SCRAWL_FILE_NAME = "scrawl";
// 远程图片抓取filename定义
private final static String REMOTE_FILE_NAME = "remote";

/*
 * 通过一个给定的路径构建一个配置管理器, 该管理器要求地址路径所在目录下必须存在config.properties文件
 */
private ConfigManager ( String rootPath, String contextPath, String uri ) throws FileNotFoundException, IOException {

    rootPath = rootPath.replace( "\\", "/" );
    //下面的rootPath就是我的根路径
    // rootPath=D:/workspace_de_client/.metadata/.plugins/org.eclipse.wst.server.core/tmp0/wtpwebapps/Test/
    this.rootPath = rootPath;
    this.contextPath = contextPath;
    //请求路径 url = /Test/jsp/controller.jsp
    if ( contextPath.length() > 0 ) {
        // D:/workspace_de_client/.metadata/.plugins/org.eclipse.wst.server.core/tmp0/wtpwebapps/Test//jsp/controller.jsp
        this.originalPath = this.rootPath + uri.substring( contextPath.length() );
    } else {
        this.originalPath = this.rootPath + uri;
    }
    /** 调用当前类的初始化环境方法 initEnv **/
    this.initEnv();

}

//上面的方法无非就是获得controller.jsp这个类所在的真实目录而已


//下面看看initEnv()这个方法

private void initEnv () throws FileNotFoundException, IOException {
    /**  **/
    File file = new File( this.originalPath );

    if ( !file.isAbsolute() ) {
        file = new File( file.getAbsolutePath() );
    }
    /** 获得文件的父路径,也就是  ..../jsp **/
    this.parentPath = file.getParent();
    /** 读取配置文件,这个方法比较重要,往下看 **/
    String configContent = this.readFile( this.getConfigPath() );

    try{
        /** 把返回的的json字符串扔进JsonObject对象中 **/
        JSONObject jsonConfig = new JSONObject( configContent );
        this.jsonConfig = jsonConfig;
    } catch ( Exception e ) {
        this.jsonConfig = null;
    }

}

/** 获得配置路径,记住config.json是和controller.jsp放在同一个目录下的,很坑有木有 **/
private String getConfigPath () {
    /** 拼凑config.json的真实路径 **/
    return this.parentPath + File.separator + ConfigManager.configFileName;
}

private String[] getArray ( String key ) {

    JSONArray jsonArray = this.jsonConfig.getJSONArray( key );
    String[] result = new String[ jsonArray.length() ];

    for ( int i = 0, len = jsonArray.length(); i < len; i++ ) {
        result[i] = jsonArray.getString( i );
    }

    return result;

}
/** 获得配置文件的内容,变成字符串返回 **/
private String readFile ( String path ) throws IOException {

    StringBuilder builder = new StringBuilder();

    try {

        InputStreamReader reader = new InputStreamReader( new FileInputStream( path ), "UTF-8" );
        BufferedReader bfReader = new BufferedReader( reader );

        String tmpContent = null;

        while ( ( tmpContent = bfReader.readLine() ) != null ) {
            builder.append( tmpContent );
        }

        bfReader.close();

    } catch ( UnsupportedEncodingException e ) {
        // 忽略
    }
    //过滤输入字符串, 剔除多行注释以及替换掉反斜杠
    return this.filter( builder.toString() );

}

// 过滤输入字符串, 剔除多行注释以及替换掉反斜杠
private String filter ( String input ) {

    return input.replaceAll( "/\\*[\\s\\S]*?\\*/", "" );

}
从上面的方法中,读取配置文件的所有后端代码就都执行完了吧!!!!很简单吧!!!!
3.后端代码执行完之后,富文本框就初始化出来了,很有成就感吧!!
如图:
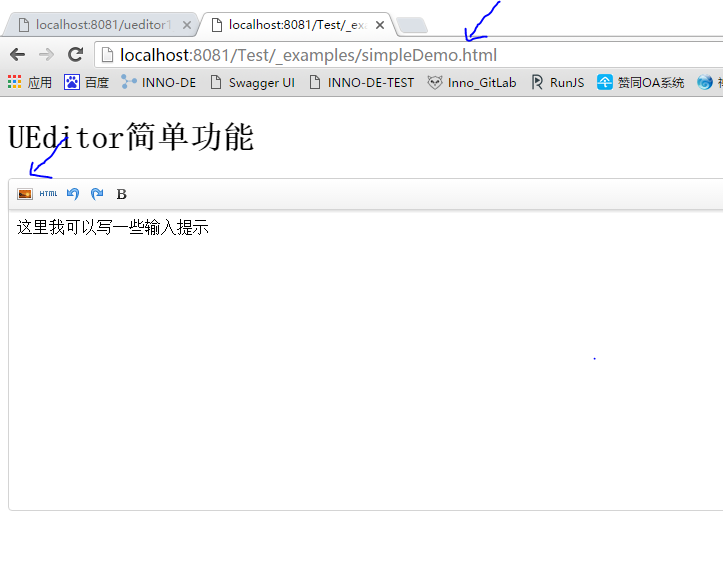
我们点击上传图片的按钮,选择一张图片上传,好,接下来就看看前端是如何调用,以及后端是如何保存文件的吧!!
我们看simpleupload.js这个文件,它是实现单文本上传的主要前段代码,很重要的
我们从53行开始看也就是:domUtils.on(input, ‘change’, function() 找不到可以Ctrl +F,相信这点技能还是有的吧,否则就不适合这个行业了 !!!!
这里我要说明下,ueditor读取配置文件的顺序,是:
后端返回json配置文件 --> 用户自定义的配置文件 --> ueditor.config(我不知道有没有记错,在家里写,没网啊!!!一切都是凭记忆啊)

/**
 * @description
 * 简单上传:点击按钮,直接选择文件上传
 * @author Jinqn
 * @date 2014-03-31
 */
UE.plugin.register('simpleupload', function (){
    var me = this,
        isLoaded = false,
        containerBtn;
    /** 初始化上传的图片按钮,人家名字取得好啊!! **/
    function initUploadBtn(){
        var w = containerBtn.offsetWidth || 20,
            h = containerBtn.offsetHeight || 20,
            btnIframe = document.createElement('iframe'),
            btnStyle = 'display:block;width:' + w + 'px;height:' + h + 'px;overflow:hidden;border:0;margin:0;padding:0;position:absolute;top:0;left:0;filter:alpha(opacity=0);-moz-opacity:0;-khtml-opacity: 0;opacity: 0;cursor:pointer;';

        domUtils.on(btnIframe, 'load', function(){

            var timestrap = (+new Date()).toString(36),
                wrapper,
                btnIframeDoc,
                btnIframeBody;

            btnIframeDoc = (btnIframe.contentDocument || btnIframe.contentWindow.document);
            btnIframeBody = btnIframeDoc.body;
            wrapper = btnIframeDoc.createElement('div');

            wrapper.innerHTML = '<form id="edui_form_' + timestrap + '" target="edui_iframe_' + timestrap + '" method="POST" enctype="multipart/form-data" action="' + me.getOpt('serverUrl') + '" ' +
            'style="' + btnStyle + '">' +
            '<input id="edui_input_' + timestrap + '" type="file" accept="image/*" name="' + me.options.imageFieldName + '" ' +
            'style="' + btnStyle + '">' +
            '</form>' +
            '<iframe id="edui_iframe_' + timestrap + '" name="edui_iframe_' + timestrap + '" style="display:none;width:0;height:0;border:0;margin:0;padding:0;position:absolute;"></iframe>';

            wrapper.className = 'edui-' + me.options.theme;
            wrapper.id = me.ui.id + '_iframeupload';
            btnIframeBody.style.cssText = btnStyle;
            btnIframeBody.style.width = w + 'px';
            btnIframeBody.style.height = h + 'px';
            btnIframeBody.appendChild(wrapper);

            if (btnIframeBody.parentNode) {
                btnIframeBody.parentNode.style.width = w + 'px';
                btnIframeBody.parentNode.style.height = w + 'px';
            }

            var form = btnIframeDoc.getElementById('edui_form_' + timestrap);
            var input = btnIframeDoc.getElementById('edui_input_' + timestrap);
            var iframe = btnIframeDoc.getElementById('edui_iframe_' + timestrap);
            /** 点击上传图片按钮时,调用的代码 **/
            domUtils.on(input, 'change', function(){
                if(!input.value) return;
                var loadingId = 'loading_' + (+new Date()).toString(36);
                var params = utils.serializeParam(me.queryCommandValue('serverparam')) || '';
                /** 获得配置文件中的imageActionName值 **/
                var imageActionUrl = me.getActionUrl(me.getOpt('imageActionName'));
                //获取允许的文件格式
                var allowFiles = me.getOpt('imageAllowFiles');

                me.focus();
                me.execCommand('inserthtml', '<img class="loadingclass" id="' + loadingId + '" src="' + me.options.themePath + me.options.theme +'/images/spacer.gif" title="' + (me.getLang('simpleupload.loading') || '') + '" >');
                //这个方法先不看,它是后端执行完图片上传后回调函数
                function callback(){
                    try{
                        var link, json, loader,
                            body = (iframe.contentDocument || iframe.contentWindow.document).body,
                            result = body.innerText || body.textContent || '';
                        json = (new Function("return " + result))();
                        link = me.options.imageUrlPrefix + json.url;
                        if(json.state == 'SUCCESS' && json.url) {
                            loader = me.document.getElementById(loadingId);
                            loader.setAttribute('src', link);
                            loader.setAttribute('_src', link);
                            loader.setAttribute('title', json.title || '');
                            loader.setAttribute('alt', json.original || '');
                            loader.removeAttribute('id');
                            domUtils.removeClasses(loader, 'loadingclass');
                        } else {
                            showErrorLoader && showErrorLoader(json.state);
                        }
                    }catch(er){
                        showErrorLoader && showErrorLoader(me.getLang('simpleupload.loadError'));
                    }
                    form.reset();
                    domUtils.un(iframe, 'load', callback);
                }
                function showErrorLoader(title){
                    if(loadingId) {
                        var loader = me.document.getElementById(loadingId);
                        loader && domUtils.remove(loader);
                        me.fireEvent('showmessage', {
                            'id': loadingId,
                            'content': title,
                            'type': 'error',
                            'timeout': 4000
                        });
                    }
                }

                /* 判断后端配置是否没有加载成功 */
                if (!me.getOpt('imageActionName')) {
                    errorHandler(me.getLang('autoupload.errorLoadConfig'));
                    return;
                }
                // 判断文件格式是否错误
                var filename = input.value,
                    fileext = filename ? filename.substr(filename.lastIndexOf('.')):'';
                if (!fileext || (allowFiles && (allowFiles.join('') + '.').indexOf(fileext.toLowerCase() + '.') == -1)) {
                    showErrorLoader(me.getLang('simpleupload.exceedTypeError'));
                    return;
                }

                // -----这里要注意了,这就是调用后端接口的重要代码 start ----
                domUtils.on(iframe, 'load', callback);
                //给form标签的action设置请求路径,不要问我form标签在哪里,在上面的初始化按钮就有了
                form.action = utils.formatUrl(imageActionUrl + (imageActionUrl.indexOf('?') == -1 ? '?':'&') + params);
                //很简单,把form代码提交了
                form.submit();
                // -------end  ----------------------------------------
            });

            var stateTimer;
            me.addListener('selectionchange', function () {
                clearTimeout(stateTimer);
                stateTimer = setTimeout(function() {
                    var state = me.queryCommandState('simpleupload');
                    if (state == -1) {
                        input.disabled = 'disabled';
                    } else {
                        input.disabled = false;
                    }
                }, 400);
            });
            isLoaded = true;
        });

        btnIframe.style.cssText = btnStyle;
        containerBtn.appendChild(btnIframe);
    }

    return {
        bindEvents:{
            'ready': function() {
                //设置loading的样式
                utils.cssRule('loading',
                    '.loadingclass{display:inline-block;cursor:default;background: url(\''
                    + this.options.themePath
                    + this.options.theme +'/images/loading.gif\') no-repeat center center transparent;border:1px solid #cccccc;margin-right:1px;height: 22px;width: 22px;}\n' +
                    '.loaderrorclass{display:inline-block;cursor:default;background: url(\''
                    + this.options.themePath
                    + this.options.theme +'/images/loaderror.png\') no-repeat center center transparent;border:1px solid #cccccc;margin-right:1px;height: 22px;width: 22px;' +
                    '}',
                    this.document);
            },
            /* 初始化简单上传按钮 */
            'simpleuploadbtnready': function(type, container) {
                containerBtn = container;
                me.afterConfigReady(initUploadBtn);
            }
        },
        outputRule: function(root){
            utils.each(root.getNodesByTagName('img'),function(n){
                if (/\b(loaderrorclass)|(bloaderrorclass)\b/.test(n.getAttr('class'))) {
                    n.parentNode.removeChild(n);
                }
            });
        },
        commands: {
            'simpleupload': {
                queryCommandState: function () {
                    return isLoaded ? 0:-1;
                }
            }
        }
    }
});
好了,开始来调用后端的代码了,一样是调用ActionEnter.java这个类
前端的请求路径是
"http://localhost:8081/Test/jsp/controller.jsp?action=uploadimage"


/**
 * 处理不同类型的回调函数
 * @return
 */
public String invoke() {
    //自己添加上去的
    Map<String, Integer> mapping = ActionMap.mapping;

    if ( actionType == null || !ActionMap.mapping.containsKey( actionType ) ) {
        return new BaseState( false, AppInfo.INVALID_ACTION ).toJSONString();
    }

    if ( this.configManager == null || !this.configManager.valid() ) {
        return new BaseState( false, AppInfo.CONFIG_ERROR ).toJSONString();
    }

    State state = null;
    // 获得actionType类型码 ActionMap这个类我就不介绍了,自己可以看看,主要是封装的一些常量
    int actionCode = ActionMap.getType( this.actionType );

    Map<String, Object> conf = null;

    switch ( actionCode ) {
        //如果配置文件,执行下面的方法,这个就是我们开始讲的后端读取的配置文件执行的逻辑
        case ActionMap.CONFIG:
            return this.configManager.getAllConfig().toString();
        //这里是我们这次重点讲解的路径,图片上传,视频上传都执行这个路基
        case ActionMap.UPLOAD_IMAGE:
        case ActionMap.UPLOAD_SCRAWL:
        case ActionMap.UPLOAD_VIDEO:
        case ActionMap.UPLOAD_FILE:
            //发现没有,这里获得配置文件,看到这里,你应该先看getConfig这个方法,跟着思路走,不是是跟着调试代码走
            conf = this.configManager.getConfig( actionCode );
            //这里就是执行文件上传的方法了,看完上面代码才可以看这里呀,不要急
            state = new Uploader( request, conf ).doExec();
            break;

        case ActionMap.CATCH_IMAGE:
            conf = configManager.getConfig( actionCode );
            String[] list = this.request.getParameterValues( (String)conf.get( "fieldName" ) );
            state = new ImageHunter( conf ).capture( list );
            break;

        case ActionMap.LIST_IMAGE:
        case ActionMap.LIST_FILE:
            conf = configManager.getConfig( actionCode );
            int start = this.getStartIndex();
            state = new FileManager( conf ).listFile( start );
            break;

    }

    return state.toJSONString();

}
看看configManager.getConfig这个类
//如何是获得后端的所有配置,调用这个方法
public JSONObject getAllConfig () {
    return this.jsonConfig;

}
//获得部分的配置
public Map<String, Object> getConfig ( int type ) {

    Map<String, Object> conf = new HashMap<String, Object>();
    String savePath = null;

    switch ( type ) {

        case ActionMap.UPLOAD_FILE:
            conf.put( "isBase64", "false" );
            conf.put( "maxSize", this.jsonConfig.getLong( "fileMaxSize" ) );
            conf.put( "allowFiles", this.getArray( "fileAllowFiles" ) );
            conf.put( "fieldName", this.jsonConfig.getString( "fileFieldName" ) );
            savePath = this.jsonConfig.getString( "filePathFormat" );
            break;
        //上传图片逻辑
        case ActionMap.UPLOAD_IMAGE:
            conf.put( "isBase64", "false" );
            conf.put( "maxSize", this.jsonConfig.getLong( "imageMaxSize" ) );
            conf.put( "allowFiles", this.getArray( "imageAllowFiles" ) );
            //看看看,走在路上别瞎看,看这里很重要的
            //imageFieldName 图片名称
            conf.put( "fieldName", this.jsonConfig.getString( "imageFieldName" ) );
            //图片保存路径,有没有发现在config.json配置的imagePathFormat返回前端变成savePath
            savePath = this.jsonConfig.getString( "imagePathFormat" );
            break;

        case ActionMap.UPLOAD_VIDEO:
            conf.put( "maxSize", this.jsonConfig.getLong( "videoMaxSize" ) );
            conf.put( "allowFiles", this.getArray( "videoAllowFiles" ) );
            conf.put( "fieldName", this.jsonConfig.getString( "videoFieldName" ) );
            savePath = this.jsonConfig.getString( "videoPathFormat" );
            break;

        case ActionMap.UPLOAD_SCRAWL:
            conf.put( "filename", ConfigManager.SCRAWL_FILE_NAME );
            conf.put( "maxSize", this.jsonConfig.getLong( "scrawlMaxSize" ) );
            conf.put( "fieldName", this.jsonConfig.getString( "scrawlFieldName" ) );
            conf.put( "isBase64", "true" );
            savePath = this.jsonConfig.getString( "scrawlPathFormat" );
            break;

        case ActionMap.CATCH_IMAGE:
            conf.put( "filename", ConfigManager.REMOTE_FILE_NAME );
            conf.put( "filter", this.getArray( "catcherLocalDomain" ) );
            conf.put( "maxSize", this.jsonConfig.getLong( "catcherMaxSize" ) );
            conf.put( "allowFiles", this.getArray( "catcherAllowFiles" ) );
            conf.put( "fieldName", this.jsonConfig.getString( "catcherFieldName" ) + "[]" );
            savePath = this.jsonConfig.getString( "catcherPathFormat" );
            break;

        case ActionMap.LIST_IMAGE:
            conf.put( "allowFiles", this.getArray( "imageManagerAllowFiles" ) );
            conf.put( "dir", this.jsonConfig.getString( "imageManagerListPath" ) );
            conf.put( "count", this.jsonConfig.getInt( "imageManagerListSize" ) );
            break;

        case ActionMap.LIST_FILE:
            conf.put( "allowFiles", this.getArray( "fileManagerAllowFiles" ) );
            conf.put( "dir", this.jsonConfig.getString( "fileManagerListPath" ) );
            conf.put( "count", this.jsonConfig.getInt( "fileManagerListSize" ) );
            break;

    }

    conf.put( "savePath", savePath );
    conf.put( "rootPath", this.rootPath );

    return conf;

}
接下了这个类Uploader.java
package com.baidu.ueditor.upload;

import com.baidu.ueditor.define.State;
import java.util.Map;
import javax.servlet.http.HttpServletRequest;

public class Uploader {
    private HttpServletRequest request = null;
    private Map<String, Object> conf = null;

    public Uploader(HttpServletRequest request, Map<String, Object> conf) {
        this.request = request;
        this.conf = conf;
    }

    public final State doExec() {
        String filedName = (String) this.conf.get("fieldName");
        State state = null;
        //重点在这里
        if ("true".equals(this.conf.get("isBase64"))) {
            //重点看这里,好了,知道我们要干嘛了吧!!!看Base64Uploader类的代码
            state = Base64Uploader.save(this.request.getParameter(filedName),
                    this.conf);
        } else {
            state = BinaryUploader.save(this.request, this.conf);
        }

        return state;
    }
}
接下来看这个类的方法:BaseUploader.java,这里的save方法就是把文件保存到硬盘上
package com.baidu.ueditor.upload;

import com.baidu.ueditor.PathFormat;
import com.baidu.ueditor.define.AppInfo;
import com.baidu.ueditor.define.BaseState;
import com.baidu.ueditor.define.FileType;
import com.baidu.ueditor.define.State;

import java.io.IOException;
import java.io.InputStream;
import java.util.Arrays;
import java.util.List;
import java.util.Map;

import javax.servlet.http.HttpServletRequest;

import org.apache.commons.fileupload.FileItemIterator;
import org.apache.commons.fileupload.FileItemStream;
import org.apache.commons.fileupload.FileUploadException;
import org.apache.commons.fileupload.disk.DiskFileItemFactory;
import org.apache.commons.fileupload.servlet.ServletFileUpload;

public class BinaryUploader {

    public static final State save(HttpServletRequest request,
            Map<String, Object> conf) {
        FileItemStream fileStream = null;
        boolean isAjaxUpload = request.getHeader( "X_Requested_With" ) != null;

        if (!ServletFileUpload.isMultipartContent(request)) {
            return new BaseState(false, AppInfo.NOT_MULTIPART_CONTENT);
        }
        //common-io包中类,用于文件上传
        ServletFileUpload upload = new ServletFileUpload(
                new DiskFileItemFactory());

        if ( isAjaxUpload ) {
            upload.setHeaderEncoding( "UTF-8" );
        }

        try {//获取文件条目
            FileItemIterator iterator = upload.getItemIterator(request);

            while (iterator.hasNext()) {
                fileStream = iterator.next();

                if (!fileStream.isFormField())
                    break;
                fileStream = null;
            }

            if (fileStream == null) {
                return new BaseState(false, AppInfo.NOTFOUND_UPLOAD_DATA);
            }
            //获得保存路径
            String savePath = (String) conf.get("savePath");
            //文件原始名称
            String originFileName = fileStream.getName();
            //文件后缀
            String suffix = FileType.getSuffixByFilename(originFileName);
            //原文讲原始名称
            originFileName = originFileName.substring(0,
                    originFileName.length() - suffix.length());
            savePath = savePath + suffix;

            long maxSize = ((Long) conf.get("maxSize")).longValue();

            if (!validType(suffix, (String[]) conf.get("allowFiles"))) {
                return new BaseState(false, AppInfo.NOT_ALLOW_FILE_TYPE);
            }

            savePath = PathFormat.parse(savePath, originFileName);
            //文件保存的真实物理路径
            String physicalPath = (String) conf.get("rootPath") + savePath;

            InputStream is = fileStream.openStream();
            //这里就是把文件保存到硬盘上,具体怎么保存的可以自己跟过去看看
            //State这个类很重要,是一个接口,它是返回到前端的数据
            State storageState = StorageManager.saveFileByInputStream(is,
                    physicalPath, maxSize);
            is.close();

            if (storageState.isSuccess()) {
                storageState.putInfo("url", PathFormat.format(savePath));
                storageState.putInfo("type", suffix);
                storageState.putInfo("original", originFileName + suffix);
            }

            return storageState;
        } catch (FileUploadException e) {
            return new BaseState(false, AppInfo.PARSE_REQUEST_ERROR);
        } catch (IOException e) {
        }
        return new BaseState(false, AppInfo.IO_ERROR);
    }

    private static boolean validType(String type, String[] allowTypes) {
        List<String> list = Arrays.asList(allowTypes);

        return list.contains(type);
    }
}
最后,我们再看一个类就是State这个类,它是一个接口,我们主要是看它的实现类BaseState
这个类很重要,很重要,很重要,重要事情说3遍:::
介绍下吧:
这个类主要是返回前端的数据,格式就是下面这个样子,格式一定要对,否则前端会出现问题
package com.baidu.ueditor.define;

import java.util.HashMap;
import java.util.Iterator;
import java.util.Map;

import com.baidu.ueditor.Encoder;

public class BaseState implements State {
    //状态码
    private boolean state = false;
    private String info = null;
    //里面存保存好的文件路径和
    private Map<String, String> infoMap = new HashMap<String, String>();

    public BaseState () {
        this.state = true;
    }

    public BaseState ( boolean state ) {
        this.setState( state );
    }

    public BaseState ( boolean state, String info ) {
        this.setState( state );
        this.info = info;
    }

    public BaseState ( boolean state, int infoCode ) {
        this.setState( state );
        this.info = AppInfo.getStateInfo( infoCode );
    }

    public boolean isSuccess () {
        return this.state;
    }

    public void setState ( boolean state ) {
        this.state = state;
    }

    public void setInfo ( String info ) {
        this.info = info;
    }

    public void setInfo ( int infoCode ) {
        this.info = AppInfo.getStateInfo( infoCode );
    }

    @Override
    public String toJSONString() {
        return this.toString();
    }
    /** 这里很重要的,也很简单,它把infoMap手工拼凑成json字符串返回回去 **/
    public String toString () {

        String key = null;
        String stateVal = this.isSuccess() ? AppInfo.getStateInfo( AppInfo.SUCCESS ) : this.info;

        StringBuilder builder = new StringBuilder();

        builder.append( "{\"state\": \"" + stateVal + "\"" );

        Iterator<String> iterator = this.infoMap.keySet().iterator();

        while ( iterator.hasNext() ) {

            key = iterator.next();

            builder.append( ",\"" + key + "\": \"" + this.infoMap.get(key) + "\"" );

        }

        builder.append( "}" );

        return Encoder.toUnicode( builder.toString() );

    }

    @Override
    public void putInfo(String name, String val) {
        this.infoMap.put(name, val);
    }

    @Override
    public void putInfo(String name, long val) {
        this.putInfo(name, val+"");
    }

}
4.上面后端的代码已经调完了,接下来就是后端数据返回到前端
之前讲过,看前端的simpleupload.js
后端返回数据后会调用回调函数的callback()方法
function callback(){
                try{
                    var link, json, loader,
                        body = (iframe.contentDocument || iframe.contentWindow.document).body,
                        result = body.innerText || body.textContent || '';
                    //这里result就是后端返回的数据
                    json = (new Function("return " + result))();
                    //imageUrlPrefix这个很重要很重要很重要,如果没配置的话,图片可能显示不出来
                    //link就是图片的路径
                    link = me.options.imageUrlPrefix + json.url;
                    if(json.state == 'SUCCESS' && json.url) {
                        loader = me.document.getElementById(loadingId);
                        loader.setAttribute('src', link);
                        loader.setAttribute('_src', link);
                        loader.setAttribute('title', json.title || '');
                        loader.setAttribute('alt', json.original || '');
                        loader.removeAttribute('id');
                        domUtils.removeClasses(loader, 'loadingclass');
                    } else {
                        showErrorLoader && showErrorLoader(json.state);
                    }
                }catch(er){
                    showErrorLoader && showErrorLoader(me.getLang('simpleupload.loadError'));
                }
                form.reset();
                domUtils.un(iframe, 'load', callback);
            }
            function showErrorLoader(title){
                if(loadingId) {
                    var loader = me.document.getElementById(loadingId);
                    loader && domUtils.remove(loader);
                    me.fireEvent('showmessage', {
                        'id': loadingId,
                        'content': title,
                        'type': 'error',
                        'timeout': 4000
                    });
                }
            }


 320
320

 被折叠的 条评论
为什么被折叠?
被折叠的 条评论
为什么被折叠?
 到【灌水乐园】发言


