


前两天看到这篇介绍gnome shell extensions 开发的文章,来自blog.fpmurphy.com 很不错,特转来留着。有兴趣的人看看吧。
GNOME Shell Extensions
The new GNOME Shell in GNOME 3 includes support for GNOME Shell extensions. What, you may ask, is a GNOME Shell extension? According to the GNOME web page on GNOME Shell extensions
the GNOME Shell extension design is designed to give a high degree of power to the parts of the GNOME interface managed by the shell, such as window management and application launching. It simply loads arbitrary JavaScript and CSS. This gives developers a way to make many kinds of changes and share those changes with others, without having to patch the original source code and recompile it, and somehow distribute the patched code.
In other ways, a GNOME Shell extension can be used to alter the existing functionality of the GNOME Shell or to provide additional functionality.
This post assumes that you are familiar with the GNOME 3 Shell provided in Fedora 15 and have a working knowledge of JavaScript. By means of a number of examples, it will introduce you to some of the key concepts required to write you own extension. As with a lot of my posts, this post will be a living document and will be edited from time to time to correct errors and add more examples.
So how should you go about creating a GNOME Shell extension? Let us dive in an create a simple extension and explain the concepts and theory as we go along. We will use gnome-shell-extension-tool for our first example. This tool is available in Fedora 15 Alpha. I am not sure whether it is available on other GNU/Linux distributions. There is no manpage for this tool but it is simple to use. Just answer a couple of questions and all the necessary files are created for you.
$ gnome-shell-extension-tool --help
Usage: gnome-shell-extension-tool [options]
Options:
 -h, --help          show this help message and exit
 --create-extension  Create a new GNOME Shell extension
Example 1:
Suppose I use this gnome-shell-extension-tool to create an extension named helloworld with a UUID of helloworld@example.com and a description of My first GNOME 3 Shell extension. The tool, which is just a Python script, creates an appropriately named subdirectory (actually it is the uuid of the extension) under ~/.local/share/gnome-shell/extensions and populates that subdirectory with three files. Note that the UUID can be the classical 128 bit number, some other number or alphanumeric combination, or something more mundane like helloworld@example.com. So long as it can be used to create a subdirectory, it will be regarded as a valid UUID.
$ cd .local/share/gnome-shell/extensions
$ find ./
./helloworld@example.com
./helloworld@example.com/stylesheet.css
./helloworld@example.com/extension.js
./helloworld@example.com/metadata.json
$ cd helloworld@example.com
$ ls -l
-rw-rw-r--. 1 fpm fpm  718 Mar 31 00:24 extension.js
-rw-rw-r--. 1 fpm fpm  137 Mar 31 00:23 metadata.json
-rw-rw-r--. 1 fpm fpm  177 Mar 31 00:23 stylesheet.css
Here are the contents of these three files:
|
01
02
03
04
05
06
07
08
09
10
11
12
13
14
15
16
17
18
19
20
21
22
23
24
25
26
27
28
29
30
31
32
33
34
35
36
37
38
39
40
41
|
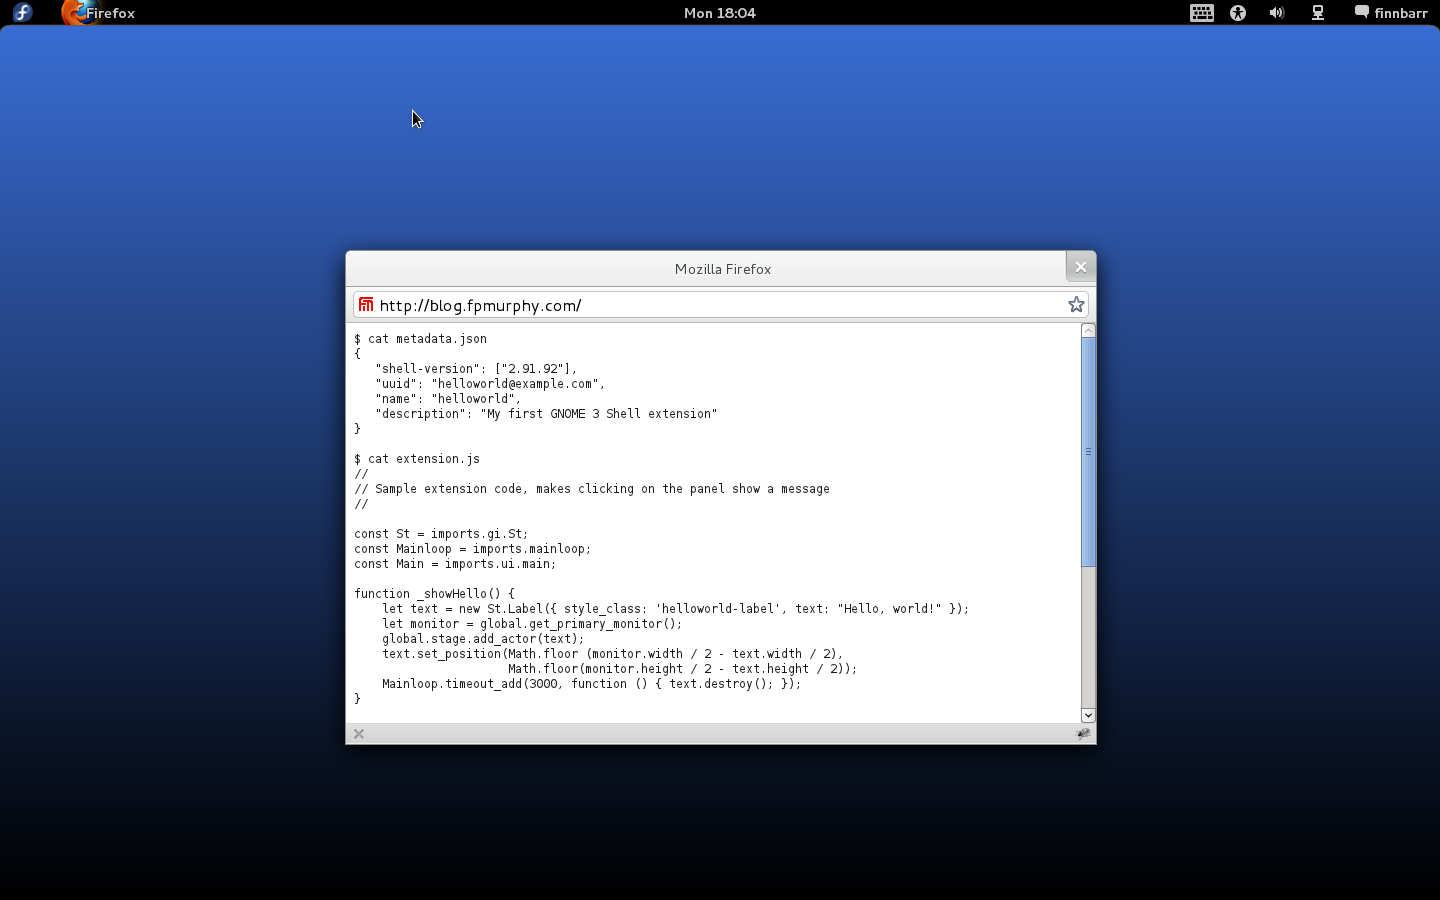
$ cat metadata.json
{
"shell-version"
: [
"2.91.92"
],
"uuid"
:
"helloworld@example.com"
,
"name"
:
"helloworld"
,
"description"
:
"My first GNOME 3 Shell extension"
}
$ cat extension.js
//
// Sample extension code, makes clicking on the panel show a message
//
const
St = imports.gi.St;
const
Mainloop = imports.mainloop;
const
Main = imports.ui.main;
function _showHello() {
let text =
new
St.Label({ style_class:
'helloworld-label'
, text:
"Hello, world!"
});
let monitor = global.get_primary_monitor();
global.stage.add_actor(text);
text.set_position(Math.
floor
(monitor.width / 2 - text.width / 2),
Math.
floor
(monitor.height / 2 - text.height / 2));
Mainloop.timeout_add(3000, function () { text.destroy(); });
}
// Put your extension initialization code here
function main() {
Main.panel.actor.reactive =
true
;
Main.panel.actor.connect(
'button-release-event'
, _showHello);
}
$ cat stylesheet.css
/* Example stylesheet */
.helloworld-label {
font-size: 36px;
font-weight: bold;
color: #ffffff;
background-color: rgba(10,10,10,0.7);
border-radius: 5px;
}
|
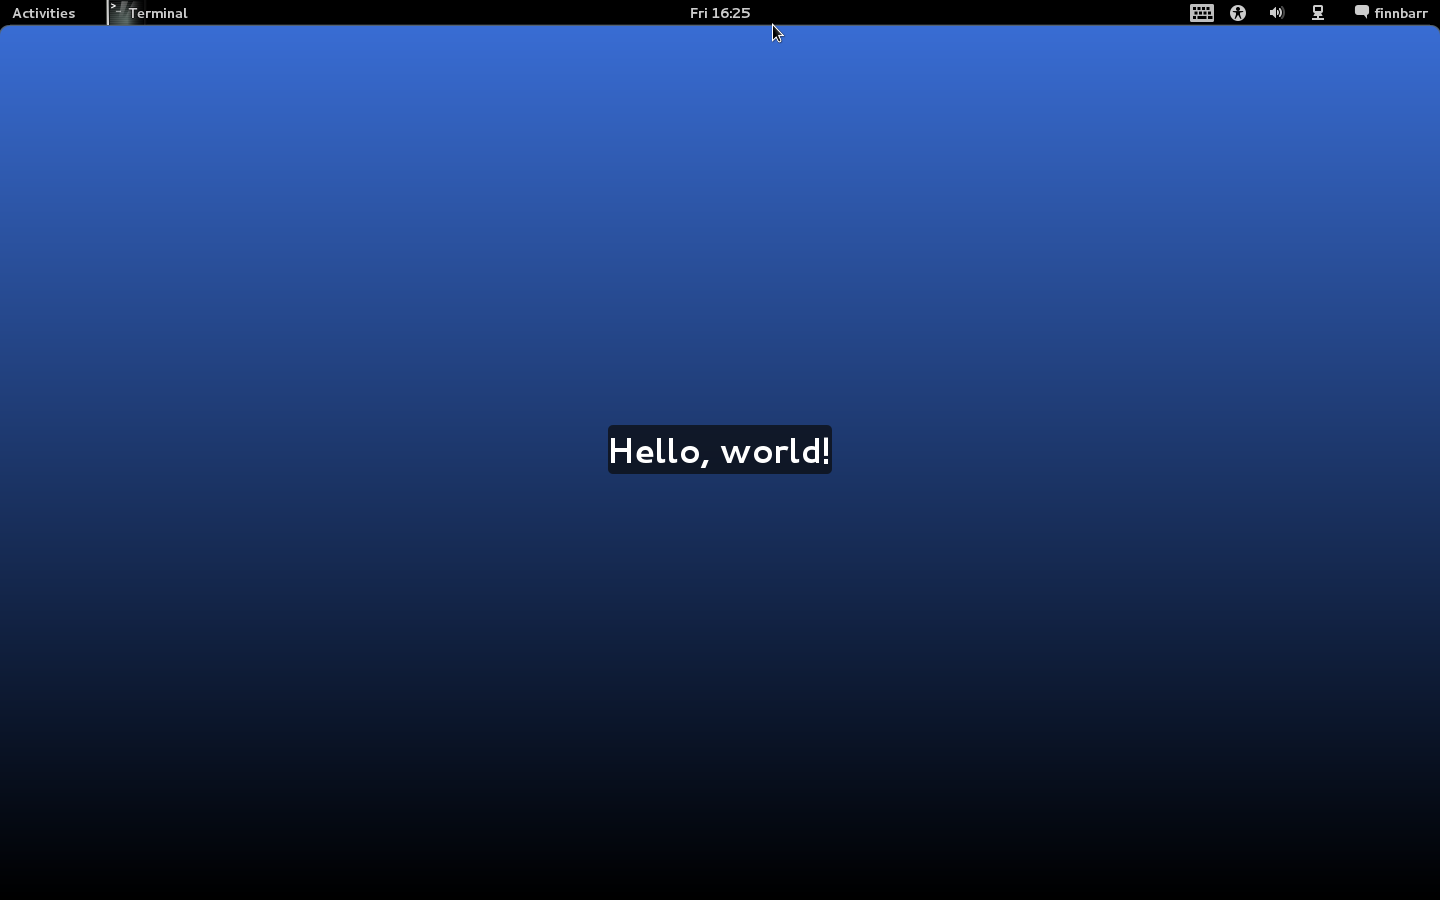
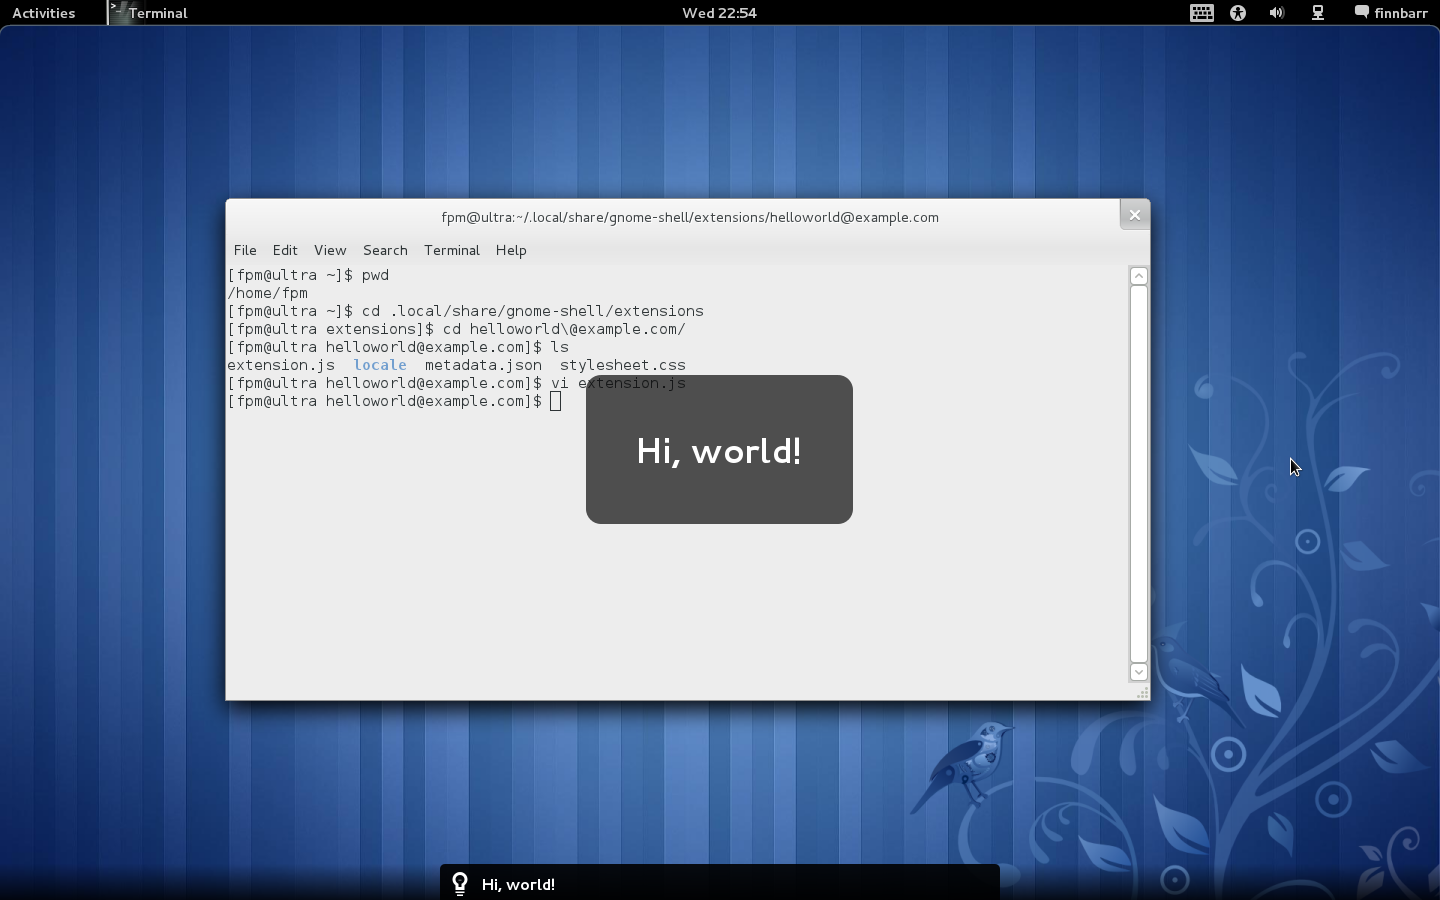
What is created is a very simple extension that display a message, Hello, world!, in the middle of your screen as shown below whenever you click the panel (the horizontal bar at the top of your screen in the GNOME 3 Shell) or a menu selection.
This extension is created under ~/.local/share/gnome-shell/extensions which is the designated location for per user extensions. Note that ~/.local is also used for other purposes, not just for per user extensions.
$ find .local
.local
.local/share
.local/share/gnome-shell
.local/share/gnome-shell/extensions
.local/share/gnome-shell/extensions/helloworld@example.com
.local/share/gnome-shell/extensions/helloworld@example.com/stylesheet.css
.local/share/gnome-shell/extensions/helloworld@example.com/extension.js
.local/share/gnome-shell/extensions/helloworld@example.com/metadata.json
.local/share/gnome-shell/application_state .local/share/icc
.local/share/icc/edid-67c2e64687cb4fd59883902829614117.icc
.local/share/gsettings-data-convert
Global (system-wide) extensions should be placed in either /usr/share/gnome-shell/extensions or /usr/local/share/gnome-shell/extensions.
By the way I really wish the GNOME developers would stop creating more and more hidden subdirectories in a users home directory! It would be really nice if everything to do with GNOME 3 was located under, say, .gnome3.
Notice that the actual code for the extension is written in JavaScript and contained in a file called extension.js. This file is mandatory and is what gets loaded into GNOME Shell. At a minimum, it must contain a main() function which is invoked immediately after the extension is loaded by GNOME shell.
The JavaScript language version is 1.8 (which is a Mozilla extension to ECMAscript 262.) This is why non-standard JavaScript keywords like let are supported in shell extensions. The actual JavaScript engine (called gjs) is based on the Mozilla SpiderMonkey JavaScript engine and the GObject introspection framework.
Interestingly, a gjs shell is provided but unfortunately most of the shell functionality present in SpiderMonkey such as quit() does not appear to be supported in this particular JavaScript shell
$ gjs
** (gjs:11363): DEBUG: Command line: gjs
** (gjs:11363): DEBUG: Creating new context to eval console script
gjs> help() ReferenceError: help is not defined
gjs> quit() ReferenceError: quit is not defined
gjs>
Persistent metadata for the extension is stored in the file metadate.json which uses the JSON file format. JSON was chosen because it is natively supported by JavaScript. Here is the current list of defined strings:
- shell-version: A list of GNOME Shell versions compatible with the extension. For example ["2.91.92", "3.0.0"].
- uuid: A unique UUID for the extension. This must be unique among any installed extensions as the UUID is used as the name of the subdirectory under which the files for the extension are located.
- name: The name of the extension. This is displayed by the Looking Glass debugger when the extensions panel is displayed.
- description: The description of the extension. This is also displayed by Looking Glass when the extensions panle is displayed.
- url: [OPTIONAL] A valid URL pointing the the source code for the extension. Looking Glass uses this URL, if provided, to display a button which when pressed opens the source code file.
- js-version: [OPTIONAL] This can be used to specify that a particular version of hjs is required by the extension.
There is nothing stopping you adding additional strings to this file. It some cases this may be useful as the contents of metadata.json is passed as an argument to the main() function in extension.js.
The third file is stylesheet.css. This contains all the CSS (Cascading Style Sheet) information for your extension. This file is not required if your particular extension does not require it’s own presentation markup.
Example 2:
What if we want to display localized message strings (always a good idea!) in our helloworld shell extension. In this case we need to modify entension.js to support message catalogs and we need to provide and install the relevant message catalogs in the appropriate directories.
The GNOME Shell uses the standard GNU/Linux gettext paradigm. I am going to assume that you are somewhat familiar with software localization and how to use gettext. A whole post could be devoted to the use of gettext but that is not the purpose of this post.
Fortunately the heavy lifting has been done for us by others and a JavaScript binding to gettext is available to us. We import the necessary JavaScript gettext module into the helloworld shell extension using imports and modify the code to use Gettext.gettext(“message string”) to retrieve the localized version of the message string if provided in a message catalog.
Normally compiled gettext message catalogs (.mo files) are placed under /usr/share/locale on GNU/Linux distributions. However I do not think that this is a good location for extension message catalogs as I believe that extensions should be as self-contained as possible to aid in their easy installation and removal. It also avoids the possibility of message catalog namespace collisions. For this reason, we place the message catalogs in a subdirectory called locale under the top directory of the extension.
By way of example, here is a listing of the files for our helloworld extension after it has been modified to support message localization and message catalogs for en_US and fr_FR locales provided.
./helloworld@example.com
./helloworld@example.com/stylesheet.css
./helloworld@example.com/extension.js
./helloworld@example.com/locale
./helloworld@example.com/locale/fr_FR
./helloworld@example.com/locale/fr_FR/LC_MESSAGES
./helloworld@example.com/locale/fr_FR/LC_MESSAGES/helloworld.mo
./helloworld@example.com/locale/fr_FR/LC_MESSAGES/helloworld.po
./helloworld@example.com/locale/en_US ./helloworld@example.com/locale/en_US/LC_MESSAGES
./helloworld@example.com/locale/en_US/LC_MESSAGES/helloworld.mo
./helloworld@example.com/locale/en_US/LC_MESSAGES/helloworld.po
./helloworld@example.com/metadata.json
As you can see I have provided support for two locales, en_US for Americanese speakers and fr_FR for French speakers. The default message string Hello, world! will be displayed if neither of these two locales is set. Only the .mo files are necessary but I suggest that the corresponding .po files also reside there to make it easy to update a message catalog.
Here is our entension.js after it was modified to support message string localization:
|
01
02
03
04
05
06
07
08
09
10
11
12
13
14
15
16
17
18
19
20
21
22
23
24
25
26
27
|
const St = imports.gi.St;
const Mainloop = imports.mainloop;
const Main = imports.ui.main;
const Gettext = imports.gettext;
function
_showHello() {
let text =
new
St.Label({ style_class:
'helloworld-label'
,
text: Gettext.gettext(
"Hello, world!"
) });
let monitor = global.get_primary_monitor();
global.stage.add_actor(text);
text.set_position(Math.floor (monitor.width / 2 - text.width / 2),
Math.floor(monitor.height / 2 - text.height / 2));
Mainloop.timeout_add(3000,
function
() { text.destroy(); });
}
function
main(extensionMeta) {
let userExtensionLocalePath = extensionMeta.path +
'/locale'
;
Gettext.bindtextdomain(
"helloworld"
, userExtensionLocalePath);
Gettext.textdomain(
"helloworld"
);
Main.panel.actor.reactive =
true
;
Main.panel.actor.connect(
'button-release-event'
, _showHello);
}
|
Note that the main function now has one parameter extensionMeta. This is an object that contains all the information from the extension’s metadata.json file. This is the only parameter available to the main function in an extension. See the loadExtension function in /usr/share/gnome-shell/js/ui/extensionSystem.js for further details.
This parameter is used to build the path to the shell extension locale subdirectory. We then tell gettext that we want to use message catalogs from this subdirectory using bindtextdomain and specify the relevant message catalog, helloworld.mo, using textdomain.
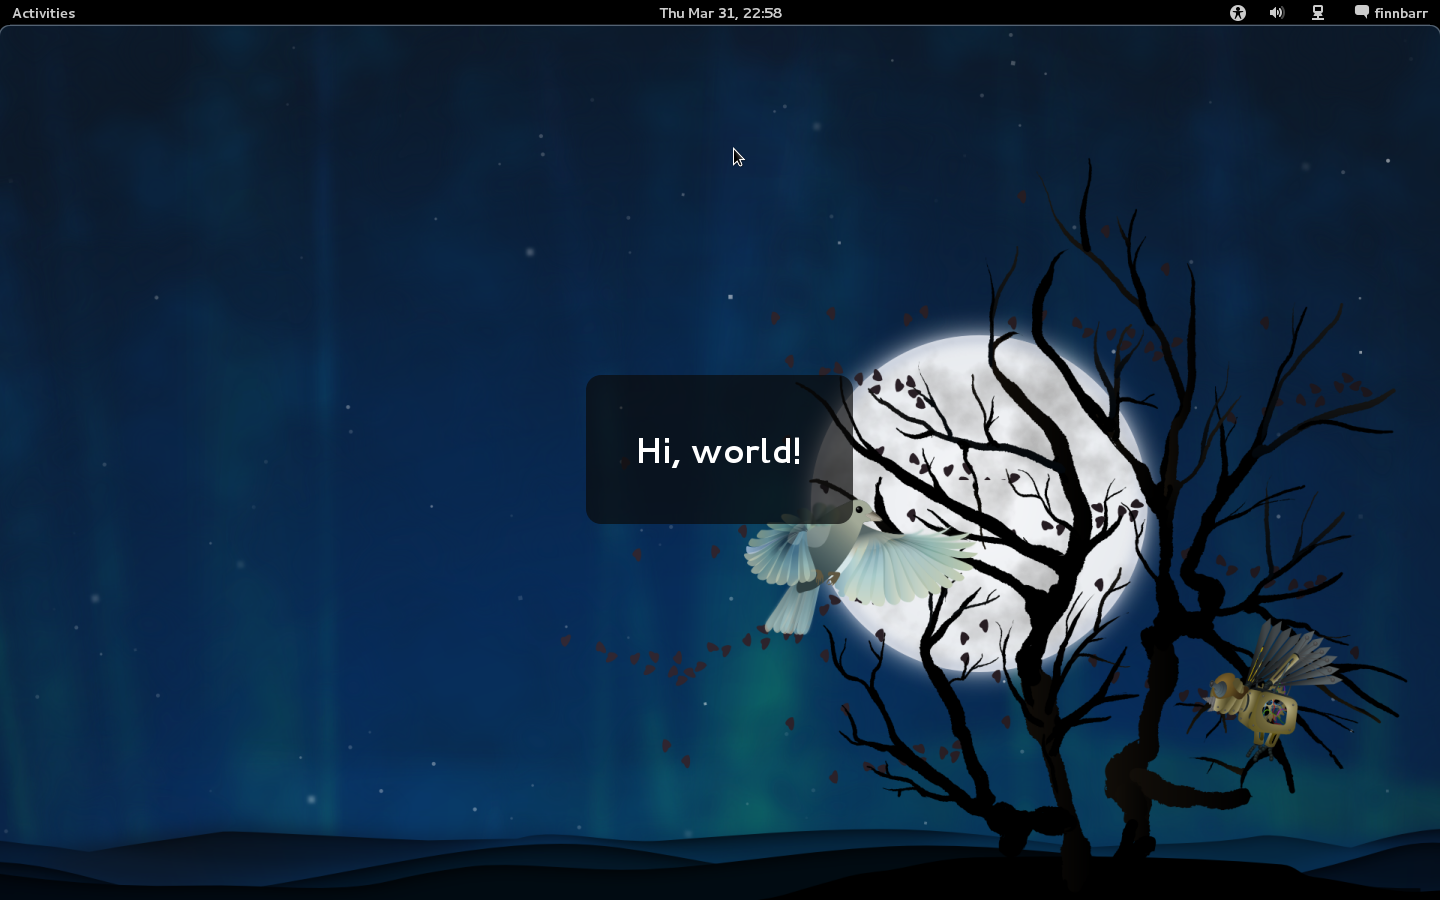
Here is what is displayed when the locale is set to en_US:
and here is what is displayed when the locale set to fr_FR
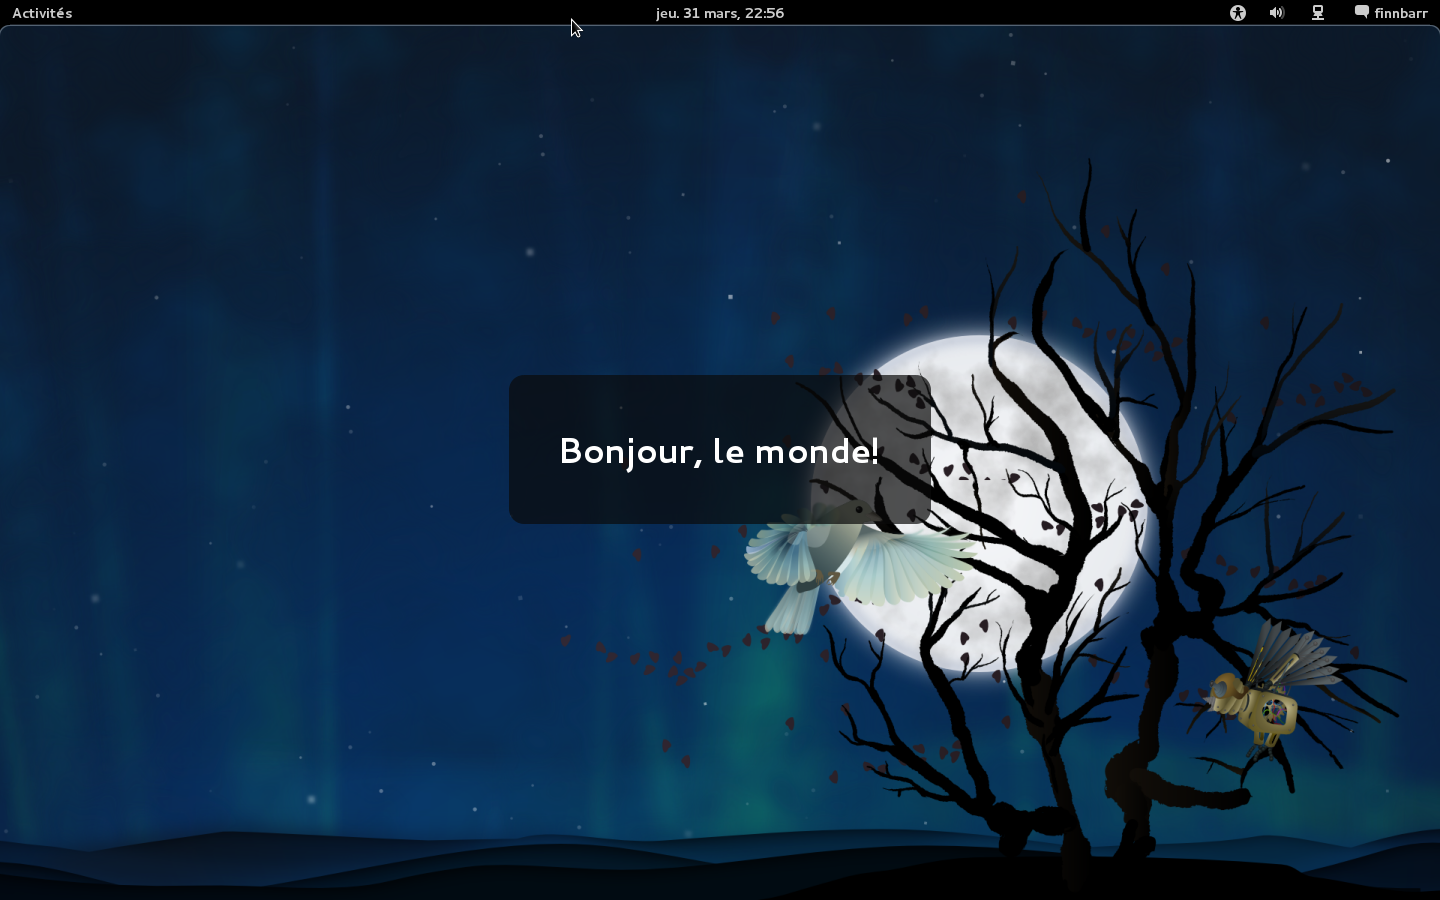
If no suitable message catalog is found, the message string Hello, world! will be displayed.
Example 3:
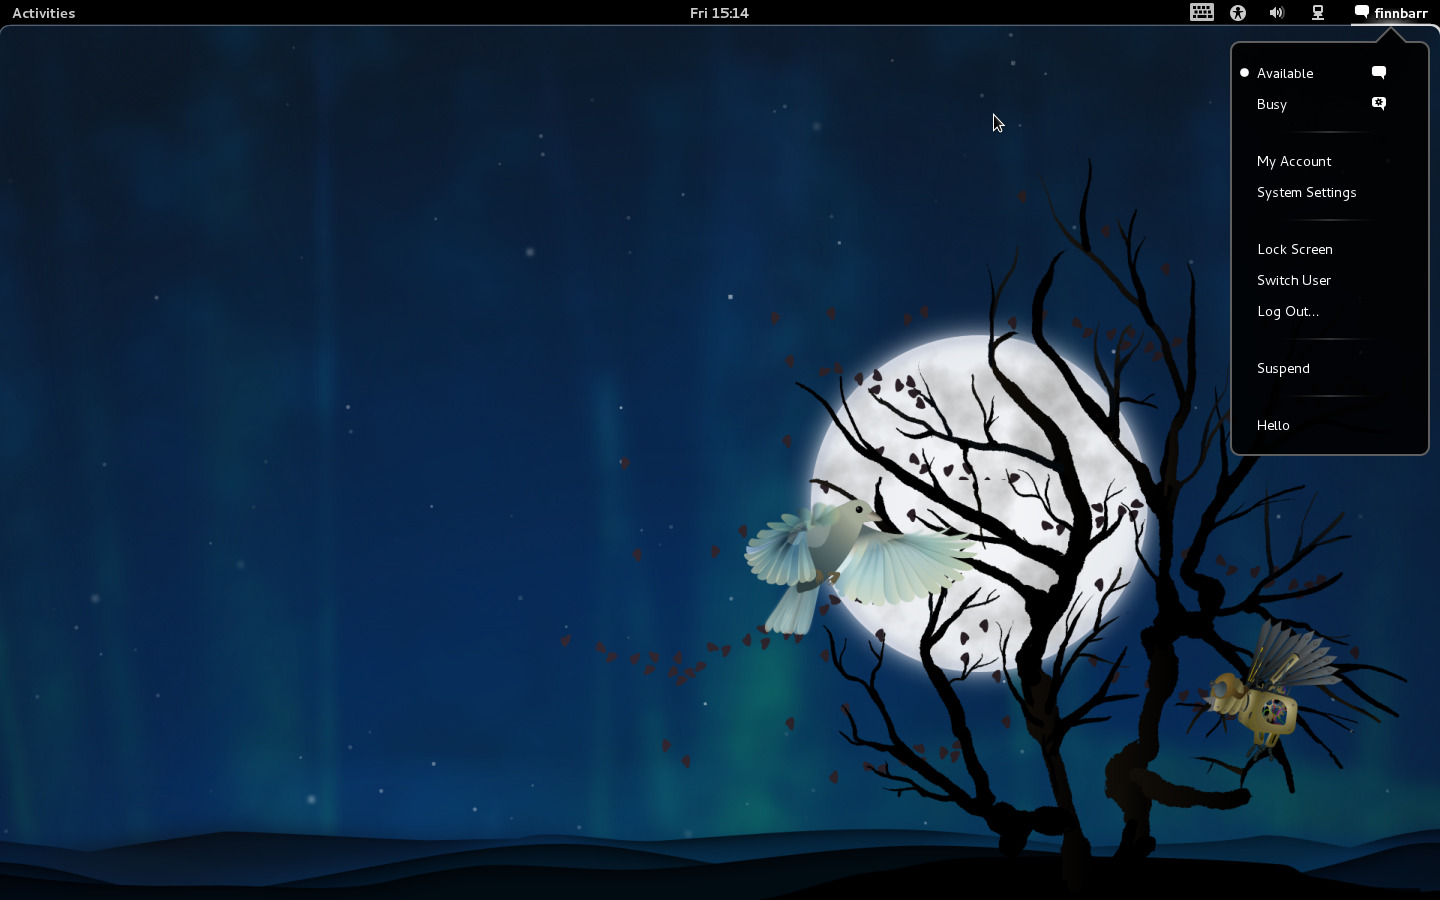
This example shows you how modify our helloworld example extension to add a menu item to the Status Menu (the menu at the top right hand corner) of your primary display and output the Hello, world! message.
Here is the modified extensions.js:
|
01
02
03
04
05
06
07
08
09
10
11
12
13
14
15
16
17
18
19
20
21
22
23
24
25
26
27
28
29
30
31
32
33
34
35
|
const
Main = imports.ui.main;
const
Shell = imports.gi.Shell;
const
Lang = imports.lang;
const
PopupMenu = imports.ui.popupMenu;
const
Gettext = imports.gettext;
const
_ = Gettext.gettext;
function _showHello() {
let text =
new
St.Label({ style_class:
'helloworld-label'
, text: _(
"Hello, world!"
) });
let monitor = global.get_primary_monitor();
global.stage.add_actor(text);
text.set_position(Math.
floor
(monitor.width / 2 - text.width / 2),
Math.
floor
(monitor.height / 2 - text.height / 2));
Mainloop.timeout_add(3000, function () { text.destroy(); });
}
function main(extensionMeta) {
let userExtensionLocalePath = extensionMeta.path +
'/locale'
;
Gettext.bindtextdomain(
"helloworld"
, userExtensionLocalePath);
Gettext.textdomain(
"helloworld"
);
let statusMenu = Main.panel._statusmenu;
// use this in future: let statusMenu = Main.panel._userMenu;
let item =
new
PopupMenu.PopupSeparatorMenuItem();
statusMenu.menu.addMenuItem(item);
item =
new
PopupMenu.PopupMenuItem(_(
"Hello"
));
item.connect(
'activate'
, Lang.bind(
this
,
this
._showHello));
statusMenu.menu.addMenuItem(item);
}
|
Note the use of const _ to make message strings note legible in the source code.
Notice how we increased the size of the message box. No code changes were required; we simply edited the relevant styling markup. Here is the new version of stylesheet.css
|
1
2
3
4
5
6
7
8
|
.helloworld-label {
font-size
:
36px
;
font-weight
:
bold
;
color
:
#ffffff
;
background-color
: rgba(
10
,
10
,
10
,
0.7
);
border-radius:
15px
;
margin
:
50px
;
padding
:
50px
;
|
Example 4:
This example modifies the previous example to display a message in the GNOME Shell message tray.
Here is the modified extensions.js:
|
01
02
03
04
05
06
07
08
09
10
11
12
13
14
15
16
17
18
19
20
21
22
23
24
25
26
27
28
29
30
31
32
33
34
35
36
37
38
39
40
41
42
43
44
45
46
47
48
49
50
|
const St = imports.gi.St;
const Mainloop = imports.mainloop;
const Main = imports.ui.main;
const Shell = imports.gi.Shell;
const Lang = imports.lang;
const PopupMenu = imports.ui.popupMenu;
const Gettext = imports.gettext;
const MessageTray = imports.ui.messageTray;
const _ = Gettext.gettext;
function
_myNotify(text)
{
global.log(
"_myNotify called: "
+ text);
let source =
new
MessageTray.SystemNotificationSource();
Main.messageTray.add(source);
let notification =
new
MessageTray.Notification(source, text,
null
);
notification.setTransient(
true
);
source.notify(notification);
}
function
_showHello() {
_myNotify(_(
"Hello, world!"
))
let text =
new
St.Label({ style_class:
'helloworld-label'
, text: _(
"Hello, world!"
) });
let monitor = global.get_primary_monitor();
global.stage.add_actor(text);
text.set_position(Math.floor (monitor.width / 2 - text.width / 2),
Math.floor(monitor.height / 2 - text.height / 2));
Mainloop.timeout_add(3000,
function
() { text.destroy(); });
}
function
main(extensionMeta) {
let userExtensionLocalePath = extensionMeta.path +
'/locale'
;
Gettext.bindtextdomain(
"helloworld"
, userExtensionLocalePath);
Gettext.textdomain(
"helloworld"
);
let statusMenu = Main.panel._statusmenu;
let item =
new
PopupMenu.PopupSeparatorMenuItem();
statusMenu.menu.addMenuItem(item);
item =
new
PopupMenu.PopupMenuItem(_(
"Hello, world!"
));
item.connect(
'activate'
, Lang.bind(
this
,
this
._showHello));
statusMenu.menu.addMenuItem(item);
}
|
Note the use of global.log to log a message to the error log. This log can be viewed in Looking Glass. This is useful when debugging an extension.
Example 5:
This example demonstrates how to modify our helloworld extension to add a button to the panel which when pressed displays a single option menu which when selected displays our Hello, world! message.

Here is the modified extensions.js:
|
01
02
03
04
05
06
07
08
09
10
11
12
13
14
15
16
17
18
19
20
21
22
23
24
25
26
27
28
29
30
31
32
33
34
35
36
37
38
39
40
41
42
43
44
45
46
47
48
49
50
51
52
53
|
const St = imports.gi.St;
const Mainloop = imports.mainloop;
const Main = imports.ui.main;
const Shell = imports.gi.Shell;
const Lang = imports.lang;
const PopupMenu = imports.ui.popupMenu;
const PanelMenu = imports.ui.panelMenu;
const Gettext = imports.gettext;
const MessageTray = imports.ui.messageTray;
const _ = Gettext.gettext;
function
_myButton() {
this
._init();
}
_myButton.prototype = {
__proto__: PanelMenu.Button.prototype,
_init:
function
() {
PanelMenu.Button.prototype._init.call(
this
, 0.0);
this
._label =
new
St.Label({ style_class:
'panel-label'
, text: _(
"HelloWorld Button"
) });
this
.actor.set_child(
this
._label);
Main.panel._centerBox.add(
this
.actor, { y_fill:
true
});
this
._myMenu =
new
PopupMenu.PopupMenuItem(_(
'HelloWorld MenuItem'
));
this
.menu.addMenuItem(
this
._myMenu);
this
._myMenu.connect(
'activate'
, Lang.bind(
this
, _showHello));
},
_onDestroy:
function
() {}
};
function
_showHello() {
let text =
new
St.Label({ style_class:
'helloworld-label'
, text: _(
"Hello, world!"
) });
let monitor = global.get_primary_monitor();
global.stage.add_actor(text);
text.set_position(Math.floor (monitor.width / 2 - text.width / 2),
Math.floor(monitor.height / 2 - text.height / 2));
Mainloop.timeout_add(3000,
function
() { text.destroy(); });
}
function
main(extensionMeta) {
let userExtensionLocalePath = extensionMeta.path +
'/locale'
;
Gettext.bindtextdomain(
"helloworld"
, userExtensionLocalePath);
Gettext.textdomain(
"helloworld"
);
let _myPanelButton =
new
_myButton();
}
|
Here is the modified stylesheet.css
|
01
02
03
04
05
06
07
08
09
10
11
12
13
14
15
|
.panel-label {
padding
: .
4em
1.75em
;
font-size
:
10.5pt
;
color
:
#cccccc
;
font-weight
:
bold
;
}
.helloworld-label {
font-size
:
36px
;
font-weight
:
bold
;
color
:
#ffffff
;
background-color
: rgba(
10
,
10
,
10
,
0.7
);
border-radius:
15px
;
margin
:
50px
;
padding
:
50px
;
|
Example 6:
This example demonstrates how to modify our helloworld extension to change the hotspot button to display the Fedora logo in the upper left corner instead of the string Activities.
Here is the modified extensions.js. As you can see it contains only a few lines of JavaScript.
|
01
02
03
04
05
06
07
08
09
10
11
12
13
|
const
St = imports.gi.St;
const
Main = imports.ui.main;
function main() {
hotCornerButton = Main.panel.button;
let logo =
new
St.Icon({ icon_type: St.IconType.FULLCOLOR, icon_size: hotCornerButton.height, icon_name:
'fedora-logo-icon'
});
let box =
new
St.BoxLayout();
box.add_actor(logo);
Main.panel.button.set_child(box);
}
|
No stylesheet.css is required as this particular extension is not using any presentation markup.
Example 7:
This example demonstrates how to remove the Computer Accessibility (AKA a11y icon and menu from the status tray in the panel.
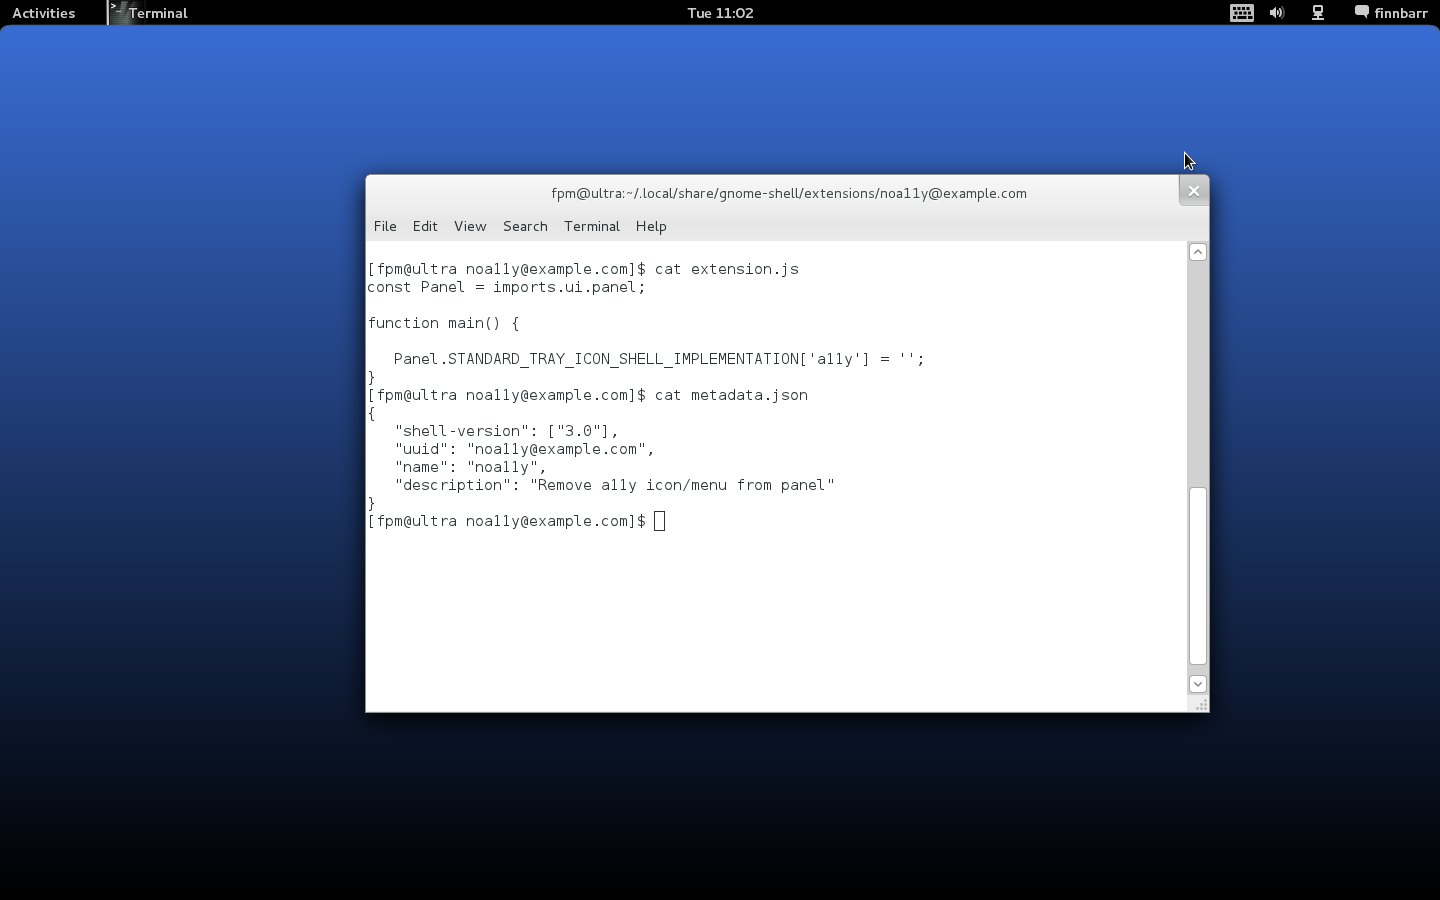
Consider the following extensions.js. As you can see it contains only a few lines of JavaScript.
|
1
2
3
4
5
6
|
const Panel = imports.ui.panel;
function
main() {
Panel.STANDARD_TRAY_ICON_SHELL_IMPLEMENTATION[
'a11y'
] =
''
;
}
|
No stylesheet.css is required since the extension uses no presentation markup. This solution works. You no longer see the a11y status icon. However a SystemStatusButton object (see panelMenu.js ) is left dangling. A better approach is to do something like the following:
|
01
02
03
04
05
06
07
08
09
10
|
const Panel = imports.ui.panel;
function
main() {
let index = Panel.STANDARD_TRAY_ICON_ORDER.indexOf(
'a11y'
);
if
(index >= 0) {
Panel.STANDARD_TRAY_ICON_ORDER.splice(index, 1);
}
delete
Panel.STANDARD_TRAY_ICON_SHELL_IMPLEMENTATION[
'a11y'
];
}
|
This extension is available as noa11y-1.0.tar.gz in the extensions area of my website.
Turning now to the question of how to determine which GNOME Shell extensions are loaded and what information is available about the state of such extensions. Currently no tool is provided in a distribution to list information about extensions.
Here is a small Python utility which lists the details of all your GNOME Shell extensions on the command line:
|
01
02
03
04
05
06
07
08
09
10
11
12
13
14
15
16
17
18
19
20
21
22
23
24
25
26
27
28
29
30
31
32
33
34
35
36
37
38
39
40
41
42
43
44
45
46
47
48
49
50
51
52
53
54
55
56
57
58
59
60
61
62
63
64
65
66
67
68
69
70
71
72
73
74
75
76
77
78
|
#!/usr/bin/python
#
# Copyright (c) 2011 Finnbarr P. Murphy
#
# This utility is free software. You can redistribute it and/or
# modify it under the terms of the GNU General Public License as
# published by the Free Software Foundation, either version 2 of
# the License, or (at your option) any later version.
#
# This utility is distributed in the hope that it will be useful,
# but WITHOUT ANY WARRANTY; without even the implied warranty of
# MERCHANTABILITY or FITNESS FOR A PARTICULAR PURPOSE. See the
# GNU General Public License for more details.
#
# See for full text of the license.
#
import
os.path
import
json
from
gi.repository
import
Gio
from
gi.repository
import
GLib
state
=
{
1
:
"enabled"
,
2
:
"disabled"
,
3
:
"error"
,
4
:
"out of date"
}
type
=
{
1
:
"system"
,
2
:
"per user"
}
class
GnomeShell:
def
__init__(
self
):
d
=
Gio.bus_get_sync(Gio.BusType.SESSION,
None
)
self
._proxy
=
Gio.DBusProxy.new_sync(
d,
0
,
None
,
'org.gnome.Shell'
,
'/org/gnome/Shell'
,
'org.gnome.Shell'
,
None
)
def
execute_javascript(
self
, js):
result, output
=
self
._proxy.
Eval
(
'(s)'
, js)
if
not
result:
raise
Exception(output)
return
output
def
list_extensions(
self
):
out
=
self
.execute_javascript(
'const ExtensionSystem = imports.ui.extensionSystem; ExtensionSystem.extensionMeta'
)
return
json.loads(out)
def
get_shell_version(
self
):
out
=
self
.execute_javascript(
'const Config = imports.misc.config; version = Config.PACKAGE_VERSION'
)
return
out
def
get_gjs_version(
self
):
out
=
self
.execute_javascript(
'const Config = imports.misc.config; version = Config.GJS_VERSION'
)
return
out
if
__name__
=
=
"__main__"
:
s
=
GnomeShell()
print
print
"Shell Version:"
, s.get_shell_version()
print
" GJS Version:"
, s.get_gjs_version()
print
l
=
s.list_extensions()
for
k, v
in
l.iteritems():
print
'Extension: %s'
%
k
print
"-"
*
(
len
(k)
+
11
)
for
k1, v1
in
v.iteritems():
if
k1
=
=
'state'
:
print
'%15s: %s (%s)'
%
(k1, v1, state[v1])
elif
k1
=
=
'type'
:
print
'%15s: %s (%s)'
%
(k1, v1,
type
[v1])
elif
k1
=
=
'shell-version'
:
print
'%15s:'
%
k1,
print
", "
.join(v1)
else
:
print
'%15s: %s'
%
(k1, v1)
print
|
Here is what is outputted for our HelloWorld example extension:
Shell Version: "3.0.0"
GJS Version: "0.7.13"

Extension: helloworld@example.com
---------------------------------
     description: My first GNOME 3 Shell extension
   shell-version: 2.91.91, 2.91.92, 2.91.93
       name: helloworld
        url: http://example.com
       state: 1 (enabled)
       path: /home/fpm/.local/share/gnome-shell/extensions/helloworld@example.com
       type: 2 (per user)
       uuid: helloworld@example.com
You can also see which extensions are loaded using the Looking Glass debugger which is accessible via Alt-F2 lg. Unfortunately, the current version of Looking Glass displays very little information about extensions other than the fact that they are loaded, but that is easily remedied by adding a few lines of JavaScript to /usr/share/gnome-shell/js/ui/lookingGlass.js.
|
01
02
03
04
05
06
07
08
09
10
11
12
13
14
15
16
17
18
19
20
21
22
23
24
25
26
27
28
29
30
31
32
33
34
35
36
37
38
39
40
41
42
43
44
45
46
|
$ diff lookingGlass.js.org lookingGlass.js
621a622,631
> _typeToString: function(extensionType) {
>
switch
(extensionType) {
>
case
ExtensionSystem.ExtensionType.SYSTEM:
>
return
_(
"System"
);
>
case
ExtensionSystem.ExtensionType.PER_USER:
>
return
_(
"Per User"
);
> }
>
return
'Unknown'
;
> },
>
637a648
> let line1Box =
new
St.BoxLayout();
640d650
< box.add(name, { expand:
true
});
642,643c652,655
< text: meta.description });
< box.add(description, { expand:
true
});
---
> text:
" "
+ meta.description });
> line1Box.add(name, { expand:
false
});
> line1Box.add(description, { expand:
false
});
> box.add(line1Box);
645,647d656
< let metaBox =
new
St.BoxLayout();
< box.add(metaBox);
< let stateString =
this
._stateToString(meta.state);
649c658,667
< text:
this
._stateToString(meta.state) });
---
> text:
" State: "
+
this
._stateToString(meta.state)+
", "
});
> let type =
new
St.Label({ style_class:
'lg-extension-state'
,
> text:
"Type: "
+
this
._typeToString(meta.type)+
", "
});
> let
uuid
=
new
St.Label({ style_class:
'lg-extension-state'
,
> text:
"UUID: "
+ meta.
uuid
});
>
> let metaDataBox =
new
St.BoxLayout();
> metaDataBox.add(state, { expand:
false
});
> metaDataBox.add(type, { expand:
false
});
> metaDataBox.add(
uuid
, { expand:
false
});
650a669,670
> let metaBox =
new
St.BoxLayout();
> box.add(metaBox);
666a687,690
> actionsBox.add(metaDataBox);
|
Here is what is displayed by the modified Looking Glass for our HelloWorld extension:

How do you disable or enable installed extensions? By default, all extensions are enabled provided they match the current GNOME Shell version number (and the gjs version number if one is provided in metadata.json.) You can disable extensions from the command line using the gsettings utility. You should also be able to disable extensions using dconf-editor but this utility is broken as of the date of this post (and seems to be always broken for some reason or other) so I cannot test it. At present there is no specific GUI-based utility to disable or enable extensions.
$ gsettings list-recursively
org.gnome.shell org.gnome.shell command-history @as []
org.gnome.shell development-tools true
org.gnome.shell disabled-extensions @as []
org.gnome.shell disabled-open-search-providers @as []
org.gnome.shell enable-app-monitoring true
org.gnome.shell favorite-apps ['mozilla-firefox.desktop', 'evolution.desktop', 'empathy.desktop', 'rhythmbox.desktop', 'shotwell.desktop', 'openoffice.org-writer.desktop', 'nautilus.desktop']
org.gnome.shell looking-glass-history @as []
org.gnome.shell.calendar show-weekdate false
org.gnome.shell.clock show-date false
org.gnome.shell.clock show-seconds false
org.gnome.shell.recorder file-extension 'webm'
org.gnome.shell.recorder framerate 15
org.gnome.shell.recorder pipeline ''
[root@ultra noarch]#
The requisite key is disabled-extensions
$ gsettings get org.gnome.shell disabled-extensions
@as []
The @as [] syntax is outputted whenever there are no disabled GNOME Shell extensions. This indicates a serialized GVariant. A GVariant is a variant datatype; it stores a value along with the type of that value.
To disable an extension, simply add the UUID of the extension to the disabled-extensions key, logout and log back in, or reload the GNOME Shell using Alt-F2 r. Note that disabling an extension does not stop it operating once it has been loaded into the GNOME Shell; it merely stops it being loaded in the first place.
$ gsettings set org.gnome.shell disabled-extensions "['helloworld@example.com']"
By the way, gsettings does not handle incrementally adding an extensions’ UUID to the disabled-extensions key nor does it overwrite or remove existing values. You first have to reset the key and then set the key with the new values.
$ gsettngs reset org.gnome.shell disabled-extensions
$ gsettings set org.gnome.shell disabled-extensions "['helloworld@gnome.org']"
Recently an official repository for GNOME Shell extensions was created by Giovanni Campagna. As of the date of this post it includes the following extensions:
- alternate-tab: provides the classic GNOME Alt+Tab functionality.
- alternative-status-menu: replaces the status menu with one featuring separate Suspend and Power Off menu options.
- auto-move-windows: assigns a specific workspace to each application as soon as it creates a window, in a configurable manner.
- dock: displays a docked task switcher on the right side of your screen.
- example: a minimal example illustrating how to write extensions.
- gajim: provides integration with Gajim, a Jabber/XMPP instant messaging client.
- user-theme: loads a user specified shell theme.
- windowsNavigator: enables keyboard selection of windows and workspaces in overlay mode.
- xrandr-indicator: enable you to rotate your screen and access display preferences quickly.
Currently these extensions are not available as RPMs but I am sure that it will not take long before somebody does the necessary work to make this happen. If you want to build you own RPMs, here is a .spec file which packages the example shell extension. It assumes that the source files exist in gnome-shell-extensions.tar.gz in the build source directory. You can easily modify the file to use git archive –format=tar to pull the files directly from the extensions git repository and to build a package for other extensions.
Name:           gnome-shell-extensions
Version:        2.91.6 Release:        1
License:        GPLv2+
Group:          User Interface/Desktops
Summary:        A collection of extensions for the GNOME 3 Shell
Url:            http://live.gnome.org/GnomeShell/Extensions
Source:         %{name}.tar.gz
BuildRequires:  gnome-common
BuildRequires:  pkgconfig(gnome-desktop-3.0)
Requires:       gnome-shell
BuildRoot:      %{_tmppath}/%{name}-%{version}-build
BuildArch:      noarch

 %description
GNOME Shell Extensions is a collection of extensions providing
additional optional functionality for the GNOME 3 Shell.

%prep
%setup -q -n %{name}
%build
# Needed because we build from a git checkout
[ -x autogen.sh ] && NOCONFIGURE=1 ./autogen.sh
%configure --enable-extensions="example" --prefix=$HOME/.local

%configure
make %{?_smp_mflags}
%install rm -rf $RPM_BUILD_ROOT
%make_install
%find_lang %{name}

%clean
%{?buildroot:%__rm -rf %{buildroot}}

%post

%postun
%files -f %{name}.lang
%defattr(-,root,root)
%doc README
%dir %{_datadir}/gnome-shell
%{_datadir}/gnome-shell/extensions/
%{_datadir}/glib-2.0/schemas/

%changelog
*Tue Mar 29 2011  1
-- Initial Build
I am going to assume that you know how to build RPMs. Since the GNOME Shell and, by extension (bad pun?), extensions are still a moving target at present, you will probably have to make minor changes to the above .spec file to meet your specific requirements and to conform to changes in the extensions repository. A word of caution however – if you build and install all the shell extensions that are in the repository at the one time, you will most certainly break GNOME Shell.
What are my thoughts on an architecture and framework for extensions? Based on my experience with developing extensions for Mozilla Firefox, WordPress and suchlike, I believe that:
- Each extension should be packaged separately to allow for individual installation, updating or removal.
- Extensions do not need to be packaged as RPMs but should be compressed into some kind of tarball or zip file. An extension installation tool i(possibly part of the GNOME Shell, should unpack the extension tarball, do some sanity checking, and then install the extension.
- All files, including message catalogs, images, and icons, for an extension should live under the extension top directory.
- There needs to be a GUI for listing, installing, disabling, enabling and removing extensions.
- There needs to be a better version checking mechanism in extensionSystem.js. The current code is too restrictive and does not support range checking, i.e. minimum and maximum supported versions.
- GNOME Shell needs to guarantee some set of public hooks (APIs) that extensions can depend upon.
- There needs to be a basic validation/testsuite for extensions.
- An ecosystem needs to be put in place around extensions. Something like addons.mozilla.org.
- Whether an extension accepted or not should not depend on the whims of a single gatekeeper but solely depend on whether the extension met certain published guidelines.
- Extensions should be disabled by default on installation to ensure stability of the Shell and require specific user action (white-list?) to enable.
- There should be some mechanism in place to enable the order of loading of extensions to be specified.
The GNOME Shell is still under active development. It will probably be GNOME 3.2 before it stabilizes to the extent that serious effort will be expended developing an extensions ecosystem. A lot more documentation, tools and infrastructure need to be place before a formal reliable ecosystem for GNOME Shell extensions emerges.
As always, experiment and enjoy the experience!
P.S. If you have found this post via an Internet search, you might be interested to know that I have written a number of other posts in this blog about configuring and extending the GNOME 3 Shell. Most of the extensions that I have written are available here.

|
发音: 无拼音
所有意思 1. |


 4635
4635

 被折叠的 条评论
为什么被折叠?
被折叠的 条评论
为什么被折叠?
 到【灌水乐园】发言


