


本节内容
项目实战:运维堡垒机开发
前景介绍
到目前为止,很多公司对堡垒机依然不太感冒,其实是没有充分认识到堡垒机在IT管理中的重要作用的,很多人觉得,堡垒机就是跳板机,其实这个认识是不全面的,跳板功能只是堡垒机所具备的功能属性中的其中一项而已,下面我就给大家介绍一下堡垒机的重要性,以帮助大家参考自己公司的业务是否需要部署堡垒机。
堡垒机有以下两个至关重要的功能:
权限管理
当你公司的服务器变的越来越多后,需要操作这些服务器的人就肯定不只是一个运维人员,同时也可能包括多个开发人员,那么这么多的人操作业务系统,如果权限分配不当就会存在很大的安全风险,举几个场景例子:
-
设想你们公司有300台Linux服务器,A开发人员需要登录其中5台WEB服务器查看日志或进行问题追踪等事务,同时对另外10台hadoop服务器有root权限,在有300台服务器规模的网络中,按常理来讲你是已经使用了ldap权限统一认证的,你如何使这个开发人员只能以普通用户的身份登录5台web服务器,并且同时允许他以管理员的身份登录另外10台hadoop服务器呢?并且同时他对其它剩下的200多台服务器没有访问权限
-
目前据我了解,很多公司的运维团队为了方面,整个运维团队的运维人员还是共享同一套root密码,这样内部信任机制虽然使大家的工作方便了,但同时存在着极大的安全隐患,很多情况下,一个运维人员只需要管理固定数量的服务器,毕竟公司分为不同的业务线,不同的运维人员管理的业务线也不同,但如果共享一套root密码,其实就等于无限放大了每个运维人员的权限,也就是说,如果某个运维人员想干坏事的话,他可以在几分钟内把整个公司的业务停转,甚至数据都给删除掉。为了降低风险,于是有人想到,把不同业务线的root密码改掉就ok了么,也就是每个业务线的运维人员只知道自己的密码,这当然是最简单有效的方式,但问题是如果你同时用了ldap,这样做又比较麻烦,即使你设置了root不通过ldap认证,那新问题就是,每次有运维人员离职,他所在的业务线的密码都需要重新改一次。
其实上面的问题,我觉得可以很简单的通过堡垒机来实现,收回所有人员的直接登录服务器的权限,所有的登录动作都通过堡垒机授权,运维人员或开发人员不知道远程服务器的密码,这些远程机器的用户信息都绑定在了堡垒机上,堡垒机用户只能看到他能用什么权限访问哪些远程服务器。
在回收了运维或开发人员直接登录远程服务器的权限后,其实就等于你们公司生产系统的所有认证过程都通过堡垒机来完成了,堡垒机等于成了你们生产系统的SSO(single sign on)模块了。你只需要在堡垒机上添加几条规则就能实现以下权限控制了:
-
允许A开发人员通过普通用户登录5台web服务器,通过root权限登录10台hadoop服务器,但对其余的服务器无任务访问权限
-
多个运维人员可以共享一个root账户,但是依然能分辨出分别是谁在哪些服务器上操作了哪些命令,因为堡垒机账户是每个人独有的,也就是说虽然所有运维人员共享了一同一个远程root账户,但由于他们用的堡垒账户都是自己独有的,因此依然可以通过堡垒机控制每个运维人员访问不同的机器。
审计管理
审计管理其实很简单,就是把用户的所有操作都纪录下来,以备日后的审计或者事故后的追责。在纪录用户操作的过程中有一个问题要注意,就是这个纪录对于操作用户来讲是不可见的,什么意思?就是指,无论用户愿不愿意,他的操作都会被纪录下来,并且,他自己如果不想操作被纪录下来,或想删除已纪录的内容,这些都是他做不到的,这就要求操作日志对用户来讲是不可见和不可访问的,通过堡垒机就可以很好的实现。
堡垒机架构
堡垒机的主要作用权限控制和用户行为审计,堡垒机就像一个城堡的大门,城堡里的所有建筑就是你不同的业务系统 , 每个想进入城堡的人都必须经过城堡大门并经过大门守卫的授权,每个进入城堡的人必须且只能严格按守卫的分配进入指定的建筑,且每个建筑物还有自己的权限访问控制,不同级别的人可以到建筑物里不同楼层的访问级别也是不一样的。还有就是,每个进入城堡的人的所有行为和足迹都会被严格的监控和纪录下来,一旦发生犯罪事件,城堡管理人员就可以通过这些监控纪录来追踪责任人。
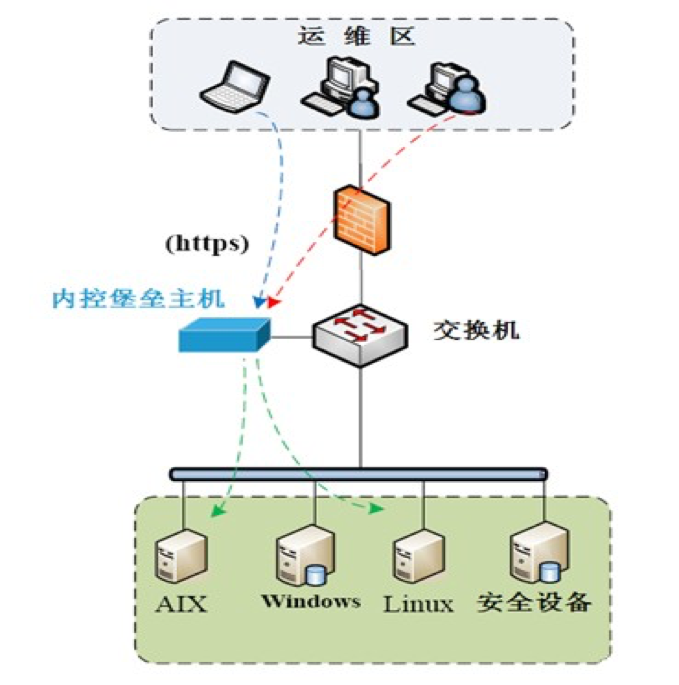
堡垒要想成功完全记到他的作用,只靠堡垒机本身是不够的, 还需要一系列安全上对用户进行限制的配合,堡垒机部署上后,同时要确保你的网络达到以下条件:
- 所有人包括运维、开发等任何需要访问业务系统的人员,只能通过堡垒机访问业务系统
- 回收所有对业务系统的访问权限,做到除了堡垒机管理人员,没有人知道业务系统任何机器的登录密码
- 网络上限制所有人员只能通过堡垒机的跳转才能访问业务系统
- 确保除了堡垒机管理员之外,所有其它人对堡垒机本身无任何操作权限,只有一个登录跳转功能
- 确保用户的操作纪录不能被用户自己以任何方式获取到并篡改
堡垒机功能实现需求
业务需求:
- 兼顾业务安全目标与用户体验,堡垒机部署后,不应使用户访问业务系统的访问变的复杂,否则工作将很难推进,因为没人喜欢改变现状,尤其是改变后生活变得更艰难
- 保证堡垒机稳定安全运行, 没有100%的把握,不要上线任何新系统,即使有100%把握,也要做好最坏的打算,想好故障预案
功能需求:
- 所有的用户操作日志要保留在数据库中
- 每个用户登录堡垒机后,只需要选择具体要访问的设置,就连接上了,不需要再输入目标机器的访问密码
- 允许用户对不同的目标设备有不同的访问权限,例:
- 对10.0.2.34 有mysql 用户的权限
- 对192.168.3.22 有root用户的权限
- 对172.33.24.55 没任何权限
- 分组管理,即可以对设置进行分组,允许用户访问某组机器,但对组里的不同机器依然有不同的访问权限
设计表结构:
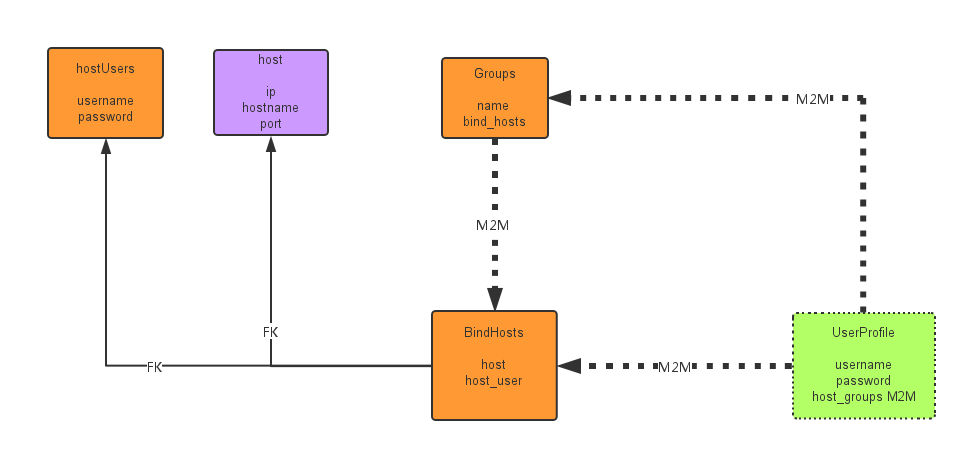


  1 #_*_coding:utf-8_*_
  2 __author__ = 'Alex Li'
  3
  4 from sqlalchemy import create_engine,Table
  5 from sqlalchemy.ext.declarative import declarative_base
  6 from sqlalchemy import Column, Integer, String,ForeignKey,UniqueConstraint
  7 from sqlalchemy.orm import relationship
  8 from  sqlalchemy.orm import sessionmaker
  9 from sqlalchemy import or_,and_
 10 from sqlalchemy import func
 11 from sqlalchemy_utils import ChoiceType,PasswordType
 12
 13 Base = declarative_base() #生成一个SqlORM 基类
 14
 15
 16 engine = create_engine("mysql+mysqldb://root@localhost:3306/test",echo=False)
 17
 18
 19 BindHost2Group = Table('bindhost_2_group',Base.metadata,
 20     Column('bindhost_id',ForeignKey('bind_host.id'),primary_key=True),
 21     Column('group_id',ForeignKey('group.id'),primary_key=True),
 22 )
 23
 24 BindHost2UserProfile = Table('bindhost_2_userprofile',Base.metadata,
 25     Column('bindhost_id',ForeignKey('bind_host.id'),primary_key=True),
 26     Column('uerprofile_id',ForeignKey('user_profile.id'),primary_key=True),
 27 )
 28
 29 Group2UserProfile = Table('group_2_userprofile',Base.metadata,
 30     Column('userprofile_id',ForeignKey('user_profile.id'),primary_key=True),
 31     Column('group_id',ForeignKey('group.id'),primary_key=True),
 32 )
 33
 34
 35 class UserProfile(Base):
 36     __tablename__ = 'user_profile'
 37     id = Column(Integer,primary_key=True,autoincrement=True)
 38     username = Column(String(32),unique=True,nullable=False)
 39     password = Column(String(128),unique=True,nullable=False)
 40     groups = relationship('Group',secondary=Group2UserProfile)
 41     bind_hosts = relationship('BindHost',secondary=BindHost2UserProfile)
 42
 43     def __repr__(self):
 44         return "<UserProfile(id='%s',username='%s')>" % (self.id,self.username)
 45
 46 class RemoteUser(Base):
 47     __tablename__ = 'remote_user'
 48     AuthTypes = [
 49         (u'ssh-passwd',u'SSH/Password'),
 50         (u'ssh-key',u'SSH/KEY'),
 51     ]
 52     id = Column(Integer,primary_key=True,autoincrement=True)
 53     auth_type = Column(ChoiceType(AuthTypes))
 54     username = Column(String(64),nullable=False)
 55     password = Column(String(255))
 56
 57     __table_args__ = (UniqueConstraint('auth_type', 'username','password', name='_user_passwd_uc'),)
 58
 59     def __repr__(self):
 60         return "<RemoteUser(id='%s',auth_type='%s',user='%s')>" % (self.id,self.auth_type,self.username)
 61
 62
 63 class Host(Base):
 64     __tablename__ = 'host'
 65     id = Column(Integer,primary_key=True,autoincrement=True)
 66     hostname = Column(String(64),unique=True,nullable=False)
 67     ip_addr = Column(String(128),unique=True,nullable=False)
 68     port = Column(Integer,default=22)
 69     bind_hosts = relationship("BindHost")
 70     def __repr__(self):
 71         return "<Host(id='%s',hostname='%s')>" % (self.id,self.hostname)
 72
 73 class Group(Base):
 74     __tablename__  = 'group'
 75     id = Column(Integer,primary_key=True,autoincrement=True)
 76     name = Column(String(64),nullable=False,unique=True)
 77     bind_hosts = relationship("BindHost",secondary=BindHost2Group, back_populates='groups' )
 78     user_profiles = relationship("UserProfile",secondary=Group2UserProfile )
 79
 80     def __repr__(self):
 81         return "<HostGroup(id='%s',name='%s')>" % (self.id,self.name)
 82
 83
 84 class BindHost(Base):
 85     '''Bind host with different remote user,
 86        eg. 192.168.1.1 mysql passAbc123
 87        eg. 10.5.1.6    mysql pass532Dr!
 88        eg. 10.5.1.8    mysql pass532Dr!
 89        eg. 192.168.1.1 root
 90     '''
 91     __tablename__ = 'bind_host'
 92     id = Column(Integer,primary_key=True,autoincrement=True)
 93     host_id = Column(Integer,ForeignKey('host.id'))
 94     remoteuser_id = Column(Integer,ForeignKey('remote_user.id'))
 95     host = relationship("Host")
 96     remoteuser = relationship("RemoteUser")
 97     groups = relationship("Group",secondary=BindHost2Group,back_populates='bind_hosts')
 98     user_profiles = relationship("UserProfile",secondary=BindHost2UserProfile)
 99
100     __table_args__ = (UniqueConstraint('host_id', 'remoteuser_id', name='_bindhost_and_user_uc'),)
101
102     def __repr__(self):
103         return "<BindHost(id='%s',name='%s',user='%s')>" % (self.id,
104                                                            self.host.hostname,
105                                                            self.remoteuser.username
106                                                                       )
107
108
109 Base.metadata.create_all(engine) #创建所有表结构
110
111 if __name__ == '__main__':
112     SessionCls = sessionmaker(bind=engine) #创建与数据库的会话session class ,注意,这里返回给session的是个class,不是实例
113     session = SessionCls()
114     #h1 = session.query(Host).filter(Host.hostname=='ubuntu4').first()
115     #hg1 = session.query(HostGroup).filter(HostGroup.name=='t2').first()
116
117     #h2 = Host(hostname='ubuntu4',ip_addr='192.168.1.21')
118     #h3 = Host(hostname='ubuntu5',ip_addr='192.168.1.24',port=20000)
119     #hg= HostGroup(name='TestServers3',host_id=h3.id)
120     #hg2= HostGroup(name='TestServers2',host_id=h2.id)
121     #hg3= HostGroup(name='TestServers3')
122     #hg4= HostGroup(name='TestServers4')
123     #session.add_all([hg3,hg4])
124     #h2.host_groups = [HostGroup(name="t1"),HostGroup(name="t2")]
125     #h3.host_groups = [HostGroup(name="t2")]
126     #h1.host_groups.append(HostGroup(name="t3") )
127     #print(h1.host_groups)
128     #print("hg1:",hg1.host.hostname)
129     #join_res = session.query(Host).join(Host.host_groups).filter(HostGroup.name=='t1').group_by("Host").all()
130     #print('join select:',join_res)
131     #group_by_res = session.query(HostGroup, func.count(HostGroup.name )).group_by(HostGroup.name).all()
132     #print("-------------group by res-----")
133
134     '''
135     h1=Host(hostname='h1',ip_addr='1.1.1.1')
136     h2=Host(hostname='h2',ip_addr='1.1.1.2')
137     h3=Host(hostname='h3',ip_addr='1.1.1.3')
138     r1=RemoteUser(auth_type=u'ssh-passwd',username='alex',password='abc123')
139     r2=RemoteUser(auth_type=u'ssh-key',username='alex')
140
141     g1 = Group(name='g1')
142     g2 = Group(name='g2')
143     g3 = Group(name='g3')
144     session.add_all([h1,h2,h3,r1,r2])
145     session.add_all([g1,g2,g3])
146
147
148
149     b1 = BindHost(host_id=1,remoteuser_id=1)
150     b2 = BindHost(host_id=1,remoteuser_id=2)
151     b3 = BindHost(host_id=2,remoteuser_id=2)
152     b4 = BindHost(host_id=3,remoteuser_id=2)
153     session.add_all((b1,b2,b3,b4))
154
155     all_groups = session.query(Group).filter().all() #first()
156     all_bindhosts = session.query(BindHost).filter().all()
157
158     #h1 = session.query(BindHost).filter(BindHost.host_id==1).first()
159     #h1.groups.append(all_groups[1])
160     #print("h1:",h1)
161     #print("----------->",all_groups.name,all_groups.bind_hosts)
162     u1 = session.query(UserProfile).filter(UserProfile.id==1).first()
163     print('--user:',u1.bind_hosts)
164     print('--user:',u1.groups[0].bind_hosts)
165     #u1.groups = [all_groups[1] ]
166     #u1.bind_hosts.append(all_bindhosts[1])
167     #u1 = UserProfile(username='alex',password='123')
168     #u2 = UserProfile(username='rain',password='abc!23')
169     #session.add_all([u1,u2])
170     #b1 = BindHost()
171     session.commit()
172     #print(h2.host_groups)
173     '''
ssh公钥登录过程
使用密码登录,每次都必须输入密码,非常麻烦。好在SSH还提供了公钥登录,可以省去输入密码的步骤。
所谓"公钥登录",原理很简单,就是用户将自己的公钥储存在远程主机上。登录的时候,远程主机会向用户发送一段随机字符串,用户用自己的私钥加密后,再发回来。远程主机用事先储存的公钥进行解密,如果成功,就证明用户是可信的,直接允许登录shell,不再要求密码。
这种方法要求用户必须提供自己的公钥。如果没有现成的,可以直接用ssh-keygen生成一个:
$ ssh-keygen
运行上面的命令以后,系统会出现一系列提示,可以一路回车。其中有一个问题是,要不要对私钥设置口令(passphrase),如果担心私钥的安全,这里可以设置一个。
运行结束以后,在$HOME/.ssh/目录下,会新生成两个文件:id_rsa.pub和id_rsa。前者是你的公钥,后者是你的私钥。
这时再输入下面的命令,将公钥传送到远程主机host上面:
$ ssh-copy-id user@host
好了,从此你再登录,就不需要输入密码了。
完整示例代码
https://github.com/triaquae/py3_training/tree/master/%E5%A0%A1%E5%9E%92%E6%9C%BA


 615
615


 被折叠的 条评论
为什么被折叠?
被折叠的 条评论
为什么被折叠?
 到【灌水乐园】发言


