


首先看一下都有哪些命令吧
[root@localhost admin]# docker help

Usage:    docker COMMAND

A self-sufficient runtime for containers

Options:
      --config string      Location of client config files (default "/root/.docker")
  -D, --debug              Enable debug mode
      --help               Print usage
  -H, --host list          Daemon socket(s) to connect to (default [])
  -l, --log-level string   Set the logging level ("debug", "info", "warn", "error", "fatal") (default "info")
      --tls                Use TLS; implied by --tlsverify
      --tlscacert string   Trust certs signed only by this CA (default "/root/.docker/ca.pem")
      --tlscert string     Path to TLS certificate file (default "/root/.docker/cert.pem")
      --tlskey string      Path to TLS key file (default "/root/.docker/key.pem")
      --tlsverify          Use TLS and verify the remote
  -v, --version            Print version information and quit

Management Commands:
  container   Manage containers
  image       Manage images
  network     Manage networks
  node        Manage Swarm nodes
  plugin      Manage plugins
  secret      Manage Docker secrets
  service     Manage services
  stack       Manage Docker stacks
  swarm       Manage Swarm
  system      Manage Docker
  volume      Manage volumes

Commands:
  attach      Attach to a running container
  build       Build an image from a Dockerfile
  commit      Create a new image from a container's changes
  cp          Copy files/folders between a container and the local filesystem
  create      Create a new container
  diff        Inspect changes on a container's filesystem
  events      Get real time events from the server
  exec        Run a command in a running container
  export      Export a container's filesystem as a tar archive
  history     Show the history of an image
  images      List images
  import      Import the contents from a tarball to create a filesystem image
  info        Display system-wide information
  inspect     Return low-level information on Docker objects
  kill        Kill one or more running containers
  load        Load an image from a tar archive or STDIN
  login       Log in to a Docker registry
  logout      Log out from a Docker registry
  logs        Fetch the logs of a container
  pause       Pause all processes within one or more containers
  port        List port mappings or a specific mapping for the container
  ps          List containers
  pull        Pull an image or a repository from a registry
  push        Push an image or a repository to a registry
  rename      Rename a container
  restart     Restart one or more containers
  rm          Remove one or more containers
  rmi         Remove one or more images
  run         Run a command in a new container
  save        Save one or more images to a tar archive (streamed to STDOUT by default)
  search      Search the Docker Hub for images
  start       Start one or more stopped containers
  stats       Display a live stream of container(s) resource usage statistics
  stop        Stop one or more running containers
  tag         Create a tag TARGET_IMAGE that refers to SOURCE_IMAGE
  top         Display the running processes of a container
  unpause     Unpause all processes within one or more containers
  update      Update configuration of one or more containers
  version     Show the Docker version information
  wait        Block until one or more containers stop, then print their exit codes
查看命令详情则在命令后面加一个--help参数,比如
[root@localhost admin]# docker ps --help

Usage:    docker ps [OPTIONS]

List containers

Options:
  -a, --all             Show all containers (default shows just running)
  -f, --filter filter   Filter output based on conditions provided
      --format string   Pretty-print containers using a Go template
      --help            Print usage
  -n, --last int        Show n last created containers (includes all states) (default -1)
  -l, --latest          Show the latest created container (includes all states)
      --no-trunc        Don't truncate output
  -q, --quiet           Only display numeric IDs
  -s, --size            Display total file sizes
常用命令
1. 搜索镜像
[root@localhost admin]# docker search java
INDEX       NAME                                               DESCRIPTION                                     STARS     OFFICIAL   AUTOMATED
docker.io   docker.io/node                                     Node.js is a JavaScript-based platform for...   7778      [OK]
docker.io   docker.io/tomcat                                   Apache Tomcat is an open source implementa...   2503      [OK]
docker.io   docker.io/java                                     Java is a concurrent, class-based, and obj...   1976      [OK]
docker.io   docker.io/openjdk                                  OpenJDK is an open-source implementation o...   1853      [OK]
docker.io   docker.io/ghost                                    Ghost is a free and open source blogging p...   1019      [OK]
docker.io   docker.io/jetty                                    Jetty provides a Web server and javax.serv...   312       [OK]
docker.io   docker.io/couchdb                                  CouchDB is a database that uses JSON for d...   297       [OK]
docker.io   docker.io/groovy                                   Apache Groovy is a multi-faceted language ...   76        [OK]
docker.io   docker.io/lwieske/java-8                           Oracle Java 8 Container - Full + Slim - Ba...   43                   [OK]
docker.io   docker.io/nimmis/java-centos                       This is docker images of CentOS 7 with dif...   42                   [OK]
docker.io   docker.io/fabric8/java-jboss-openjdk8-jdk          Fabric8 Java Base Image (JBoss, OpenJDK 8)      28                   [OK]
docker.io   docker.io/frekele/java                             docker run --rm --name java frekele/java        12                   [OK]
docker.io   docker.io/blacklabelops/java                       Java Base Images.                               8                    [OK]
docker.io   docker.io/bitnami/java                             Bitnami Java Docker Image                       4                    [OK]
docker.io   docker.io/rightctrl/java                           Oracle Java                                     3                    [OK]
docker.io   docker.io/zoran/java10-sjre                        Slim Docker image based on AlpineLinux wit...   2                    [OK]
docker.io   docker.io/buildo/java8-wkhtmltopdf                 Java 8 + wkhtmltopdf                            1                    [OK]
docker.io   docker.io/cfje/java-buildpack                      Java Buildpack CI Image                         1
docker.io   docker.io/cfje/java-resource                       Java Concourse Resource                         1
docker.io   docker.io/cfje/java-test-applications              Java Test Applications CI Image                 1
docker.io   docker.io/dwolla/java                              Dwolla’s custom Java image                      1                    [OK]
docker.io   docker.io/cfje/java-buildpack-dependency-builder   Java Buildpack Dependencies Builder Image       0
docker.io   docker.io/cfje/java-buildpack-memory-calculator    Java Buildpack Memory Calculator CI Image       0
docker.io   docker.io/jelastic/javaengine                      An image of the Java Engine server maintai...   0
docker.io   docker.io/thingswise/java-docker                   Java + dcd                                      0                    [OK]
NAME——名字
DESCRIPTION——描述
STARS——收藏数
OFFICIAL——官方仓库
2. 下载仓库
[root@localhost admin]# docker pull docker.io/java
Using default tag: latest
Trying to pull repository docker.io/library/java ...
latest: Pulling from docker.io/library/java
5040bd298390: Pull complete
fce5728aad85: Pull complete
76610ec20bf5: Pull complete
60170fec2151: Pull complete
e98f73de8f0d: Pull complete
11f7af24ed9c: Pull complete
49e2d6393f32: Pull complete
bb9cdec9c7f3: Pull complete
Digest: sha256:c1ff613e8ba25833d2e1940da0940c3824f03f802c449f3d1815a66b7f8c0e9d
Status: Downloaded newer image for docker.io/java:latest
3. 查看已下载的镜像
[root@localhost admin]# docker images
REPOSITORY                  TAG                 IMAGE ID            CREATED             SIZE
docker.io/mongo             latest              8bf72137439e        12 months ago       380 MB
docker.io/influxdb          latest              34de2bdc2d7f        12 months ago       213 MB
docker.io/centos            latest              5182e96772bf        12 months ago       200 MB
docker.io/grafana/grafana   latest              3e16e05be9a3        13 months ago       245 MB
docker.io/hello-world       latest              2cb0d9787c4d        13 months ago       1.85 kB
docker.io/java              latest              d23bdf5b1b1b        2 years ago         643 MB
REPOSITORY——仓库名称
TAG——标签
IMAGE ID——镜像唯一标识
CREATED——镜像创建时间
SIZE——镜像大小
4. 删除镜像
#删除一个镜像
docker rmi hello-world
#强制删除所有镜像
docker rmi -f $(docker images)
5. 启动容器
# 用nginx做示范
[root@localhost admin]# docker pull nginx
Using default tag: latest
Trying to pull repository docker.io/library/nginx ...
latest: Pulling from docker.io/library/nginx
1ab2bdfe9778: Pull complete
a17e64cfe253: Pull complete
e1288088c7a8: Pull complete
Digest: sha256:53ddb41e46de3d63376579acf46f9a41a8d7de33645db47a486de9769201fec9
Status: Downloaded newer image for docker.io/nginx:latest
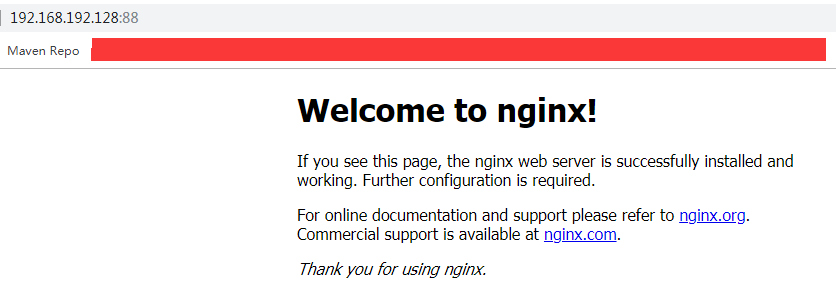
启动
[root@localhost admin]# docker run -d -p 88:80 nginx
514fce089f8e807ceaff4969f24d561ca2ee3c083f750a3409afa864c6f34403

# 开启端口
[root@localhost admin]# firewall-cmd --list-all
public (active)
  target: default
  icmp-block-inversion: no
  interfaces: ens33
  sources:
  services: ssh dhcpv6-client
  ports: 2888/tcp 3888/tcp 2181/tcp 15672/tcp 8083/tcp 8086/tcp 3000/tcp 8848/tcp 3306/tcp 24801/tcp 24901/tcp 33061/tcp
  protocols:
  masquerade: no
  forward-ports:
  source-ports:
  icmp-blocks:
  rich rules:

[root@localhost admin]# firewall-cmd --zone=public --add-port=88/tcp --permanent
success
[root@localhost admin]# systemctl restart firewalld
在浏览器访问
参数解释:
docker run -d -p 88:80 nginx

-d:后台启动
-p:指定端口映射【宿主机端口(88):容器端口(80)】

# 你也可以指定自定义容器名字,通过--name参数
docker run --name mynginx -d -p 88:80 nginx
6. 列出容器
[root@localhost admin]# docker ps
CONTAINER ID        IMAGE               COMMAND                  CREATED             STATUS              PORTS                NAMES
514fce089f8e        nginx               "nginx -g 'daemon ..."   8 minutes ago       Up 8 minutes        0.0.0.0:88->80/tcp   adoring_thompson
默认是列出已启动的,加上-a可以列出所有
[root@localhost admin]# docker ps -a
CONTAINER ID        IMAGE               COMMAND                  CREATED             STATUS                       PORTS                NAMES
514fce089f8e        nginx               "nginx -g 'daemon ..."   9 minutes ago       Up 9 minutes                 0.0.0.0:88->80/tcp   adoring_thompson
6c9d5d2d8422        grafana/grafana     "/run.sh"                12 months ago       Exited (0) 12 months ago                          my_grafana
aec85244ff22        influxdb            "/entrypoint.sh in..."   12 months ago       Exited (0) 12 months ago                          my_influxdb
a43c0d9de6de        centos              "bash"                   12 months ago       Exited (137) 12 months ago                        my_centos
8b799b9035b6        mongo:latest        "docker-entrypoint..."   12 months ago       Exited (1) 12 months ago                          quizzical_hoover
6f5b2fdc120f        mongo               "docker-entrypoint..."   12 months ago       Exited (0) 12 months ago                          my_mongo
7. 停止容器
[root@localhost admin]# docker stop 514fce089f8e
514fce089f8e
514fce089f8e是容器的ID,你也可以通过指定名字来停止。如果你要强制停止:docker kill 514fce089f8e
8. 启动已停止的容器
对于docker run 是新建并启动一个容器,而对于我们已经新建的并且已停止的容器,可以使用docker start 来启动。
[root@localhost admin]# docker start 514fce089f8e
514fce089f8e
如果你要重启,可以执行 docker restart 514fce089f8e
9. 进入容器
比如我们启动一下已存在的mongo容器。
[root@localhost admin]# docker start 6f5b2fdc120f
6f5b2fdc120f
[root@localhost admin]# docker exec -it 6f5b2fdc120f bash
root@6f5b2fdc120f:/# mongo
MongoDB shell version v4.0.1
connecting to: mongodb://127.0.0.1:27017
MongoDB server version: 4.0.1
Server has startup warnings:
2019-08-27T02:42:19.030+0000 I CONTROL  [initandlisten]
2019-08-27T02:42:19.030+0000 I CONTROL  [initandlisten] ** WARNING: Access control is not enabled for the database.
2019-08-27T02:42:19.030+0000 I CONTROL  [initandlisten] **          Read and write access to data and configuration is unrestricted.
2019-08-27T02:42:19.030+0000 I CONTROL  [initandlisten]
2019-08-27T02:42:19.031+0000 I CONTROL  [initandlisten]
2019-08-27T02:42:19.031+0000 I CONTROL  [initandlisten] ** WARNING: /sys/kernel/mm/transparent_hugepage/enabled is 'always'.
2019-08-27T02:42:19.031+0000 I CONTROL  [initandlisten] **        We suggest setting it to 'never'
2019-08-27T02:42:19.031+0000 I CONTROL  [initandlisten]
2019-08-27T02:42:19.031+0000 I CONTROL  [initandlisten] ** WARNING: /sys/kernel/mm/transparent_hugepage/defrag is 'always'.
2019-08-27T02:42:19.031+0000 I CONTROL  [initandlisten] **        We suggest setting it to 'never'
2019-08-27T02:42:19.031+0000 I CONTROL  [initandlisten]
---
Enable MongoDB's free cloud-based monitoring service, which will then receive and display
metrics about your deployment (disk utilization, CPU, operation statistics, etc).

The monitoring data will be available on a MongoDB website with a unique URL accessible to you
and anyone you share the URL with. MongoDB may use this information to make product
improvements and to suggest MongoDB products and deployment options to you.

To enable free monitoring, run the following command: db.enableFreeMonitoring()
To permanently disable this reminder, run the following command: db.disableFreeMonitoring()
---

> show dbs
admin   0.000GB
config  0.000GB
local   0.000GB
10. 退出容器
总不能许进不许出吧,可以在容器里执行 exit 命令退出,也可以Ctrl+P+Q
root@6f5b2fdc120f:/# exit
exit
[root@localhost admin]#
11. 前面有一个删除镜像,现在是删除容器
# 删除一个容器
docker rm [容器ID]

# 删除所有容器
docker rm -f $(docker ps -a -q)
12. 卸载docker
# 移除docker
yum remove docker-ce
# 移除 images, containers, and volumes
rm -rf /var/lib/docker
13. 版本信息
# 简略版本信息
[root@localhost admin]# docker --version
Docker version 19.03.1, build 74b1e89

# 详细版本信息
[root@localhost admin]# docker version
Client: Docker Engine - Community
 Version:           19.03.1
 API version:       1.40
 Go version:        go1.12.5
 Git commit:        74b1e89
 Built:             Thu Jul 25 21:21:07 2019
 OS/Arch:           linux/amd64
 Experimental:      false

Server: Docker Engine - Community
 Engine:
  Version:          19.03.1
  API version:      1.40 (minimum version 1.12)
  Go version:       go1.12.5
  Git commit:       74b1e89
  Built:            Thu Jul 25 21:19:36 2019
  OS/Arch:          linux/amd64
  Experimental:     false
 containerd:
  Version:          1.2.6
  GitCommit:        894b81a4b802e4eb2a91d1ce216b8817763c29fb
 runc:
  Version:          1.0.0-rc8
  GitCommit:        425e105d5a03fabd737a126ad93d62a9eeede87f
 docker-init:
  Version:          0.18.0
  GitCommit:        fec3683

# docker信息
[root@localhost admin]# docker info
Client:
 Debug Mode: false

Server:
 Containers: 22
  Running: 0
  Paused: 0
  Stopped: 22
 Images: 32
 Server Version: 19.03.1
 Storage Driver: overlay2
  Backing Filesystem: xfs
  Supports d_type: true
  Native Overlay Diff: true
 Logging Driver: json-file
 Cgroup Driver: cgroupfs
 Plugins:
  Volume: local
  Network: bridge host ipvlan macvlan null overlay
  Log: awslogs fluentd gcplogs gelf journald json-file local logentries splunk syslog
 Swarm: active
  NodeID: 2nsxaa9nllfle88l133d30z0n
  Is Manager: true
  ClusterID: s4cihymltbj12gig7j5viiqwd
  Managers: 2
  Nodes: 2
  Default Address Pool: 10.0.0.0/8
  SubnetSize: 24
  Data Path Port: 4789
  Orchestration:
   Task History Retention Limit: 5
  Raft:
   Snapshot Interval: 10000
   Number of Old Snapshots to Retain: 0
   Heartbeat Tick: 1
   Election Tick: 10
  Dispatcher:
   Heartbeat Period: 5 seconds
  CA Configuration:
   Expiry Duration: 3 months
   Force Rotate: 0
  Autolock Managers: false
  Root Rotation In Progress: false
  Node Address: 192.168.192.128
  Manager Addresses:
   192.168.192.128:2377
   192.168.192.130:2377
 Runtimes: runc
 Default Runtime: runc
 Init Binary: docker-init
 containerd version: 894b81a4b802e4eb2a91d1ce216b8817763c29fb
 runc version: 425e105d5a03fabd737a126ad93d62a9eeede87f
 init version: fec3683
 Security Options:
  seccomp
   Profile: default
 Kernel Version: 3.10.0-862.9.1.el7.x86_64
 Operating System: CentOS Linux 7 (Core)
 OSType: linux
 Architecture: x86_64
 CPUs: 1
 Total Memory: 974.6MiB
 Name: localhost.localdomain
 ID: RKLD:HVRZ:AAX6:O36J:264Q:QAF6:EHO6:2VCI:AA3M:445E:266Y:KCKU
 Docker Root Dir: /var/lib/docker
 Debug Mode: false
 Registry: https://index.docker.io/v1/
 Labels:
 Experimental: false
 Insecure Registries:
  192.168.192.128:443
  127.0.0.0/8
 Registry Mirrors:
  https://2148hpzn.mirror.aliyuncs.com/
  http://hub-mirror.c.163.com/
 Live Restore Enabled: false
-------------------------------run一个redis容器以供测试(docker run -d redis)
14. 查看容器进程信息(最后的为容器ID)
[root@localhost admin]# docker top b81c7945bfcc
UID                 PID                 PPID                C                   STIME               TTY                 TIME                CMD
polkitd             3937                3921                0                   22:58               ?                   00:00:00            redis-server *:6379
15. 查看容器详细信息
[root@localhost admin]# docker inspect b81c7945bfcc

// 以下内容过长,不贴了
16. 查看容器日志
[root@localhost admin]# docker logs b81c7945bfcc
1:C 19 Sep 2019 11:05:49.205 # oO0OoO0OoO0Oo Redis is starting oO0OoO0OoO0Oo
1:C 19 Sep 2019 11:05:49.205 # Redis version=5.0.5, bits=64, commit=00000000, modified=0, pid=1, just started
1:C 19 Sep 2019 11:05:49.205 # Warning: no config file specified, using the default config. In order to specify a config file use redis-server /path/to/redis.conf
1:M 19 Sep 2019 11:05:49.208 * Running mode=standalone, port=6379.
1:M 19 Sep 2019 11:05:49.208 # WARNING: The TCP backlog setting of 511 cannot be enforced because /proc/sys/net/core/somaxconn is set to the lower value of 128.
1:M 19 Sep 2019 11:05:49.208 # Server initialized
1:M 19 Sep 2019 11:05:49.208 # WARNING overcommit_memory is set to 0! Background save may fail under low memory condition. To fix this issue add 'vm.overcommit_memory = 1' to /etc/sysctl.conf and then reboot or run the command 'sysctl vm.overcommit_memory=1' for this to take effect.
1:M 19 Sep 2019 11:05:49.208 # WARNING you have Transparent Huge Pages (THP) support enabled in your kernel. This will create latency and memory usage issues with Redis. To fix this issue run the command 'echo never > /sys/kernel/mm/transparent_hugepage/enabled' as root, and add it to your /etc/rc.local in order to retain the setting after a reboot. Redis must be restarted after THP is disabled.
1:M 19 Sep 2019 11:05:49.208 * Ready to accept connections
1:signal-handler (1568893287) Received SIGTERM scheduling shutdown...
1:M 19 Sep 2019 11:41:27.993 # User requested shutdown...
1:M 19 Sep 2019 11:41:27.993 * Saving the final RDB snapshot before exiting.
1:M 19 Sep 2019 11:41:27.994 * DB saved on disk
1:M 19 Sep 2019 11:41:27.994 # Redis is now ready to exit, bye bye...
1:C 19 Sep 2019 11:46:09.720 # oO0OoO0OoO0Oo Redis is starting oO0OoO0OoO0Oo
1:C 19 Sep 2019 11:46:09.720 # Redis version=5.0.5, bits=64, commit=00000000, modified=0, pid=1, just started
1:C 19 Sep 2019 11:46:09.720 # Warning: no config file specified, using the default config. In order to specify a config file use redis-server /path/to/redis.conf
1:M 19 Sep 2019 11:46:09.723 * Running mode=standalone, port=6379.
1:M 19 Sep 2019 11:46:09.723 # WARNING: The TCP backlog setting of 511 cannot be enforced because /proc/sys/net/core/somaxconn is set to the lower value of 128.
1:M 19 Sep 2019 11:46:09.723 # Server initialized
1:M 19 Sep 2019 11:46:09.723 # WARNING overcommit_memory is set to 0! Background save may fail under low memory condition. To fix this issue add 'vm.overcommit_memory = 1' to /etc/sysctl.conf and then reboot or run the command 'sysctl vm.overcommit_memory=1' for this to take effect.
1:M 19 Sep 2019 11:46:09.723 # WARNING you have Transparent Huge Pages (THP) support enabled in your kernel. This will create latency and memory usage issues with Redis. To fix this issue run the command 'echo never > /sys/kernel/mm/transparent_hugepage/enabled' as root, and add it to your /etc/rc.local in order to retain the setting after a reboot. Redis must be restarted after THP is disabled.
1:M 19 Sep 2019 11:46:09.723 * DB loaded from disk: 0.000 seconds
1:M 19 Sep 2019 11:46:09.723 * Ready to accept connections
1:signal-handler (1568893876) Received SIGTERM scheduling shutdown...
1:M 19 Sep 2019 11:51:16.228 # User requested shutdown...
1:M 19 Sep 2019 11:51:16.228 * Saving the final RDB snapshot before exiting.
1:M 19 Sep 2019 11:51:16.230 * DB saved on disk
1:M 19 Sep 2019 11:51:16.230 # Redis is now ready to exit, bye bye...
1:C 20 Sep 2019 02:58:08.094 # oO0OoO0OoO0Oo Redis is starting oO0OoO0OoO0Oo
1:C 20 Sep 2019 02:58:08.094 # Redis version=5.0.5, bits=64, commit=00000000, modified=0, pid=1, just started
1:C 20 Sep 2019 02:58:08.094 # Warning: no config file specified, using the default config. In order to specify a config file use redis-server /path/to/redis.conf
1:M 20 Sep 2019 02:58:08.098 * Running mode=standalone, port=6379.
1:M 20 Sep 2019 02:58:08.098 # WARNING: The TCP backlog setting of 511 cannot be enforced because /proc/sys/net/core/somaxconn is set to the lower value of 128.
1:M 20 Sep 2019 02:58:08.098 # Server initialized
1:M 20 Sep 2019 02:58:08.098 # WARNING overcommit_memory is set to 0! Background save may fail under low memory condition. To fix this issue add 'vm.overcommit_memory = 1' to /etc/sysctl.conf and then reboot or run the command 'sysctl vm.overcommit_memory=1' for this to take effect.
1:M 20 Sep 2019 02:58:08.098 # WARNING you have Transparent Huge Pages (THP) support enabled in your kernel. This will create latency and memory usage issues with Redis. To fix this issue run the command 'echo never > /sys/kernel/mm/transparent_hugepage/enabled' as root, and add it to your /etc/rc.local in order to retain the setting after a reboot. Redis must be restarted after THP is disabled.
1:M 20 Sep 2019 02:58:08.115 * DB loaded from disk: 0.017 seconds
1:M 20 Sep 2019 02:58:08.115 * Ready to accept connections
Docker网络
创建一个指定网段的网络
[root@localhost admin]# docker network create --driver=bridge --subnet=172.28.0.0/16 --ip-range=172.28.5.0/24 --gateway=172.28.5.254 br0
3f3d2cd29c17f7ebb41a4a1bd63b01933f931b6ce0b33c81ea31aeeb003f8c11
[root@localhost admin]# docker network ls
NETWORK ID          NAME                DRIVER              SCOPE
3f3d2cd29c17        br0                 bridge              local
查看网络详情
[root@localhost admin]# docker network inspect 3f3d2cd29c17
[
    {
        "Name": "br0",
        "Id": "3f3d2cd29c17f7ebb41a4a1bd63b01933f931b6ce0b33c81ea31aeeb003f8c11",
        "Created": "2019-09-19T07:01:03.409204333-04:00",
        "Scope": "local",
        "Driver": "bridge",
        "EnableIPv6": false,
        "IPAM": {
            "Driver": "default",
            "Options": {},
            "Config": [
                {
                    "Subnet": "172.28.0.0/16",
                    "IPRange": "172.28.5.0/24",
                    "Gateway": "172.28.5.254"
                }
            ]
        },
        "Internal": false,
        "Attachable": false,
        "Ingress": false,
        "ConfigFrom": {
            "Network": ""
        },
        "ConfigOnly": false,
        "Containers": {},
        "Options": {},
        "Labels": {}
    }
]
连接(或者断开)容器到此网络
先创建个redis容器
[root@localhost admin]# docker run -d redis
b81c7945bfcc5f879d692e55ae46200dbb51845d9a2f8e9a58aecf1babb62e9a
查看信息
[root@localhost admin]# docker ps
CONTAINER ID        IMAGE               COMMAND                  CREATED              STATUS              PORTS               NAMES
b81c7945bfcc        redis               "docker-entrypoint.s…"   About a minute ago   Up About a minute   6379/tcp            admiring_goldstine
[root@localhost admin]# docker inspect b81c7945bfcc
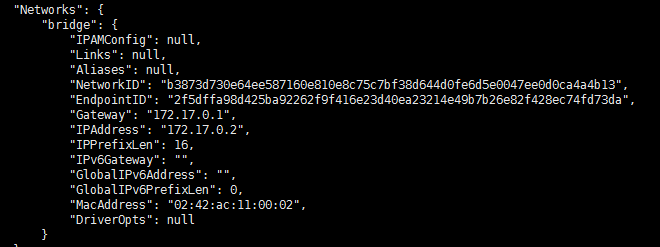
可以看到网络为自动分配的,现在我们给它指定
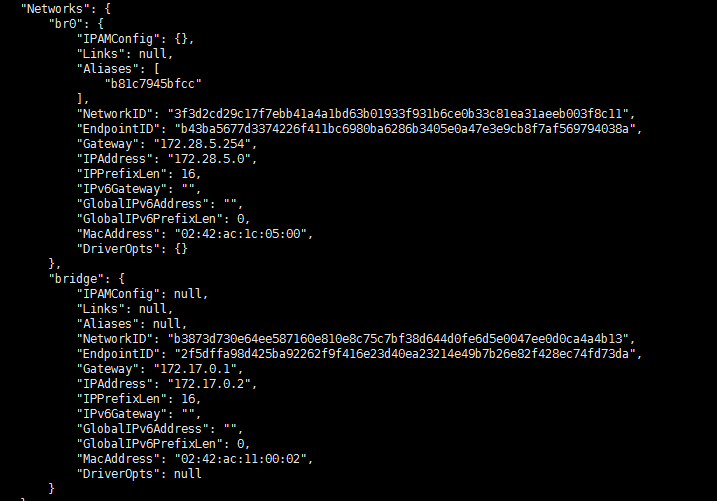
[root@localhost admin]# docker network connect br0 b81c7945bfcc
[root@localhost admin]# docker inspect b81c7945bfcc
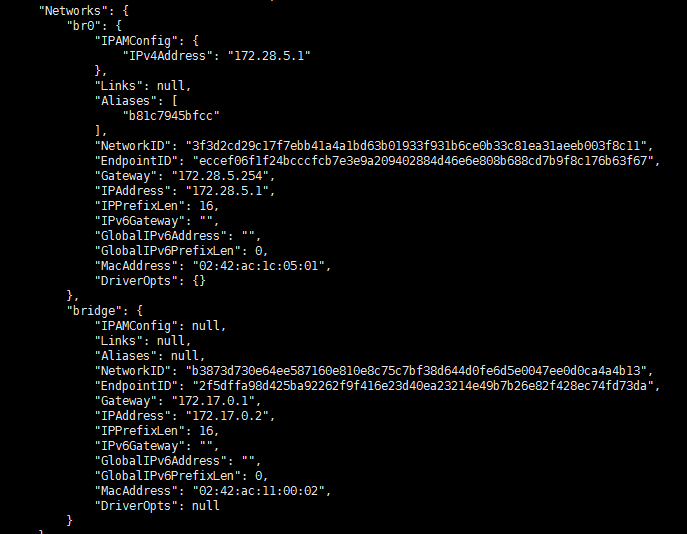
我们还可以指定具体ip
# 先断开连接
[root@localhost admin]# docker network disconnect br0 b81c7945bfcc
# 指定具体ip
[root@localhost admin]# docker network connect --ip=172.28.5.1 br0 b81c7945bfcc
再次查看信息
我们还可以在run的时候指定网络
docker run -itd --network=br0 redis
删除网络
[root@localhost admin]# docker network rm br0
Docker集群(docker swarm 和 docker node)
初始化当前节点
[root@localhost admin]# docker swarm init
Swarm initialized: current node (7655b5sby8sw84r5r4uwa468g) is now a manager.

To add a worker to this swarm, run the following command:

    docker swarm join --token SWMTKN-1-0z2o31z887zr60map679i9kilgix8bhtgiwokumay6tu8gvdlq-emm3ff3656st5jvvh9dyuopvx 192.168.192.128:2377

To add a manager to this swarm, run 'docker swarm join-token manager' and follow the instructions.
另外一个节点加入
[root@localhost admin]# docker swarm join --token SWMTKN-1-0z2o31z887zr60map679i9kilgix8bhtgiwokumay6tu8gvdlq-emm3ff3656st5jvvh9dyuopvx 192.168.192.128:2377
This node joined a swarm as a worker.
查看节点列表
[root@localhost admin]# docker node ls
ID                            HOSTNAME                STATUS              AVAILABILITY        MANAGER STATUS      ENGINE VERSION
7655b5sby8sw84r5r4uwa468g *   localhost.localdomain   Ready               Active              Leader              19.03.1
qfhab5d60gzcc1jmmdy0m8n18     localhost.localdomain   Ready               Active                                  19.03.2
查看节点上的任务
--------------------------------------准备测试数据
启动任务
# 文件:docker-compose-task.yml

version: '3.7'

services:

  redis:
    image: redis
    ports:
      - "6379"
    deploy:
      replicas: 2
      update_config:
        parallelism: 2
        delay: 10s
      restart_policy:
        condition: on-failure
    networks:
      - swarmnet

networks: # 自定义网络
  swarmnet:
运行
[root@localhost admin]# docker stack deploy -c DockerComposeFolder/docker-compose-task.yml my_task
Creating network my_task_swarmnet
Creating service my_task_redis
-----------------------------------------------------
默认查看当前节点的任务
[root@localhost admin]# docker node ps
ID                  NAME                IMAGE               NODE                    DESIRED STATE       CURRENT STATE            ERROR               PORTS
9x9ibeowwrxh        my_task_redis.1     redis:latest        localhost.localdomain   Running             Running 54 seconds ago
[root@localhost admin]#
查看另外节点的任务
[root@localhost admin]# docker node ls
ID                            HOSTNAME                STATUS              AVAILABILITY        MANAGER STATUS      ENGINE VERSION
7655b5sby8sw84r5r4uwa468g *   localhost.localdomain   Ready               Active              Leader              19.03.1
qfhab5d60gzcc1jmmdy0m8n18     localhost.localdomain   Ready               Active                                  19.03.2
[root@localhost admin]# docker node ps qfhab5d60gzcc1jmmdy0m8n18
ID                  NAME                IMAGE               NODE                    DESIRED STATE       CURRENT STATE           ERROR               PORTS
mv0h8383ueku        my_task_redis.2     redis:latest        localhost.localdomain   Running             Running 3 minutes ago
[root@localhost admin]#
查看节点详细
[root@localhost admin]# docker node inspect qfhab5d60gzcc1jmmdy0m8n18
[
    {
        "ID": "qfhab5d60gzcc1jmmdy0m8n18",
        "Version": {
            "Index": 23
        },
        "CreatedAt": "2019-09-19T11:42:13.498834948Z",
        "UpdatedAt": "2019-09-19T11:58:39.899968676Z",
        "Spec": {
            "Labels": {},
            "Role": "worker",
            "Availability": "active"
        },
        "Description": {
            "Hostname": "localhost.localdomain",
            "Platform": {
                "Architecture": "x86_64",
                "OS": "linux"
            },
            "Resources": {
                "NanoCPUs": 1000000000,
                "MemoryBytes": 1023688704
            },
            "Engine": {
                "EngineVersion": "19.03.2",
                "Plugins": [
                    {
                        "Type": "Log",
                        "Name": "awslogs"
                    },
                    {
                        "Type": "Log",
                        "Name": "fluentd"
                    },
                    {
                        "Type": "Log",
                        "Name": "gcplogs"
                    },
                    {
                        "Type": "Log",
                        "Name": "gelf"
                    },
                    {
                        "Type": "Log",
                        "Name": "journald"
                    },
                    {
                        "Type": "Log",
                        "Name": "json-file"
                    },
                    {
                        "Type": "Log",
                        "Name": "local"
                    },
                    {
                        "Type": "Log",
                        "Name": "logentries"
                    },
                    {
                        "Type": "Log",
                        "Name": "splunk"
                    },
                    {
                        "Type": "Log",
                        "Name": "syslog"
                    },
                    {
                        "Type": "Network",
                        "Name": "bridge"
                    },
                    {
                        "Type": "Network",
                        "Name": "host"
                    },
                    {
                        "Type": "Network",
                        "Name": "ipvlan"
                    },
                    {
                        "Type": "Network",
                        "Name": "macvlan"
                    },
                    {
                        "Type": "Network",
                        "Name": "null"
                    },
                    {
                        "Type": "Network",
                        "Name": "overlay"
                    },
                    {
                        "Type": "Volume",
                        "Name": "local"
                    }
                ]
            },
            "TLSInfo": {
                "TrustRoot": "-----BEGIN CERTIFICATE-----\nMIIBazCCARCgAwIBAgIUKygBnRAJjSp8TV9HG+r6gMCSLYcwCgYIKoZIzj0EAwIw\nEzERMA8GA1UEAxMIc3dhcm0tY2EwHhcNMTkwOTE5MTEzMzAwWhcNMzkwOTE0MTEz\nMzAwWjATMREwDwYDVQQDEwhzd2FybS1jYTBZMBMGByqGSM49AgEGCCqGSM49AwEH\nA0IABL4fIR/rHlUgZJtnWgT0f+snH5FpRejZB/PR1o3qGOLVjlzVXeTSq9zQ9nDr\nr9jkBS9o8vVAAzLUjK0+r5sbG+ujQjBAMA4GA1UdDwEB/wQEAwIBBjAPBgNVHRMB\nAf8EBTADAQH/MB0GA1UdDgQWBBSha+UHLEsq1KZEFWcwxr/bOrqpxDAKBggqhkjO\nPQQDAgNJADBGAiEAh67Wzyb2nnSBo3/vx3jehMJYXaXToATqW42Dliz30xMCIQCf\nUegyW6hsHZrM0BJmeXXSO3hsjZWuKhmUKqY1NuMBmg==\n-----END CERTIFICATE-----\n",
                "CertIssuerSubject": "MBMxETAPBgNVBAMTCHN3YXJtLWNh",
                "CertIssuerPublicKey": "MFkwEwYHKoZIzj0CAQYIKoZIzj0DAQcDQgAEvh8hH+seVSBkm2daBPR/6ycfkWlF6NkH89HWjeoY4tWOXNVd5NKr3ND2cOuv2OQFL2jy9UADMtSMrT6vmxsb6w=="
            }
        },
        "Status": {
            "State": "ready",
            "Addr": "192.168.192.130"
        }
    }
]
移除节点
先把堆栈关闭
[root@localhost admin]# docker stack rm my_task
Removing service my_task_redis
Removing network my_task_swarmnet
删除(这个命令只能删除集群中已停止的节点)
[root@localhost admin]# docker node rm qfhab5d60gzcc1jmmdy0m8n18
Error response from daemon: rpc error: code = FailedPrecondition desc = node qfhab5d60gzcc1jmmdy0m8n18 is not down and can't be removed
删除正在运行的节点(--force)
[root@localhost admin]# docker node rm --force qfhab5d60gzcc1jmmdy0m8n18
qfhab5d60gzcc1jmmdy0m8n18
[root@localhost admin]# docker node ls
ID                            HOSTNAME                STATUS              AVAILABILITY        MANAGER STATUS      ENGINE VERSION
7655b5sby8sw84r5r4uwa468g *   localhost.localdomain   Ready               Active              Leader              19.03.1
[root@localhost admin]#
注意,即使在管理节点上移除了某个节点(docker node rm)比如节点A,在节点A上依然是加入集群的状态,需要手动执行 docker swarm leave 才能彻底离开集群
添加节点为管理节点
先在leader节点上执行
[root@localhost admin]# docker swarm join-token manager
To add a manager to this swarm, run the following command:

    docker swarm join --token SWMTKN-1-5k6yxmw2vwx1xxk1dq501e9z7c53c4ryzrtazyoge7b7beu67y-f19e9qhwkypxbf01y160ag9da 192.168.192.128:2377
然后在其他节点上执行如下命令,即可加入成为manager
[root@localhost admin]# docker swarm join --token SWMTKN-1-5k6yxmw2vwx1xxk1dq501e9z7c53c4ryzrtazyoge7b7beu67y-f19e9qhwkypxbf01y160ag9da 192.168.192.128:2377
This node joined a swarm as a manager.
查看节点列表(此时另一个节点也是管理节点,也可以执行管理节点才能执行的命令)

另一个节点

由此可见这个命令是用来生成不同角色加入集群的命令的。【只能由manager节点执行】

离开集群
[root@localhost admin]# docker swarm leave --force
Node left the swarm.


 426
426


 被折叠的 条评论
为什么被折叠?
被折叠的 条评论
为什么被折叠?
 到【灌水乐园】发言


