用InfoPath表单自动获取MOSS站点当前用户信息
注意需要在IIS中关闭匿名访问。否则会收到错误信息
1、打开InfoPath建立一个Blank Form Template,选中Enable browser-compatible features only,点OK
![](http://bbs.sharepoint.org.cn/images/attachicons/attachimg.gif)
2、建立Data Connection:
A、点Tools选择Data Connections
![](http://bbs.sharepoint.org.cn/images/attachicons/attachimg.gif)
点Add
![](http://bbs.sharepoint.org.cn/images/attachicons/attachimg.gif)
选中Create a new data connection to和Receive data,点Next
![](http://bbs.sharepoint.org.cn/images/attachicons/attachimg.gif)
选择Web service,点Next
![](http://bbs.sharepoint.org.cn/images/attachicons/attachimg.gif)
输入web service的URL,格式是 http://MOSS/_vti_bin/UserProfileService.asmx,将MOSS替换成实际的Sharepoint Server的地址,点Next
![](http://bbs.sharepoint.org.cn/images/attachicons/attachimg.gif)
在Web Service列表里面选择GetUserProfileByName,点Next
![](http://bbs.sharepoint.org.cn/images/attachicons/attachimg.gif)
点Next
![](http://bbs.sharepoint.org.cn/images/attachicons/attachimg.gif)
点Next
![](http://bbs.sharepoint.org.cn/images/attachicons/attachimg.gif)
给Data Connection起个名字(可使用默认的),选中Automatically retrieve data when form is opened,点Finished
![](http://bbs.sharepoint.org.cn/images/attachicons/attachimg.gif)
点Close
![](http://bbs.sharepoint.org.cn/images/attachicons/attachimg.gif)
3、在表单上建一个2行2列的表格,第一列的两个单元格分别输入First Name、Last Name,第二列的两个单元格分别插入两个文本框,并将名称改为FistName、LastName
![](http://bbs.sharepoint.org.cn/images/attachicons/attachimg.gif)
A、双击FirstName文本框,点击Default value右边的公式按钮fx
![](http://bbs.sharepoint.org.cn/images/attachicons/attachimg.gif)
B、点 Insert Field or Group
![](http://bbs.sharepoint.org.cn/images/attachicons/attachimg.gif)
C、点Datasource下拉框,选中GetUserProfileByName(Secondary)
![](http://bbs.sharepoint.org.cn/images/attachicons/attachimg.gif)
D、按下图选中Value,并点Filter Data
![](http://bbs.sharepoint.org.cn/images/attachicons/attachimg.gif)
E、点Add
![](http://bbs.sharepoint.org.cn/images/attachicons/attachimg.gif)
F、第一个选项选Select field or group ...
![](http://bbs.sharepoint.org.cn/images/attachicons/attachimg.gif)
G、按下图选中Name,点OK
![](http://bbs.sharepoint.org.cn/images/attachicons/attachimg.gif)
H、第二项保持is equal to不变,第三项选Type text...
![](http://bbs.sharepoint.org.cn/images/attachicons/attachimg.gif)
I、在第三项里面输入FirstName(注:这个FirstName与文本框的名字FirstName没关系,此FirstName非彼FirstName)点OK
![](http://bbs.sharepoint.org.cn/images/attachicons/attachimg.gif)
J、点OK
![](http://bbs.sharepoint.org.cn/images/attachicons/attachimg.gif)
K、点OK
![](http://bbs.sharepoint.org.cn/images/attachicons/attachimg.gif)
L、点OK
![](http://bbs.sharepoint.org.cn/images/attachicons/attachimg.gif)
M、点OK
![](http://bbs.sharepoint.org.cn/images/attachicons/attachimg.gif)
N、如法炮制,将文本框LastName的Value设置成Value[Name="FirstName"],点OK
![](http://bbs.sharepoint.org.cn/images/attachicons/attachimg.gif)
4、将表单发布到MOSS站点,点Open this form in the broswer进行测试
![](http://bbs.sharepoint.org.cn/images/attachicons/attachimg.gif)
5、成功
扩展一下获取用户信息:包括:姓名(中文)、部门、办公室及经理这些信息。
如何找到这些信息所对应的属性名称呢?
打开“管理中心”——》“共享服务器管理”SharedServices-->用户配置文件和属性———》查看配置文件属性
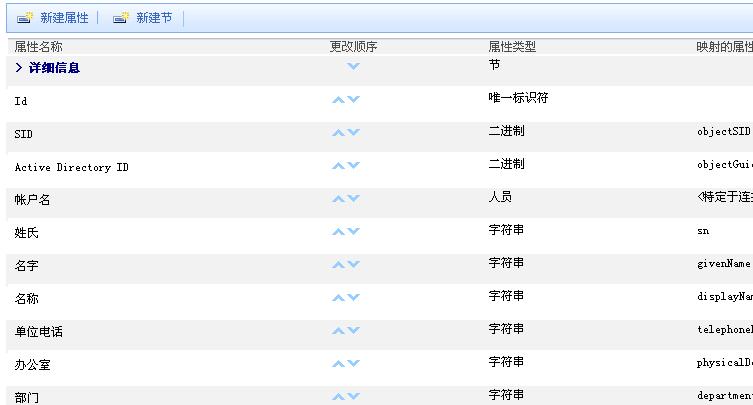
![](https://images.cnblogs.com/cnblogs_com/sango9502/20090306.jpg)
点开对应的“属性名称”
![](https://images.cnblogs.com/cnblogs_com/sango9502/2009030601.jpg)
灰色部门就是我们需要的“属性名称”
这时就可以用name=AccountName
以此类推。