


模块的概念
一个python文件就是一个模块(module)
模块分为3中:python标准库、第三方模块、应用程序自定义模块
模块的导入
1.import 语句
import 模块名
2.from 模块名 import *(不推荐,有可能会导致函数重名引发的一系列问题)
3.from 模块名 import 函数名
4.导入模块时,取的是当前执行文件的绝对路径,如果导入的模块与当前执行文件不在一个路径下,则报错
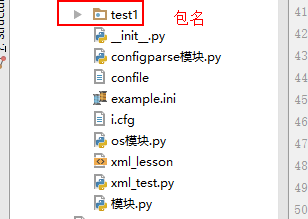
包(package)
为了避免模块名冲突,Python又引入了按目录来组织模块的方法,称为包(Package)
if __name__ == '__main__'
在执行文件中__name__==__main__
在调用文件中__name__=='调用文件的路径'
因此如果文件中某些函数可以被调用,但是某些程序不想被调用,可以在不想被调用的函数前加上 if __name__=='__main__'。调试代码常用到。
常用模块
1.time模块
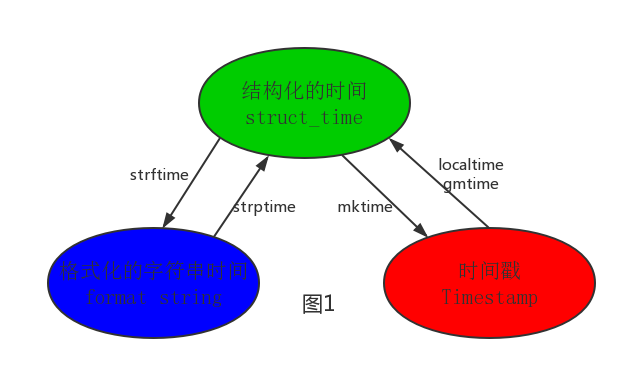
python中有3种表达时间的方式
timestamp:时间戳(通常来说,时间戳表示的是从1970年1月1日00:00:00开始按秒计算的偏移量。我们运行“type(time.time())”,返回的是float类型。)
format string:字符串时间
struct_time:结构化时间(struct_time元组共有9个元素共九个元素:(年,月,日,时,分,秒,一年中第几周,一年中第几天,夏令时))
import time

print(time.time())   #时间戳  1568354974.5475204秒

t=time.localtime()   #结构化时间,当地时间
print(t)
#time.struct_time(tm_year=2019, tm_mon=9, tm_mday=13, tm_hour=14,
# tm_min=9, tm_sec=34, tm_wday=4, tm_yday=256, tm_isdst=0)
print(t.tm_year)   #获取年份

t1=time.gmtime()    #结构化时间,UTC时间

#结构化时间转换成时间戳
print(time.mktime(time.localtime()))

#结构化时间转换成字符串时间
print(time.strftime('%Y-%m-%d %X',time.localtime()))  #%X 表示时分秒   2019-09-13 14:31:26
print(time.strftime('%Y%m%d %X',time.localtime()))    #20190913 14:31:26
#字符串时间转换成结构化时间
print(time.strptime('2019:09:13:14:35:40','%Y:%m:%d:%X'))

print(time.asctime())    #Fri Sep 13 14:39:11 2019   固定格式的字符串时间
print(time.ctime())     #Fri Sep 13 14:39:11 2019
print(time.ctime(1568366797)) #Fri Sep 13 17:26:37 2019

import datetime
print(datetime.datetime.now()) #2019-09-13 14:46:29.546649
2.random模块
import random
random.random()   #随机数,浮点数
random.randint(1,3)   #[1,3]
random.randrange(1,3)   #[1,3)
random.randrange(1,100,2)  # 生成从1到100的间隔为2的随机整数
random.choice([1,'22',[1,2],'ss'])  #随机取列表中的一个值
random.sample([1,'22',[1,2],'ss'],2) #随机取列表中的2个值
random.uniform(1,3)  #1-3之间的一个浮点数

ret5=[1,'22',[1,2],'ss']
random.shuffle(ret5)    #打乱列表顺序
print(ret5)

#验证码
def v_code():
    code=''
    for i in range(5):
        num=random.randint(0,9)
        alf=chr(random.randint(65,122))
        ret=str(random.choice([num,alf]))
        code=code+ret
    return code
3.os模块
os.getcwd() 获取当前工作目录,即当前python脚本工作的目录路径
os.chdir("dirname")  改变当前脚本工作目录;相当于shell下cd
os.curdir  返回当前目录: ('.')
os.pardir  获取当前目录的父目录字符串名:('..')
os.makedirs('dirname1/dirname2')    可生成多层递归目录
os.removedirs('dirname1')    若目录为空,则删除,并递归到上一级目录,如若也为空,则删除,依此类推
os.mkdir('dirname')    生成单级目录;相当于shell中mkdir dirname
os.rmdir('dirname')    删除单级空目录,若目录不为空则无法删除,报错;相当于shell中rmdir dirname
os.listdir('dirname')    列出指定目录下的所有文件和子目录,包括隐藏文件,并以列表方式打印
os.remove()  删除一个文件
os.rename("oldname","newname")  重命名文件/目录
os.stat('path/filename')  获取文件/目录信息
os.sep    输出操作系统特定的路径分隔符,win下为"\\",Linux下为"/"
os.linesep    输出当前平台使用的行终止符,win下为"\t\n",Linux下为"\n"
os.pathsep    输出用于分割文件路径的字符串 win下为;,Linux下为:
os.name    输出字符串指示当前使用平台。win->'nt'; Linux->'posix'
os.system("bash command")  运行shell命令,直接显示
os.environ  获取系统环境变量
os.path.abspath(path)  返回path规范化的绝对路径
os.path.split(path)  将path分割成目录和文件名二元组返回
os.path.dirname(path)  返回path的目录。其实就是os.path.split(path)的第一个元素
os.path.basename(path)  返回path最后的文件名。如何path以/或\结尾,那么就会返回空值。即os.path.split(path)的第二个元素
os.path.exists(path)  如果path存在,返回True;如果path不存在,返回False
os.path.isabs(path)  如果path是绝对路径,返回True
os.path.isfile(path)  如果path是一个存在的文件,返回True。否则返回False
os.path.isdir(path)  如果path是一个存在的目录,则返回True。否则返回False
os.path.join(path1[, path2[, ...]])  将多个路径组合后返回,第一个绝对路径之前的参数将被忽略
os.path.getatime(path)  返回path所指向的文件或者目录的最后存取时间
os.path.getmtime(path)  返回path所指向的文件或者目录的最后修改时间
os.makedirs('name1/name2')  #当前目录下,生成多层递归目录
os.mkdir('name3')   #当前目录下,生成单级目录
os.removedirs('name3')
os.removedirs('name1/name2') #若目录为空,则删除,并递归到上一级目录,如若也为空,则删除,依此类推
os.rmdir('name3')      #删除单级空目录,若目录不为空则无法删除,报错
os.listdir('test1')   #列出指定目录下的所有文件和子目录,包括隐藏文件,并以列表方式打印
os.remove()   #删除一个文件
os.rename("oldname","newname")  #重命名文件/目录

a=r'C:\Users\李金萍\PycharmProjects'
b='untitled\mypython\day21'
# os.path.join()将多个路径组合后返回,第一个绝对路径之前的参数将被忽略
print(os.path.join(a,b))   #--》C:\Users\李金萍\PycharmProjects\untitled\mypython\day21
print(os.path.join(b,a))   #--》C:\Users\李金萍\PycharmProjects
4.sys模块
sys.path 返回模块的搜索路径,初始化时使用PYTHONPATH环境变量的值
sys.platform 返回操作系统平台名称
sys.version 获取Python解释程序的版本信息
sys.exit(n) 退出程序,正常退出时exit(0)
sys.argv 命令行参数List,第一个元素是程序本身路径
import sys
print(sys.path)
# [
# 'C:\\Users\\李金萍\\PycharmProjects\\untitled\\mypython',
#  'C:\\Users\\李金萍\\PycharmProjects\\untitled',
#  'C:\\Program Files\\Python35\\python35.zip',
#  'C:\\Program Files\\Python35\\DLLs',
#  'C:\\Program Files\\Python35\\lib',
#  'C:\\Program Files\\Python35',
#  'C:\\Program Files\\Python35\\lib\\site-packages'
#  ]
print(sys.platform)   #win32
print(sys.version)    #3.5.1 (v3.5.1:37a07cee5969, Dec  6 2015, 01:54:25) [MSC v.1900 64 bit (AMD64)]
# sys.argv[]就是一个从程序外部获取参数的桥梁,得到的是一个列表,而列表第一个元素就是程序本身,随后依次是外部给予的参数
#当前文件:sys模块.py
import sys
ret=sys.argv[1]
print(ret)    #C:/Users/李金萍/PycharmProjects/untitled/mypython/sys模块.py
5.json模块
把对象(变量)从内存中变成可存储或传输的过程称之为序列化,在Python中叫pickling
序列化之后,就可以把序列化后的内容写入磁盘,或者通过网络传输到别的机器上
反过来,把变量内容从序列化的对象重新读到内存里称之为反序列化,即unpickling
要在不同的编程语言之间传递对象,就必须把对象序列化为标准格式,比如XML,但更好的方法是序列化为JSON,因为JSON表示出来就是一个字符串,可以被所有语言读取,也可以方便地存储到磁盘或者通过网络传输。JSON不仅是标准格式,并且比XML更快,而且可以直接在Web页面中读取,非常方便。
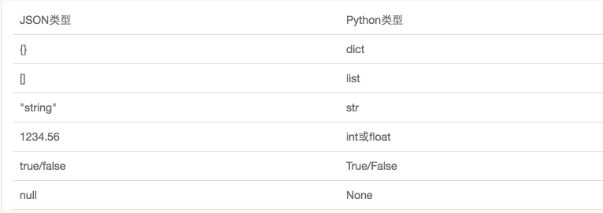
JSON表示的对象就是标准的JavaScript语言的对象,JSON和Python内置的数据类型对应如下:
import json

#dumps
dic={'name':'alex'}
dic_str=json.dumps(dic)   #序列化,转换成json字符串 ,单引号都转换为双引号  '{"name": "alex"}'
f=open('new_hello','w')
f.write(dic_str)

#loads
f_read=open('new_hello','r')
data=json.loads(f_read.read())   #反序列化,得到原始的字典  {'name': 'alex'}
print(data['name'])      #alex

#dump
dic={'name':'alex'}
f=open('new_hello1','w')
json.dump(dic,f)   #用于文件处理,相当于 dic_str=json.dumps(dic)   f.write(dic_str)
# dic_str=json.dumps(dic)
# f.write(dic_str)

#load
f_read=open('new_hello1','r')
data=json.load(f_read)  #用于文件处理
print(data)
6.xml模块
xml是实现不同语言或程序之间进行数据交换的协议
#xml_lesson
<data>
    <country name="Liechtenstein">
        <rank updated="yes">2</rank>
        <year>2008</year>
        <gdppc>141100</gdppc>
        <neighbor name="Austria" direction="E"/>
        <neighbor name="Switzerland" direction="W"/>
    </country>
</data>
#contry下的tag:
#rank 属性(attrib):updated="yes" text:2
#year 无属性,text:2008
#gdppc 无属性,text:2008
#neighbor 两个属性,无文本
import xml.etree.ElementTree as ET

tree=ET.parse('xml_lesson')
root=tree.getroot()
print(root)   #<Element 'data' at 0x00000190D2F7EE08>
for i in root:
    print(i)
# <Element 'data' at 0x00000217D7B9E5E8>
# <Element 'country' at 0x00000217D7D5BF48>
#遍历xml文档
import xml.etree.ElementTree as ET
tree=ET.parse('xml_lesson')
root=tree.getroot()
for child in root:
    print(child.tag, child.attrib)
    for i in child:
        print(i.tag,i.attrib,i.text)
#country {'name': 'Liechtenstein'}
# rank {'updated': 'yes'} 2
# year {} 2008
# gdppc {} 141100
# neighbor {'name': 'Austria', 'direction': 'E'} None
# neighbor {'name': 'Switzerland', 'direction': 'W'} None
#只遍历某个节点
import  xml.etree.ElementTree
tree=xml.etree.ElementTree.parse('xml_lesson')
root=tree.getroot()
for node in root.iter('year'):
    print(node.tag,node.text)
#year 2008
for node in root.iter('neighbor'):
    print(node.tag,node.attrib)
#neighbor {'name': 'Austria', 'direction': 'E'}
# neighbor {'name': 'Switzerland', 'direction': 'W'}
#修改
import xml.etree.ElementTree as ET
tree=ET.parse('xml_lesson')
root=tree.getroot()
for i in root.iter('year'):
    new_year=int(i.text)+3
    i.text=str(new_year)
    i.set('updated','yes')   #增加了一个updated属性,属性值为yes
tree.write('xml_lesson')
#xml_lesson1
<?xml version="1.0"?>
<data>
    <country name="Liechtenstein">
        <rank updated="yes">2</rank>
        <year>2008</year>
        <gdppc>141100</gdppc>
        <neighbor name="Austria" direction="E"/>
        <neighbor name="Switzerland" direction="W"/>
    </country>
    <country name="Singapore">
        <rank updated="yes">5</rank>
        <year>2011</year>
        <gdppc>59900</gdppc>
        <neighbor name="Malaysia" direction="N"/>
    </country>
    <country name="Panama">
        <rank updated="yes">69</rank>
        <year>2011</year>
        <gdppc>13600</gdppc>
        <neighbor name="Costa Rica" direction="W"/>
        <neighbor name="Colombia" direction="E"/>
    </country>
</data>
#删除
import xml.etree.ElementTree as ET
tree=ET.parse('xml_lesson1')
root=tree.getroot()
for country in root.findall('country'):   #findall
    rank=int(country.find('rank').text)     #find
    if rank > 50:
        root.remove(country)              #remove

tree.write('output.xml')
#创建XML文档
import xml.etree.ElementTree as ET
new_xml=ET.Element('namelist')  #创建根节点

name=ET.SubElement(new_xml,'name',attrib={"enrolled":"yes"})   #创建子节点  SubElement(上一级tag,自身tag,属性)
name.text='alice'
age=ET.SubElement(name,'age',attrib={"checked":"no"})
sex = ET.SubElement(name,"sex")
sex.text = '33'

name2 = ET.SubElement(new_xml,"name",attrib={"enrolled":"no"})
age = ET.SubElement(name2,"age")
age.text = '19'

et = ET.ElementTree(new_xml) #生成文档对象
et.write("test916.xml", encoding="utf-8",xml_declaration=True)
ET.dump(new_xml) #打印生成的格式
#生成的文档
<?xml version='1.0' encoding='utf-8'?>
<namelist>
    <name enrolled="yes">alice
        <age checked="no"/>
        <sex>33</sex>
    </name>
    <name enrolled="no">
        <age>19</age>
    </name>
</namelist>
7.logging模块
import logging

logging.debug('debug message')
logging.info('info message')
logging.warning('warning message')
logging.error('error message')
logging.critical('critical message')
#默认打印warming级别及以上的日志
# WARNING:root:warning message
# ERROR:root:error message
# CRITICAL:root:critical message
#设置打印的形式
logging.basicConfig(
    level=logging.DEBUG,
    filename='logger.log',
    filemode='w',
    format='%(asctime)s %(filename)s [%(lineno)d] %(message)s'
    )
# level:设置打印DEBUG级别及以上的日志  filename:将日志打印(追加)到logger.log文件中   filemode:设置打印模式,w:清空重新写入
logging.debug('debug message')
logging.info('info message')
logging.warning('warning message')
logging.error('error message')
logging.critical('critical messag')
#logger.log文件
2019-09-16 15:20:38,383 logging模块.py [38] debug message
2019-09-16 15:20:38,383 logging模块.py [39] info message
2019-09-16 15:20:38,383 logging模块.py [40] warning message
2019-09-16 15:20:38,383 logging模块.py [41] error message
2019-09-16 15:20:38,383 logging模块.py [42] critical messag
format参数中可能用到的格式化串:
%(name)s Logger的名字
%(levelno)s 数字形式的日志级别
%(levelname)s 文本形式的日志级别
%(pathname)s 调用日志输出函数的模块的完整路径名,可能没有
%(filename)s 调用日志输出函数的模块的文件名
%(module)s 调用日志输出函数的模块名
%(funcName)s 调用日志输出函数的函数名
%(lineno)d 调用日志输出函数的语句所在的代码行
%(created)f 当前时间,用UNIX标准的表示时间的浮 点数表示
%(relativeCreated)d 输出日志信息时的,自Logger创建以 来的毫秒数
%(asctime)s 字符串形式的当前时间。默认格式是 “2003-07-08 16:49:45,896”。逗号后面的是毫秒
%(thread)d 线程ID。可能没有
%(threadName)s 线程名。可能没有
%(process)d 进程ID。可能没有
%(message)s用户输出的消息
#同时在屏幕和文件中打印日志
logger=logging.getLogger()       #不填写默认root用户,root为mylogger的父节点
logger1=logging.getLogger('mylogger')
fh=logging.FileHandler('test.log')
ch=logging.StreamHandler()
fm=logging.Formatter('%(asctime)s - %(name)s - %(levelname)s - %(message)s')
logger.setLevel('ERROR')
logger1.setLevel('WARNING')
fh.setFormatter(fm)
ch.setFormatter(fm)
logger.addHandler(fh)
logger.addHandler(ch)
logger1.addHandler(fh)
logger1.addHandler(ch)

logger.debug('hahaha')
logger.info('hahaha')
logger.warning('hahaha')
logger.error('hahaha')
logger.critical('hahaha')

logger1.debug('hello world')
logger1.info('hello world')
logger1.warning('hello world')
logger1.error('hello world')
logger1.critical('hello world')

#mylogger打印完,向上找到父节点,判断父节点是否也有输出,如果是,则再打印一份,所以这里的结果mylogger打印了两份
# 2019-09-16 15:28:59,255 - root - ERROR - hahaha
# 2019-09-16 15:28:59,270 - root - CRITICAL - hahaha
# 2019-09-16 15:28:59,270 - mylogger - WARNING - hello world
# 2019-09-16 15:28:59,270 - mylogger - WARNING - hello world
# 2019-09-16 15:28:59,270 - mylogger - ERROR - hello world
# 2019-09-16 15:28:59,270 - mylogger - ERROR - hello world
# 2019-09-16 15:28:59,270 - mylogger - CRITICAL - hello world
# 2019-09-16 15:28:59,270 - mylogger - CRITICAL - hello world
8.configparse模块
#创建配置文件
import  configparser

config=configparser.ConfigParser()

config["DEFAULT"] = {'ServerAliveInterval': '45',
                     'Compression': 'yes',
                     'CompressionLevel': '9'}

config['bitbucket.org'] = {}
config['bitbucket.org']['User'] = 'hg'

config['topsecret.server.com'] = {}
topsecret = config['topsecret.server.com']
topsecret['Host Port'] = '50022'
topsecret['ForwardX11'] = 'no'

config['DEFAULT']['ForwardX11'] = 'yes'

with open('example.ini', 'w') as configfile:
    config.write(configfile)
#生成的example.ini文件
[DEFAULT]
compression = yes
compressionlevel = 9
serveraliveinterval = 45
forwardx11 = yes

[bitbucket.org]
user = hg

[topsecret.server.com]
host port = 50022
forwardx11 = no
#读取example.ini文件
import configparser
config=configparser.ConfigParser()
config.read('example.ini')
print(config.sections())   #取出块 ['bitbucket.org', 'topsecret.server.com']
print('bite.com' in config)  #False
print(config['DEFAULT']['Compression'])   #yes
print(config['bitbucket.org']['User'])   #hg

for key in config['bitbucket.org']:
    print(key)
# 遍历结果,除了遍历出自身的key,也会把default下面的key也遍历出来
# user
# compression
# compressionlevel
# serveraliveinterval
# forwardx11

print(config.options('bitbucket.org'))
#取出键名
#['user', 'compression', 'compressionlevel', 'serveraliveinterval', 'forwardx11']

print(config.items('bitbucket.org'))
#取出键值对
#[('compression', 'yes'), ('compressionlevel', '9'), ('serveraliveinterval', '45'), ('forwardx11', 'yes'), ('user', 'hg')]

print(config.get('bitbucket.org','compression'))
#yes
#新增/删除/修改操作
import configparser
config=configparser.ConfigParser()
config.read('i.cfg')
config.add_section('yuan1')      #块
config.set('yuan1','k1','123')   #块 键 值
config.set('yuan1','k2','123333')
config.set('yuan1','k3','1234')
config.add_section('yuan2')      #块
config.set('yuan2','k1','www')   #块 键 值
config.set('yuan2','k2','www')
config.set('bitbucket.org','k3','www')
config.set('bitbucket.org','user','pplee')
config.remove_section('topsecret.server.com')  #删除块
config.remove_option('bitbucket.org','user')  #删除块下面的键值对

config.write(open('i.cfg',"w"))
9.hashlib模块
用于加密的相关操作
import hashlib

m=hashlib.md5()           #md5加密
m1=hashlib.md5('qaz#$'.encode('utf-8'))
sha=hashlib.sha256()      #sha256加密
passwd='wss223$%'

m.update(passwd.encode('utf-8'))
m1.update(passwd.encode('utf-8'))
sha.update(passwd.encode('utf-8'))
print(m.hexdigest())     #f16a662126c91bb312419d08f5e8726b
print(m1.hexdigest())    #f100d2f5a559b0c6e8e85203db337d31
print(sha.hexdigest())   #584968ed709045d8093888eea0906e46bcad6780d9e10dda8b72b5434fa013a9
10.re模块
正则表达式:re
元字符:. ^ $ * + ? { } [ ] | ( ) \
import re

#元之符 . ^ $
ret='sadfdgjsadfadlkslle'
print(re.findall('s..e',ret))    #-->['slle']
print(re.findall('s...d',ret))   #-->['sadfd']
print(re.findall('s..f',ret))    #-->['sadf', 'sadf']
print(re.findall('^s..f',ret))   #-->['sadf']  ^表示只能在字符串开头进行匹配
print(re.findall('s..f$',ret))   #-->[]  $表示只能在字符串结尾进行匹配
print(re.findall('l.e$',ret))   #-->['lle']  $表示只能在字符串结尾进行匹配
#元之符  * + ? {}
# *:匹配0到无穷次  +:匹配1到无穷次   都属于贪婪匹配
# ?:匹配0到1次    {}:{0,}==*  {1,}==+   {0,1}==?   {6}重复6次  {1,6}重复1-6次
print(re.findall('d*','dfdddddddddddddddl'))   #-->['d', '', 'ddddddddddddddd', '', '']
print(re.findall('d+','dfdddddddddddddddl'))   #-->['d', 'ddddddddddddddd']
print(re.findall('alick*','sdsdalice'))   #-->['alic']
print(re.findall('alick+','sdsdalice'))   #-->[]
print(re.findall('alem?','asdhfalexxx'))   #-->['ale']
print(re.findall('alex?','asdhfalexxx'))   #-->['alex']
print(re.findall('alex{2}','asdhfalexxx'))   #-->['alexx']
print(re.findall('alex{3}','asdhfalexxx'))   #-->['alexxx']
print(re.findall('alex{0,2}','asdhfalexxx'))   #-->['alexx']
#元之符   字符集[]
#在字符集里有功能的符号: - ^ \
print(re.findall('x[y*z.]p','xyphhx*pssxzpx.p'))  #-->['xyp', 'x*p', 'xzp', 'x.p']
print(re.findall('q[a-z]*','qads9fsdkq1'))         #-:一段范围  ['qads', 'q']
print(re.findall('q[^a-z]*','qads9fsdkq1'))         #^:非的意思  ['q', 'q1']
print(re.findall('\([^()]*\)','12+(34*6-2-5(2-1))')) #\转义 去除特殊功能   ['(2-1)']
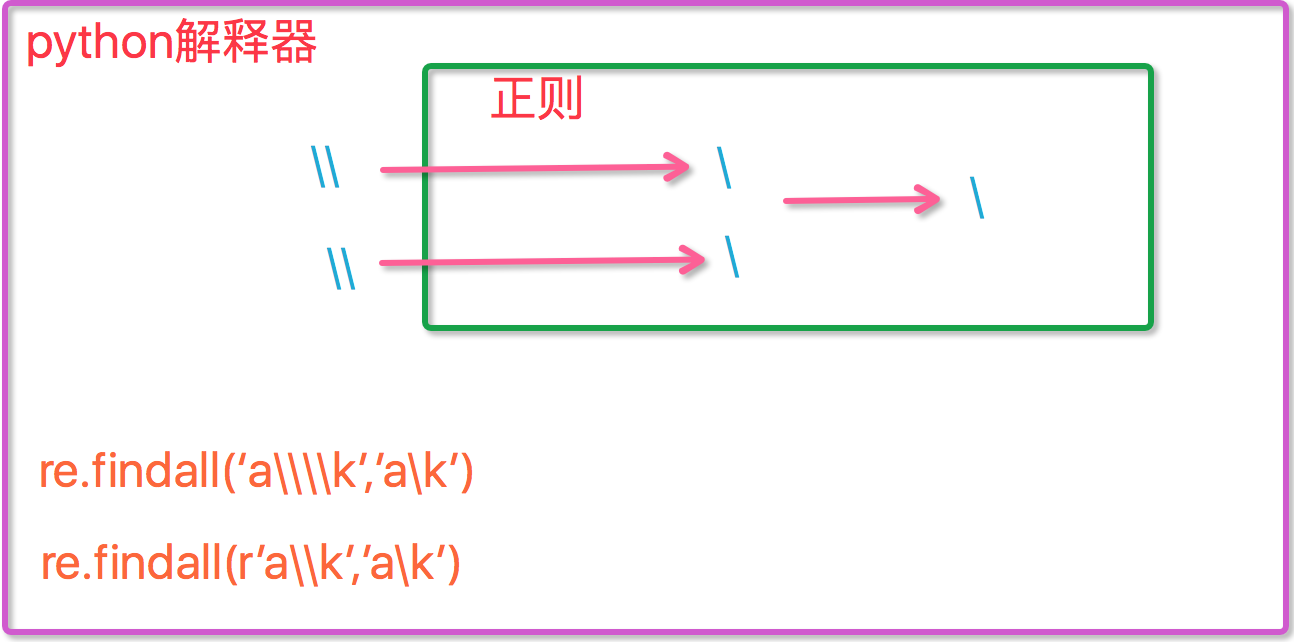
# 元之符  转义符\
# 反斜杠后边跟元字符去除特殊功能,比如\.
# 反斜杠后边跟普通字符实现特殊功能,比如\d

# \d  匹配任何十进制数;它相当于类 [0-9]。
# \D 匹配任何非数字字符;它相当于类 [^0-9]
print(re.findall('\d','ka34kj45ll1'))  #['3', '4', '4', '5', '1']
print(re.findall('\d+','ka34kj45ll1'))  #['34', '45', '1']
print(re.findall('\D','ka34kj45ll1'))  #['k', 'a', 'k', 'j', 'l', 'l']
print(re.findall('\D+','ka34kj45ll1'))  #['ka', 'kj', 'll']

#\s  匹配任何空白字符
#\S 匹配任何非空白字符
print(re.findall('\s','hello world  hhha'))  #[' ', ' ', ' ']
print(re.findall('\s+','hello world  hhha'))  #[' ', '  ']
print(re.findall('\S','hello world'))  #['h', 'e', 'l', 'l', 'o', 'w', 'o', 'r', 'l', 'd']
print(re.findall('\S+','hello world'))  #['hello', 'world']

# \w 匹配任何字母数字字符;它相当于类 [a-zA-Z0-9_]。
# \W 匹配任何非字母数字字符;它相当于类 [^a-zA-Z0-9_]
print(re.findall('\w+','ka34%kj45'))  #['ka34', 'kj45']
print(re.findall('\W+','ka34%kj45'))  #['%']

#\b  匹配一个特殊字符边界,比如空格 ,&,#等
print(re.findall('i','i am ss list'))    #['i', 'i']
print(re.findall('i\b','i am list'))      #[] python解释器传给re模块处理时,需要传入\\,re接受才能接受到转义后的\
print(re.findall('i\\b','i am list'))    #['i']
print(re.findall(r'i\b','i am list'))    #['i'] r表示后面内容不转义
# 元之符  | 或
print(re.findall('ka|b','ckafbc'))  #['ka', 'b']
# 元之符  () 分组
print(re.findall('abc*','abccrabcerab'))  #['abcc', 'abc', 'ab']
print(re.findall('(abc)','abccrabcerab'))    #['abc', 'abc']
print(re.search('(abc)','abccccabc').group())    #search只匹配一个   abc

print(re.search('(?P<name>[a-z]+)','alice34buny45').group())  #alice  ?P<>分组的固定格式  name表示分组的组名
print(re.search('(?P<name>[a-z]+)','alice34buny45').group('name')) #alice
print(re.search('(?P<name>[a-z]+)(?P<id>\d+)','alice34buny45').group('id'))
#34 name和id都表示分组的组名,group里面加上组名取出相应的值
#re模块常用方法
print(re.match('a','abc').group())  #search的基础上,在字符串开头进行匹配
print(re.split('[ |]','hello abc|ccc'))  #先根据空格分隔,再跟据|分割  ['hello', 'abc', 'ccc']
print(re.split('[ab]','abc')) #先按a分割,分割结果为空和bc,bc再根据b分割,结果为空和c,最终结果为['', '', 'c']

print(re.sub('\d+','A','sdf34kjf4567lksd1'))  #根据匹配规则匹配出来的结果替换成A   sdfAkjfAlksdA
print(re.sub('\d+','A','sdf34kjf4567lksd1',1))  #只匹配第一个   sdfAkjf4567lksd1
print(re.subn('\d+','A','sdf34kjf4567lksd1'))   #('sdfAkjfAlksdA', 3)  打印总共匹配的次数

com=re.compile('\d+')    #规则已编译到com中
print(com.findall('asf34adsf8avf890') )     #不用再写规则  ['34', '8', '890']

ret=re.finditer('\d','dsfgerjgergq840rjcfea0r9ffjaergjjg')
print(ret)
#将结果存在迭代器当中,<callable_iterator object at 0x00000203BCE6AB00>
print(next(ret).group())   #8
#re 补充
print(re.findall('www\.(baidu)\.com','www.baidu.com'))  #优先取分组里面的结果  ['baidu']
print(re.findall('www\.(?:baidu)\.com','www.baidu.com')) #在分组中加入?: 去掉优先级  ['www.baidu.com']
学习资料来源:
https://www.cnblogs.com/linhaifeng/articles/6379069.html
https://www.cnblogs.com/yuanchenqi/articles/5732581.html


 5196
5196


 被折叠的 条评论
为什么被折叠?
被折叠的 条评论
为什么被折叠?
 到【灌水乐园】发言


