


写在前面,这个教程不是我原创,只是我换背景的时候找了三篇博文才把背景换好,所以总结一下,让朋友们少走弯路。
改完背景后我发现其实只是把css代码里的背景地址换成我们想要设置的图片地址就可以,所以直接进入第3步就可以,小白的话可以从第1步开始看。
1.先获取背景地址,直接去网上找喜欢的图片的地址就可以了,但是这样的缺点是万一那张图片的地址变了,博客园的背景就跟着变了,所以可以先把背景存博客园相册,不过怕麻烦的话可以直接复制图片地址进入第二步
先把想要设置的背景图上传到自己的博客相册里
步骤:进入博客园首页》右上角我的博客》管理》相册
先建立一个相册,再上传照片

建好以后这个样子,然后点击没有照片,选择文件


2.记录好相册里背景图的url
步骤:点击上传的图片》点击f12查看元素》光标点到图片那里查看图片的url

src后面这一串就是,如果你用浏览器打开这一串地址显示的是这张图片就说明这个这个url是对的
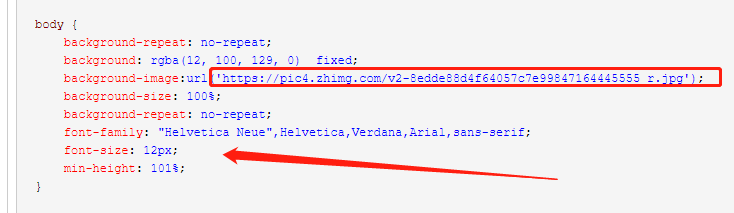
3.修改css代码里body里的图片路径(这一步很关键,我就是卡在这个地方才搞了半天才发现问题)
步骤:点击管理》设置》找到“页面定制css代码”》复制下面这一段代码到框里
white-space: pre;
    word-wrap: normal;
}
.cnblogs-markdown .hljs {
    display: block;
    overflow-x: auto;
    padding: 0.5em;
    background: #23241f !important;
    color: #FFF;
    white-space: pre;
    word-break: normal;
}

.hljs,
.hljs-tag,
.hljs-subst {
  color: #f8f8f2;
}

.hljs-strong,
.hljs-emphasis {
  color: #a8a8a2;
}

.hljs-bullet,
.hljs-quote,
.hljs-number,
.hljs-regexp,
.hljs-literal,
.hljs-link {
  color: #ae81ff;
}

.hljs-code,
.hljs-title,
.hljs-section,
.hljs-selector-class {
  color: #a6e22e;
}

.hljs-strong {
  font-weight: bold;
}

.hljs-emphasis {
  font-style: italic;
}

.hljs-keyword,
.hljs-selector-tag,
.hljs-name,
.hljs-attr {
  color: #f92672;
}

.hljs-symbol,
.hljs-attribute {
  color: #66d9ef;
}

.hljs-params,
.hljs-class .hljs-title {
  color: #f8f8f2;
}

.hljs-string,
.hljs-type,
.hljs-built_in,
.hljs-builtin-name,
.hljs-selector-id,
.hljs-selector-attr,
.hljs-selector-pseudo,
.hljs-addition,
.hljs-variable,
.hljs-template-variable {
  color: #e6db74;
}

.hljs-comment,
.hljs-deletion,
.hljs-meta {
  color: #75715e;
}

.cnblogs_code {
    background-color: rgba(245, 245, 245, 0.05);
}

#AjaxHolder_UpdatePanel1, #AjaxHolder_PostComment_divCommnentArea, #profile, .entrylist, .gallery {
    background: none repeat scroll 0 0 rgba(255, 255, 255, 0.24);
    border-radius: 7px;
    box-shadow: 1px 1px 2px #A7A8AD;
    margin: 0 0 15px 0;
    min-height: 200px;
    overflow: hidden;
    padding: 0 15px;
    text-overflow: ellipsis;
    word-break: break-all;
}


#home {
    margin: 0 auto;
    width: 80%;/*原始65*/
    min-width: 980px;/*页面顶部的宽度*/
    background-color:rgba(185, 171, 171, 0.29);
    padding: 30px;
    margin-top: 50px;
    margin-bottom: 50px;
    box-shadow: 0 2px 6px rgba(100, 100, 100, 0.3);
}


body {
    background-repeat: no-repeat;
    background: rgba(12, 100, 129, 0)  fixed;
    background-image:url('https://pic4.zhimg.com/v2-8edde88d4f64057c7e99847164445555_r.jpg');
    background-size: 100%;
    background-repeat: no-repeat;
    font-family: "Helvetica Neue",Helvetica,Verdana,Arial,sans-serif;
    font-size: 12px;
    min-height: 101%;
}


#blogTitle {
    height: 100px;  /*高度*/
    clear: both;
    background-color: rgba(245, 245, 245, 0);
}
#blogTitle h1 {
    font-size: 36px;
    font-weight: bold;
    line-height: 1.8em;/*原始 1.6em*/
    margin-top: 10px;/*原始 15px */
    color: #548B54;
}
#blogTitle h2 {
    font-weight: normal;
    font-size: 17px;/*原始 16px ;font-size: 1.0rem;*/
    line-height: 1.8;
    color: #FFFFFF;
    font-weight: bold;
    text-align: right;
    float: right;
}
#navigator{
    background-color:rgba(59, 181, 153, 0);
}
#navList a:link, #navList a:visited, #navList a:active{
    color: rgba(29, 15, 15, 0.53);
    font-size: 18px;
    font-weight: bold;
}

#navList a:hover {
    color: white;
    background-color: rgba(52, 52, 52, 0.09);
    text-decoration: none;
    text-shadow: 0px 0px 0px #19d427;
}

.blogStats{
    color: #eee;
}
.postTitle {
    border-left: 8px solid rgba(41, 162, 56, 0.56);
    margin-left: 10px;
    margin-bottom: 10px;
    font-size: 20px;
    float: right;
    width: 100%;
    clear: both;
}
.postTitle a:link, .postTitle a:visited, .postTitle a:active {
    color:rgba(16, 25, 16, 0.43);
    transition: all 0.4s linear 0s;
}
.postTitle a:hover {
    margin-left: 30px;
    color: #0f3647;
    text-decoration: none;
}
.postCon {
    float: right;
    line-height: 1.5em;
    width: 100%;
    clear: both;
    padding: 10px 0;
}

.day .postTitle a {
    padding-left: 10px;
}
.day {
    background: rgba(255, 255, 255, 0);
}
/*文章附加信息*/
.postDesc {
    background: url(images/posted_time.png) no-repeat 0 1px;
    color: #757575;
    float: left;
    width: 100%;
    clear: both;
    text-align: left;
    font-family: "微软雅黑" , "宋体" , "黑体" ,Arial;
    font-size: 13px;
    padding-right: 20px;/*5px  padding-left: 90px;posted 发表时间左边距离*/
    margin-top: 20px;
    line-height: 1.8;
    padding-bottom: 35px;
}

.newsItem, .catListEssay, .catListLink, .catListNoteBook, .catListTag, .catListPostCategory,
.catListPostArchive, .catListImageCategory, .catListArticleArchive, .catListView,
.catListFeedback, .mySearch, .catListComment, .catListBlogRank, .catList, .catListArticleCategory ,#blog-calendar
{
    background: rgba(255, 255, 255, 0.5);
    margin-bottom: 35px;
    word-wrap: break-word;
}

.CalTitle{
    background: rgba(255, 255, 255, 0);
}
.catListTitle{
    background-color: rgba(33, 160, 139, 0);
}

.catListTitle {
    background: rgba(51, 153, 0, 0);
    border-bottom: 1px solid #006600;
    border-top-left-radius: 7px;
    border-top-right-radius: 7px;
    color: rgba(37, 177, 80, 0.61);
    font-size: 1.3em;
    height: 1.8em;
    line-height: 1.8em;
    padding: 6px;
    text-indent: 0.6em;
    text-shadow: 0px 0px rgba(0, 0, 0, 0.3);
}

#topics{
    background: rgba(255, 255, 255, 0.5);
}

.c_ad_block{
    display: none;
}

#tbCommentBody{
    width: 100%;
    height: 200px;
    background: rgba(255, 255, 255, 0.5);
}

#q{background: rgba(255, 255, 255, 0);}

.CalNextPrev{background: rgba(255, 255, 255, 0);}
在上面这一串代码中找到body,把body里的url换成背景图的url,注意:url括号里有个引号,不要漏了,我第一次改的时候漏了就出错了,箭头指的大概是背景图的大小,我第一次复制的另外个博主的代码改出来就是n张背景图拼接的,换成这个大小以后就是一张很大的背景图了
都改好以后点击保存就可以了,不必禁用模板默认css
如果改完以后博客依然不是自己改的背景图的话,可能是自己之前选的皮肤和自己的背景图样式冲突,再把皮肤改成darkgreentrip就可以了,如果还不可以的话.......就自己检查一下,反正这样改百分之百能成功,我写这篇文章就又改了一次,嘿嘿


 471
471


 被折叠的 条评论
为什么被折叠?
被折叠的 条评论
为什么被折叠?
 到【灌水乐园】发言


