前几节我们讲了如何布局,如何使用控件。这一节我们主要讲如何操作控件。
安卓提供了一个很好的框架,并且内置了相应控件的java组件代码。我们一般通过findViewById方法来获取控件对象。
看一段代码:
package com.example.androidtest;
import android.app.Activity;
import android.os.Bundle;
import android.view.Window;
import android.widget.TextView;
/**
* 安卓入口文件
* @author zhuli.zhul
* @date 2013 2013-6-5 下午3:09:14
*/
public class MainActivity extends Activity {
/**
* 页面布局
*/
protected void onCreate(Bundle savedInstanceState) {
super.onCreate(savedInstanceState);
requestWindowFeature(Window.FEATURE_NO_TITLE);
setContentView(R.layout.activity_main); //设置一个View模板
//通过findViewById方法获取TextView对象,并且setText进行赋值
TextView textView = (TextView) findViewById(R.id.textView1);
textView.setText("Hello World");
}
}
android:layout_width="fill_parent"
android:layout_height="fill_parent" >
android:id="@+id/textView1"
android:layout_width="wrap_content"
android:layout_height="wrap_content"
android:layout_alignParentLeft="true"
android:layout_alignParentTop="true"
android:layout_marginLeft="95dp"
android:layout_marginTop="69dp"
android:text="TextView" />
上面的Java代码很简单,主要是在页面渲染的时候,通过findViewById来获取TextView对象,然后操作XML中的TextView控件,改变text文本内容。所以在页面上显示的是“Hello World”的文字。
我们在什么请况下可以使用findViewById:
1. 在Activity中,因为所有的Activity都会继承安卓自身的Activity基类。并且这个基类中自带了findViewById方法。通过ID获取View视图对象。ID对应XML中的android:id="@+id/textView1"。可以看一下基类Activity中的这个findViewById方法:
/**
* Finds a view that was identified by the id attribute from the XML that
* was processed in {@link #onCreate}.
*
* @return The view if found or null otherwise.
*/
public View findViewById(int id) {
return getWindow().findViewById(id);
}
2. View对象中,自带findViewById。所以也可以通过view.findViewById方法调用。其实Activity中的findViewById最终也是调用了View对象中的函数。看下View中的这个方法:
/**
* Look for a child view with the given id. If this view has the given
* id, return this view.
*
* @param id The id to search for.
* @return The view that has the given id in the hierarchy or null
*/
public final View findViewById(int id) {
if (id < 0) {
return null;
}
return findViewTraversal(id);
}
新增一个Button控件,并且绑定Onlick事件,代码:
package com.example.androidtest;
import android.app.Activity;
import android.os.Bundle;
import android.view.View;
import android.view.Window;
import android.widget.Button;
import android.widget.TextView;
import android.widget.Toast;
/**
* 安卓入口文件
* @author zhuli.zhul
* @date 2013 2013-6-5 下午3:09:14
*/
public class MainActivity extends Activity {
/**
* 页面布局
*/
protected void onCreate(Bundle savedInstanceState) {
super.onCreate(savedInstanceState);
requestWindowFeature(Window.FEATURE_NO_TITLE);
setContentView(R.layout.activity_main); //设置一个View模板
//通过findViewById方法获取TextView对象,并且setText进行赋值
TextView textView = (TextView) findViewById(R.id.textView1);
textView.setText("Hello World");
//获取Button对象,并且绑定onclick事件
Button button1 = (Button) findViewById(R.id.button1);
button1.setOnClickListener(new View.OnClickListener() {
@Override
public void onClick(View v) {
Toast.makeText(getBaseContext(), "YES2!" + v.getTag(), Toast.LENGTH_SHORT).show();
}
});
}
}
android:layout_width="fill_parent"
android:layout_height="fill_parent" >
android:id="@+id/textView1"
android:layout_width="wrap_content"
android:layout_height="wrap_content"
android:layout_alignParentLeft="true"
android:layout_alignParentTop="true"
android:layout_marginLeft="95dp"
android:layout_marginTop="69dp"
android:text="TextView" />
android:id="@+id/button1"
android:layout_width="wrap_content"
android:layout_height="wrap_content"
android:layout_alignLeft="@+id/textView1"
android:layout_below="@+id/textView1"
android:layout_marginTop="52dp"
android:text="Button"
android:tag="Hell"/>
说明:我们通过findViewById获取到Button对象,并且绑定了一个Onclick点击事件。点击事件中弹出一个消息框,参数View v其实就是当前的View-button对象,从这个对象中,我们获取它的tag属性,并且显示出来。
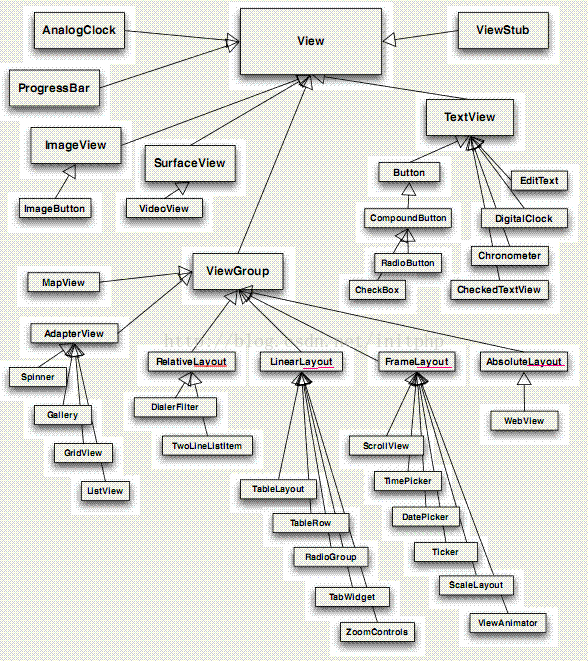
从上面,我们可以看出,View实际是一个Base Class,可以衍生出TextView,Button等各种控件对象子类,可以看下这些子类组件和View之间的关系图:

每个对象的所包含能操作的方法很多,例如:
TextView textView = (TextView) findViewById(R.id.textView1);
textView.setText("Hello World");
这段代码是对TextView设置内容。具体的这些方法有多少,怎么用,如何用,可以点击进TextView对象中一看究竟。这边就不多说了。


 1211
1211


 被折叠的 条评论
为什么被折叠?


