


分析 Layer Spy 这个 demo,官网介绍是:
Layer rendering can be manipulated in prerender and postrender event listeners. These listeners get an event with a reference to the Canvas rendering context. In this example, the prerender listener sets a clipping mask around the most recent mouse position, giving you a spyglass effect for viewing one layer over another.
Move around the map to see the effect. Use the ↑ up and ↓ down arrow keys to adjust the spyglass size.
图层渲染是被prerender和postrender事件监听器控制的。这些监听器获得一个带有 Canvas 渲染上下文引用的事件。在这个例子中,prerender事件监听器在最近的鼠标位置处设置一个剪贴蒙版,这个剪贴蒙版能让你用看望远镜的感觉来观察普通地图图层上面的航拍图层。
在地图上移动鼠标来查看效果。使用 ↑ 上键 和 ↓ 下键来调整望远镜的大小。
官网实例:Layer Spy
跟我学 OpenLayers——基础实例讲解:12 渲染器机制的使用 > 实例 84.图层遮罩

定义基本结构
在这里应用了必应地图的普通带道路地图(RoadOnDemand)和航拍地图(Aerial),可以发现跟之前地图的source定义相比,多了一个必填的key,这个key是用 bing 地图的开发者账号来申请的,申请链接:http://www.bingmapsportal.com/。
1
2
3
4
5
6
7
8
9
10
11
12
13
14
15
16
17
18
19
20
21
22
23
24
25
26
27
28
29
30
31
32
33
34
35
36
37
38
39
40
41
42
43
44
45
46
47
48
49
50
51
rel="stylesheet"
href="https://cdn.jsdelivr.net/gh/openlayers/openlayers.github.io@master/en/v6.1.1/css/ol.css"
type="text/css"
/>
Layer Spy(图层探查)html,
body,
.map {
height: 100%;
width: 100%;
}
// 必应地图的申请的key
let key = "Your Bing Maps Key from http://www.bingmapsportal.com/ here";
// 带道路的普通地图
let roads = new ol.layer.Tile({
source: new ol.source.BingMaps({ key: key, imagerySet: "RoadOnDemand" })
});
// 航拍地图
let imagery = new ol.layer.Tile({
source: new ol.source.BingMaps({ key: key, imagerySet: "Aerial" })
});
let container = document.getElementById("map");
let map = new ol.Map({
layers: [roads, imagery],
target: container,
view: new ol.View({
// 设定视图中心
center: ol.proj.fromLonLat([-109, 46.5]),
zoom: 6
})
});
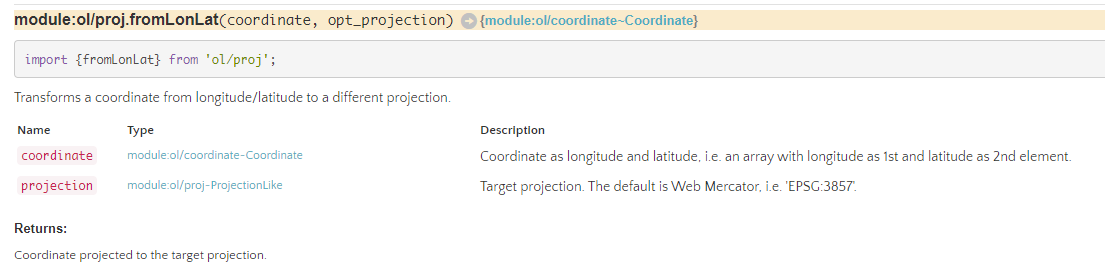
在map中设置view中center的时候,使用了ol.proj.fromLonLat,如下图所示,可以把经纬度转化为指定坐标系下的坐标,默认为EPSG:3857坐标系。
监听鼠标和键盘事件
修改望远镜大小
首先给望远镜设置一个初始大小 75px,然后监听键盘按下(keydown)事件,同时通过被按下键which属性,也就是keyCode或者charCode来判断是哪一个键(which是一个已经从 web 标准中弃用的事件属性,推荐使用key或者code代替)。
在计算radius(半径)的时候,同时给radius限制了最大值和最小值。在修改了radius后重新渲染地图并阻止按键的默认事件。
1
2
3
4
5
6
7
8
9
10
11
12
13
14
15
16
17
18// 设定圆圈的半径
let radius = 75;
// 当按上方向键时放大圆圈,按下方向键时缩小圆圈,同时渲染地图并阻止按键默认事件
document.addEventListener("keydown", evt => {
// 38为↑键
if (evt.which === 38) {
// 最大半径150
radius = Math.min(radius + 5, 150);
map.render();
evt.preventDefault();
// 40为↓键
} else if (evt.which === 40) {
// 最小半径25
radius = Math.max(radius - 5, 25);
map.render();
evt.preventDefault();
}
});
保存鼠标位置
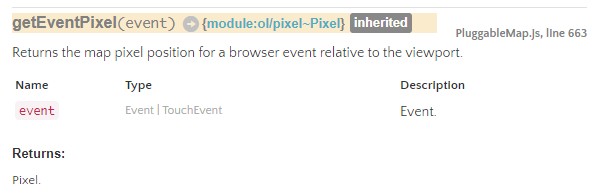
因为需要让望远镜跟随鼠标移动,所以需要监听鼠标位置的变化。如代码所示,监听mousemove,同时利用getEventPixel来获取浏览器事件相对于视区的像素位置,也就是鼠标相对于地图的位置,最后再渲染地图。
1
2
3
4
5
6
7
8
9
10
11
12
13// 存放鼠标的像素位置
let mousePosition = null;
// 鼠标移动时把位置传给mousePosition并渲染
container.addEventListener("mousemove", event => {
// https://openlayers.org/en/latest/apidoc/module-ol_Map-Map.html#getEventPixel
mousePosition = map.getEventPixel(event);
map.render();
});
// 鼠标离开地图时清空mouserPosition并渲染
container.addEventListener("mouseout", () => {
mousePosition = null;
map.render();
});
绘制望远镜
绘制望远镜圆圈的代码如下所示:
1
2
3
4
5
6
7
8
9
10
11
12
13
14
15
16
17
18
19
20
21
22
23
24
25
26
27
28
29
30
31// 在渲染图层之前,做一些clipping
imagery.on("prerender", event => {
let ctx = event.context;
// 获取像素比,普通屏幕应该为1
let pixelRatio = event.frameState.pixelRatio;
ctx.save();
ctx.beginPath();
// 当mousePosition不为null时才执行
if (mousePosition) {
// canvas绘制圆圈
ctx.arc(
mousePosition[0] * pixelRatio,
mousePosition[1] * pixelRatio,
radius * pixelRatio,
0,
2 * Math.PI
);
ctx.lineWidth = 5 * pixelRatio;
ctx.strokeStyle = "rgba(0,0,0,0.5)";
ctx.stroke();
}
// 仅显示imagery中画圆圈的部分
// https://www.w3school.com.cn/tiy/t.asp?f=html5_canvas_clip
ctx.clip();
});
// 在图层渲染之后,重置canvas上下文
imagery.on("postrender", event => {
let ctx = event.context;
ctx.restore();
});
在imagery图层上监听事件prerender和postrender,prerender是图层渲染之前触发,postrender是图层渲染之后触发。
在prerender事件中,首先拿到pixelRatio,通过API可以发现实际上是window.devicePixelRatio,简单点说,就是一个渲染出来的像素大小与设备像素的大小比值,一般情况下,普通屏幕都是1,高清屏幕为2。
再获取上下文context,熟悉 canvas 绘制的同志们肯定很熟悉。这里需要先save,然后再开始绘制,绘制完成以后还需要clip一下,才会把绘制好的圆圈截取出来(关于clip的作用可以看这里)。
最后的时候,还需要在postrender的时候使用restore重置上下文环境到save的位置,清空 canvas,为下一次渲染做准备。不断循环渲染就能实现了跟随鼠标的望远镜效果。
全部代码
最后贴上全部代码,key需要自己申请。
1
2
3
4
5
6
7
8
9
10
11
12
13
14
15
16
17
18
19
20
21
22
23
24
25
26
27
28
29
30
31
32
33
34
35
36
37
38
39
40
41
42
43
44
45
46
47
48
49
50
51
52
53
54
55
56
57
58
59
60
61
62
63
64
65
66
67
68
69
70
71
72
73
74
75
76
77
78
79
80
81
82
83
84
85
86
87
88
89
90
91
92
93
94
95
96
97
98
99
100
101
102
103
104
105
106
107
108
109
110
111
112
rel="stylesheet"
href="https://cdn.jsdelivr.net/gh/openlayers/openlayers.github.io@master/en/v6.1.1/css/ol.css"
type="text/css"
/>
Layer Spy(图层探查)html,
body,
.map {
height: 100%;
width: 100%;
}
// 必应地图的申请的key
let key = "Your Bing Maps Key from http://www.bingmapsportal.com/ here";
// 带道路的普通地图
let roads = new ol.layer.Tile({
source: new ol.source.BingMaps({ key: key, imagerySet: "RoadOnDemand" })
});
// 航拍地图
let imagery = new ol.layer.Tile({
source: new ol.source.BingMaps({ key: key, imagerySet: "Aerial" })
});
let container = document.getElementById("map");
let map = new ol.Map({
layers: [roads, imagery],
target: container,
view: new ol.View({
// 设定视图中心
center: ol.proj.fromLonLat([-109, 46.5]),
zoom: 6
})
});
// 设定圆圈的半径
let radius = 75;
// 当按上方向键时放大圆圈,按下方向键时缩小圆圈,同时渲染地图并阻止按键默认事件
document.addEventListener("keydown", evt => {
if (evt.which === 38) {
// 最大半径150
radius = Math.min(radius + 5, 150);
map.render();
evt.preventDefault();
} else if (evt.which === 40) {
// 最小半径25
radius = Math.max(radius - 5, 25);
map.render();
evt.preventDefault();
}
});
// 存放鼠标的像素位置
let mousePosition = null;
// 鼠标移动时把位置传给mousePosition并渲染
container.addEventListener("mousemove", event => {
mousePosition = map.getEventPixel(event);
map.render();
});
// 鼠标离开地图时清空mouserPosition并渲染
container.addEventListener("mouseout", () => {
mousePosition = null;
map.render();
});
// 在渲染图层之前,做一些clipping
imagery.on("prerender", event => {
let ctx = event.context;
// 获取像素比,普通屏幕应该为1
let pixelRatio = event.frameState.pixelRatio;
ctx.save();
ctx.beginPath();
// 当mousePosition不为null时才执行
if (mousePosition) {
// canvas绘制圆圈
ctx.arc(
mousePosition[0] * pixelRatio,
mousePosition[1] * pixelRatio,
radius * pixelRatio,
0,
2 * Math.PI
);
ctx.lineWidth = 5 * pixelRatio;
ctx.strokeStyle = "rgba(0,0,0,0.5)";
ctx.stroke();
}
// 仅显示imagery中画圆圈的部分
ctx.clip();
});
// 在图层渲染之后,重置canvas上下文
imagery.on("postrender", event => {
let ctx = event.context;
ctx.restore();
});


 297
297


 被折叠的 条评论
为什么被折叠?
被折叠的 条评论
为什么被折叠?
 到【灌水乐园】发言


