


前言
我可能有三年没怎么碰C#了,目前的工作是在全职搞前端,最近有时间抽空看了一下Asp.net Core,Core版本号都到了5.0了,也越来越好用了,下面将记录一下这几天以来使用Asp.Net Core WebApi+Dapper+Mysql+Redis+Docker的一次开发过程。
项目结构
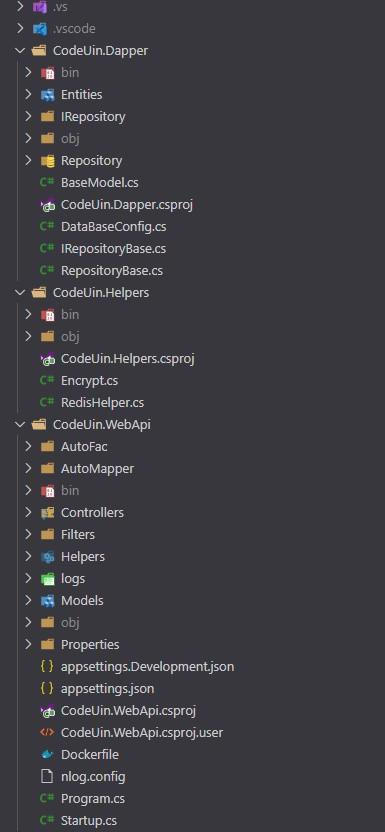
最终项目结构如下,CodeUin.Dapper数据访问层,CodeUin.WebApi应用层,其中涉及到具体业务逻辑的我将直接写在Controllers中,不再做过多分层。CodeUin.Helpers我将存放一些项目的通用帮助类,如果是只涉及到当前层的帮助类将直接在所在层级种的Helpers文件夹中存储即可。
安装环境
MySQL
# 下载镜像
docker pull mysql
# 运行
docker run-itd --name 容器名称 -p 3306:3306 -e MYSQL_ROOT_PASSWORD=你的密码 mysql
如果正在使用的客户端工具连接MySQL提示1251,这是因为客户端不支持新的加密方式造成的,解决办法如下。

# 查看当前运行的容器
dockerps# 进入容器
docker exec-it 容器名称 bash
# 访问MySQL
mysql-u root -p
# 查看加密规则selecthost,user,plugin,authentication_string from mysql.user;
# 对远程连接进行授权
GRANT ALL PRIVILEGES ON*.* TO 'root'@'%'WITH GRANT OPTION;
# 更改密码加密规则
ALTER USER'root'@'%' IDENTIFIED WITH mysql_native_password BY '你的密码';
# 刷新权限
flush privileges;
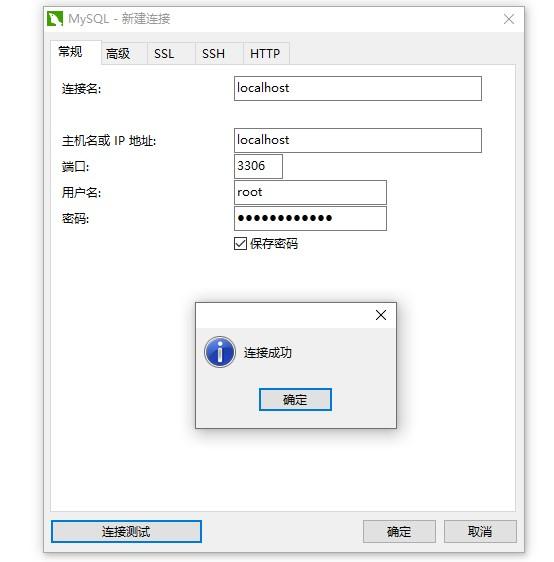
最后,使用MySQL客户端工具进行连接测试,我使用的工具是Navicat Premium。
Redis
# 下载镜像
docker pull redis
# 运行
docker run-itd -p 6379:6379 redis
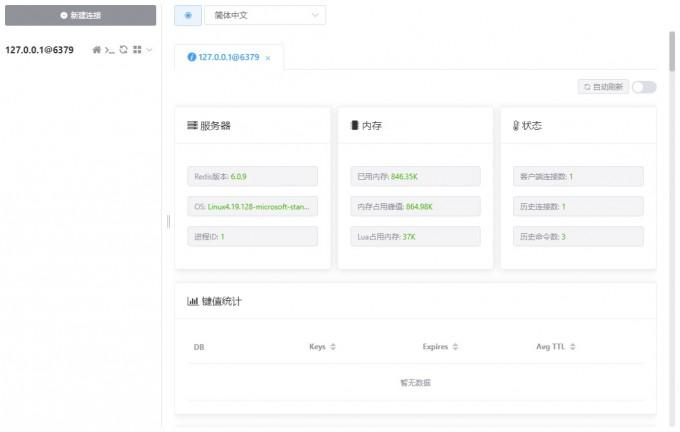
使用Redis客户端工具进行连接测试,我使用的工具是Another Redis DeskTop Manager。
.NET 环境
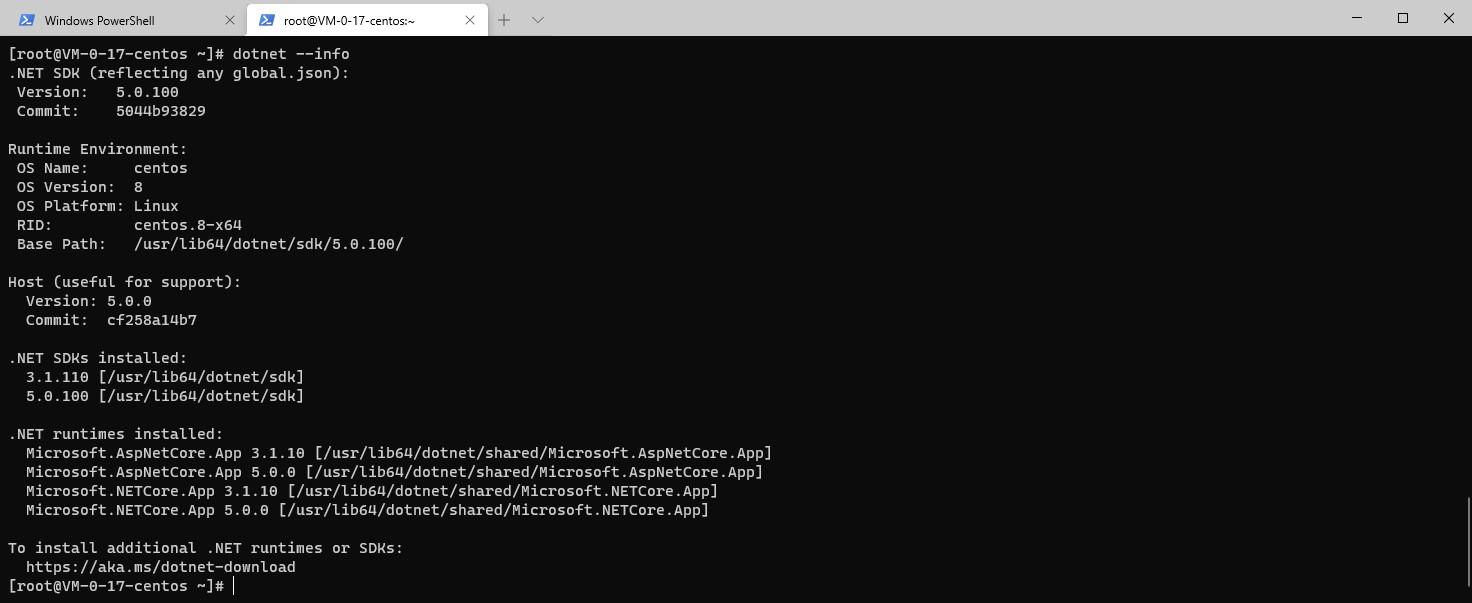
服务器我使用的是CentOS 8,使用的NET SDK版本5.0,下面将记录我是如何在CentOS 8中安装.NET SDK和.NET运行时的。
# 安装SDKsudo dnf install dotnet-sdk-5.0# 安装运行时sudo dnf install aspnetcore-runtime-5.0
检查是否安装成功,使用dotnet --info命令查看安装信息
创建项目
下面将实现一个用户的登录注册,和获取用户信息的小功能。
数据服务层
该层设计参考了 玉龙雪山 的架构,我也比较喜欢这种结构,一看结构就知道是要做什么的,简单清晰。
首先,新建一个项目命名为CodeUin.Dapper,只用来提供接口,为业务层服务。
Entities
存放实体类
IRepository
存放仓库接口
Repository
存放仓库接口实现类
BaseModel
实体类的基类,用来存放通用字段
DataBaseConfig
数据访问配置类
IRepositoryBase
存放最基本的仓储接口 增删改查等
RepositoryBase
基本仓储接口的具体实现

创建BaseModel基类
该类存放在项目的根目录下,主要作用是将数据库实体类中都有的字段独立出来。
1 usingSystem;2
3 namespaceCodeUin.Dapper4 {5 ///
6 ///基础实体类7 ///
8 public classBaseModel9 {10 ///
11 ///主键Id12 ///
13 public int Id { get; set; }14
15 ///
16 ///创建时间17 ///
18 public DateTime CreateTime { get; set; }19 }20 }
创建DataBaseConfig类
该类存放在项目的根目录下,我这里使用的是MySQL,需要安装以下依赖包,如果使用的其他数据库,自行安装对应的依赖包即可。
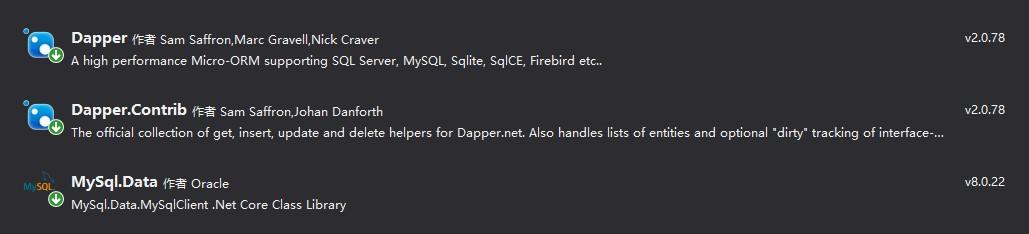
该类具体代码如下:
1 usingMySql.Data.MySqlClient;2 usingSystem.Data;3
4 namespaceCodeUin.Dapper5 {6 public classDataBaseConfig7 {8 private static string MySqlConnectionString = @"Data Source=数据库地址;Initial Catalog=codeuin;Charset=utf8mb4;User ID=root;Password=数据库密码;";9
10 public static IDbConnection GetMySqlConnection(string sqlConnectionString = null)11 {12 if (string.IsNullOrWhiteSpace(sqlConnectionString))13 {14 sqlConnectionString =MySqlConnectionString;15 }16 IDbConnection conn = newMySqlConnection(sqlConnectionString);17 conn.Open();18 returnconn;19 }20 }21 }
创建IRepositoryBase类
该类存放在项目的根目录下,存放常用的仓储接口。
1 usingSystem;2 usingSystem.Collections.Generic;3 usingSystem.Threading.Tasks;4
5 namespaceCodeUin.Dapper6 {7 public interface IRepositoryBase
8 {9 Task Insert(T entity, stringinsertSql);10
11 Task Update(T entity, stringupdateSql);12
13 Task Delete(int Id, stringdeleteSql);14
15 Task> Select(stringselectSql);16
17 Task Detail(int Id, stringdetailSql);18 }19 }
创建RepositoryBase类
该类存放在项目的根目录下,是IRepositoryBase类的具体实现。
1 usingDapper;2 usingSystem.Collections.Generic;3 usingSystem.Data;4 usingSystem.Linq;5 usingSystem.Threading.Tasks;6
7 namespaceCodeUin.Dapper8 {9 public class RepositoryBase : IRepositoryBase
10 {11 public async Task Delete(int Id, stringdeleteSql)12 {13 using (IDbConnection conn =DataBaseConfig.GetMySqlConnection())14 {15 await conn.ExecuteAsync(deleteSql, new{ Id });16 }17 }18
19 public async Task Detail(int Id, stringdetailSql)20 {21 using (IDbConnection conn =DataBaseConfig.GetMySqlConnection())22 {23 return await conn.QueryFirstOrDefaultAsync(detailSql, new{ Id });24 }25 }26
27 public async Task> ExecQuerySP(stringSPName)28 {29 using (IDbConnection conn =DataBaseConfig.GetMySqlConnection())30 {31 return await Task.Run(() => conn.Query(SPName, null, null, true, null, CommandType.StoredProcedure).ToList());32 }33 }34
35 public async Task Insert(T entity, stringinsertSql)36 {37 using (IDbConnection conn =DataBaseConfig.GetMySqlConnection())38 {39 return awaitconn.ExecuteAsync(insertSql, entity);40 }41 }42
43 public async Task> Select(stringselectSql)44 {45 using (IDbConnection conn =DataBaseConfig.GetMySqlConnection())46 {47 return await Task.Run(() => conn.Query(selectSql).ToList());48 }49 }50
51 public async Task Update(T entity, stringupdateSql)52 {53 using (IDbConnection conn =DataBaseConfig.GetMySqlConnection())54 {55 awaitconn.ExecuteAsync(updateSql, entity);56 }57 }58 }59 }
好了,基础类基本已经定义完成。下面将新建一个Users类,并定义几个常用的接口。
创建Users实体类
该类存放在Entities文件夹中,该类继承BaseModel。
1 namespaceCodeUin.Dapper.Entities2 {3 ///
4 ///用户表5 ///
6 public classUsers : BaseModel7 {8 ///
9 ///用户名10 ///
11 public string UserName { get; set; }12
13 ///
14 ///密码15 ///
16 public string Password { get; set; }17
18 ///
19 ///盐20 ///
21 public string Salt { get; set; }22
23 ///
24 ///邮箱25 ///
26 public string Email { get; set; }27
28 ///
29 ///手机号30 ///
31 public string Mobile { get; set; }32
33 ///
34 ///性别35 ///
36 public int Gender { get; set; }37
38 ///
39 ///年龄40 ///
41 public int Age { get; set; }42
43 ///
44 ///头像45 ///
46 public string Avatar { get; set; }47
48 ///
49 ///是否删除50 ///
51 public int IsDelete { get; set; }52 }53 }
创建IUserRepository类
该类存放在IRepository文件夹中,继承IRepositoryBase,并定义了额外的接口。
1 usingCodeUin.Dapper.Entities;2 usingSystem;3 usingSystem.Collections.Generic;4 usingSystem.Threading.Tasks;5
6 namespaceCodeUin.Dapper.IRepository7 {8 public interface IUserRepository : IRepositoryBase
9 {10 Task>GetUsers();11
12 TaskAddUser(Users entity);13
14 Task DeleteUser(intd);15
16 Task GetUserDetail(intid);17
18 Task GetUserDetailByEmail(stringemail);19 }20 }
创建UserRepository类
该类存放在Repository文件夹中,继承RepositoryBase, IUserRepository ,是IUserRepository类的具体实现。
1 usingCodeUin.Dapper.Entities;2 usingCodeUin.Dapper.IRepository;3 usingDapper;4 usingSystem.Collections.Generic;5 usingSystem.Data;6 usingSystem.Threading.Tasks;7
8 namespaceCodeUin.Dapper.Repository9 {10 public class UserRepository : RepositoryBase, IUserRepository11 {12 public async Task DeleteUser(intid)13 {14 string deleteSql = "DELETE FROM [dbo].[Users] WHERE Id=@Id";15 awaitDelete(id, deleteSql);16 }17
18
19 public async Task GetUserDetail(intid)20 {21 string detailSql = @"SELECT Id, Email, UserName, Mobile, Password, Age, Gender, CreateTime,Salt, IsDelete FROM Users WHERE Id=@Id";22 return awaitDetail(id, detailSql);23 }24
25 public async Task GetUserDetailByEmail(stringemail)26 {27 string detailSql = @"SELECT Id, Email, UserName, Mobile, Password, Age, Gender, CreateTime, Salt, IsDelete FROM Users WHERE Email=@email";28
29 using (IDbConnection conn =DataBaseConfig.GetMySqlConnection())30 {31 return await conn.QueryFirstOrDefaultAsync(detailSql, new{ email });32 }33 }34
35 public async Task>GetUsers()36 {37 string selectSql = @"SELECT * FROM Users";38 return awaitSelect(selectSql);39 }40
41 public async TaskAddUser(Users entity)42 {43 string insertSql = @"INSERT INTO Users (UserName, Gender, Avatar, Mobile, CreateTime, Password, Salt, IsDelete, Email) VALUES (@UserName, @Gender, @Avatar, @Mobile, now(),@Password, @Salt, @IsDelete,@Email);SELECT @id= LAST_INSERT_ID();";44 return awaitInsert(entity, insertSql);45 }46 }47 }
大功告成,接下来需要手动创建数据库和表结构,不能像使用EF那样自动生成了,使用Dapper基本上是要纯写SQL的,如果想像EF那样使用,就要额外的安装一个扩展 Dapper.Contrib。
数据库表结构如下,比较简单。
DROP TABLE IF EXISTS`Users`;CREATE TABLE`Users` (
`Id`int(11) NOT NULL AUTO_INCREMENT COMMENT '主键',
`Email`varchar(255) DEFAULT NULL COMMENT '邮箱',
`UserName`varchar(20) DEFAULT NULL COMMENT '用户名称',
`Mobile`varchar(11) DEFAULT NULL COMMENT '手机号',
`Age`int(11) DEFAULT NULL COMMENT '年龄',
`Gender`int(1) DEFAULT '0' COMMENT '性别',
`Avatar`varchar(255) DEFAULT NULL COMMENT '头像',
`Salt`varchar(255) DEFAULT NULL COMMENT '加盐',
`Password`varchar(255) DEFAULT NULL COMMENT '密码',
`IsDelete`int(2) DEFAULT '0' COMMENT '0-正常 1-删除',
`CreateTime`datetime DEFAULT CURRENT_TIMESTAMP COMMENT '创建时间',PRIMARY KEY(`Id`),UNIQUE KEY`USER_MOBILE_INDEX` (`Mobile`) USING BTREE
) ENGINE=InnoDB AUTO_INCREMENT=10000 DEFAULT CHARSET=utf8mb4 COMMENT='用户信息表';
好了,数据访问层大概就这样子了,下面来看看应用层的具体实现方式。
应用程序层
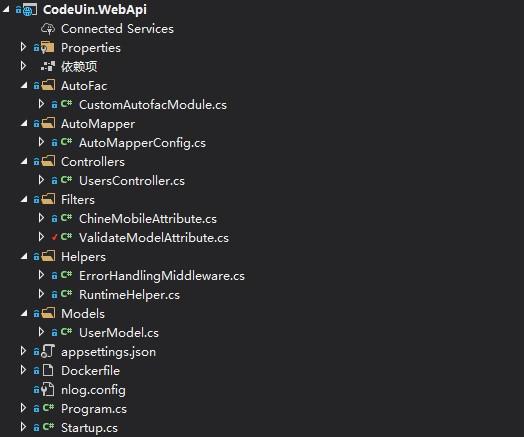
创建一个WebApi项目,主要对外提供Api接口服务,具体结构如下。
Autofac
存放IOC 依赖注入的配置项
AutoMapper
存放实体对象映射关系的配置项
Controllers
控制器,具体业务逻辑也将写在这
Fliters
存放自定义的过滤器
Helpers
存放本层中用到的一些帮助类
Models
存放输入/输出/DTO等实体类
好了,结构大概就是这样。错误优先,先处理程序异常,和集成日志程序吧。
自定义异常处理
在Helpers文件夹中创建一个ErrorHandingMiddleware中间件,添加扩展方法ErrorHandlingExtensions,在Startup中将会使用到。
1 usingMicrosoft.AspNetCore.Builder;2 usingMicrosoft.AspNetCore.Http;3 usingMicrosoft.Extensions.Logging;4 usingNewtonsoft.Json;5 usingSystem;6 usingSystem.Threading.Tasks;7
8 namespaceCodeUin.WebApi.Helpers9 {10 public classErrorHandlingMiddleware11 {12 private readonlyRequestDelegate next;13 private readonly ILogger_logger;14
15 public ErrorHandlingMiddleware(RequestDelegate next, ILoggerlogger)16 {17 this.next =next;18 _logger =logger;19 }20
21 public asyncTask Invoke(HttpContext context)22 {23 try
24 {25 awaitnext(context);26 }27 catch(Exception ex)28 {29 _logger.LogError(ex.Message);30
31 var statusCode = 500;32
33 awaitHandleExceptionAsync(context, statusCode, ex.Message);34 }35 finally
36 {37 var statusCode =context.Response.StatusCode;38 var msg = "";39
40 if (statusCode == 401)41 {42 msg = "未授权";43 }44 else if (statusCode == 404)45 {46 msg = "未找到服务";47 }48 else if (statusCode == 502)49 {50 msg = "请求错误";51 }52 else if (statusCode != 200)53 {54 msg = "未知错误";55 }56 if (!string.IsNullOrWhiteSpace(msg))57 {58 awaitHandleExceptionAsync(context, statusCode, msg);59 }60 }61 }62
63 //异常错误信息捕获,将错误信息用Json方式返回
64 private static Task HandleExceptionAsync(HttpContext context, int statusCode, stringmsg)65 {66 var result = JsonConvert.SerializeObject(new { Msg = msg, Code =statusCode });67
68 context.Response.ContentType = "application/json;charset=utf-8";69
70 returncontext.Response.WriteAsync(result);71 }72 }73
74 //扩展方法
75 public static classErrorHandlingExtensions76 {77 public static IApplicationBuilder UseErrorHandling(thisIApplicationBuilder builder)78 {79 return builder.UseMiddleware();80 }81 }82 }
最后,在 Startup 的 Configure 方法中添加 app.UseErrorHandling() ,当程序发送异常时,会走我们的自定义异常处理。
1 public voidConfigure(IApplicationBuilder app, IWebHostEnvironment env)2 {3 if(env.IsDevelopment())4 {5 app.UseDeveloperExceptionPage();6 }7
8 app.UseHttpsRedirection();9
10 //请求错误提示配置
11 app.UseErrorHandling();12
13 app.UseRouting();14
15 app.UseAuthorization();16
17 app.UseEndpoints(endpoints =>
18 {19 endpoints.MapControllers();20 });21 }
日志程序
我这里使用的是NLog,需要在项目中先安装依赖包。

首先在项目根目录创建一个 nlog.config 的配置文件,具体内容如下。
1 <?xml version="1.0" encoding="utf-8"?>
2
3 xmlns:xsi="http://www.w3.org/2001/XMLSchema-instance"
4 autoReload="true"
5 internalLogLevel="Info"
6 internalLogFile="c:\temp\internal-nlog.txt">
7
8
9
10
11
12
13
14
15
16
17 layout="${longdate}|${event-properties:item=EventId_Id}|${uppercase:${level}}|${aspnet-request-ip}|${logger}|${message} ${exception:format=tostring}" />
18
19
20 layout="${longdate}|${event-properties:item=EventId_Id}|${uppercase:${level}}|${logger}|${aspnet-request-ip}|${message} ${exception:format=tostring}|url: ${aspnet-request-url}|action: ${aspnet-mvc-action}" />
21
22
23
24
25
26
27
28
29
30
31
32
最后,在 Program 入口文件中集成 Nlog
1 usingAutofac.Extensions.DependencyInjection;2 usingMicrosoft.AspNetCore.Hosting;3 usingMicrosoft.Extensions.Hosting;4 usingMicrosoft.Extensions.Logging;5 usingNLog.Web;6
7 namespaceCodeUin.WebApi8 {9 public classProgram10 {11 public static void Main(string[] args)12 {13 NLogBuilder.ConfigureNLog("nlog.config");14 CreateHostBuilder(args).Build().Run();15 }16
17 public static IHostBuilder CreateHostBuilder(string[] args) =>
18 Host.CreateDefaultBuilder(args)19 .UseServiceProviderFactory(newAutofacServiceProviderFactory())20 .ConfigureLogging(logging =>
21 {22 logging.ClearProviders();23 logging.AddConsole();24 })25 .ConfigureWebHostDefaults(webBuilder =>
26 {27 webBuilder.UseStartup();28 })29 .UseNLog();30 }31 }
现在,我们可以直接使用NLog了,使用方法可以查看上面的 ErrorHandlingMiddleware 类中有使用到。
依赖注入
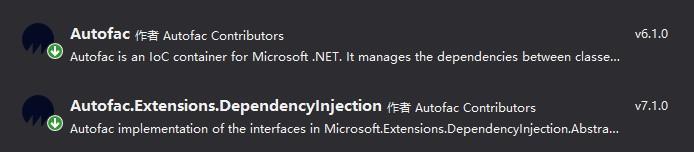
将使用 Autofac 来管理类之间的依赖关系,Autofac 是一款超级赞的.NET IoC 容器 。首先我们需要安装依赖包。
在 项目根目录的 Autofac 文件夹中新建一个 CustomAutofacModule 类,用来管理我们类之间的依赖关系。
1 usingAutofac;2 usingCodeUin.Dapper.IRepository;3 usingCodeUin.Dapper.Repository;4
5 namespaceCodeUin.WebApi.Autofac6 {7 public classCustomAutofacModule:Module8 {9 protected override voidLoad(ContainerBuilder builder)10 {11 builder.RegisterType().As();12 }13 }14 }
最后,在 Startup 类中添加方法
1 public voidConfigureContainer(ContainerBuilder builder)2 {3 //依赖注入
4 builder.RegisterModule(newCustomAutofacModule());5 }
实体映射
将使用 Automapper 帮我们解决对象映射到另外一个对象中的问题,比如这种代码。
// 如果有几十个属性是相当的可怕的
var users = new Users
{
Email = user.Email,
Password = user.Password,
UserName = user.UserName
};
// 使用Automapper就容易多了
var model = _mapper.Map(user);
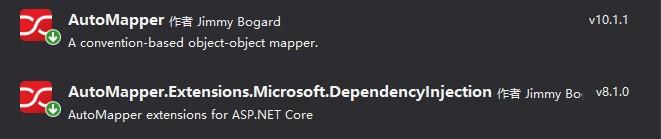
先安装依赖包
在项目根目录的 AutoMapper 文件夹中 新建 AutoMapperConfig 类,来管理我们的映射关系。
1 usingAutoMapper;2 usingCodeUin.Dapper.Entities;3 usingCodeUin.WebApi.Models;4
5 namespaceCodeUin.WebApi.AutoMapper6 {7 public classAutoMapperConfig : Profile8 {9 publicAutoMapperConfig()10 {11 CreateMap().ReverseMap();12 CreateMap().ReverseMap();13 CreateMap().ReverseMap();14 CreateMap().ReverseMap();15 }16 }17 }
在 Startup 文件的 ConfigureServices 方法中 添加 services.AddAutoMapper(AppDomain.CurrentDomain.GetAssemblies()) 即可。
使用JWT
下面将集成JWT,来处理授权等信息。首先,需要安装依赖包。

修改 appsttings.json 文件,添加 Jwt 配置信息。
1 {2 "Logging": {3 "LogLevel": {4 "Default": "Information",5 "Microsoft": "Warning",6 "Microsoft.Hosting.Lifetime": "Information"
7 }8 },9 "AllowedHosts": "*",10 "Jwt": {11 "Key": "e816f4e9d7a7be785a", //这个key必须大于16位数,非常生成的时候会报错
12 "Issuer": "codeuin.com"
13 }14 }
然后在 Startup 类的 ConfigureServices 方法中添加 Jwt 的使用。
1 services.AddAuthentication(JwtBearerDefaults.AuthenticationScheme)2 .AddJwtBearer(options =>
3 {4 options.TokenValidationParameters = newTokenValidationParameters5 {6 ValidateIssuer = true,7 ValidateAudience = true,8 ValidateLifetime = true,9 ClockSkew = TimeSpan.FromMinutes(5), //缓冲过期时间 默认5分钟
10 ValidateIssuerSigningKey = true,11 ValidIssuer = Configuration["Jwt:Issuer"],12 ValidAudience = Configuration["Jwt:Issuer"],13 IssuerSigningKey = new SymmetricSecurityKey(Encoding.UTF8.GetBytes(Configuration["Jwt:Key"]))14 };15 });
好了,最终我们的 Startup 类是这样子的,关于自定义的参数验证后面会讲到。
1 usingAutofac;2 usingAutoMapper;3 usingCodeUin.WebApi.Autofac;4 usingCodeUin.WebApi.Filters;5 usingCodeUin.WebApi.Helpers;6 usingMicrosoft.AspNetCore.Authentication.JwtBearer;7 usingMicrosoft.AspNetCore.Builder;8 usingMicrosoft.AspNetCore.Hosting;9 usingMicrosoft.AspNetCore.Mvc;10 usingMicrosoft.Extensions.Configuration;11 usingMicrosoft.Extensions.DependencyInjection;12 usingMicrosoft.Extensions.Hosting;13 usingMicrosoft.IdentityModel.Tokens;14 usingSystem;15 usingSystem.Text;16
17 namespaceCodeUin.WebApi18 {19 public classStartup20 {21 publicStartup(IConfiguration configuration)22 {23 Configuration =configuration;24 }25
26 public IConfiguration Configuration { get; }27
28 public voidConfigureContainer(ContainerBuilder builder)29 {30 //依赖注入
31 builder.RegisterModule(newCustomAutofacModule());32 }33
34 //This method gets called by the runtime. Use this method to add services to the container.
35 public voidConfigureServices(IServiceCollection services)36 {37 services.AddAuthentication(JwtBearerDefaults.AuthenticationScheme)38 .AddJwtBearer(options =>
39 {40 options.TokenValidationParameters = newTokenValidationParameters41 {42 ValidateIssuer = true,43 ValidateAudience = true,44 ValidateLifetime = true,45 ClockSkew = TimeSpan.FromMinutes(5), //缓冲过期时间 默认5分钟
46 ValidateIssuerSigningKey = true,47 ValidIssuer = Configuration["Jwt:Issuer"],48 ValidAudience = Configuration["Jwt:Issuer"],49 IssuerSigningKey = new SymmetricSecurityKey(Encoding.UTF8.GetBytes(Configuration["Jwt:Key"]))50 };51 });52
53 services.AddHttpContextAccessor();54
55 //使用AutoMapper
56 services.AddAutoMapper(AppDomain.CurrentDomain.GetAssemblies());57
58 //关闭参数自动校验
59 services.Configure((options) =>
60 {61 options.SuppressModelStateInvalidFilter = true;62 });63
64 //使用自定义验证器
65 services.AddControllers(options =>
66 {67 options.Filters.Add();68 }).69 AddJsonOptions(options =>
70 {71 //忽略null值
72 options.JsonSerializerOptions.IgnoreNullValues = true;73 });74 }75
76 //This method gets called by the runtime. Use this method to configure the HTTP request pipeline.
77 public voidConfigure(IApplicationBuilder app, IWebHostEnvironment env)78 {79 if(env.IsDevelopment())80 {81 app.UseDeveloperExceptionPage();82 }83
84 app.UseHttpsRedirection();85
86 //请求错误提示配置
87 app.UseErrorHandling();88
89 //授权
90 app.UseAuthentication();91
92 app.UseRouting();93
94 app.UseAuthorization();95
96 app.UseEndpoints(endpoints =>
97 {98 endpoints.MapControllers();99 });100 }101 }102 }
新建实体类
我将新建三个实体类,分别是 UserLoginModel 用户登录,UserRegisterModel 用户注册,UserModel 用户基本信息。
UserLoginModel 和 UserRegisterModel 将根据我们在属性中配置的特性自动验证合法性,就不需要在控制器中单独写验证逻辑了,极大的节省了工作量。
1 usingSystem;2 usingSystem.ComponentModel.DataAnnotations;3
4 namespaceCodeUin.WebApi.Models5 {6 ///
7 ///用户实体类8 ///
9 public classUserModel10 {11 public int Id { get; set; }12
13 public string Email { get; set; }14 public string UserName { get; set; }15
16 public string Mobile { get; set; }17
18 public int Gender { get; set; }19
20 public int Age { get; set; }21
22 public string Avatar { get; set; }23 }24
25 public classUserLoginModel26 {27 [Required(ErrorMessage = "请输入邮箱")]28 public string Email { get; set; }29
30 [Required(ErrorMessage = "请输入密码")]31 public string Password { get; set; }32 }33
34 public classUserRegisterModel35 {36 [Required(ErrorMessage = "请输入邮箱")]37 [EmailAddress(ErrorMessage = "请输入正确的邮箱地址")]38 public string Email { get; set; }39
40 [Required(ErrorMessage = "请输入用户名")]41 [MaxLength(length: 12, ErrorMessage = "用户名最大长度不能超过12")]42 [MinLength(length: 2, ErrorMessage = "用户名最小长度不能小于2")]43 public string UserName { get; set; }44
45 [Required(ErrorMessage = "请输入密码")]46 [MaxLength(length: 20, ErrorMessage = "密码最大长度不能超过20")]47 [MinLength(length: 6, ErrorMessage = "密码最小长度不能小于6")]48 public string Password { get; set; }49 }50 }
验证器
在项目根目录的 Filters 文件夹中 添加 ValidateModelAttribute 文件夹,将在 Action 请求中先进入我们的过滤器,如果不符合我们定义的规则将直接输出错误项。
具体代码如下。
1 usingMicrosoft.AspNetCore.Mvc;2 usingMicrosoft.AspNetCore.Mvc.Filters;3 usingSystem.Linq;4
5 namespaceCodeUin.WebApi.Filters6 {7 public classValidateModelAttribute : ActionFilterAttribute8 {9 public override voidOnActionExecuting(ActionExecutingContext context)10 {11 if (!context.ModelState.IsValid)12 {13 var item =context.ModelState.Keys.ToList().FirstOrDefault();14
15 //返回第一个验证参数错误的信息
16 context.Result = new BadRequestObjectResult(new
17 {18 Code = 400,19 Msg = context.ModelState[item].Errors[0].ErrorMessage20 });21 }22 }23 }24 }
添加自定义验证特性
有时候我们需要自己额外的扩展一些规则,只需要继承 ValidationAttribute 类然后实现 IsValid 方法即可,比如我这里验证了中国的手机号码。
1 usingSystem.ComponentModel.DataAnnotations;2 usingSystem.Text.RegularExpressions;3
4 namespaceCodeUin.WebApi.Filters5 {6 public classChineMobileAttribute : ValidationAttribute7 {8 public override bool IsValid(objectvalue)9 {10 if (!(value is string)) return false;11
12 var val = (string)value;13
14 return Regex.IsMatch(val, @"^[1]{1}[2,3,4,5,6,7,8,9]{1}\d{9}$");15 }16 }17 }
实现登录注册
我们来实现一个简单的业务需求,用户注册,登录,和获取用户信息,其他的功能都大同小异,无非就是CRUD!。
接口我们在数据服务层已经写好了,接下来是处理业务逻辑的时候到了,将直接在 Controllers 中编写。
新建一个控制器 UsersController ,业务很简单,不过多介绍了,具体代码如下。
1 usingSystem;2 usingSystem.IdentityModel.Tokens.Jwt;3 usingSystem.Security.Claims;4 usingSystem.Text;5 usingSystem.Threading.Tasks;6 usingAutoMapper;7 usingCodeUin.Dapper.Entities;8 usingCodeUin.Dapper.IRepository;9 usingCodeUin.Helpers;10 usingCodeUin.WebApi.Models;11 usingMicrosoft.AspNetCore.Authorization;12 usingMicrosoft.AspNetCore.Http;13 usingMicrosoft.AspNetCore.Mvc;14 usingMicrosoft.Extensions.Configuration;15 usingMicrosoft.Extensions.Logging;16 usingMicrosoft.IdentityModel.Tokens;17
18 namespaceCodeUin.WebApi.Controllers19 {20 [Route("api/[controller]/[action]")]21 [ApiController]22 [Authorize]23 public classUsersController : Controller24 {25 private readonly ILogger_logger;26 private readonlyIUserRepository _userRepository;27 private readonlyIMapper _mapper;28 private readonlyIConfiguration _config;29 private readonlyIHttpContextAccessor _httpContextAccessor;30
31 public UsersController(ILoggerlogger, IUserRepository userRepository, IMapper mapper, IConfiguration config, IHttpContextAccessor httpContextAccessor)32 {33 _logger =logger;34 _userRepository =userRepository;35 _mapper =mapper;36 _config =config;37 _httpContextAccessor =httpContextAccessor;38 }39
40 [HttpGet]41 public async TaskGet()42 {43 var userId = int.Parse(_httpContextAccessor.HttpContext.User.FindFirst(ClaimTypes.NameIdentifier).Value);44
45 var userInfo = await_userRepository.GetUserDetail(userId);46
47 if (userInfo == null)48 {49 return Json(new { Code = 200, Msg = "未找到该用户的信息"});50 }51
52 var outputModel = _mapper.Map(userInfo);53
54 return Json(new { Code = 200, Data =outputModel }); ;55 }56
57 [HttpPost]58 [AllowAnonymous]59 public async TaskLogin([FromBody] UserLoginModel user)60 {61 //查询用户信息
62 var data = await_userRepository.GetUserDetailByEmail(user.Email);63
64 //账号不存在
65 if (data == null)66 {67 return Json(new { Code = 200, Msg = "账号或密码错误"});68 }69
70 user.Password = Encrypt.Md5(data.Salt +user.Password);71
72 //密码不一致
73 if (!user.Password.Equals(data.Password))74 {75 return Json(new { Code = 200, Msg = "账号或密码错误"});76 }77
78 var userModel = _mapper.Map(data);79
80 //生成token
81 var token =GenerateJwtToken(userModel);82
83 //存入Redis
84 await new RedisHelper().StringSetAsync($"token:{data.Id}", token);85
86 return Json(new
87 {88 Code = 200,89 Msg = "登录成功",90 Data =userModel,91 Token =token92 });93 }94
95 [HttpPost]96 [AllowAnonymous]97 public async TaskRegister([FromBody] UserRegisterModel user)98 {99 //查询用户信息
100 var data = await_userRepository.GetUserDetailByEmail(user.Email);101
102 if (data != null)103 {104 return Json(new { Code = 200, Msg = "该邮箱已被注册"});105 }106
107 var salt = Guid.NewGuid().ToString("N");108
109 user.Password = Encrypt.Md5(salt +user.Password);110
111 var users = newUsers112 {113 Email =user.Email,114 Password =user.Password,115 UserName =user.UserName116 };117
118 var model = _mapper.Map(user);119
120 model.Salt =salt;121
122 await_userRepository.AddUser(model);123
124 return Json(new { Code = 200, Msg = "注册成功"});125 }126
127 ///
128 ///生成Token129 ///
130 /// 用户信息
131 ///
132 private stringGenerateJwtToken(UserModel user)133 {134 var securityKey = new SymmetricSecurityKey(Encoding.UTF8.GetBytes(_config["Jwt:Key"]));135 var credentials = newSigningCredentials(securityKey, SecurityAlgorithms.HmacSha256);136
137 var claims = new[] {138 newClaim(JwtRegisteredClaimNames.Email, user.Email),139 newClaim(JwtRegisteredClaimNames.Gender, user.Gender.ToString()),140 newClaim(ClaimTypes.NameIdentifier,user.Id.ToString()),141 newClaim(ClaimTypes.Name,user.UserName),142 new Claim(ClaimTypes.MobilePhone,user.Mobile??""),143 };144
145 var token = new JwtSecurityToken(_config["Jwt:Issuer"],146 _config["Jwt:Issuer"],147 claims,148 expires: DateTime.Now.AddMinutes(120),149 signingCredentials: credentials);150
151 return newJwtSecurityTokenHandler().WriteToken(token);152 }153 }154 }
接下来测试一下我们的功能,首先是注册。
先来验证一下我们的传入的参数是否符合我们定义的规则。
输入一个错误的邮箱号试试看!
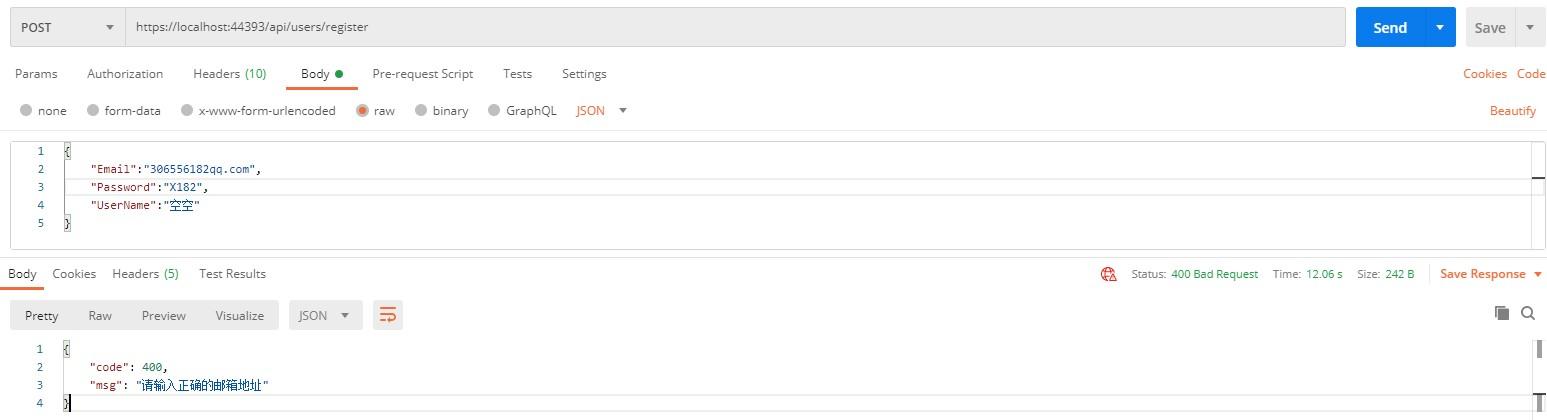
ok,没有问题,和我们在 UserRegisterModel 中 添加的验证特性返回结果一致,最后我们测试一下完全符合规则的情况。
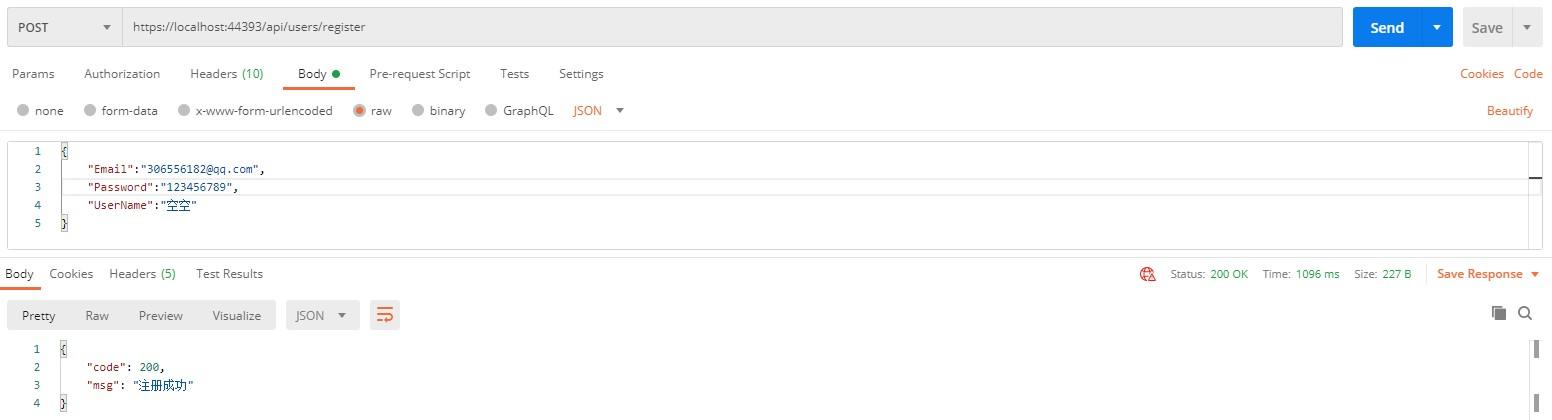
最后,注册成功了,查询下数据库也是存在的。

我们来试试登录接口,在调用登录接口之前我们先来测试一下我们的配置的权限验证是否已经生效,在不登录的情况下直接访问获取用户信息接口。
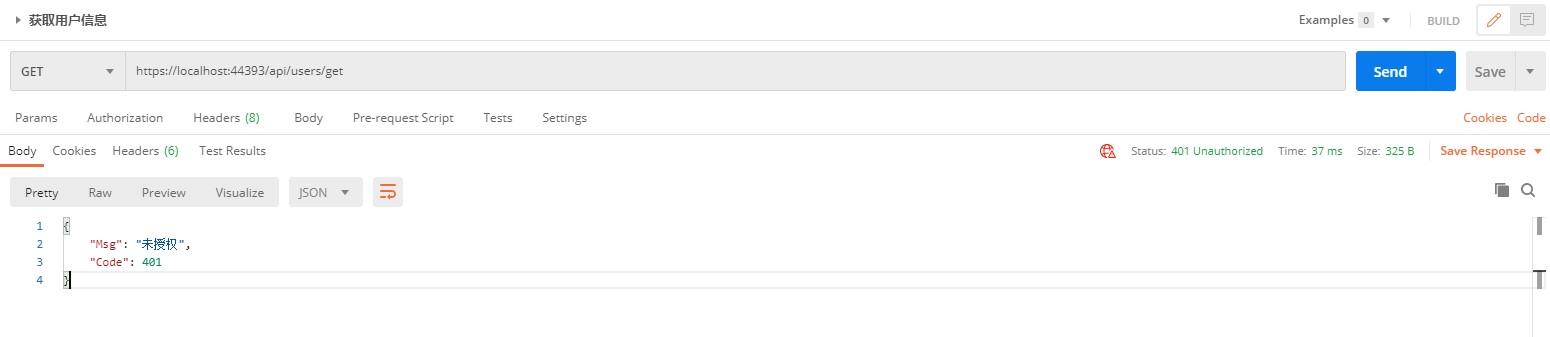
直接访问会返回未授权,那是因为我们没有登录,自然也就没有 Token,目前来看是没问题的,但要看看我们传入正确的Token 是否能过权限验证。
现在,我们需要调用登录接口,登录成功后会返回一个Token,后面的接口请求都需要用到,不然会无权限访问。
先来测试一下密码错误的情况。
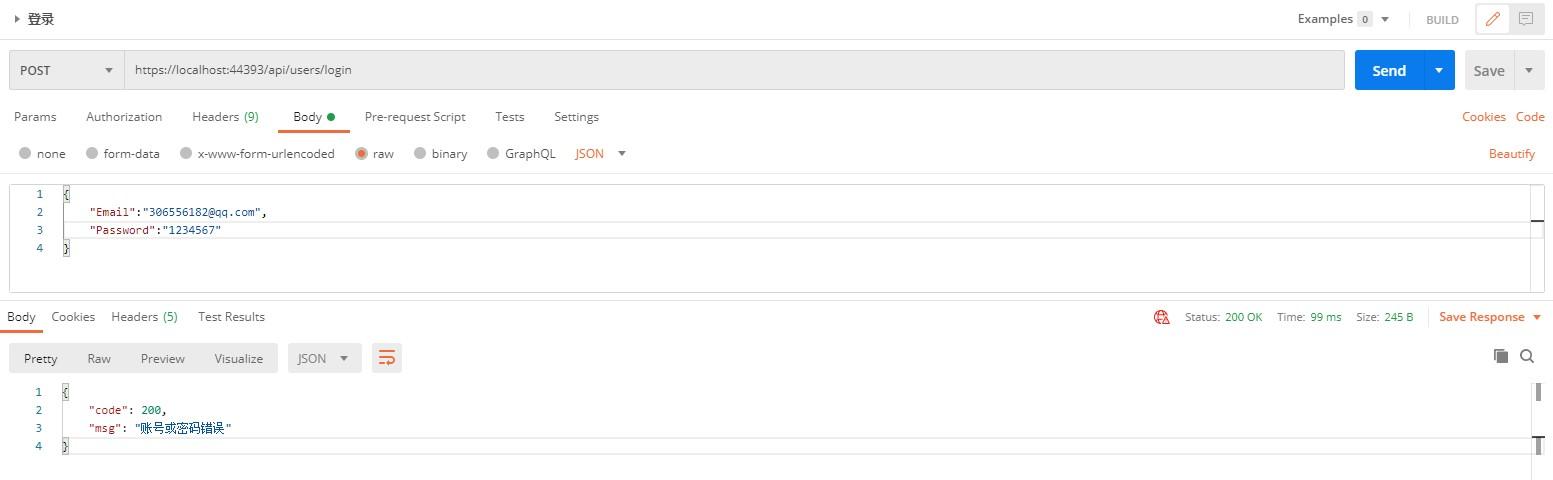
返回正确,符合我们的预期结果,下面将试试正确的密码登录,看是否能够返回我们想要的结果。
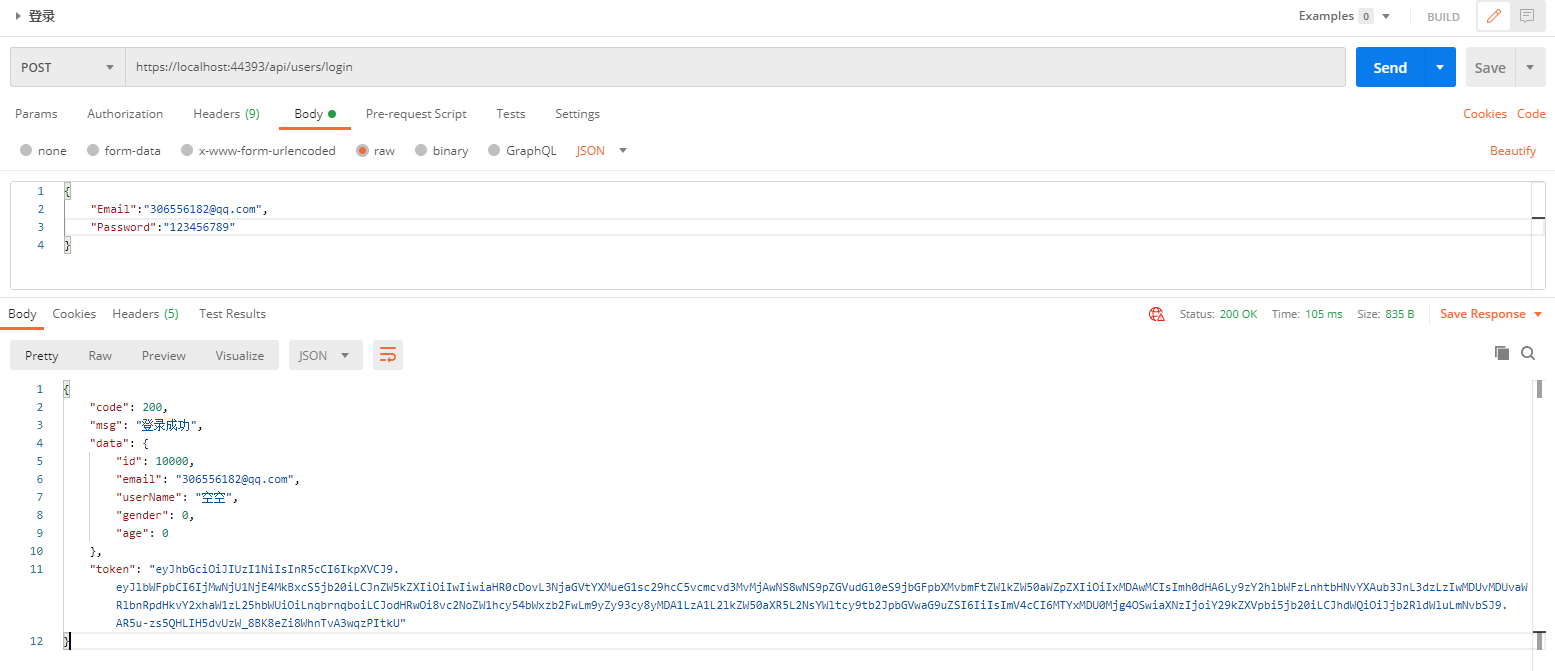
登录成功,接口也返回了我们预期的结果,最后看看生成的 token 是否按照我们写的逻辑那样,存一份到 redis 当中。
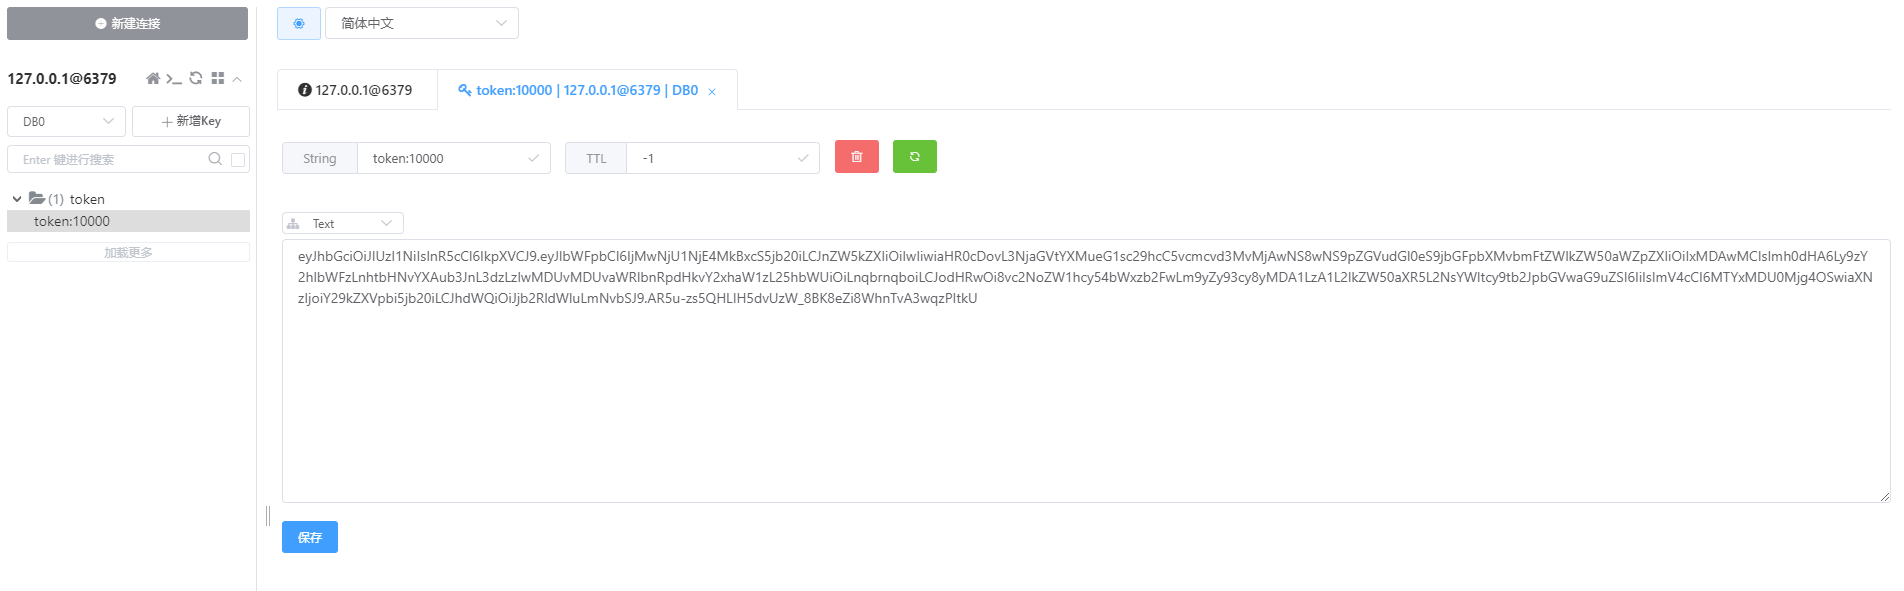
也是没有问题的,和我们预想的一样。
下面将携带正确的 token 请求获取用户信息的接口,看看是否能够正确返回。
获取用户信息的接口不会携带任何参数,只会在请求头的 Headers 中 添加 Authorization ,将我们正确的 token 传入其中。
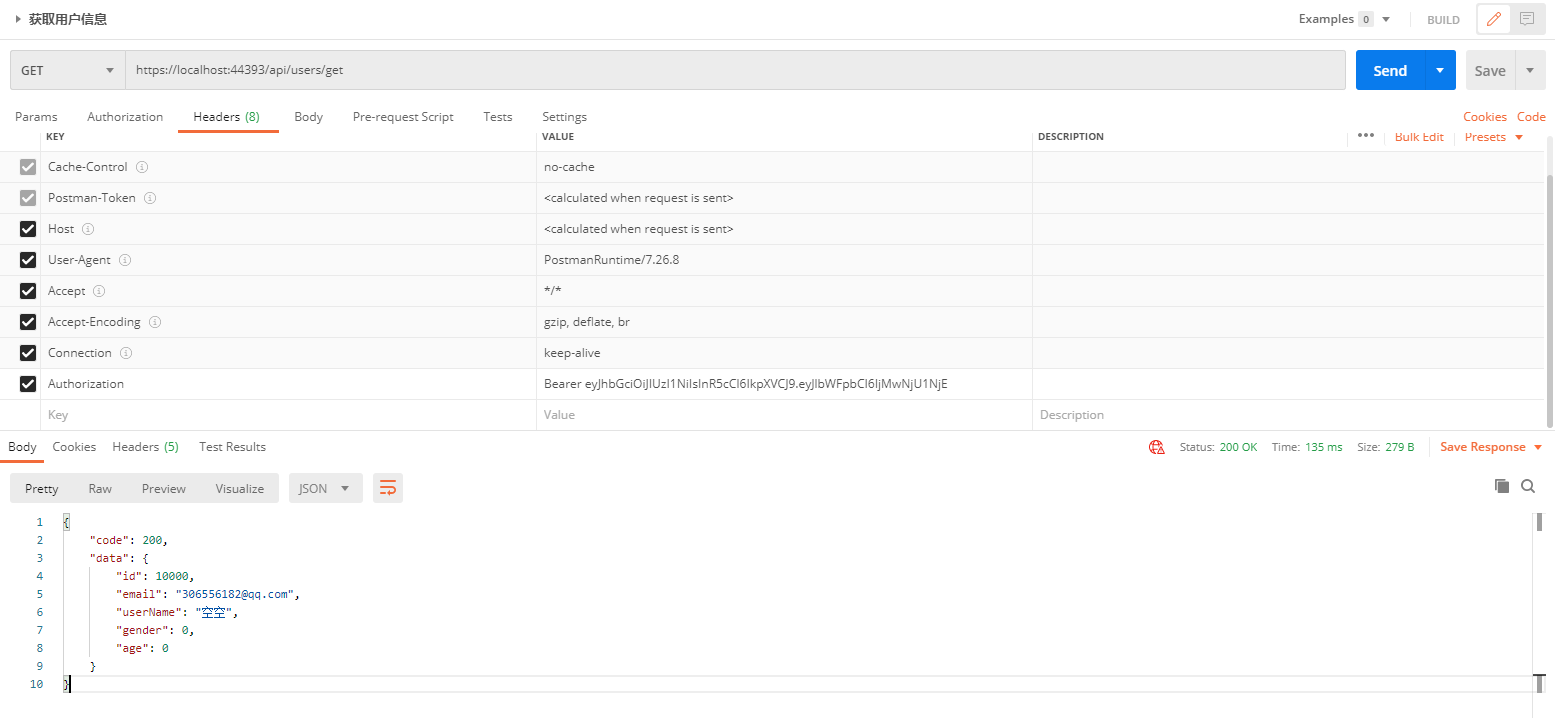
能够正确获取到我们的用户信息,也就是说我们的权限这一块也是没有问题的了,下面将使用 Docker 打包部署到 Linux 服务器中。
打包部署
在项目的根目录下添加 Dockerfile 文件,内容如下。
1 #See https://aka.ms/containerfastmode to understand how Visual Studio uses this Dockerfile to build your images for faster debugging.
2
3 FROM mcr.microsoft.com/dotnet/aspnet:5.0-buster-slim AS base4 WORKDIR /app5 EXPOSE 80
6 EXPOSE 443
7
8 FROM mcr.microsoft.com/dotnet/sdk:5.0-buster-slim AS build9 WORKDIR /src10 COPY ["CodeUin.WebApi/CodeUin.WebApi.csproj", "CodeUin.WebApi/"]11 COPY ["CodeUin.Helpers/CodeUin.Helpers.csproj", "CodeUin.Helpers/"]12 COPY ["CodeUin.Dapper/CodeUin.Dapper.csproj", "CodeUin.Dapper/"]13 RUN dotnet restore "CodeUin.WebApi/CodeUin.WebApi.csproj"
14 COPY . .15 WORKDIR "/src/CodeUin.WebApi"
16 RUN dotnet build "CodeUin.WebApi.csproj" -c Release -o /app/build17
18 FROM build AS publish19 RUN dotnet publish "CodeUin.WebApi.csproj" -c Release -o /app/publish20
21 FROM base AS final22 WORKDIR /app23 COPY --from=publish /app/publish .24 ENTRYPOINT ["dotnet", "CodeUin.WebApi.dll"]
在 Dockerfile 文件的目录下运行打包命令
# 在当前文件夹(末尾的句点)中查找 Dockerfile
docker build-t codeuin-api .
# 查看镜像
docker images
# 保存镜像到本地
docker save-o codeuin-api.tar codeuin-api
最后,将我们保存的镜像通过上传的服务器后导入即可。
通过 ssh 命令 连接服务器,在刚上传包的目录下执行导入命令。
# 加载镜像
docker load-i codeuin-api.tar# 运行镜像
docker run-itd -p 8888:80 --name codeuin-api codeuin-api
# 查看运行状态
docker stats
到此为止,我们整个部署工作已经完成了,最后在请求服务器的接口测试一下是否ok。
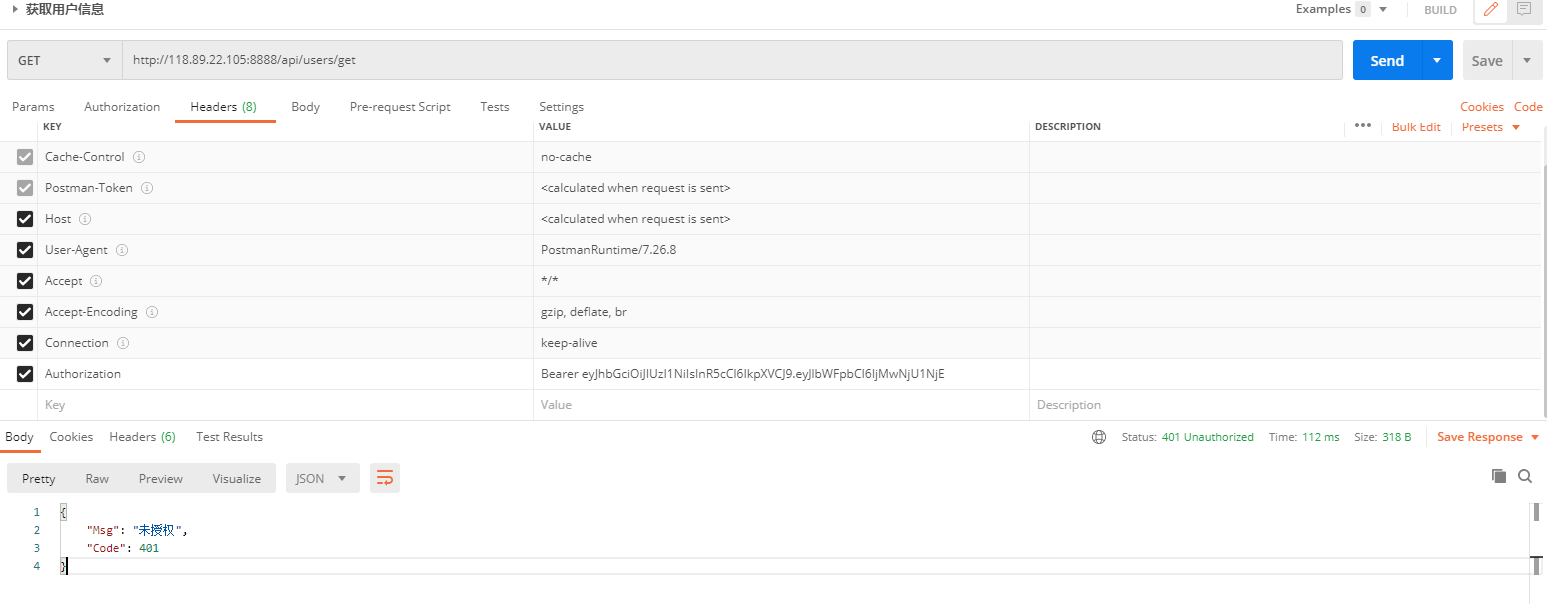
最终的结果也是ok的,到此为止,我们所有基础的工作都完成了,所有的代码存储在 https://github.com/xiazanzhang/dotnet5 中,如果对你有帮助的话可以参考一下。


 2032
2032


 被折叠的 条评论
为什么被折叠?
被折叠的 条评论
为什么被折叠?
 到【灌水乐园】发言


