


 本文介绍了如何使用create-react-app创建一个TypeScript的React项目,并详细探讨了类组件和函数组件的使用,包括Props、State、事件处理、PureComponent、Portals、Fragments等。此外,还深入讲解了React Hooks如useState、useEffect、useContext、useReducer、useRef等,以及在组件间传递数据的Context API和Ref与DOM的操作。
使用 create-react-app 开启 TypeScript
Create React App 是一个官方支持的创建 React 单页应用程序的CLI,它提供了一个零配置的现代构建设置。当你使用 Create React App 来创建一个新的 TypeScript React 工程时,你可以运行:
$ npx create-react-app my-app --typescript
$ # 或者
$ yarn create react-app my-app --typescript
如果在已有的工程中添加,也非常简单:
$ npm install --save typescript @types/node @types/react @types/react-dom @types/jest
$ # 或者
$ yarn add typescript @types/node @types/react @types/react-dom @types/jest
从零配置
创建 index.html 文件,以及src 目录,在 src目录中创建 index.tsx。
TypeScript 的文件格式是 tsx
接下来安装必要的包和配置 package.json 文件:
"scripts": {

  "dev": "MODE=development webpack -w --mode=development",
  "build": "MODE=production webpack --mode=production"
},
"dependencies": {

  "@types/react": "^16.8.13",
  "@types/react-dom": "^16.8.3",
  "react": "^16.8.6",
  "react-dom": "^16.8.6"
},
"devDependencies": {

  "awesome-typescript-loader": "^5.2.1",
  "source-map-loader": "^0.2.4",
  "typescript": "^3.4.3",
  "webpack": "^4.29.6",
  "webpack-cli": "^3.3.0"
}
创建 tsconfig.json 和 webpack.config.js 文件:
{

  "compilerOptions": {

    "target": "es5",
    "module": "commonjs",
    "lib": ["dom","es2015"],
    "jsx": "react",
    "sourceMap": true,
    "strict": true,
    "noImplicitAny": true,
    "baseUrl": "src",
    "paths": {

      "@/*": ["./*"],
    },
    "esModuleInterop": true,
    "experimentalDecorators": true,
  },
  "include": [
    "./src/**/*"
  ]
}- jsx 选择
react - lib 开启
dom和es2015 - include 选择我们创建的
src目录
var fs = require('fs')
var path = require('path')
var webpack = require('webpack')
const {
     CheckerPlugin } = require('awesome-typescript-loader');
var ROOT = path.resolve(__dirname);

var entry = './src/index.tsx';
const MODE = process.env.MODE;
const plugins = [];
const config = {

  entry: entry,
  output: {

    path: ROOT + '/dist',
    filename: '[name].bundle.js'
  },
  module: {

    rules: [
      {

        test: /.ts[x]?$/,
        loader: [
          'awesome-typescript-loader'
        ]
      },
      {

        enforce: 'pre',
        test: /.ts[x]$/,
        loader: 'source-map-loader'
      }
    ]
  },
  resolve: {

    extensions: ['.ts', '.tsx', '.js', '.json'],
    alias: {

      '@': ROOT + '/src'
    }
  },
}

if (MODE === 'production') {

  config.plugins = [
    new CheckerPlugin(),
    ...plugins
  ];
}

if (MODE === 'development') {

  config.devtool = 'inline-source-map';
  config.plugins = [
    new CheckerPlugin(),
    ...plugins
  ];
}

module.exports = config;
类组件的使用
类组件是目前来说使用的最频繁的一种,因此我们需要了解到它。
Props 和 State
首先创建 Props 和 State 接口,Props 接口接收一个 name 参数,State 接口接收 color:
interface IProps {

  name: string;
}

interface IState {

  color: "red" | "blueviolet"
}
class Home extends React.Component<IProps, IState> {

  constructor(props: IProps){

    super(props);
    this.state = {

      color: "red"
    }
  }

  public onClickColor = () => {

    const {
     color } = this.state;
    if (color === "red") {

      this.setState({

        color: "blueviolet"
      });
    }
    if (color === "blueviolet") {

      this.setState({

        color: "red"
      });
    }
  }

  public render(){

    const {
     name } = this.props;
    const {
     color } = this.state;
    return (
      <div>
        <span style={
    {
     color }}>{
     name }</span>
        <button onClick={
    this.onClickColor}>变颜色</button>
      </div>
    );
  }
}


export default Home;
如图:
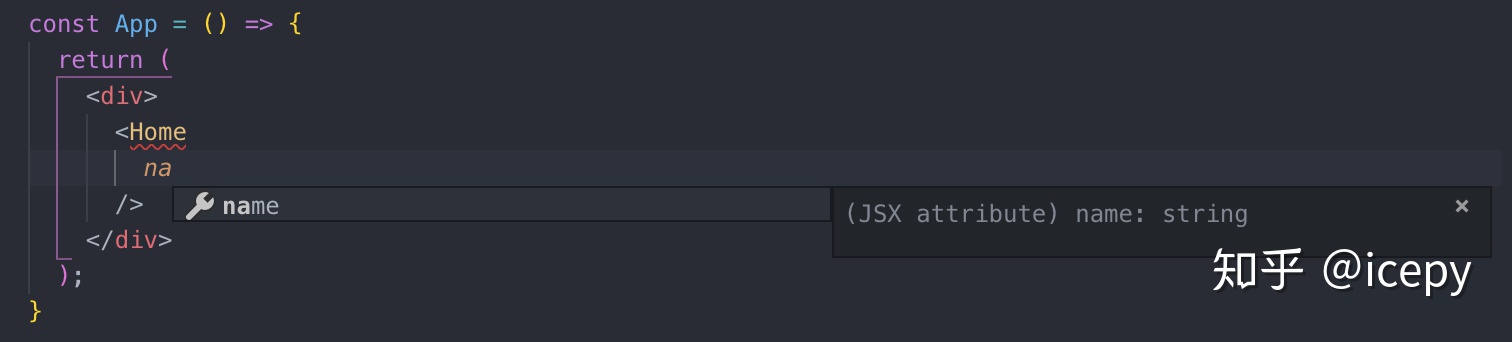
在 App 中使用 Home 组件时我们可以得到明确的传递参数类型。
处理 Event 对象
有时候我们需要处理一下 Event 对象,一般 change 事件我们可以使用 React.ChangeEvent,click 事件可以使用 React.MouseEvent ,它们都接收一个 Element,如:
onClickColor = (ev: React.MouseEvent<HTMLButtonElement>) => {

  //
}
PureComponent
我们都知道 React 的刷新机制,因此如果每一次的变动都要刷新一下界面,这对于应用程序的性能来说是一
 最低0.47元/天 解锁文章


 192
192

 被折叠的 条评论
为什么被折叠?
被折叠的 条评论
为什么被折叠?
 到【灌水乐园】发言


