


Mysql作为目前世界上使用最广泛的免费数据库,相信所有从事系统运维的工程师都一定接触过。但在实际的生产环境中,由单台Mysql作为独立的数据库是完全不能满足实际需求的,无论是在安全性,高可用性以及高并发等各个方面。
因此,一般来说都是通过 主从复制(Master-Slave)的方式来同步数据,再通过读写分离(MySQL-Proxy)来提升数据库的并发负载能力 这样的方案来进行部署与实施的。
读写分离应用:
mysql-proxy:Oracle,https://downloads.mysql.com/archives/proxy/
Atlas:Qihoo,https://github.com/Qihoo360/Atlas/blob/master/README_ZH.md
dbproxy:美团,https://github.com/Meituan-Dianping/DBProxy
Cetus:网易乐得,https://github.com/Lede-Inc/cetus
Amoeba:https://sourceforge.net/projects/amoeba/
Cobar:阿里巴巴,Amoeba的升级版
Mycat:基于Cobar, http://www.mycat.io/
ProxySQL:https://proxysql.com/
ProxySQL
ProxySQL: MySQL中间件,两个版本:官方版和percona版,percona版是基于官方版基础上修改,C++语言开发,轻量级但性能优异(支持处理千亿级数据),具有中间件所需的绝大多数功能,包括:
多种方式的的读/写分离
定制基于用户、基于schema、基于语句的规则对SQL语句进行路由
缓存查询结果
后端节点监控
官方站点:https://proxysql.com/
官方手册:https://github.com/sysown/proxysql/wiki # proxysql源仓库
基于RPM下载安装:https://github.com/sysown/proxysql/releases
ProxySQL组成
服务脚本:/etc/init.d/proxysql
配置文件:/etc/proxysql.cnf
主程序:/usr/bin/proxysql
准备:实现读写分离前,先实现主从复制
注意:slave节点需要设置read_only=1
(1)启动ProxySQL:service proxysql start
(2)启动后会监听两个默认端口
6032:ProxySQL的管理端口
6033:ProxySQL对外提供服务的端口
(3)使用mysql客户端连接到ProxySQL的管理接口6032,默认管理员用户和密码都是admin:
mysql -uadmin -padmin -P6032 -h127.0.0.1
说明:在main和monitor数据库中的表, runtime_开头的是运行时的配置,不能修改,只能修改非runtime_表,修改后必须执行LOAD … TO RUNTIME才能加载到RUNTIME生效,执行save … to disk将配置持久化保存到磁盘
ProxySQL安装
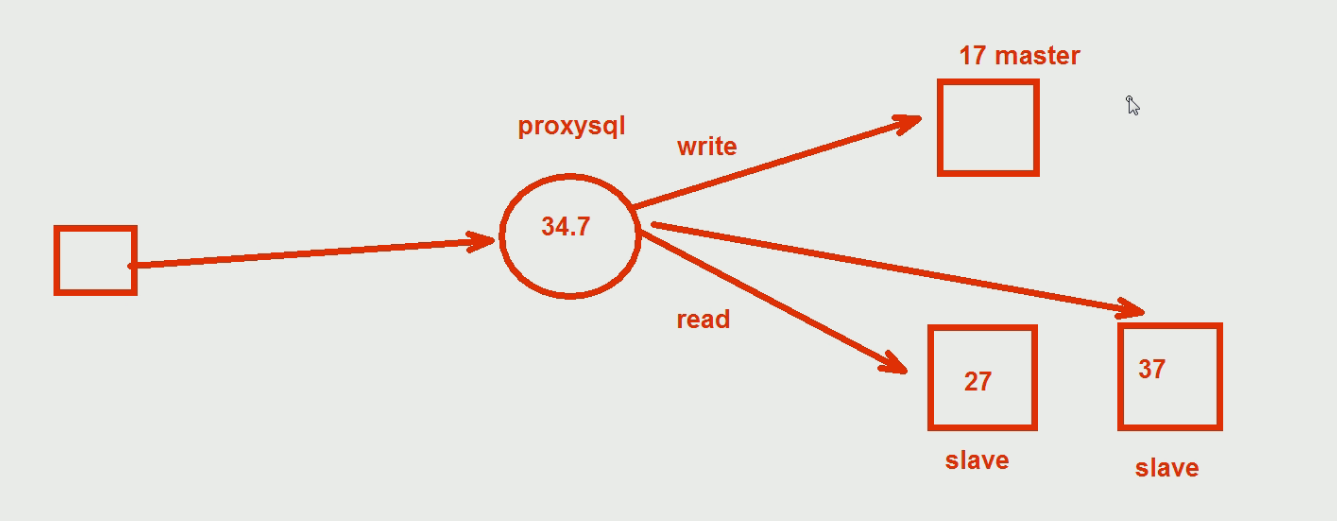
原理:配置好主从复制(B主、C从1、D从2), 客户端将读写的数据发给A调度器,A调度器将写内容传递到B主服务器上,将读传递到C和D从服务器上。
模拟实验:
A主机:192.168.34.105 调度器
B主机:192.168.34.101 主服务器
C主机:192.168.34.102 C从服务器
D主机:192.168.34.103 D从服务器
注意:要确定C和D从服务器的mysql配置文件中添加read-only选项
(1)先在A主机上配置proxysql的yum源,并安装proxysql包
[root@centos6~]#cat <
> [proxysql_repo]
> name= ProxySQL YUM repository
> baseurl=http://repo.proxysql.com/ProxySQL/proxysql-1.4.x/centos/\$releasever
> gpgcheck=1
> gpgkey=http://repo.proxysql.com/ProxySQL/repo_pub_key
> EOF
[root@centos6~]#cat /etc/yum.repos.d/proxysql.repo 查看yum源配置文件信息
[proxysql_repo]
name= ProxySQL YUM repository
baseurl=http://repo.proxysql.com/ProxySQL/proxysql-1.4.x/centos/$releasever
gpgcheck=1
gpgkey=http://repo.proxysql.com/ProxySQL/repo_pub_key
A主机安装proxysql包
[root@centos6~]#yum install proxysql -y
A主机开启proxysql服务
[root@centos6~]#service proxysql start
Starting ProxySQL: 2019-11-26 09:02:37 [INFO] Using config file /etc/proxysql.cnf
DONE!
在A主机上,连接msyql服务,默认的用户名是admin 密码是admin 连接端口号:6032
[root@centos6~]#mysql -uadmin -padmin -h127.0.0.1 -P6032
Welcome to the MySQL monitor. Commands end with ; or \g.
Your MySQL connection id is 2
Server version: 5.5.30 (ProxySQL Admin Module)
Copyright (c) 2000, 2013, Oracle and/or its affiliates. All rights reserved.
Oracle is a registered trademark of Oracle Corporation and/or its
affiliates. Other names may be trademarks of their respective
owners.
Type 'help;' or '\h' for help. Type '\c' to clear the current input statement.
mysql> use main;
MySQL [main]> show tables;
+--------------------------------------------+
| tables |
+--------------------------------------------+
| global_variables |
| mysql_collations |
| mysql_group_replication_hostgroups |
| mysql_query_rules |
| mysql_query_rules_fast_routing |
| mysql_replication_hostgroups |
| mysql_servers | #查看对应的mysql服务表
| mysql_users |
| proxysql_servers |
| runtime_checksums_values |
| runtime_global_variables |
| runtime_mysql_group_replication_hostgroups |
| runtime_mysql_query_rules |
| runtime_mysql_query_rules_fast_routing |
| runtime_mysql_replication_hostgroups |
| runtime_mysql_servers |
| runtime_mysql_users |
| runtime_proxysql_servers |
| runtime_scheduler |
| scheduler |
+--------------------------------------------+
20 rows in set (0.01 sec)
在A主机上,向ProxySQL中添加MySQL节点,以下操作不需要use main也可成功
mysql> insert into mysql_servers(hostgroup_id,hostname,port) values(10,'192.168.34.101',3306); # 其中hostgroup_id对应的10是自定义的数字
Query OK, 1 row affected (0.00 sec)
mysql> insert into mysql_servers(hostgroup_id,hostname,port) values(10,'192.168.34.102',3306);
Query OK, 1 row affected (0.00 sec)
mysql> insert into mysql_servers(hostgroup_id,hostname,port) values(10,'192.168.34.103',3306);
Query OK, 1 row affected (0.00 sec)
在A主机上查看当前添加的状态
mysql> select * from mysql_servers\G;
*************************** 1. row ***************************
hostgroup_id: 10
hostname: 192.168.34.101
port: 3306
status: ONLINE 已经成功
weight: 1
compression: 0
max_connections: 1000
max_replication_lag: 0
use_ssl: 0
max_latency_ms: 0
comment:
*************************** 2. row ***************************
hostgroup_id: 10
hostname: 192.168.34.102
port: 3306
status: ONLINE 已经成功
weight: 1
compression: 0
max_connections: 1000
max_replication_lag: 0
use_ssl: 0
max_latency_ms: 0
comment:
*************************** 3. row ***************************
hostgroup_id: 10
hostname: 192.168.34.103
port: 3306
status: ONLINE 在线,说明已经成功
weight: 1
compression: 0
max_connections: 1000
max_replication_lag: 0
use_ssl: 0
max_latency_ms: 0
comment:
3 rows in set (0.00 sec)
在A主机上生效并保存节点信息
mysql> load mysql servers to runtime;
mysql> save mysql servers to disk;
在B主服务器上添加一个复制监控的用户账号
添加监控后端节点的用户。ProxySQL通过每个节点的read_only值来自动调整它们是属于读组还是写组
MariaDB [(none)]> grant replication client on *.* to monitor@'192.168.34.%' identified by 'magedu';
在C和D从服务器上查看当前创建的账号复制过来了没有,此时查看已经复制过来
MariaDB [(none)]> select user from mysql.user;
ERROR 2006 (HY000): MySQL server has gone away
No connection. Trying to reconnect...
Connection id: 55
Current database: *** NONE ***
+---------+
| user |
+---------+
| root |
| liu |
| monitor |
| rplssl |
| root |
| |
| root |
| |
| root |
+---------+
在A主机上将monitor账号设置密码
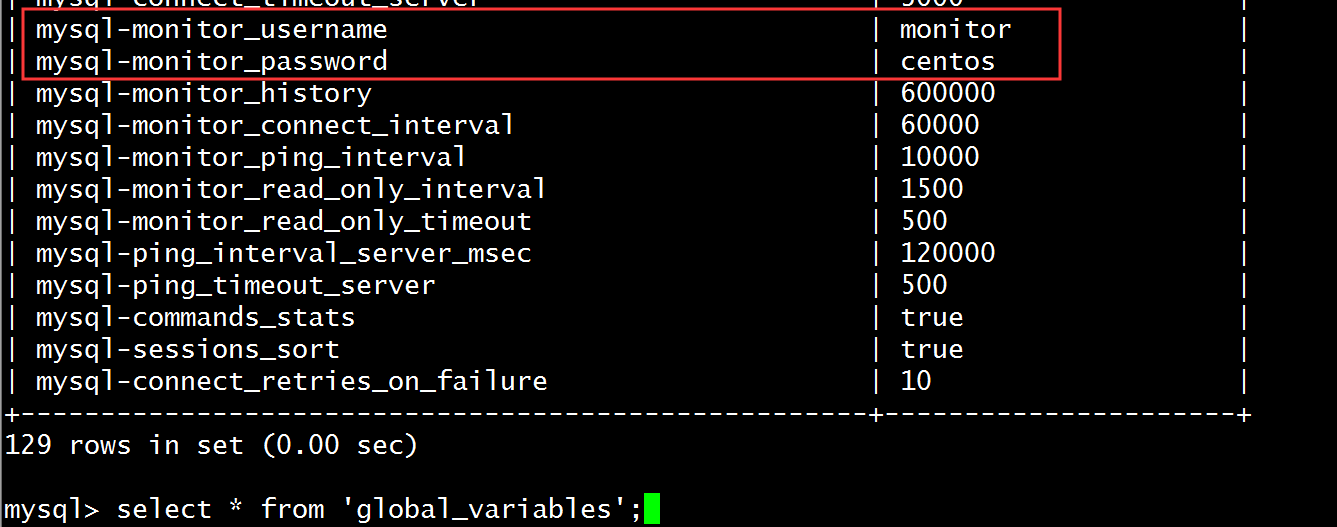
MySQL [(none)]> set mysql-monitor_username='monitor'; 设置账号,目前默认是monitor
MySQL [(none)]> set mysql-monitor_password='magedu'; 只需要设置monitor账号的密码
查看修改后的用户名和密码
mysql> select * from 'global_variables';
加载到RUNTIME,并保存到disk
MySQL [(none)]> load mysql variables to runtime;
MySQL [(none)]> save mysql variables to disk;
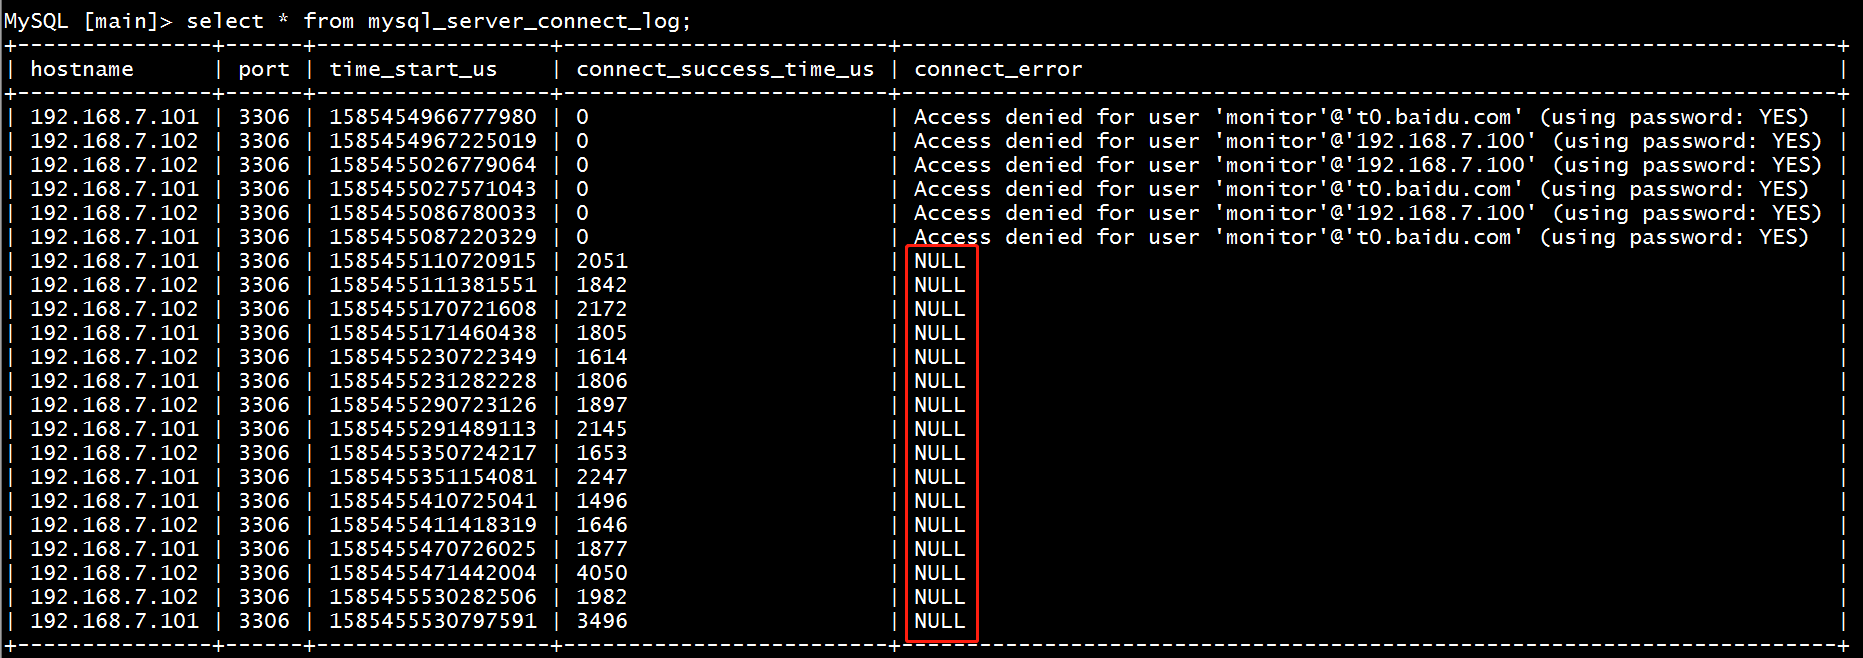
监控模块的指标保存在monitor库的log表中
在调度器A主机上查看监控连接是否正常的 (对connect指标的监控):(如果connect_error的结果为NULL则表示正常)
mysql> select * from mysql_server_connect_log;
查看监控心跳信息 (对ping指标的监控):
mysql> select * from mysql_server_ping_log;
查看read_only和replication_lag的监控日志
mysql> select * from mysql_server_read_only_log;
mysql> select * from mysql_server_replication_lag_log;
设置分组信息
在A主机上,需要修改的是main库中的mysql_replication_hostgroups表,该表有3个字段:writer_hostgroup,reader_hostgroup,comment, 指定写组的id为10,读组的id为20
mysql> insert into mysql_replication_hostgroups values(10,20,"test"); # 其中test只是描述信息,可以自定义,10和20分别为读和写组ID
Query OK, 1 row affected (0.01 sec)
mysql> select * from mysql_replication_hostgroups;
+------------------+------------------+---------+
| writer_hostgroup | reader_hostgroup | comment |
+------------------+------------------+---------+
| 10 | 20 | test |
+------------------+------------------+---------+
在A主机上,将mysql_replication_hostgroups表的修改加载到RUNTIME生效
load mysql servers to runtime;
save mysql servers to disk;
Monitor模块监控后端的read_only值,按照read_only的值将节点自动移动到读/写组
mysql> select hostgroup_id,hostname,port,status,weight from mysql_servers;
+--------------+----------------+------+--------+--------+
| hostgroup_id | hostname | port | status | weight |
+--------------+----------------+------+--------+--------+
| 10 | 192.168.34.101 | 3306 | ONLINE | 1 |
| 20 | 192.168.34.102 | 3306 | ONLINE | 1 |
| 20 | 192.168.34.103 | 3306 | ONLINE | 1 |
+--------------+----------------+------+--------+--------+
在B主服务器上配置发送SQL语句的用户
在B主服务器节点上创建访问用户
MariaDB [(none)]> grant all on *.* to sqluser@'192.168.34.%' identified by 'magedu';
在ProxySQL(A主机)配置,将用户sqluser添加到mysql_users表中, default_hostgroup默认组设置为写组10,当读写分离的路由规则不符合时,会访问默认组的数据库
mysql> insert into mysql_users(username,password,default_hostgroup) values('sqluser','magedu',10);
加载并生效到disk中
load mysql users to runtime;
save mysql users to disk;
查看当前monitor数据库中的mysql_users表信息
mysql> select * from mysql_users\G;
*************************** 1. row ***************************
username: sqluser
password: magedu
active: 1
use_ssl: 0
default_hostgroup: 10
default_schema: NULL
schema_locked: 0
transaction_persistent: 1
fast_forward: 0
backend: 1
frontend: 1
max_connections: 10000
1 row in set (0.00 sec)
在A主机上,使用sqluser用户测试是否能路由到默认的10写组实现读、写数据
mysql -usqluser -pmagedu -P6033 -h127.0.0.1 -e 'select @@server_id'
mysql -usqluser -pmagedu -P6033 -h127.0.0.1 -e 'create database testdb'
mysql -usqluser -pmagedu -P6033 -h127.0.0.1 -e 'use testdb;create table t(id int)'
在A主机上实现读写分离
在A主机上配置路由规则,实现读写分离
(1)配置路由规则,实现读写分离
(2)与规则有关的表:mysql_query_rules和mysql_query_rules_fast_routing,后者是前者的扩展表,1.4.7之后支持
(3)插入路由规则:将select语句分离到20的读组,select语句中有一个特殊语句SELECT...FOR UPDATE它会申请写锁,应路由到10的写组
解释:
(rule_id,active):代表的是开启对应的规则1,1.
^SELECT...FOR UPDATE$:申请写锁,会将写操作写入到写组内
apply:是应用读或者写的操作。
^SELECT:以select开头的命令分到读组内(2代表是读,1代表是开启,后面的20为读组,1代表的是apply应用到读组)
insert into mysql_query_rules
(rule_id,active,match_digest,destination_hostgroup,apply)VALUES
(1,1,'^SELECT.*FOR UPDATE$',10,1),(2,1,'^SELECT',20,1);
查看插入的表信息
MySQL [stats]> select * from mysql_query_rules\G;
*************************** 1. row ***************************
rule_id: 1 #ID为1
active: 1
username: NULL
schemaname: NULL
flagIN: 0
client_addr: NULL
proxy_addr: NULL
proxy_port: NULL
digest: NULL
match_digest: ^SELECT.*FOR UPDATE$ # 申请写锁
match_pattern: NULL
negate_match_pattern: 0
re_modifiers: CASELESS
flagOUT: NULL
replace_pattern: NULL
destination_hostgroup: 10
cache_ttl: NULL
reconnect: NULL
timeout: NULL
retries: NULL
delay: NULL
next_query_flagIN: NULL
mirror_flagOUT: NULL
mirror_hostgroup: NULL
error_msg: NULL
OK_msg: NULL
sticky_conn: NULL
multiplex: NULL
log: NULL
apply: 1
comment: NULL
*************************** 2. row ***************************
rule_id: 2 #ID为2
active: 1
username: NULL
schemaname: NULL
flagIN: 0
client_addr: NULL
proxy_addr: NULL
proxy_port: NULL
digest: NULL
match_digest: ^SELECT # 以select开头的分配到查询组
match_pattern: NULL
negate_match_pattern: 0
re_modifiers: CASELESS
flagOUT: NULL
replace_pattern: NULL
destination_hostgroup: 20
cache_ttl: NULL
reconnect: NULL
timeout: NULL
retries: NULL
delay: NULL
next_query_flagIN: NULL
mirror_flagOUT: NULL
mirror_hostgroup: NULL
error_msg: NULL
OK_msg: NULL
sticky_conn: NULL
multiplex: NULL
log: NULL
apply: 1
comment: NULL
加载并生效到disk中,此时所有的proxysql配置完成
load mysql query rules to runtime;
save mysql query rules to disk;
注意:因ProxySQL根据rule_id顺序进行规则匹配,select ... for update规则的rule_id必须要小于普通的select规则的rule_id
验证MySQL读写分离
测试读操作是否路由给20的读组
mysql -usqluser -pmagedu -P6033 -h127.0.0.1 -e 'select @@server_id'
测试写操作,以事务方式进行测试、以及创建的数据库和表,都会存放在写操作中。
[root@centos7 ~]# mysql -usqluser -pmagedu -P6033 -h127.0.0.1 -e 'begin;select @@server_id;commit'
[root@centos7 ~]# mysql -usqluser -pmagedu -P6033 -h127.0.0.1 -e 'create database testdb'
[root@centos7 ~]# mysql -usqluser -pmagedu -P6033 -h127.0.0.1 -e 'insert testdb.t1 value(34343)'
路由的信息:查询stats库中的stats_mysql_query_digest表
SELECT hostgroup hg,sum_time, count_star, digest_text FROM stats_mysql_query_digest ORDER BY sum_time DESC;

总结:由此验证,我们已经实现了MySQL读写分离,目前所有的写操作都全部在Master主服务器上,用来避免数据的不同步;
另外,所有的读操作都分摊给了其它各个Slave从服务器上,用来分担数据库压力。


 66
66


 被折叠的 条评论
为什么被折叠?
被折叠的 条评论
为什么被折叠?
 到【灌水乐园】发言


