


相信大家将这三者部署到同一台主机应该已经不陌生了,今天在这里,给大家演示一下如何将三者部署到三台主机上。
实验系统:CentOS 6.6_x86_64
实验前提:大部分软件使用编译安装,请提前准备好编译环境,防火墙和selinux都关闭
实验软件:nginx-1.9.3 mariadb-10.0.20 php-5.6.11 memcache-2.2.7 xcache-3.2.0
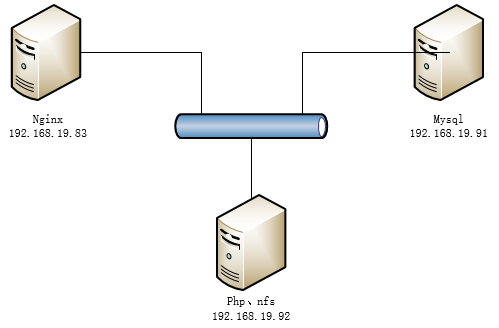
实验拓扑:
一、安装nginx
1.解决依赖关系:
需要专门安装pcre-devel包:
1 yum -y install pcre-devel
2.添加nginx用户:
1 useradd -r nginx
3.解压并编译安装nginx:
1 tar xf nginx-1.9.3.tar.gz2 cd nginx-1.9.3
3 ./configure \4 --prefix=/usr/local/nginx \ //安装位置5 --sbin-path=/usr/local/nginx/sbin/nginx \ //程序文件6 --conf-path=/etc/nginx/nginx.conf \ //配置文件安装位置7 --error-log-path=/var/log/nginx/error.log \ //错误日志安装位置8 --http-log-path=/var/log/nginx/access.log \ //访问日志安装位置9 --pid-path=/var/run/nginx/nginx.pid \ //pid文件位置10 --lock-path=/var/lock/nginx.lock \ //锁文件位置11 --user=nginx \ //运行进程时使用的用户身份12 --group=nginx \ //运行进程时使用的用户组13 --with-http_ssl_module \ //支持ssl模块14 --with-http_flv_module \ //支持flv模块15 --with-http_stub_status_module \ //支持stub_status模块16 --with-http_gzip_static_module \ //支持gzip_static模块17 --http-client-body-temp-path=/var/tmp/nginx/client/\ //存储HTTP客户端请求body体的临时文件位置18 --http-proxy-temp-path=/var/tmp/nginx/proxy/\ //存储HTTP代理的临时文件位置19 --http-fastcgi-temp-path=/var/tmp/nginx/fcgi/\ //存储fasycgi临时文件位置20 --http-uwsgi-temp-path=/var/tmp/nginx/uwsgi \ //存储uwsgi临时文件位置21 --http-scgi-temp-path=/var/tmp/nginx/scgi \ //存储scgi临时文件位置22 --with-pcre //支持pcre库23 make && make install
4.提供脚本文件:
1 vim /etc/init.d/nginx2 --------------------------------
3 #!/bin/sh
4 #5 # nginx -this script starts and stops the nginx daemon6 #7 # chkconfig: - 85 15
8 # description: Nginx is an HTTP(S) server, HTTP(S) reverse \9 # proxy and IMAP/POP3 proxy server10 #
 最低0.47元/天 解锁文章


 154
154


 被折叠的 条评论
为什么被折叠?
被折叠的 条评论
为什么被折叠?
 到【灌水乐园】发言


