


做网站时,感觉数据库的设计比较重要,当花了很多时间设计好数据库时,就希望有一个能自动生成bean的工具,虽然Eclipse的插件能反向生成bean和hibernate的配置文件,但总感觉不够灵活,不够小到随意简单使用。但又实在不想去敲代码写一个个很多属性的bean。网上没找着现成合适的,于是就花了点时间自己写了个生成工具玩玩,也希望能给需要的朋友们一点点帮助~~
直接放出可执行的exe程序和源码了,喜欢且需要的朋友尽管拿去用。
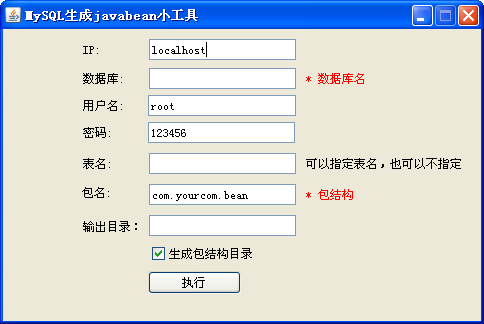
MySQLToBean.java
package org.just.util;
import java.io.File;
import java.io.FileInputStream;
import java.io.FileNotFoundException;
import java.io.FileOutputStream;
import java.io.FileWriter;
import java.io.IOException;
import java.io.InputStream;
import java.io.OutputStream;
import java.sql.Connection;
import java.sql.ResultSet;
import java.sql.SQLException;
import java.text.SimpleDateFormat;
import java.util.Date;
import java.util.Properties;
import java.util.regex.Matcher;
import java.util.regex.Pattern;
import javax.swing.JFrame;
import javax.swing.JPanel;
import java.awt.BorderLayout;
import java.awt.EventQueue;
import javax.swing.JTextField;
import javax.swing.JLabel;
import javax.swing.JCheckBox;
import javax.swing.UIManager;
import javax.swing.UnsupportedLookAndFeelException;
import java.awt.Color;
import java.awt.event.WindowAdapter;
import java.awt.event.WindowEvent;
import javax.swing.JButton;
import java.awt.event.ActionListener;
import java.awt.event.ActionEvent;
/**
* 此类用来将mysql的表直接生成Bean
*
* @author [email protected]
*/
public class MySQLToBean extends JFrame {
/**
*
*/
private static final long serialVersionUID = 1L;
private JCheckBox checkBox;
Properties p = new Properties();
String configFile = "config.ini";
private JLabel lblNewLabel_4;
public MySQLToBean() {
setResizable(false);
setTitle("MySQL生成javabean小工具");
setDefaultCloseOperation(JFrame.DO_NOTHING_ON_CLOSE);
setBounds(100, 100, 484, 324);
JPanel panel = new JPanel();
getContentPane().add(panel, BorderLayout.CENTER);
panel.setLayout(null);
txtLocalhost = new JTextField();
txtLocalhost.setText("localhost");
txtLocalhost.setBounds(146, 10, 147, 21);
panel.add(txtLocalhost);
txtLocalhost.setColumns(10);
JLabel lblIp = new JLabel("IP:");
lblIp.setBounds(80, 13, 30, 15);
panel.add(lblIp);
JLabel label = new JLabel("数据库:");
label.setBounds(80, 42, 54, 15);
panel.add(label);
textField = new JTextField();
textField.setBounds(146, 39, 147, 21);
panel.add(textField);
textField.setColumns(10);
JLabel label_1 = new JLabel("表名:");
label_1.setBounds(80, 127, 54, 15);
panel.add(label_1);
textField_1 = new JTextField();
textField_1.setBounds(146, 124, 147, 21);
panel.add(textField_1);
textField_1.setColumns(10);
JLabel label_2 = new JLabel("包名:");
label_2.setBounds(79, 156, 54, 15);
panel.add(label_2);
txtComyourcom = new JTextField();
txtComyourcom.setText("com.yourcom.bean");
txtComyourcom.setBounds(146, 155, 147, 21);
panel.add(txtComyourcom);
txtComyourcom.setColumns(10);
JLabel lblNewLabel = new JLabel("输出目录:");
lblNewLabel.setBounds(80, 190, 65, 15);
panel.add(lblNewLabel);
textField_3 = new JTextField();
textField_3.setBounds(146, 186, 147, 21);
panel.add(textField_3);
textField_3.setColumns(10);
checkBox = new JCheckBox("生成包结构目录");
checkBox.setSelected(true);
checkBox.setBounds(145, 213, 147, 23);
panel.add(checkBox);
JLabel lblNewLabel_1 = new JLabel("可以指定表名,也可以不指定");
lblNewLabel_1.setBounds(303, 127, 176, 15);
panel.add(lblNewLabel_1);
JLabel lblNewLabel_2 = new JLabel("* 数据库名");
lblNewLabel_2.setForeground(Color.RED);
lblNewLabel_2.setBounds(303, 42, 66, 15);
panel.add(lblNewLabel_2);
JLabel lblNewLabel_3 = new JLabel("* 包结构");
lblNewLabel_3.setForeground(Color.RED);
lblNewLabel_3.setBounds(303, 158, 79, 15);
panel.add(lblNewLabel_3);
JButton button = new JButton("执行");
button.addActionListener(new ActionListener() {
public void actionPerformed(ActionEvent e) {
go();
}
});
button.setBounds(145, 242, 93, 23);
panel.add(button);
textField_4 = new JTextField();
textField_4.setText("123456");
textField_4.setBounds(145, 93, 147, 21);
panel.add(textField_4);
textField_4.setColumns(10);
txtRoot = new JTextField();
txtRoot.setText("root");
txtRoot.setBounds(14
 最低0.47元/天 解锁文章


 7054
7054


 被折叠的 条评论
为什么被折叠?
被折叠的 条评论
为什么被折叠?
 到【灌水乐园】发言


