mysql多数据源切换_Spring多数据源动态切换

原理

8e3acb887160e1da003c1f1a2876a643.png

3bf3640dbbdb50ea18c76a819eadc355.png

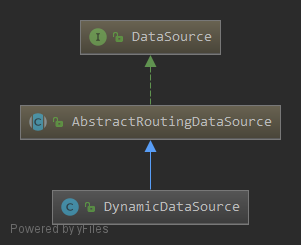
DataSource向外提供一个 getConnection() 方法,得getConnection者得数据库

AbstractRoutingDataSource 实现了 getConnection() 方法

// line 166

@Override

public Connection getConnection() throws SQLException {

return determineTargetDataSource().getConnection();

}

... 省略若干代码

// line 190

/**

* Retrieve the current target DataSource. Determines the

* {@link #determineCurrentLookupKey() current lookup key}, performs

* a lookup in the {@link #setTargetDataSources targetDataSources} map,

* falls back to the specified

* {@link #setDefaultTargetDataSource default target DataSource} if necessary.

* @see #determineCurrentLookupKey()

*/

protected DataSource determineTargetDataSource() {

Assert.notNull(this.resolvedDataSources, "DataSource router not initialized");

Object lookupKey = determineCurrentLookupKey();

DataSource dataSource = this.resolvedDataSources.get(lookupKey);

if (dataSource == null && (this.lenientFallback || lookupKey == null)) {

dataSource = this.resolvedDefaultDataSource;

}

if (dataSource == null) {

throw new IllegalStateException("Cannot determine target DataSource for lookup key [" + lookupKey + "]");

}

return dataSource;

}

/**

* Determine the current lookup key. This will typically be

* implemented to check a thread-bound transaction context.

*

Allows for arbitrary keys. The returned key needs

* to match the stored lookup key type, as resolved by the

* {@link #resolveSpecifiedLookupKey} method.

*/

@Nullable

protected abstract Object determineCurrentLookupKey();

然而 ....

AbstractRoutingDataSource 的getConnection() 方法只是调用了 determinTargetDataSource().getConnection() 来获取真正DataSource的getConnection()。

fce183360e569d28fa5f40da812a4a6b.png

这是典型的装饰模式!!自己没有的功能通过引入其他类来增强。

我们先来看看 AbstractRoutingDataSource 的类结构

b4a8f6021f9fdd98a38cfae73de0c98b.png

被框框套住的都是重要的。

方法determineCurrentLookupKey() 是留给我们开发者的(就像你家的网线口),我们通过实现该方法在不同数据源之间切换。

实践

1. 配置多数据源

在 application.yml 如下配置

spring:

datasource:

# 数据源类型

type: com.alibaba.druid.pool.DruidDataSource

# 默认数据源

default-datasource:

driver-class-name: com.mysql.cj.jdbc.Driver

url: jdbc:mysql://localhost:3306/db0?useUnicode=true&characterEncoding=utf8&zeroDateTimeBehavior=convertToNull&useSSL=true&allowMultiQueries=true&serverTimezone=GMT%2B8

username: root

password: 123456

# 多数据源

target-datasources:

datasource1:

driver-class-name: com.mysql.cj.jdbc.Driver

url: jdbc:mysql://localhost:3306/db1?useUnicode=true&characterEncoding=utf8&zeroDateTimeBehavior=convertToNull&useSSL=true&allowMultiQueries=true&serverTimezone=GMT%2B8

username: root

password: 123456

datasource2:

driver-class-name: com.mysql.cj.jdbc.Driver

url: jdbc:mysql://localhost:3306/db2?useUnicode=true&characterEncoding=utf8&zeroDateTimeBehavior=convertToNull&useSSL=true&allowMultiQueries=true&serverTimezone=GMT%2B8

username: root

password: 123456

# druid 默认配置

druid:

# 初始连接数

initial-size: 10

# 最大连接池数量

max-active: 100

# 最小连接池数量

min-idle: 10

# 配置获取连接等待超时的时间

max-wait: 60000

# 打开PSCache,并且指定每个连接上PSCache的大小

pool-prepared-statements: true

max-pool-prepared-statement-per-connection-size: 20

# 配置间隔多久才进行一次检测,检测需要关闭的空闲连接,单位是毫秒

timeBetweenEvictionRunsMillis: 60000

# 配置一个连接在池中最小生存的时间,单位是毫秒

min-evictable-idle-time-millis: 300000

validation-query: SELECT 1 FROM DUAL

test-while-idle: true

test-on-borrow: false

test-on-return: false

stat-view-servlet:

enabled: true

url-pattern: /monitor/druid/*

filter:

stat:

log-slow-sql: true

slow-sql-millis: 1000

merge-sql: false

wall:

config:

multi-statement-allow: true

# MyBatis

mybatis:

# 搜索指定包别名

typeAliasesPackage: com.liuchuanv

# 配置mapper的扫描,找到所有的mapper.xml映射文件

mapperLocations: classpath*:mapper/**/*Mapper.xml

# 加载全局的配置文件

configLocation: classpath:mybatis-config.xml

此处配置的名称(如 defaultDataSource、targetDataSources)的命名并无特殊要求,只要和下面第n步的 DataSourceConfig 中对应起来就可以

使用 Druid 数据源的话,要在 pom.xml 中引入依赖

com.alibaba

druid-spring-boot-starter

1.1.10

2. 实现动态数据源

DynamicDataSource 动态数据源,在多个数据源之间切换

public class DynamicDataSource extends AbstractRoutingDataSource {

public DynamicDataSource(DataSource defaultTargetDataSource, Map targetDataSources) {

super.setDefaultTargetDataSource(defaultTargetDataSource);

super.setTargetDataSources(targetDataSources);

super.afterPropertiesSet();

}

@Override

protected Object determineCurrentLookupKey() {

return DataSourceContextHolder.getDataSourceType();

}

}

DataSourceContextHolder 数据源上下文,使用线程变量来存储代表当前使用的数据源的key值(每个key值都对应一个数据源,用以区分多数据源)

public class DataSourceContextHolder {

public static final ThreadLocal CONTEXT_HOLDER = new ThreadLocal();

public static void setDataSourceType(String dsType) {

CONTEXT_HOLDER.set(dsType);

}

public static String getDataSourceType() {

return CONTEXT_HOLDER.get();

}

public static void removeDataSourceType() {

CONTEXT_HOLDER.remove();

}

}

DataSourceType 数据源对应的key(其实单纯的用字符串来表示数据源,替换枚举类DataSourceType也是可以的,但是写代码时要注意字符串统一)

public enum DataSourceType {

/** 默认数据源key */

DEFAULT_DATASOURCE,

/** 数据源1key*/

DATASOURCE1,

/** 数据源2key*/

DATASOURCE2;

}

3. 将数据源添加到 Spring 容器中

@Configuration

public class DataSourceConfig {

@Bean

@ConfigurationProperties(prefix = "spring.datasource.default-datasource")

public DataSource defaultDataSource() {

return DruidDataSourceBuilder.create().build();

}

@Bean

@ConfigurationProperties(prefix = "spring.datasource.target-datasources.datasource1")

public DataSource dataSource1() {

return DruidDataSourceBuilder.create().build();

}

@Bean

@ConfigurationProperties(prefix = "spring.datasource.target-datasources.datasource2")

public DataSource dataSource2() {

return DruidDataSourceBuilder.create().build();

}

@Bean

@Primary

public DataSource dynamicDataSource(DataSource defaultDataSource, DataSource dataSource1, DataSource dataSource2) {

// 注意:该方法的参数名称要和前面前面三个datasource对象在Spring容器中的bean名称一样

// 或者使用 @Qualifier 指定具体的bean

Map targetDataSources = new HashMap<>();

targetDataSources.put(DataSourceType.DEFAULT_DATASOURCE.name(), defaultDataSource);

targetDataSources.put(DataSourceType.DATASOURCE1.name(), dataSource1);

targetDataSources.put(DataSourceType.DATASOURCE2.name(), dataSource2);

return new DynamicDataSource(defaultDataSource, targetDataSources);

}

}

测试

为了方便,省略了 Service 层

TestController

@RestController

@RequestMapping("/test")

public class TestController {

@Autowired

private TestMapper testMapper;

@GetMapping

public List> test(String dataSourceIndex) {

// 根据参数值的不同,切换数据源

if ("1".equals(dataSourceIndex)) {

DataSourceContextHolder.setDataSourceType(DataSourceType.DATASOURCE1.name());

} else if ("2".equals(dataSourceIndex)) {

DataSourceContextHolder.setDataSourceType(DataSourceType.DATASOURCE2.name());

}

List> mapList = testMapper.selectList();

// 清除线程内部变量数据源key

DataSourceContextHolder.removeDataSourceType();

return mapList;

}

}

TestMapper

@Repository

public interface TestMapper {

/**

* 查询列表

* @return

*/

List> selectList();

}

TestMapper.xml

SELECT * FROM test

别忘了要准备数据哦!

下面SQL语句,创建3个数据库,然后在3个数据库中都创建一张test表,并各自插入不同的数据。

-- 创建数据库

create database db0 character set utf8 collate utf8_general_ci;

create database db1 character set utf8 collate utf8_general_ci;

create database db2 character set utf8 collate utf8_general_ci;

-- 在数据库db1下执行以下SQL

use db0;

create table test(

id int(11) primary key auto_increment,

name varchar(20)

) ;

insert into test(name) values('张三');

-- 在数据库db1下执行以下SQL

use db1;

create table test(

id int(11) primary key auto_increment,

name varchar(20)

) ;

insert into test(name) values('李四');

-- 在数据库db2下执行以下SQL

use db2;

create table test(

id int(11) primary key auto_increment,

name varchar(20)

) ;

insert into test(name) values('王五');

OK,一切准备就绪,启动应用吧!!!

一启动就出现了各种各样的,似乎无穷无尽的报错!一头黑线。

1. 找不到TestMapper

Field testMapper in com.liuchuanv.dynamicdatasource.controller.TestController required a bean of type 'com.liuchuanv.dynamicdatasource.mapper.TestMapper' that could not be found.

解决方法:在 DynamicdatasourceApplication 头上添加注解 @MapperScan("com.liuchuanv.*.mapper")

2. dynamicDataSource 依赖循环

┌─────┐

| dynamicDataSource defined in class path resource [com/liuchuanv/dynamicdatasource/common/DataSourceConfig.class]

↑ ↓

| defaultDataSource defined in class path resource [com/liuchuanv/dynamicdatasource/common/DataSourceConfig.class]

↑ ↓

| org.springframework.boot.autoconfigure.jdbc.DataSourceInitializerInvoker

└─────┘

解决方法:在 DynamicdatasourceApplication 头上修改注解 @SpringBootApplication(exclude = {DataSourceAutoConfiguration.class})

094d3acee9b904d674d1ee876267019f.png

使用的是默认数据源 defaultDataSource

ee805e658a19d0a67bd6a74100eb0015.png

使用的是数据源 dataSource1

7a30b30059b3f38628134e611cb92c29.png

使用的是数据源 dataSource2

建议大家在心里总结一下整个的过程,其实很简单

  • 0
    点赞
  • 0
    收藏
    觉得还不错? 一键收藏
  • 0
    评论

“相关推荐”对你有帮助么?

  • 非常没帮助
  • 没帮助
  • 一般
  • 有帮助
  • 非常有帮助
提交
评论
添加红包

请填写红包祝福语或标题

红包个数最小为10个

红包金额最低5元

当前余额3.43前往充值 >
需支付:10.00
成就一亿技术人!
领取后你会自动成为博主和红包主的粉丝 规则
hope_wisdom
发出的红包
实付
使用余额支付
点击重新获取
扫码支付
钱包余额 0

抵扣说明:

1.余额是钱包充值的虚拟货币,按照1:1的比例进行支付金额的抵扣。
2.余额无法直接购买下载,可以购买VIP、付费专栏及课程。

余额充值