


 本文介绍了RabbitMQ的基本概念和安装步骤,并展示了Python中使用Pika模块发送和接收消息的简单示例。讨论了消息的轮询分发、持久化、公平消费和发布/订阅模式。此外,还提及了Redis作为一个键值存储系统,以及使用Python进行Redis操作的简介。
1.RabbitMQ消息队列
1.1 RabbitMQ简介
AMQP,即Advanced Message Queuing Protocol,高级消息队列协议,是应用层协议的一个开放标准,为面向消息的中间件设计。消息中间件主要用于组件之间的解耦,消息的发送者无需知道消息使用者的存在,反之亦然。
AMQP的主要特征是面向消息、队列、路由(包括点对点和发布/订阅)、可靠性、安全。
RabbitMQ是一个开源的AMQP实现,服务器端用Erlang语言编写,支持多种客户端,如:Python、Ruby、.NET、Java、JMS、C、PHP、ActionScript、XMPP、STOMP等,支持AJAX。用于在分布式系统中存储转发消息,在易用性、扩展性、高可用性等方面表现不俗。
下面将重点介绍RabbitMQ中的一些基础概念,了解了这些概念,是使用好RabbitMQ的基础。
1.2 安装RabbitMQ和python的pika模块
1.2.1 安装RabbitMQ
(1)安装erlang平台(RabbitMQ的依赖平台)
1.安装依赖文件
yum install ncurses-devel
2.下载源文件
wget http://www.erlang.org/download/otp_src_19.1.tar.gz
若失败,到地址:http://erlang.org/download/去手动下载
3.解压源文件压缩包
tar -xvf otp_src_19.1.tar.gz
(tar 参数含义: bz2格式用j;gz格式用z;c是创建;x是解压缩;v是详细信息;f是指定文件)
4.进入解压后的目录
cd otp_src_19.1
5.依次执行以下命令:
./configure -prefix=/usr/local/erlang 就会开始编译安装 会编译到 /usr/local/erlang 下
make && make install
6.修改/etc/profile文件,增加下面的环境变量:
vim /etc/pofile
#set erlang environment
export PATH=$PATH:/usr/local/erlang/bin
source profile使得文件生效(用export 查看path中是否有刚刚添加的环境变量)
7.安装完成后执行erl看是否能打开eshell,用’halt().’退出,注意:“.”是erlang的结束符
(2)安装RabbitMQ
wget -c http://www.rabbitmq.com/releases/rabbitmq-server/v3.6.0/rabbitmq-server-3.6.0-1.noarch.rpm
rpm -ivh --nodeps rabbitmq-server-3.6.0-1.noarch.rpm
1.2.2 安装pika
pip install pika 或者easy_install pika
1.3 最简单的发送/接收消息队列模型
producer:
1 #! /usr/bin/env python3
2 #-*- coding:utf-8 -*-
3
4 importpika5
6 connection =pika.BlockingConnection(pika.ConnectionParameters(7 'localhost')) # 相当于建立一个socket连接8 channel =connection.channel()9 #声明queue
10 channel.queue_declare(queue='hello')11 #RabbitMQ a message can never be sent directly to the queue, it always needs to go through an exchange.
12 channel.basic_publish(exchange='',13 routing_key='hello',14 body='你好!'.encode("utf-8"))15 print("发送 '你好!'")16 connection.close()
consumer:
1 #! /usr/bin/env python3
2 #-*- coding:utf-8 -*-
3 importpika4
5 connection =pika.BlockingConnection(pika.ConnectionParameters(6 'localhost'))7 channel =connection.channel()8
9 #You may ask why we declare the queue again ‒ we have already declared it in our previous code.
10 #We could avoid that if we were sure that the queue already exists. For example if send.py program
11 #was run before. But we're not yet sure which program to run first. In such cases it's a good
12 #practice to repeat declaring the queue in both programs.
13 channel.queue_declare(queue='hello')14
15
16 defcallback(ch, method, properties, body):17 print("收到: %r" % body.decode("utf-8"))18
19 channel.basic_consume(callback,20 queue='hello',21 no_ack=True)22 print('等待。。。')23 channel.start_consuming()
注意代码中的英文注释,特别是为什么又一次声明queue。。。
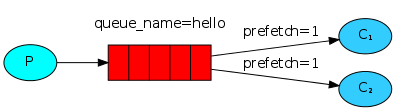
1.4 轮询原理
1.3中如果依次运行两个consumer,分别记consumer1、consumer2,那么producer第一次发消息是consumer1收到,第二次发是consumer2收到,第三次发又是consumer1收到......也就是说,rabbitMQ是依次把消息发给consumer端。
1.5 消息持久化
producer
1 #! /usr/bin/env python3
2 #-*- coding:utf-8 -*-
3 importpika4
5 connection = pika.BlockingConnection(pika.ConnectionParameters("localhost")) #相当于建立一个socket连接
6 channel = connection.channel() #定义一个管道
7 #声明Queue
8 channel.queue_declare(queue="hello2",durable=True) #durable=True 是把这个队列持久化,如果rabbitMQ挂掉,队列还在;如果
9 #队列中的消息没有持久化,则消息会丢失
10 channel.basic_publish(exchange="",11 routing_key="hello2",12 body="Hi,how are you?",13 properties=pika.BasicProperties(14 delivery_mode=2,)) #properties=pika.BasicProperties(delivery_mode=2,) 这是队列中的消息持久化
15 print("发送了一句话。。。")16 connection.close()
上述代码中,第8行只是队列持久化,如果rabbitMQ挂掉,队列还在;但如果队列中的消息没有持久化,则消息会丢失。
1.6 消息公平分发
如果Rabbit只管按顺序把消息发到各个消费者身上,不考虑消费者负载的话,很可能出现,一个机器配置不高的消费者那里堆积了很多消息处理不完,同时配置高的消费者却一直很轻松。为解决此问题,可以在各个消费者端,配置perfetch=1,意思就是告诉RabbitMQ在我这个消费者当前消息还没处理完的时候就不要再给我发新消息了。
producer:
1 importpika2 importsys3
4 connection =pika.BlockingConnection(pika.ConnectionParameters(5 host='localhost'))6 channel =connection.channel()7
8 channel.queue_declare(queue='task_queue', durable=True)9
10 message = ' '.join(sys.argv[1:]) or "Hello World!"
11 channel.basic_publish(exchange='',12 routing_key='task_queue',13 body=message,14 properties=pika.BasicProperties(15 delivery_mode = 2, #make message persistent
16 ))17 print("[x] Sent %r" %message)18 connection.close()
生产者端其实并没什么变化,只是用了消息持久化。
consumer:
1 importpika2 importtime3
4 connection =pika.BlockingConnection(pika.ConnectionParameters(5 host='localhost'))6 channel =connection.channel()7
8 channel.queue_declare(queue='task_queue', durable=True)9 print('[*] Waiting for messages. To exit press CTRL+C')10
11 defcallback(ch, method, properties, body):12 print("[x] Received %r" %body)13 time.sleep(body.count(b'.'))14 print("[x] Done")15 ch.basic_ack(delivery_tag =method.delivery_tag)16
17 channel.basic_qos(prefetch_count=1)18 channel.basic_consume(callback,19 queue='task_queue')20
21 channel.start_consuming()
注意15行,必须要手动回复。
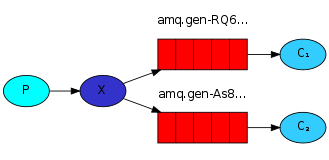
1.7 消息发布/订阅(Publish/Subscribe)
之前的例子都基本都是1对1的消息发送和接收,即消息只能发送到指定的queue里,但有些时候你想让你的消息被所有的Queue收到,类似广播的效果,这时候就要用到exchange了,
An exchange is a very simple thing. On one side it receives messages from producers and the other side it pushes them to queues. The exchange must know exactly what to do with a message it receives. Should it be appended to a particular queue? Should it be appended to many queues? Or should it get discarded. The rules for that are defined by the exchange type.
Exchange在定义的时候是有类型的,以决定到底是哪些Queue符合条件,可以接收消息
fanout: 所有bind到此exchange的queue都可以接收消息
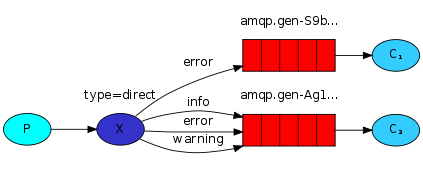
direct: 通过routingKey和exchange决定的那个唯一的queue可以接收消息
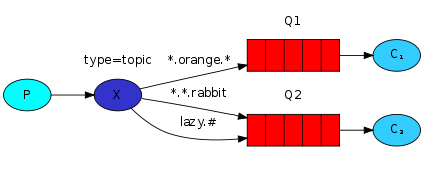
topic:所有符合routingKey(此时可以是一个表达式)的routingKey所bind的queue可以接收消息
表达式符号说明:#代表一个或多个字符,*代表任何字符
例:#.a会匹配a.a,aa.a,aaa.a等
*.a会匹配a.a,b.a,c.a等
注:使用RoutingKey为#,Exchange Type为topic的时候相当于使用fanout
headers: 通过headers 来决定把消息发给哪些queue
publisher:
1 #! /usr/bin/env python3
2 #-*- coding:utf-8 -*-
3
4 importpika5
6 connection =pika.BlockingConnection(pika.ConnectionParameters(7 host='localhost'))8 channel =connection.channel()9
10 #不需要声明队列,这里是交换器
11 channel.exchange_declare(exchange='logs',12 type='fanout') #fanout的意思是广播
13
14 message = "Info: How are you???"
15 channel.basic_publish(exchange='logs',16 routing_key='', #没有队列,这里也必须写为空
17 body=message)18 print("[x] Sent %r" %message)19 connection.close()
subscriber
1 #! /usr/bin/env python3
2 #-*- coding:utf-8 -*-
3
4 importpika5
6 connection =pika.BlockingConnection(pika.ConnectionParameters(7 host='localhost'))8 channel =connection.channel()9
10 channel.exchange_declare(exchange='logs',11 type='fanout')12
13 result = channel.queue_declare(exclusive=True) #不指定queue名字,rabbit会随机分配一个名字,exclusive=True会在使用此queue的消费者断开后,自动将queue删除
14 #exclusive唯一的
15 queue_name =result.method.queue16
17 channel.queue_bind(exchange='logs',18 queue=queue_name) #将随机分配的队列绑定到交换机logs
19
20 print('[*] Waiting for logs. To exit press CTRL+C')21
22
23 defcallback(ch, method, properties, body):24 print("[x] %r" %body)25
26
27 channel.basic_consume(callback,28 queue=queue_name,29 no_ack=True)30
31 channel.start_consuming()
1.8 有选择地接收消息(exchange type = direct)
RabbitMQ还支持根据关键字发送,即:队列绑定关键字,发送者将数据根据关键字发送到消息exchange,exchange根据 关键字 判定应该将数据发送至指定队列。
publisher
1 #! /usr/bin/env python3
2 #-*- coding:utf-8 -*-
3
4 importpika5 importsys6
7 connection =pika.BlockingConnection(pika.ConnectionParameters(8 host='localhost'))9 channel =connection.channel()10
11 channel.exchange_declare(exchange='direct_logs',12 type='direct')13
14 severity = sys.argv[1] if len(sys.argv) > 1 else 'info'
15 message = ' '.join(sys.argv[2:]) or 'Hello World!'
16 channel.basic_publish(exchange='direct_logs',17 routing_key=severity,18 body=message)19 print("[x] Sent %r:%r" %(severity, message))20 connection.close()
subscriber
1 #! /usr/bin/env python3
2 #-*- coding:utf-8 -*-
3
4 importpika5 importsys6
7 connection = pika.BlockingConnection(pika.ConnectionParameters(host='localhost'))8 channel =connection.channel()9
10 channel.exchange_declare(exchange='direct_logs',type='direct')11
12 result = channel.queue_declare(exclusive=True)13 queue_name =result.method.queue14
15 severities = sys.argv[1:]16 if notseverities:17 sys.stderr.write("Usage: %s [info] [warning] [error]\n" %sys.argv[0])18 sys.exit(1)19
20 for severity inseverities:21 channel.queue_bind(exchange='direct_logs',22 queue=queue_name,23 routing_key=severity)24
25 print('[*] Waiting for logs. To exit press CTRL+C')26
27
28 defcallback(ch, method, properties, body):29 print("[x] %r:%r" %(method.routing_key, body))30
31
32 channel.basic_consume(callback,33 queue=queue_name,34 no_ack=True)35
36 channel.start_consuming()
1.9 更细致的消息过滤
importpikaimportsys
connection=pika.BlockingConnection(pika.ConnectionParameters(
host='localhost'))
channel=connection.channel()
channel.exchange_declare(exchange='topic_logs',
type='topic')
routing_key= sys.argv[1] if len(sys.argv) > 1 else 'anonymous.info'message= ' '.join(sys.argv[2:]) or 'Hello World!'channel.basic_publish(exchange='topic_logs',
routing_key=routing_key,
body=message)print("[x] Sent %r:%r" %(routing_key, message))
connection.close()
import pikaimportsys
connection=pika.BlockingConnection(pika.ConnectionParameters(
host='localhost'))
channel=connection.channel()
channel.exchange_declare(exchange='topic_logs',
type='topic')
result= channel.queue_declare(exclusive=True)
queue_name=result.method.queue
binding_keys= sys.argv[1:]if notbinding_keys:
sys.stderr.write("Usage: %s [binding_key]...\n" %sys.argv[0])
sys.exit(1)for binding_key inbinding_keys:
channel.queue_bind(exchange='topic_logs',
queue=queue_name,
routing_key=binding_key)print('[*] Waiting for logs. To exit press CTRL+C')defcallback(ch, method, properties, body):print("[x] %r:%r" %(method.routing_key, body))
channel.basic_consume(callback,
queue=queue_name,
no_ack=True)
channel.start_consuming()
1.10 rpc
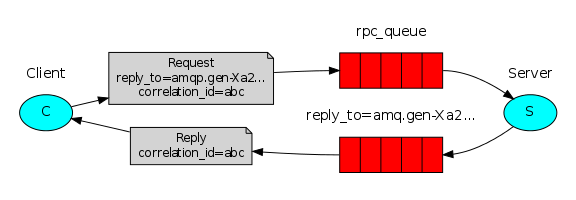
RPC server
1 importpika2 importtime3 connection =pika.BlockingConnection(pika.ConnectionParameters(4 host='localhost'))5
6 channel =connection.channel()7
8 channel.queue_declare(queue='rpc_queue')9
10 deffib(n):11 if n ==0:12 return013 elif n == 1:14 return 1
15 else:16 return fib(n-1) + fib(n-2)17
18 defon_request(ch, method, props, body):19 n =int(body)20
21 print("[.] fib(%s)" %n)22 response =fib(n)23
24 ch.basic_publish(exchange='',25 routing_key=props.reply_to,26 properties=pika.BasicProperties(correlation_id =\27 props.correlation_id),28 body=str(response))29 ch.basic_ack(delivery_tag =method.delivery_tag)30
31 channel.basic_qos(prefetch_count=1)32 channel.basic_consume(on_request, queue='rpc_queue')33
34 print("[x] Awaiting RPC requests")35 channel.start_consuming()
RPC client
1 importpika2 importuuid3
4 classFibonacciRpcClient(object):5 def __init__(self):6 self.connection =pika.BlockingConnection(pika.ConnectionParameters(7 host='localhost'))8
9 self.channel =self.connection.channel()10
11 result = self.channel.queue_declare(exclusive=True)12 self.callback_queue =result.method.queue13
14 self.channel.basic_consume(self.on_response, no_ack=True,15 queue=self.callback_queue)16
17 defon_response(self, ch, method, props, body):18 if self.corr_id ==props.correlation_id:19 self.response =body20
21 defcall(self, n):22 self.response =None23 self.corr_id =str(uuid.uuid4())24 self.channel.basic_publish(exchange='',25 routing_key='rpc_queue',26 properties=pika.BasicProperties(27 reply_to =self.callback_queue,28 correlation_id =self.corr_id,29 ),30 body=str(n))31 while self.response isNone:32 self.connection.process_data_events()33 returnint(self.response)34
35 fibonacci_rpc =FibonacciRpcClient()36
37 print("[x] Requesting fib(30)")38 response = fibonacci_rpc.call(30)39 print("[.] Got %r" % response)
2 Redis
Redis是一个key-value存储系统。和Memcached类似,它支持存储的value类型相对更多,包括string(字符串)、list(链表)、set(集合)、zset(sorted set --有序集合)和hash(哈希类型)。这些数据类型都支持push/pop、add/remove及取交集并集和差集及更丰富的操作,而且这些操作都是原子性的。在此基础上,redis支持各种不同方式的排序。与memcached一样,为了保证效率,数据都是缓存在内存中。区别的是redis会周期性的把更新的数据写入磁盘或者把修改操作写入追加的记录文件,并且在此基础上实现了master-slave(主从)同步。
2.1 python操作redis
2.1.1 操作模式
redis-py提供两个类Redis和StrictRedis用于实现Redis的命令,StrictRedis用于实现大部分官方的命令,并使用官方的语法和命令,Redis是StrictRedis的子类,用于向后兼容旧版本的redis-py。
1 importredis2
3 r = redis.Redis(host='10.211.55.4', port=6379)4 r.set('foo', 'Bar')5 print (r.get('foo'))
2.1.2 连接池
redis-py使用connection pool来管理对一个redis server的所有连接,避免每次建立、释放连接的开销。默认,每个Redis实例都会维护一个自己的连接池。可以直接建立一个连接池,然后作为参数Redis,这样就可以实现多个Redis实例共享一个连接池。
importredis
pool= redis.ConnectionPool(host='10.211.55.4', port=6379)
r= redis.Redis(connection_pool=pool)
r.set('foo', 'Bar')print(r.get('foo'))
2.1.3 String 操作
String操作,redis中的String在在内存中按照一个name对应一个value来存储。
name value
n1 -----------> v1
n2 -----------> v2
n3 -----------> v3
set(name, value, ex=None, px=None, nx=False, xx=False)
在Redis中设置值,默认,不存在则创建,存在则修改


 1474
1474

 被折叠的 条评论
为什么被折叠?
被折叠的 条评论
为什么被折叠?
 到【灌水乐园】发言


