


实现思路:在spring中配置多个数据源,然后在service层通过注解方式标明方法所要使用的数据源,利用springAOP在service方法执行前根据方法上的注解明确所要使用的数据源。如下图
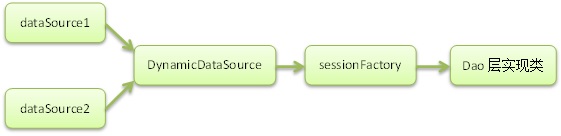
以上分析可得出,需要抽象出一个DynamicDataSource数据源,在spring中关于数据源的配置都是基于DynamicDataSource,在运行时根据service上的注解从DynamicDataSource选取需要的数据源进行实际的持久化操作,下面开始上代码
首先,介绍spring 的AbstractRoutingDataSource类
AbstractRoutingDataSource这个类 是spring2.0以后增加的,我们先来看下AbstractRoutingDataSource的定义:
Java代码
public abstract class AbstractRoutingDataSource extends AbstractDataSource implements InitializingBean {}
Java代码
public abstract class AbstractRoutingDataSource extends AbstractDataSource implements InitializingBean {
private Map targetDataSources;
private Object defaultTargetDataSource;
private DataSourceLookup dataSourceLookup = new JndiDataSourceLookup();
private Map resolvedDataSources;
private DataSource resolvedDefaultDataSource;
AbstractRoutingDataSource继承了AbstractDataSource ,而AbstractDataSource 又是DataSource 的子类。
DataSource 是javax.sql 的数据源接口,定义如下:
Java代码
public interface DataSource extends CommonDataSource,Wrapper {
Connection getConnection() throws SQLException;
Connection getConnection(String username, String password)
throws SQLException;
}
DataSource 接口定义了2个方法,都是获取数据库连接。我们在看下AbstractRoutingDataSource 如何实现了DataSource接口:
Java代码
public Connection getConnection() throws SQLException {
return determineTargetDataSource().getConnection();
}
public Connection getConnection(String username, String password) throws SQLException {
return determineTargetDataSource().getConnection(username, password);
}
很显然就是调用自己的determineTargetDataSource() 方法获取到connection。determineTargetDataSource方法定义如下:
Java代码

protected DataSource determineTargetDataSource() {
Assert.notNull(this.resolvedDataSources, "DataSource router not initialized");
Object lookupKey = determineCurrentLookupKey();
DataSource dataSource = this.resolvedDataSources.get(lookupKey);
if (dataSource == null && (this.lenientFallback || lookupKey == null)) {
dataSource = this.resolvedDefaultDataSource;
}
if (dataSource == null) {
throw new IllegalStateException("Cannot determine target DataSource for lookup key [" + lookupKey + "]");
}
return dataSource;
}
我们最关心的还是下面2句话:
Object lookupKey = determineCurrentLookupKey();
DataSource dataSource = this.resolvedDataSources.get(lookupKey);
determineCurrentLookupKey方法返回lookupKey,resolvedDataSources方法就是根据lookupKey从Map中获得数据源。resolvedDataSources 和determineCurrentLookupKey定义如下:
private Map resolvedDataSources;
protected abstract Object determineCurrentLookupKey()
看到以上定义,我们是不是有点思路了,resolvedDataSources是Map类型,我们可以把MasterDataSource和SlaveDataSource存到Map中,如下:
key value
master MasterDataSource
slave SlaveDataSource
我们在写一个类DynamicDataSource 继承AbstractRoutingDataSource,实现其determineCurrentLookupKey() 方法,该方法返回Map的key,master或slave。这样就达到了切换数据库的目的。
现在开始介绍实现方式:
1. 创建注解类,用来标记service方法所要使用的数据源key
@Retention(RetentionPolicy.RUNTIME)
public
String value();
}
2. 创建DynamicDataSource类,该类继承自AbstractRoutingDataSource


import org.springframework.jdbc.datasource.lookup.AbstractRoutingDataSource;
public class DynamicDataSource extends AbstractRoutingDataSource {
private static final ThreadLocal dataSourceKey = new InheritableThreadLocal();
public static void setDataSourceKey(String dataSource) {
dataSourceKey.set(dataSource);
}
public static String getDatasourcekey() {
return dataSourceKey.get();
}
protected Object determineCurrentLookupKey() {
return dataSourceKey.get();
}
}
方法中实现了determineCurrentLookupKey()方法,该方法会从ThreadLocal对象中获取到一个key来表明所要使用的数据源
3. 实现springAop来根据service中方法上的注解设置ThreadLocal对象
import java.lang.reflect.Method;
import org.springframework.core.annotation.AnnotationUtils;
import org.springframework.transaction.support.TransactionSynchronizationManager;
import com.chinalife.clap.core.MultDataSource;
import com.chinalife.clap.core.annotation.DataSource;
public class DataSourceAspect {
public void before(JoinPoint joinPoint) {
if (TransactionSynchronizationManager.isActualTransactionActive()
&& DynamicDataSource.getDatasourcekey() != null)
return;
// 获取方法签名
Method declareMethod = ((MethodSignature) joinPoint.getSignature()).getMethod();
Method instanceMethod = joinPoint.getTarget().getClass().getMethod(declareMethod.getName(),
declareMethod.getParameterTypes());
DataSource methodAnnotation = AnnotationUtils.findAnnotation(instanceMethod, DataSource.class);
if (methodAnnotation == null)
return;
if (methodAnnotation != null) {
MultDataSource.setDataSourceKey(methodAnnotation.value());
}
}
/**
* 方法执行完后置空
*/
public void after(JoinPoint joinPoint) {
if (TransactionSynchronizationManager.isActualTransactionActive())
return;
if (TransactionSynchronizationManager.isSynchronizationActive())
TransactionSynchronizationManager.clearSynchronization();
MultDataSource.setDataSourceKey(null);
}
}
3.开始配置spring数据源 application-jdbc.xml
class="org.springframework.jdbc.datasource.DriverManagerDataSource">
class="org.springframework.jdbc.datasource.DriverManagerDataSource">
class="org.springframework.jdbc.datasource.DataSourceTransactionManager">
下面给出service实例
public interface Userservic {
@DataSource("master")
public void add(User user);
@DataSource("master")
public void update(User user);
@DataSource("master")
public void delete(int id);
@DataSource("slave")
public User loadbyid(int id);
}


 1747
1747


 被折叠的 条评论
为什么被折叠?
被折叠的 条评论
为什么被折叠?
 到【灌水乐园】发言


