


读前思考
学习一门技术或者看一篇文章最好的方式就是带着问题去学习,这样才能在过程中有茅塞顿开、灯火阑珊的感觉,记忆也会更深刻。
有哪些常用的布局?
每一种布局有何特点与不同?
布局上如何优化?
1. 约束布局 ConstraintLayout
ConstraintLayout 是 Android Studio 2.2 中主要的新增功能之一,ConstraintLayout 使用约束的方式来指定各个控件的位置和关系的,它有点类似于 RelativeLayout,但远比 RelativeLayout 要更强大,它可以有效地解决布局嵌套过多的问题。
本文主要讲解通过 xml 的编写实现 ConstraintLayout,如果想要了解拖拽方式,可参考 Android新特性介绍,ConstraintLayout完全解析
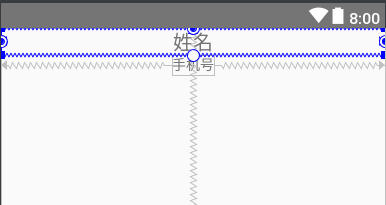
1. 首先用 ConstraintLayout 实现置顶,高自适应,宽 match_parent
android:id="@+id/tv_name"
android:layout_width="0dp"
android:layout_height="wrap_content"
android:gravity="center"
android:text="姓名"
android:textSize="20sp"
app:layout_constraintLeft_toLeftOf="parent"
app:layout_constraintRight_toRightOf="parent"
app:layout_constraintTop_toTopOf="parent"
/>
复制代码
实现效果图
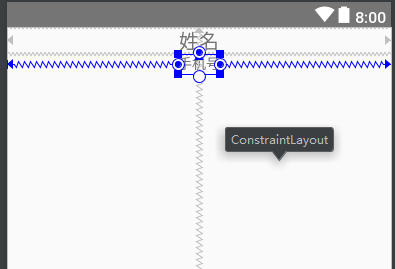
2. 实现一个控件在另一个控件下方
android:id="@+id/tv_mobile"
android:layout_width="wrap_content"
android:layout_height="20dp"
android:text="手机号"
android:gravity="center"
app:layout_constraintLeft_toLeftOf="parent"
app:layout_constraintRight_toRightOf="parent"
app:layout_constraintTop_toBottomOf="@id/tv_name"
/>
复制代码
实现效果图
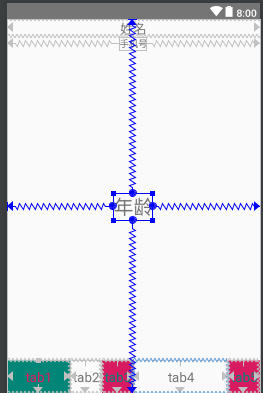
3. 实现控件上下左右居中显示
android:id="@+id/tv_age"
android:layout_width="wrap_content"
android:layout_height="wrap_content"
android:text="年龄"
android:gravity="center"
android:textSize="30sp"
app:layout_constraintHorizontal_weight="3"
app:layout_constraintLeft_toLeftOf="parent"
app:layout_constraintRight_toRightOf="parent"
app:layout_constraintTop_toTopOf="parent"
app:layout_constraintBottom_toBottomOf="parent"
/>
复制代码
实现效果
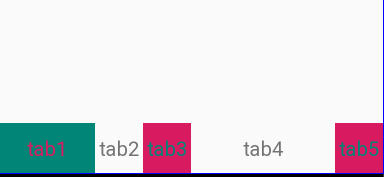
通过布局权重,实现百分比布局
android:id="@+id/tab0"
android:layout_width="0dp"
android:layout_height="50dp"
android:background="@color/colorPrimary"
android:gravity="center"
android:text="tab1"
android:textColor="@color/colorAccent"
android:textSize="20sp"
app:layout_constraintHorizontal_weight="2"
app:layout_constraintBottom_toBottomOf="parent"
app:layout_constraintLeft_toLeftOf="parent"
app:layout_constraintRight_toLeftOf="@+id/tab1" />
android:id="@+id/tab1"
android:layout_width="0dp"
android:layout_height="0dp"
android:gravity="center"
android:text="tab2"
android:textSize="20sp"
app:layout_constraintHorizontal_weight="1"
app:layout_constraintBottom_toBottomOf="parent"
app:layout_constraintLeft_toRightOf="@+id/tab0"
app:layout_constraintRight_toLeftOf="@+id/tab2"
app:layout_constraintTop_toTopOf="@+id/tab0" />
android:id="@+id/tab2"
android:layout_width="0dp"
android:layout_height="0dp"
android:background="@color/colorAccent"
android:gravity="center"
android:text="tab3"
app:layout_constraintHorizontal_weight="1"
android:textColor="@color/colorPrimary"
android:textSize="20sp"
app:layout_constraintBottom_toBottomOf="parent"
app:layout_constraintLeft_toRightOf="@+id/tab1"
app:layout_constraintRight_toLeftOf="@id/tab3"
app:layout_constraintTop_toTopOf="@+id/tab0" />
android:id="@+id/tab3"
android:layout_width="0dp"
android:layout_height="0dp"
android:gravity="center"
android:text="tab4"
android:textSize="20sp"
app:layout_constraintHorizontal_weight="3"
app:layout_constraintBottom_toBottomOf="parent"
app:layout_constraintLeft_toRightOf="@+id/tab2"
app:layout_constraintRight_toLeftOf="@+id/tab4"
app:layout_constraintTop_toTopOf="@+id/tab0" />
app:layout_constraintHorizontal_weight="1"
android:id="@+id/tab4"
android:layout_width="0dp"
android:layout_height="0dp"
android:background="@color/colorAccent"
android:gravity="center"
android:text="tab5"
android:textColor="@color/colorPrimary"
android:textSize="20sp"
app:layout_constraintBottom_toBottomOf="parent"
app:layout_constraintLeft_toRightOf="@+id/tab3"
app:layout_constraintRight_toRightOf="parent"
app:layout_constraintTop_toTopOf="@+id/tab0" />
复制代码
实现效果图
2. 线性布局 LinearLayout
线性布局是按照水平或垂直的顺序将子元素(可以是控件或布局)依次按照顺序排列,每一个元素都位于前面一个元素之后。线性布局分为两种:水平方向和垂直方向的布局。分别通过属性 android:orientation="vertical" 和 android:orientation="horizontal" 来设置。 android:layout_weight 表示子元素占据的空间大小的比例。
接下来我们来实现如下效果
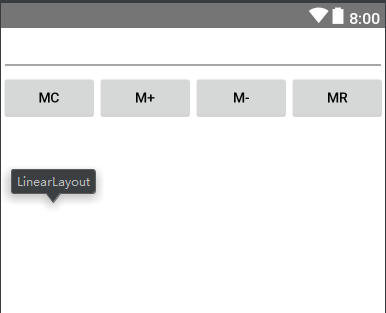
具体代码实现
xmlns:android="http://schemas.android.com/apk/res/android"
android:layout_width="match_parent"
android:layout_height="match_parent"
android:background="#FFFFFF"
android:orientation="vertical">
android:layout_width="match_parent"
android:layout_height="wrap_content"
android:orientation="horizontal" >
android:id="@+id/msg"
android:inputType="number"
android:layout_width="match_parent"
android:layout_height="wrap_content"
android:text="">
// 第二行为 mc m+ m- mr 四个Button构成一个水平布局
android:layout_width="match_parent"
android:layout_height="wrap_content"
android:orientation="horizontal" >
android:layout_width="match_parent"
android:layout_height="wrap_content"
android:text="mc" android:layout_weight="1">
android:layout_width="match_parent"
android:layout_height="wrap_content"
android:text="m+" android:layout_weight="1">
android:layout_width="match_parent"
android:layout_height="wrap_content"
android:text="m-" android:layout_weight="1">
android:layout_width="match_parent"
android:layout_height="wrap_content"
android:text="mr" android:layout_weight="1">
复制代码
3. 相对布局 RelativeLayout
RelativeLayout 继承于 android.widget.ViewGroup,其按照子元素之间的位置关系完成布局的,作为 Android 系统五大布局中最灵活也是最常用的一种布局方式,非常适合于一些比较复杂的界面设计。
接下来我们来实现如下效果
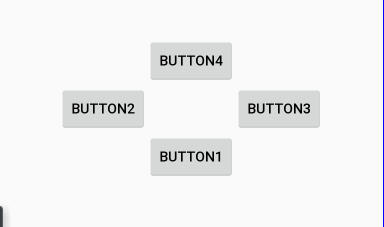
具体代码如下
xmlns:android="http://schemas.android.com/apk/res/android"
android:layout_width="match_parent"
android:layout_height="match_parent">
android:id="@+id/btn1"
android:layout_width="wrap_content"
android:layout_height="wrap_content"
android:layout_centerHorizontal="true"
android:layout_centerInParent="true"
android:text="Button1"
/>
android:id="@+id/btn2"
android:layout_width="wrap_content"
android:layout_height="wrap_content"
android:layout_above="@id/btn1"
android:layout_toLeftOf="@id/btn1"
android:text="Button2"
/>
android:id="@+id/btn3"
android:layout_width="wrap_content"
android:layout_height="wrap_content"
android:layout_above="@id/btn1"
android:layout_toRightOf="@id/btn1"
android:text="Button3"
/>
android:id="@+id/btn4"
android:layout_width="wrap_content"
android:layout_height="wrap_content"
android:layout_above="@id/btn2"
android:layout_toLeftOf="@id/btn3"
android:layout_toRightOf="@id/btn2"
android:text="Button4"
/>
复制代码
由于我在项目中很少使用下面的布局,就不过多介绍了
4. 表格布局 TableLayout
表格布局,适用于多行多列的布局格式,每个 TableLayout 是由多个 TableRow 组成,一个 TableRow 就表示 TableLayout 中的每一行,这一行可以由多个子元素组成。实际上 TableLayout 和 TableRow 都是 LineLayout 线性布局的子类。但是 TableRow 的参数 android:orientation 属性值固定为 horizontal,且 android:layout_width=MATCH_PARENT,android:layout_height=WRAP_CONTENT。所以 TableRow 实际是一个横向的线性布局,且所以子元素宽度和高度一致。
5. 框架布局 FrameLayout
FrameLayout 是最简单的布局了。所有放在布局里的控件,都按照层次堆叠在屏幕的左上角。后加进来的控件覆盖前面的控件。
在 FrameLayout 布局里,定义任何空间的位置相关的属性都毫无意义。控件自动的堆放在左上角,根本不听你的控制。但是控件本身是可以控制自己内部的布局的。
6. AbsoluteLayou 绝对布局
绝对布局中将所有的子元素通过设置 android:layout_x 和 android:layout_y 属性,将子元素的坐标位置固定下来,即坐标 (android:layout_x, android:layout_y) ,layout_x 用来表示横坐标,layout_y 用来表示纵坐标。屏幕左上角为坐标 (0,0),横向往右为正方,纵向往下为正方。实际应用中,这种布局用的比较少,因为 Android 终端一般机型比较多,各自的屏幕大小。分辨率等可能都不一样,如果用绝对布局,可能导致在有的终端上显示不全等。
布局优化
使用 include 标签加载重复布局
使用 merge 标签减少布局嵌套
使用 ViewStub 动态控制布局显示
由于篇幅问题就不对上述做具体实例,自己可以尝试着实现。
文章已经读到末尾了,不知道最初的几个问题你都会了吗?如果不会的话?可以再针对不会的问题进行精读哦!答案都在文中,相信你肯定可以解决的!


 213
213


 被折叠的 条评论
为什么被折叠?
被折叠的 条评论
为什么被折叠?
 到【灌水乐园】发言


