


在之前的文章中我们了解了网络模块的request请求API,现在让我们了解一下网络模块中的上传和下载API的使用。我们是通过wx.downloadFile和wx.uploadFile这两个API来实现的。首先我们一起来了解一下wx.uploadFileAPI的使用方法:
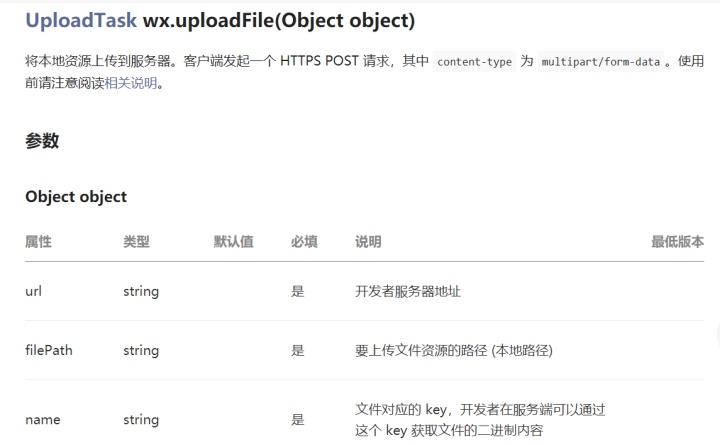
url代表了服务器的地址,filePath代表了上传文件资源的路径,也就是本地路径。Name表示了该文件对应的key。现在让我们通过一个实例来看下吧:
<!--wxml.wxml>
<view class="container">
<view class="page-body">
<view class="page-section">
<view class="page-body-info">
<block wx:if="{{imageSrc}}">
<image src="{{imageSrc}}" class="image" mode="aspectFit"></image>
</block>
<block wx:else>
<view class="image-plus image-plus-nb" bindtap="chooseImage">
<view class="image-plus-horizontal"></view>
<view class="image-plus-vertical"></view>
</view>
<view class="image-plus-text">选择图片</view>
</block>
</view>
</view>
</view>
</view>
.image {
width: 100%;
height: 360rpx;
}
.page-body-info {
display: flex;
box-sizing: border-box;
padding: 30rpx;
height: 420rpx;
border-top: 1rpx solid #D9D9D9;
border-bottom: 1rpx solid #D9D9D9;
align-items: center;
justify-content: center;
}
const uploadFileUrl = require('../../../../../config').uploadFileUrl
Page({
chooseImage: function() {
var self = this
wx.chooseImage({
count: 1,
sizeType: ['compressed'],
sourceType: ['album'],
success: function(res) {
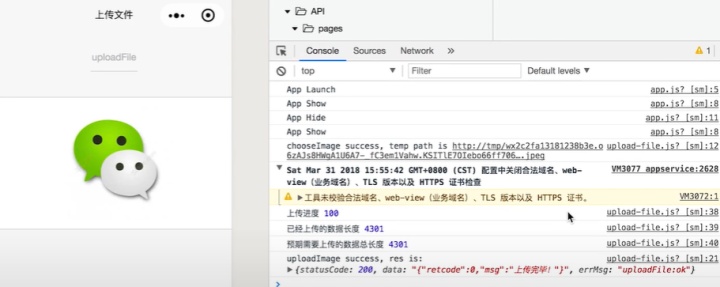
console.log('chooseImage success, temp path is', res.tempFilePaths[0])
var imageSrc = res.tempFilePaths[0]
var uploadTask = wx.uploadFile({
url: uploadFileUrl,
filePath: imageSrc,
name: 'data',
success: function(res) {
console.log('uploadImage success, res is:', res)
wx.showToast({
title: '上传成功',
icon: 'success',
duration: 1000
})
self.setData({
imageSrc
})
},
fail: function({errMsg}) {
console.log('uploadImage fail, errMsg is', errMsg)
}
});
uploadTask.onProgressUpdate((res) => {
console.log('上传进度', res.progress)
console.log('已经上传的数据长度', res.totalBytesSent)
console.log('预期需要上传的数据总长度', res.totalBytesExpectedToSend)
});
},
fail: function({errMsg}) {
console.log('chooseImage fail, err is', errMsg)
}
})
}
})和上传文件不同,我们是通过wx.downloadFile来实现文件的下载的。
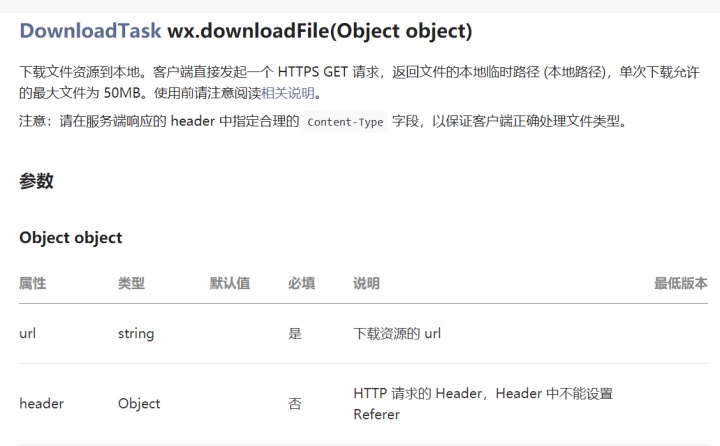
url代表下载资源的路径,header代表http请求的header。下面让我们通过一个实例来看下吧:
<!--view.wxml>
<view class="container">
<view class="page-body">
<image wx:if="{{imageSrc}}" src="{{imageSrc}}" mode="center" />
<block wx:else>
<view class="page-body-wording">
<text class="page-body-text">
点击按钮下载服务端示例图片
</text>
</view>
<view class="btn-area">
<button bindtap="downloadImage" type="primary">下载</button>
</view>
</block>
</view>
</view>
const downloadFileUrl = require('../../../../../config').downloadFileUrl
Page({
downloadImage: function() {
var self = this
var downloadTask = wx.downloadFile({
url: downloadFileUrl,
success: function(res) {
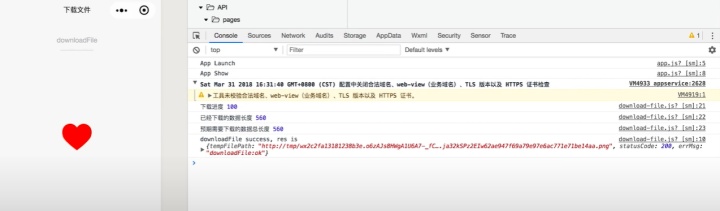
console.log('downloadFile success, res is', res)
self.setData({
imageSrc: res.tempFilePath
})
},
fail: function({errMsg}) {
console.log('downloadFile fail, err is:', errMsg)
}
});
downloadTask.onProgressUpdate((res) => {
console.log('下载进度', res.progress)
console.log('已经下载的数据长度', res.totalBytesWritten)
console.log('预期需要下载的数据总长度', res.totalBytesExpectedToWrite)
})
}
})今天的内容就到这里了,我们下期再见。


 被折叠的 条评论
为什么被折叠?
被折叠的 条评论
为什么被折叠?
 到【灌水乐园】发言


