


基于AnypointStudio IDE开发MuleESB实例
本文部分内容引用https://www.cnblogs.com/enjoyingsoft/p/10132360.html,在此,对原著作者表示感谢。
一、AnypointStudio IDE环境的安装
1.安装jdk1.8以上
2.MuleESB分为社区版和企业版,两者的区别如下:
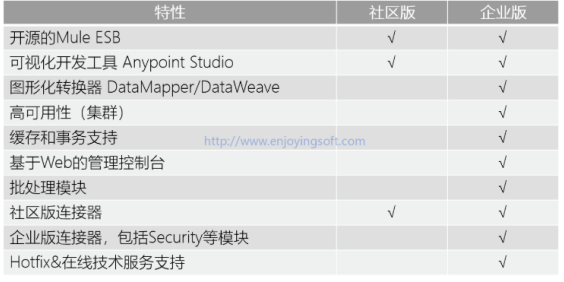
3.mule esb的开发,主要是在AnypointStudio IDE环境下开发的,所以首先需要下载一个AnypointStudio IDE,本文下载的是6.6.4版本。安装过程和eclipse一样。
由于Anypoint Studio默认只内嵌了Mule ESB企业版运行环境,如果你想使用社区版的话,我们还需要安装Mule ESB社区版运行环境。
安装社区版运行环境,可以使用下列步骤。
点击Help/Install New Software...菜单
在Work with下拉框中选择Mule Runtimes for Anypoint Studio
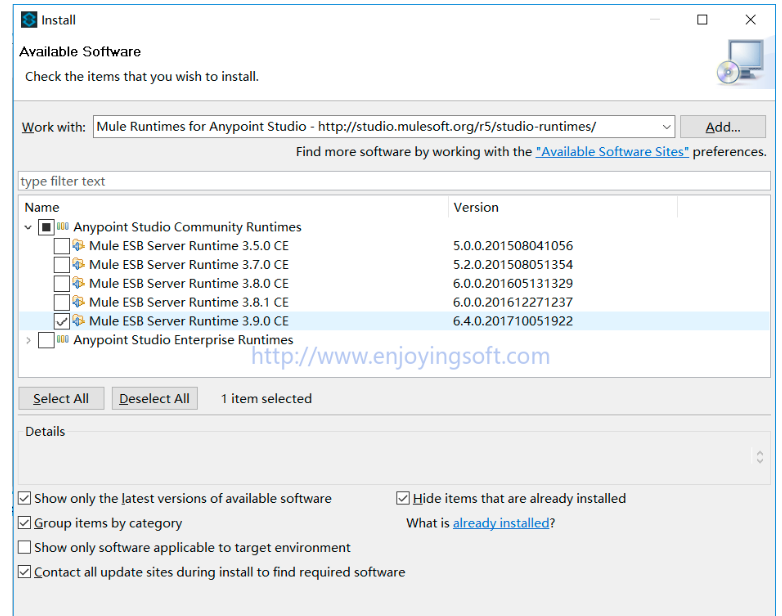
选中Mule ESB Server Runtime 3.9.0 CE,CE就是Community Edition,社区版的意思。然后点击Next一直到完成。
本例是实现一个cxf的webservice服务封装为http服务。
首先,需要自行开发一个webservice的服务端程序。
org.springframework.boot
spring-boot-starter
org.springframework.boot
spring-boot-starter-test
test
org.junit.vintage
junit-vintage-engine
org.springframework.boot
spring-boot-starter-web
org.springframework.boot
spring-boot-starter-web-services
2.2.5.RELEASE
org.apache.cxf
cxf-spring-boot-starter-jaxws
3.3.5
commons-io
commons-io
2.5
@WebService(name = "helloService",targetNamespace="http://service.cxf.cbi.com/")
public interface HelloService {
@WebMethod
String sayHello(@WebParam(name="param") Person person);
}
@Service
@WebService(targetNamespace="http://service.cxf.cbi.com/",
serviceName = "helloService",
endpointInterface = "com.cbi.cxf.server.service.HelloService")
public class HelloServiceImpl implements HelloService {
@Override
public String sayHello(@WebParam(name="param") Person person) {
System.out.println("receive:"+person.getName()+","+person.getAge());
return "hello,"+person.getName()+","+person.getAge();
}
}
@Configurationpublic classWebServiceConfig {
 最低0.47元/天 解锁文章


 8177
8177


 被折叠的 条评论
为什么被折叠?
被折叠的 条评论
为什么被折叠?
 到【灌水乐园】发言


