文章目录
  • 介绍
  • 安装部署
  • 安装服务器
  • 开放服务使用端口
  • 挂载磁盘
  • 安装MinIO
  • 创建目录
  • 下载安装文件
  • 设置执行权限
  • 目录结构如下
  • 所有节点都需要执行上述步骤
  • 编写启动脚本
  • 使用
  • Console使用
  • JavaApi调用
  • 获取永久链接
  • 可能报的错误
  • 错误1:is part of root drive, will not be used
  • 错误2:The request signature we calculated does not match the signature you provided
  • 错误3:java.net.SocketException: Broken pipe (Write failed)
  • 参考资料


辛苦您也关注下公众号,感谢!


极速掌握MinIO对象存储:从零部署到实战操作全攻略_对象存储


文章目录
  • 介绍
  • 安装部署
  • 安装服务器
  • 开放服务使用端口
  • 挂载磁盘
  • 安装MinIO
  • 创建目录
  • 下载安装文件
  • 设置执行权限
  • 目录结构如下
  • 所有节点都需要执行上述步骤
  • 编写启动脚本
  • 使用
  • Console使用
  • JavaApi调用
  • 获取永久链接
  • 可能报的错误
  • 错误1:is part of root drive, will not be used
  • 错误2:The request signature we calculated does not match the signature you provided
  • 错误3:java.net.SocketException: Broken pipe (Write failed)
  • 参考资料


介绍

MinIO 是一种高性能的对象存储解决方案,适用于各种场景,无论是公共或私有云、裸机基础设施、编排环境,还是边缘计算。MinIO 由 GlusterFS 创始人之一 Anand Babu Periasamy 发起,并采用 Apache License v2.0 协议开源,使用 Go 语言实现,支持多种编程语言的客户端,如 Java、Python、JavaScript 和 Golang。

MinIO 设计的目标是成为私有云对象存储的标准解决方案,专为存储大量非结构化数据而生,如图片、视频、日志文件、备份数据以及虚拟机镜像等。其支持的对象大小从几 KB 到最大 5 TB 不等,非常适合存储和管理大规模的文件数据。

安装部署

安装服务器

本次部署使用以下三台服务器:

IP地址

操作系统

192.158.119.4

CentOS 7.9

192.158.119.5

CentOS 7.9

192.158.119.6

CentOS 7.9

开放服务使用端口

如果防火墙已经关闭则跳过该步骤

firewall-cmd --add-port=9000/tcp --permanent
firewall-cmd --reload
  • 1.
  • 2.
挂载磁盘

使用独立目录挂载一块磁盘,所有机器都需要挂载

[root@192.158.119.4 minio]# df -h 
/dev/sdb1              100G   33M  100G   1% /data1
  • 1.
  • 2.
安装MinIO
创建目录
mkdir minio && mkdir -p minio/{bin,conf,data1,data2,log}
  • 1.
下载安装文件
cd minio/bin && wget https://dl.min.io/server/minio/release/linux-amd64/minio
  • 1.
设置执行权限
chmod +x bin/minio
  • 1.
目录结构如下
# tree 
.
├── bin
│   └── minio
├── conf
├── data1
└── data2
  • 1.
  • 2.
  • 3.
  • 4.
  • 5.
  • 6.
  • 7.
所有节点都需要执行上述步骤

也可以使用 scp -r minio/ root@192.158.119.6:/opt同步

编写启动脚本
# vim run.sh

#!/bin/bash

export MINIO_ROOT_USER=minio
export MINIO_ROOT_PASSWORD=minioMMMMmmmm
# 这里配置的 MINIO_SERVER_URL 参数为Nginx地址,Nginx转发的就是MinIO服务地址,这里配置后,在Console页面Share时候的链接才会为http://192.158.125.1,否则share的链接为127.0.0.1
export MINIO_SERVER_URL=http://192.158.125.1
 
bin/minio server  --address ":9000" --console-address ":9001" \
http://192.158.119.4/data1 \
http://192.158.119.5/data1 \
http://192.158.119.6/data1 \
http://192.158.119.7/data1 \
> minio.log &
  • 1.
  • 2.
  • 3.
  • 4.
  • 5.
  • 6.
  • 7.
  • 8.
  • 9.
  • 10.
  • 11.
  • 12.
  • 13.
  • 14.
  • 15.

Nginx配置

worker_processes  1;

events {
    worker_connections  1024;
}

http {
    include       mime.types;
    default_type  application/octet-stream;

    # 这个参数控制通过Api调用接口可以上传附件的文件大小
    client_max_body_size  100M;

    sendfile        on;
    keepalive_timeout  65;

    upstream minio {
        server 192.158.119.4:9000;
        server 192.158.119.5:9000;
        server 192.158.119.6:9000;
        server 192.158.119.7:9000;
    }

    server {
        listen 80;
        server_name localhost;

        location / {
            proxy_set_header X-Real-IP $remote_addr;
            proxy_set_header X-Forwarded-For $proxy_add_x_forwarded_for;
            proxy_set_header X-Forwarded-Proto $scheme;
            proxy_set_header Host $http_host;

            proxy_connect_timeout 300;
            # Default is HTTP/1, keepalive is only enabled in HTTP/1.1
            proxy_http_version 1.1;
            proxy_set_header Connection "";
            chunked_transfer_encoding off;

            root   html;
            index  index.html index.htm;
            proxy_pass http://minio;
        }
    }
}
  • 1.
  • 2.
  • 3.
  • 4.
  • 5.
  • 6.
  • 7.
  • 8.
  • 9.
  • 10.
  • 11.
  • 12.
  • 13.
  • 14.
  • 15.
  • 16.
  • 17.
  • 18.
  • 19.
  • 20.
  • 21.
  • 22.
  • 23.
  • 24.
  • 25.
  • 26.
  • 27.
  • 28.
  • 29.
  • 30.
  • 31.
  • 32.
  • 33.
  • 34.
  • 35.
  • 36.
  • 37.
  • 38.
  • 39.
  • 40.
  • 41.
  • 42.
  • 43.
  • 44.
  • 45.

四台服务器均需要放置该脚本,并依次启动sh run.sh

启动成功提示如下

S3-API: http://192.158.119.7:9000  http://127.0.0.1:9000     
Console: http://192.158.119.7:9001 http://127.0.0.1:9001   

Documentation: https://min.io/docs/minio/linux/index.html

┏━━━━━━━━━━━━━━━━━━━━━━━━━━━━━━━━━━━━━━━━━━━━━━━━━━━━━━━━━━━━━━━━━━━━━━━━━━━━━━━━━━━━━┓
┃ You are running an older version of MinIO released 6 days before the latest release ┃
┃ Update: Run `mc admin update`                                                       ┃
┗━━━━━━━━━━━━━━━━━━━━━━━━━━━━━━━━━━━━━━━━━━━━━━━━━━━━━━━━━━━━━━━━━━━━━━━━━━━━━━━━━━━━━┛

Healing drive 'http://192.158.119.7:9000/data1' - 'mc admin heal alias/ --verbose' to check the current status.
Healing of drive '/data1' complete (healed: 1, failed: 0).
  • 1.
  • 2.
  • 3.
  • 4.
  • 5.
  • 6.
  • 7.
  • 8.
  • 9.
  • 10.
  • 11.
  • 12.

使用

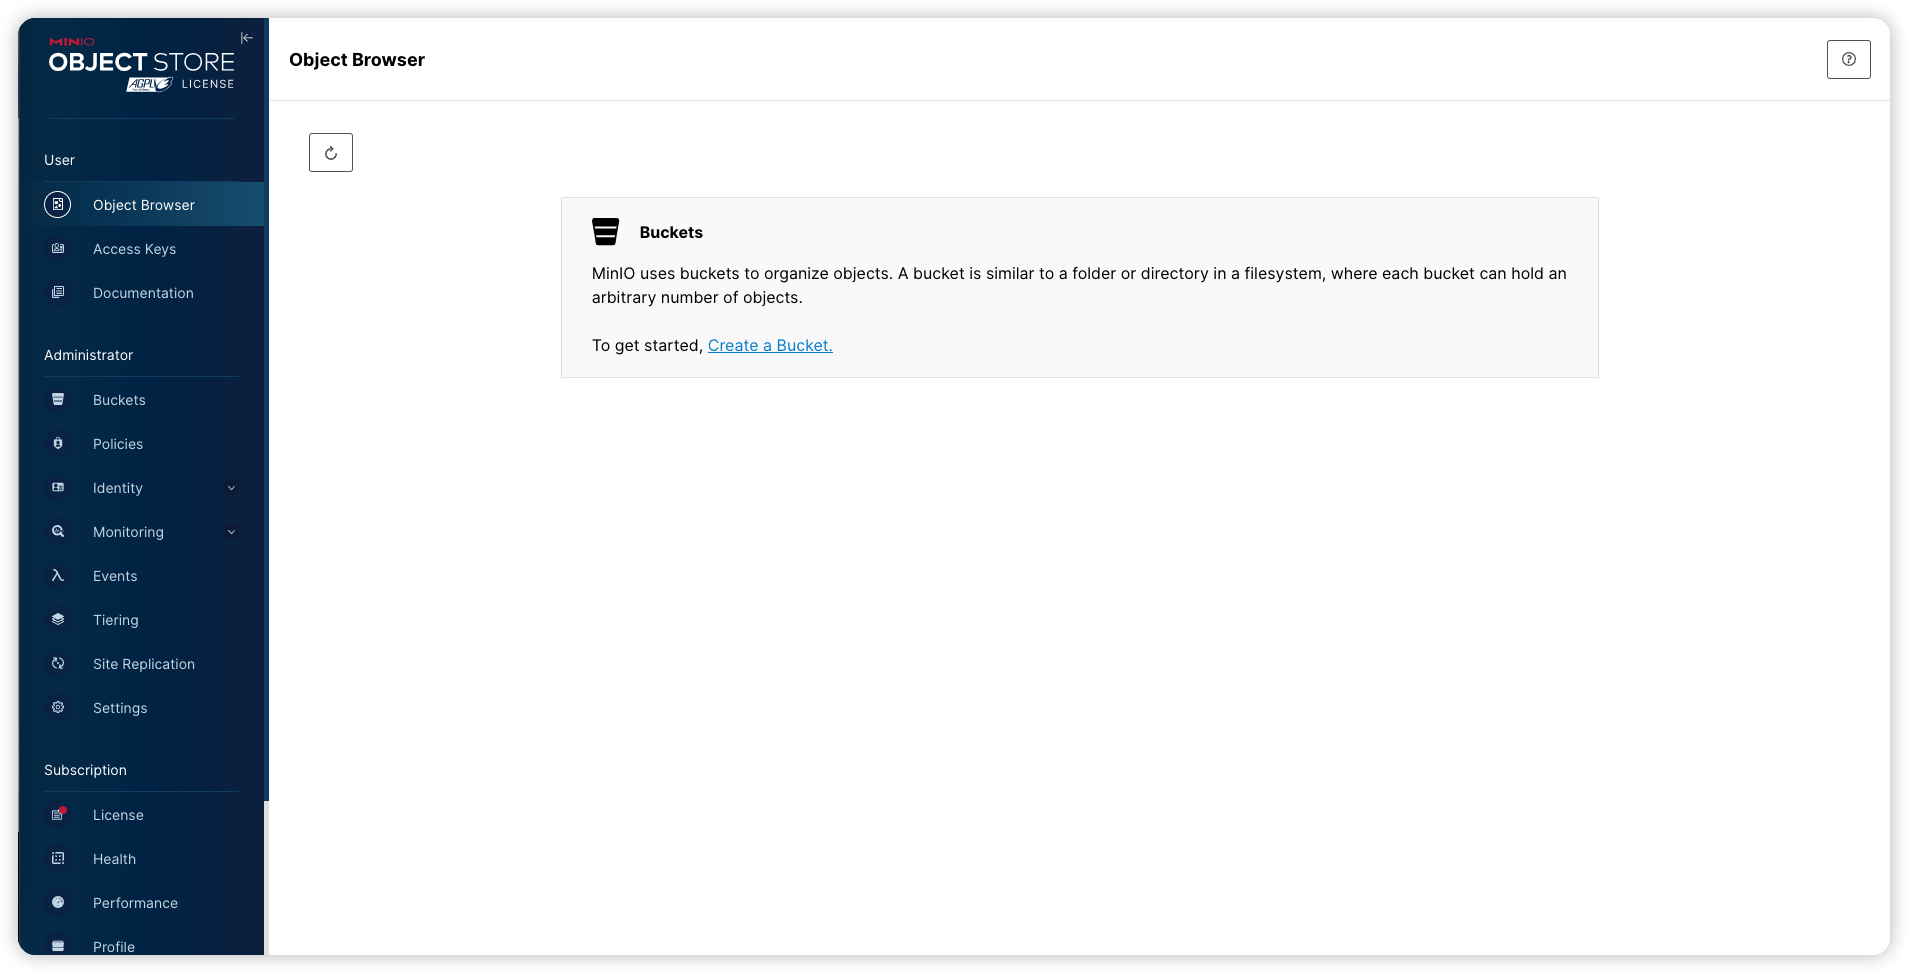
Console使用

访问地址:http://ip:9001 输入run.sh配置的账号密码

极速掌握MinIO对象存储:从零部署到实战操作全攻略_java_02

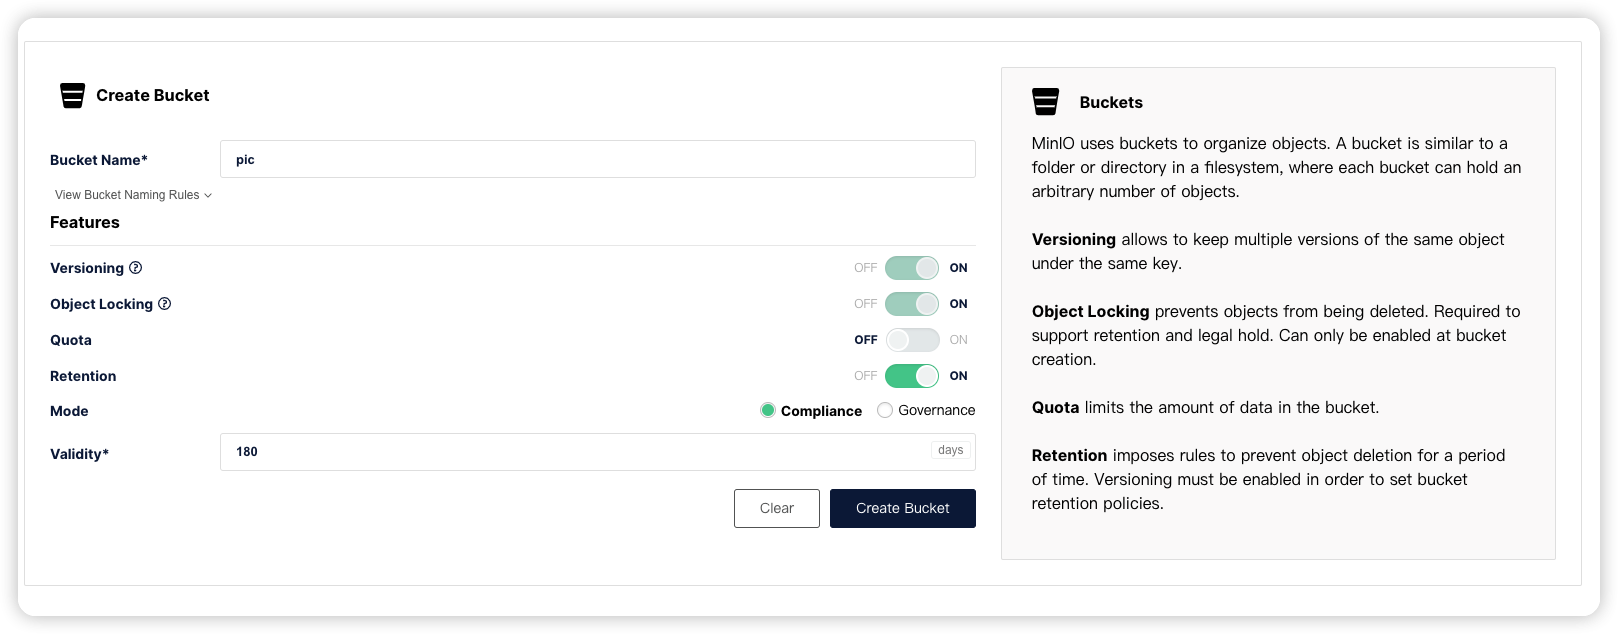
点击创建Create Bucket

极速掌握MinIO对象存储:从零部署到实战操作全攻略_服务器_03

极速掌握MinIO对象存储:从零部署到实战操作全攻略_java_04

极速掌握MinIO对象存储:从零部署到实战操作全攻略_对象存储_05

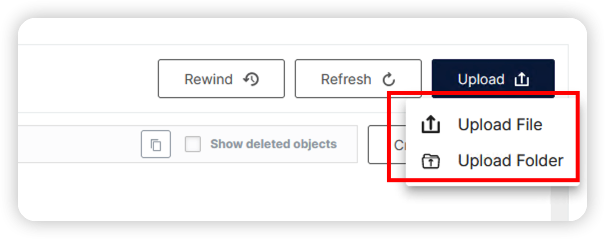
点击进入pic -> 点击 Upload

极速掌握MinIO对象存储:从零部署到实战操作全攻略_对象存储_06

上传文件或者目录

极速掌握MinIO对象存储:从零部署到实战操作全攻略_服务器_07

JavaApi调用

pom.xml

<dependency>
   <groupId>io.minio</groupId>
   <artifactId>minio</artifactId>
   <version>8.5.4</version>
</dependency>
  • 1.
  • 2.
  • 3.
  • 4.
  • 5.

操作代码

import io.minio.GetPresignedObjectUrlArgs;
import io.minio.MinioClient;
import io.minio.ObjectWriteResponse;
import io.minio.PutObjectArgs;
import io.minio.errors.*;
import io.minio.http.Method;

import java.io.FileInputStream;
import java.io.IOException;
import java.security.InvalidKeyException;
import java.security.NoSuchAlgorithmException;
import java.util.UUID;

/**
 * @author Jast
 * @description
 * @date 2023-08-18
 */
public class MinIOClient {
    private static final String MINIO_API = "http://192.158.1251"; // MinIO服务器的访问地址
    private static final String ACCESS_KEY = "minio"; // MinIO服务器的访问凭证,访问密钥
    private static final String SECRET_KEY = "minioMMMMmmmm"; // MinIO服务器的访问凭证,访问密钥
    private static final String BUCKET_NAME = "pic"; // 存储桶的名称

    public static void main(String[] args) throws Exception {
        String targetName = UUID.randomUUID()+".png"; // 生成一个随机的对象名称作为上传后的文件名
        uploadImg(BUCKET_NAME, targetName, "/Users/mac/Public/临时目录/multimodal_image_13714985U025515.jpeg"); // 上传图片
        String link = getLink(BUCKET_NAME, targetName, 60); // 获取图片链接,有效期为60秒
        System.out.println("链接:"+link); // 输出图片链接
    }


    /**
     * 上传图片到MinIO服务器
     * @param bucketName 存储桶名称
     * @param targetName 上传后的对象名称
     * @param uploadFilePath 上传文件的路径
     * @return 上传是否成功
     * @throws IOException IO异常
     * @throws ServerException MinIO服务器异常
     * @throws InsufficientDataException 数据不足异常
     * @throws ErrorResponseException 错误响应异常
     * @throws NoSuchAlgorithmException 无效的算法异常
     * @throws InvalidKeyException 无效的密钥异常
     * @throws InvalidResponseException 无效的响应异常
     * @throws XmlParserException XML解析异常
     * @throws InternalException 内部异常
     */
    public static boolean uploadImg(String bucketName, String targetName, String uploadFilePath) throws IOException, ServerException,  InsufficientDataException, ErrorResponseException, NoSuchAlgorithmException, InvalidKeyException, InvalidResponseException, XmlParserException, InternalException {
        // 创建一个MinioClient对象,用于与MinIO服务器进行交互
        MinioClient minioClient = MinioClient.builder()
                .endpoint(MINIO_API) // 设置MinIO服务器的访问地址
                .credentials(ACCESS_KEY, SECRET_KEY) // 设置MinIO服务器的访问凭证
                .build();

        // 设置分块大小为5GB
        long partSize = 5L * 1024 * 1024 * 1024;

        // 将文件上传到MinIO服务器
        ObjectWriteResponse objectWriteResponse = minioClient.putObject(
                PutObjectArgs.builder() // 构建PutObjectArgs对象,用于指定上传参数
                        .bucket(bucketName) // 设置要上传到的存储桶名称
                        .object(targetName) // 设置上传后的对象名称
                        .contentType("image/jpeg")//需要通过浏览器直接访问图片时,需要设置该参数,否则获取的链接访问时会直接当做文件下载
                        .stream(new FileInputStream(uploadFilePath), -1, partSize) // 设置上传的文件流和分块大小
                        .build() // 构建PutObjectArgs对象
        );
        System.out.println(targetName + "上传成功");
        return true;
    }

    /**
     * 获取MinIO服务器上图片的链接
     * @param bucketName 存储桶名称
     * @param targetName 对象名称
     * @param expires 链接的有效期,单位为秒
     * @return 图片链接
     * @throws ServerException MinIO服务器异常
     * @throws InsufficientDataException 数据不足异常
     * @throws ErrorResponseException 错误响应异常
     * @throws IOException IO异常
     * @throws NoSuchAlgorithmException 无效的算法异常
     * @throws InvalidKeyException 无效的密钥异常
     * @throws InvalidResponseException 无效的响应异常
     * @throws XmlParserException XML解析异常
     * @throws InternalException 内部异常
     */
    public static String getLink(String bucketName, String targetName, Integer expires) throws ServerException, InsufficientDataException, ErrorResponseException,  IOException, NoSuchAlgorithmException, InvalidKeyException, InvalidResponseException, XmlParserException, InternalException {
        // 创建一个MinioClient对象,用于与MinIO服务器进行交互
        MinioClient minioClient = MinioClient.builder()
                .endpoint(MINIO_API) // 设置MinIO服务器的访问地址
                .credentials(ACCESS_KEY, SECRET_KEY) // 设置MinIO服务器的访问凭证
                .build();

        // 构建GetPresignedObjectUrlArgs对象,用于指定获取预签名URL的参数
        GetPresignedObjectUrlArgs arg = GetPresignedObjectUrlArgs.builder()
                .method(Method.GET) // 设置请求方法为GET
                .bucket(bucketName) // 设置存储桶名称
                .object(targetName) // 设置对象名称
                .expiry(expires) // 设置URL的有效期
                .build();

        // 调用MinioClient的getPresignedObjectUrl方法获取预签名URL
        return minioClient.getPresignedObjectUrl(arg);
    }


}
  • 1.
  • 2.
  • 3.
  • 4.
  • 5.
  • 6.
  • 7.
  • 8.
  • 9.
  • 10.
  • 11.
  • 12.
  • 13.
  • 14.
  • 15.
  • 16.
  • 17.
  • 18.
  • 19.
  • 20.
  • 21.
  • 22.
  • 23.
  • 24.
  • 25.
  • 26.
  • 27.
  • 28.
  • 29.
  • 30.
  • 31.
  • 32.
  • 33.
  • 34.
  • 35.
  • 36.
  • 37.
  • 38.
  • 39.
  • 40.
  • 41.
  • 42.
  • 43.
  • 44.
  • 45.
  • 46.
  • 47.
  • 48.
  • 49.
  • 50.
  • 51.
  • 52.
  • 53.
  • 54.
  • 55.
  • 56.
  • 57.
  • 58.
  • 59.
  • 60.
  • 61.
  • 62.
  • 63.
  • 64.
  • 65.
  • 66.
  • 67.
  • 68.
  • 69.
  • 70.
  • 71.
  • 72.
  • 73.
  • 74.
  • 75.
  • 76.
  • 77.
  • 78.
  • 79.
  • 80.
  • 81.
  • 82.
  • 83.
  • 84.
  • 85.
  • 86.
  • 87.
  • 88.
  • 89.
  • 90.
  • 91.
  • 92.
  • 93.
  • 94.
  • 95.
  • 96.
  • 97.
  • 98.
  • 99.
  • 100.
  • 101.
  • 102.
  • 103.
  • 104.
  • 105.
  • 106.
  • 107.
  • 108.
获取永久链接

刚刚通过Java获取的链接,是有有效期的,最大可以设置7天,如果想获取永久链接,可以通过下面的方法设置。

1.下载mc客户端

cd minio/bin
wget https://dl.min.io/client/mc/release/linux-amd64/mc
  • 1.
  • 2.

可能报的错误

错误1:is part of root drive, will not be used
Error: Drive `http://192.158.119.5:9000/opt/minio/data2` is part of root drive, will not be used (*errors.errorString)
  • 1.

集群部署需要独占磁盘分区,不能使用文件夹代替。

解决方法

挂载磁盘

错误2:The request signature we calculated does not match the signature you provided
错误3:java.net.SocketException: Broken pipe (Write failed)

通过Api调用上传报错

java.net.SocketException: Broken pipe (Write failed)
	at java.net.SocketOutputStream.socketWrite0(Native Method)
	at java.net.SocketOutputStream.socketWrite(SocketOutputStream.java:111)
	at java.net.SocketOutputStream.write(SocketOutputStream.java:155)
	at okio.Okio$1.write(Okio.java:79)
	at okio.AsyncTimeout$1.write(AsyncTimeout.java:180)
	at okio.RealBufferedSink.emitCompleteSegments(RealBufferedSink.java:179)
	at okio.RealBufferedSink.write(RealBufferedSink.java:42)
	at okhttp3.internal.http1.Http1ExchangeCodec$KnownLengthSink.write(Http1ExchangeCodec.java:324)
	at okio.ForwardingSink.write(ForwardingSink.java:35)
	at okhttp3.internal.connection.Exchange$RequestBodySink.write(Exchange.java:231)
	at okio.RealBufferedSink.emitCompleteSegments(RealBufferedSink.java:179)
	at okio.RealBufferedSink.write(RealBufferedSink.java:117)
	at io.minio.HttpRequestBody.writeTo(HttpRequestBody.java:78)
	at okhttp3.internal.http.CallServerInterceptor.intercept(CallServerInterceptor.java:69)
	at okhttp3.internal.http.RealInterceptorChain.proceed(RealInterceptorChain.java:142)
	at okhttp3.internal.connection.ConnectInterceptor.intercept(ConnectInterceptor.java:43)
	at okhttp3.internal.http.RealInterceptorChain.proceed(RealInterceptorChain.java:142)
	at okhttp3.internal.http.RealInterceptorChain.proceed(RealInterceptorChain.java:117)
	at okhttp3.internal.cache.CacheInterceptor.intercept(CacheInterceptor.java:94)
	at okhttp3.internal.http.RealInterceptorChain.proceed(RealInterceptorChain.java:142)
	at okhttp3.internal.http.RealInterceptorChain.proceed(RealInterceptorChain.java:117)
	at okhttp3.internal.http.BridgeInterceptor.intercept(BridgeInterceptor.java:93)
	at okhttp3.internal.http.RealInterceptorChain.proceed(RealInterceptorChain.java:142)
	at okhttp3.internal.http.RetryAndFollowUpInterceptor.intercept(RetryAndFollowUpInterceptor.java:88)
	at okhttp3.internal.http.RealInterceptorChain.proceed(RealInterceptorChain.java:142)
	at okhttp3.internal.http.RealInterceptorChain.proceed(RealInterceptorChain.java:117)
	at okhttp3.RealCall.getResponseWithInterceptorChain(RealCall.java:229)
	at okhttp3.RealCall.execute(RealCall.java:81)
	at io.minio.MinioClient.execute(MinioClient.java:1014)
	at io.minio.MinioClient.putObject(MinioClient.java:7582)
	at io.minio.MinioClient.putObject(MinioClient.java:4682)
	at io.minio.MinioClient.putObject(MinioClient.java:4881)
  • 1.
  • 2.
  • 3.
  • 4.
  • 5.
  • 6.
  • 7.
  • 8.
  • 9.
  • 10.
  • 11.
  • 12.
  • 13.
  • 14.
  • 15.
  • 16.
  • 17.
  • 18.
  • 19.
  • 20.
  • 21.
  • 22.
  • 23.
  • 24.
  • 25.
  • 26.
  • 27.
  • 28.
  • 29.
  • 30.
  • 31.
  • 32.
  • 33.

原因:使用Nginx的地址去上传文件,Nginx需要设置可上传文件大小,默认为:1M

解决方法:

在http块中设置 client_max_body_size 100M;参数为我们想设置的大小,如下

worker_processes  1;

events {
 worker_connections  1024;
}

http {
 include       mime.types;
 default_type  application/octet-stream;
 # 这个参数控制通过Api调用接口可以上传附件的文件大小
 client_max_body_size        100M;
 sendfile        on;

 keepalive_timeout  65;

upstream minio{
     server 192.158.119.4:9000;
     server 192.158.119.5:9000;
     server 192.158.119.6:9000;
     server 192.158.119.7:9000;
}

server {
listen 80;
server_name localhost;
location / {
         proxy_set_header X-Real-IP $remote_addr;
     proxy_set_header X-Forwarded-For $proxy_add_x_forwarded_for;
     proxy_set_header X-Forwarded-Proto $scheme;
     proxy_set_header Host $http_host;

     proxy_connect_timeout 300;
     # Default is HTTP/1, keepalive is only enabled in HTTP/1.1
     proxy_http_version 1.1;
     proxy_set_header Connection "";
     chunked_transfer_encoding off;

 root html;
 index index.html index.htm;
 proxy_pass http://minio;
}
}
}
  • 1.
  • 2.
  • 3.
  • 4.
  • 5.
  • 6.
  • 7.
  • 8.
  • 9.
  • 10.
  • 11.
  • 12.
  • 13.
  • 14.
  • 15.
  • 16.
  • 17.
  • 18.
  • 19.
  • 20.
  • 21.
  • 22.
  • 23.
  • 24.
  • 25.
  • 26.
  • 27.
  • 28.
  • 29.
  • 30.
  • 31.
  • 32.
  • 33.
  • 34.
  • 35.
  • 36.
  • 37.
  • 38.
  • 39.
  • 40.
  • 41.
  • 42.
  • 43.

参考资料

 https://min.io/docs/minio/linux/index.html

 https://www.wenjiangs.com/doc/minio-minio-quickstart-guide