


Tomcat的Http11NioProtocol协议使用Java NIO技术实现高性能Web服务器。本文通过分析Http11NioProtocol源码来学习Java NIO的使用。从中可以了解到阻塞IO和非阻塞IO的配合,NIO的读写操作以及Selector.wakeup的使用。
1. 初始化阶段
Java NIO服务器端实现的第一步是开启一个新的ServerSocketChannel对象。Http11NioProtocol的实现也不例外, 在NioEndPoint类的init方法可以看到这段代码。
代码1:NioEndPoint.init()方法
public void init()
throws Exception {
if (initialized )
return;
//开启一个新的ServerSocketChannel
serverSock = ServerSocketChannel.open();
//设置socket的性能偏好
serverSock.socket().setPerformancePreferences(socketProperties .getPerformanceConnectionTime(),
socketProperties.getPerformanceLatency(),
socketProperties.getPerformanceBandwidth());
InetSocketAddress addr = ( address!=null ?new InetSocketAddress(address ,port ):new InetSocketAddress(port));
//绑定端口号,并设置backlog
serverSock.socket().bind(addr,backlog );
//将serverSock设置成阻塞IO
serverSock.configureBlocking(true); //mimic APR behavior
//初始化acceptor线程数
if (acceptorThreadCount == 0) {
// FIXME: Doesn't seem to work that well with multiple accept threads
acceptorThreadCount = 1;
}
//初始化poller线程数
if (pollerThreadCount <= 0) {
//minimum one poller thread
pollerThreadCount = 1;
}
// 根据需要,初始化SSL
// 因为主要关注Java NIO, 所以这一块代码就省略掉了
if (isSSLEnabled()) {
......
}
//OutOfMemoryError策略
if (oomParachute >0) reclaimParachute(true);
//开启NioSelectorPool
selectorPool.open();
initialized = true ;
}
在NioEndPoint.init方法中,可以看到ServerSocketChannel被设置成阻塞IO,并且没有注册任何就绪事件。这样可以和阻塞ServerSocket一样方便地使用阻塞accept方法来接收客户端新来的连接。但不同的是当NioEndPoint.Accept线程通过accept方法获得一个新的SocketChannel后会构建一个OP_REGISTER类型的PollerEvent事件并放到Poller.events队列中。而我们使用ServerSocket实现服务器的时候,在接收到新连接后,一般是从线程池中取出一个线程来处理这个连接。
在NioEndPoint.Accept的setSocketOptions方法中可以看到获得SocketChannel后的处理过程。步骤如下:
1)将SocketChannel设置成非阻塞;
2)构建OP_REGISTER类型的PollerEvent对象,并放入到Poller.events队列中。
代码2:NioEndPoint.Accept类的setSocketOptions方法
protected boolean setSocketOptions(SocketChannel socket) {
try {
//将客户端Socket设置为非阻塞, APR风格
socket.configureBlocking( false);
Socket sock = socket.socket();
socketProperties.setProperties(sock);
//从缓存中取NioChannel对象,如果取不到直接构建一个
NioChannel channel = nioChannels.poll();
if ( channel == null ) {
// 如果sslContext不等于null, 需要启动ssl
if (sslContext != null) {
....
}
//正常tcp启动
else {
//构建NioBufferHandler对象
NioBufferHandler bufhandler = new NioBufferHandler(socketProperties .getAppReadBufSize(),
socketProperties.getAppWriteBufSize(),
socketProperties.getDirectBuffer());
//构建NioChannel对象
channel = new NioChannel(socket, bufhandler);
}
} else {
//从缓存中取的NioChannel对象,将客户端socket设置进去
channel.setIOChannel(socket);
if ( channel instanceof SecureNioChannel ) {
SSLEngine engine = createSSLEngine();
((SecureNioChannel)channel).reset(engine);
} else {
channel.reset();
}
}
//注册NioChannel对象
getPoller0().register(channel);
} catch (Throwable t) {
try {
log.error("" ,t);
} catch ( Throwable tt){}
// Tell to close the socket
return false ;
}
return true ;
}
Poller线程会从Poller.events队列中取出PollerEvent对象,并运行PollerEvent.run()方法。在PollerEvent.run()方法中发现是OP_REGISTER事件,则会在Poller.selector上注册SocketChannel对象的OP_READ就绪事件。
代码3:PollerEvent.run()方法代码片段
public void run() {
if ( interestOps == OP_REGISTER ) {
try {
//在Poller.selector上注册OP_READ就绪事件
socket.getIOChannel().register(socket .getPoller().getSelector(), SelectionKey.OP_READ , key );
} catch (Exception x) {
log.error("" , x);
}
}
......
}
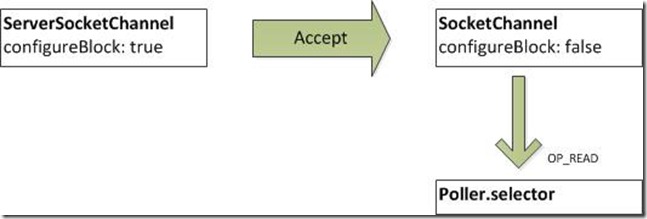
至此,一个客户端连接准备工作就已经完成了。我们获得了一个客户端的SocketChannel, 并注册OP_READ就绪事件到Poller.selector上(如图1)。下面就可以进行数据读写了。
图1:ServerSocketChannel和SocketChannel的初始化状态
2. Poller.selector的wakeup方法
Poller线程会做如下工作:
1) 通过selection操作获取已经选中的SelectionKey数量;
2) 执行Poller.events队列中的PollerEvent;
3) 处理已经选中的SelectionKey。
当有新PollerEvent对象加入Poller.events队列中,需要尽快执行第二步,而不应该阻塞的selection操作中。所以就需要配合Selector.wakeup()方法来实现这个需求。Tomcat使用信号量wakeupCounter来控制Selector.wakeup()方法,阻塞Selector.select()方法和非阻塞Selector.selectNow()方法的使用。
当有新PollerEvent对象加入Poller.events队列中,会按照如下条件执行Selector.wakeup()方法。
当wakeupCounter加1后等于0,说明Poller.selector阻塞在selection操作,这时才需要调用Selector.wakeup()方法。
当wakeupCounter加1后不等于0,说明Poller.selector没有阻塞在selection操作,则不需要调用Selector.wakeup()方法。并且为了尽快执行第二步,Poller线程在下一次直接调用非阻塞方法Selector.selectNow()。
代码4:Poller.addEvent()方法,实现将PollerEvent对象加入Poller.events队列中。
public void addEvent(Runnable event) {
events.offer(event);
//如果wakeupCount加1后等于0,则调用wakeup方法
if ( wakeupCounter .incrementAndGet() == 0 ) selector.wakeup();
}
代码5: Poller线程的selection操作代码
if (wakeupCounter .get()>0) {
keyCount = selector.selectNow();
else {
wakeupCounter.set(-1);
keyCount = selector.select(selectorTimeout );
}
wakeupCounter.set(0);
这样的设计因为Java NIO的wakeup有如下的特性:
在Selector对象上调用wakeup()方法将会导致第一个没有返回的selection操作立即返回。如果当前没有进行的selection操作,那么下一次的select()方法的调用将立即返回。而这个将wakeup行为延迟到下一个select()方法经常不是我们想要的(当然也不是Tomcat想要的)。我们一般只是想从sleeping的线程wakeup,但允许接下来的selection操作正常处理。
所以,Tomcat通过wakeupCounter信号量的变化来控制只有阻塞在selection操作的时候才调用Selector.wakeup()方法。当有新PollerEvent对象加入Poller.events队列中,并且没有处于阻塞在selection操作中,则直接调用非阻塞方法Selector.selectNow()。


 5845
5845


 被折叠的 条评论
为什么被折叠?
被折叠的 条评论
为什么被折叠?
 到【灌水乐园】发言


