


一.简介
openGauss是一款极致性能、安全、可靠的关系型(OLTP)开源数据库,基于postgresql开发,LTS(长期支持版本)包括3.0.0/3.0.3/3.0.5(LTS),5.0.0/5.0.1/5.0.2(LTS),可兼容MySQL包括数据类型、操作符、系统函数、DDL、DML、DCL、PL/SQL等在内的绝大部分常用语法,使用MySQL一站式迁移工具gs_rep_portal实现应用近似零修改迁移。典型应用场景,包裹物联网行业(发布/订阅逻辑复制实现)和交易性应用(高并发、大数据量、以联机事务处理OLTP)的行业。 官网地址
openGauss核心技术包括:高性能、高可用、易维护性、数据库安全(访问控制、加密、脱敏、审计)和AI能力。
二.部署前准备
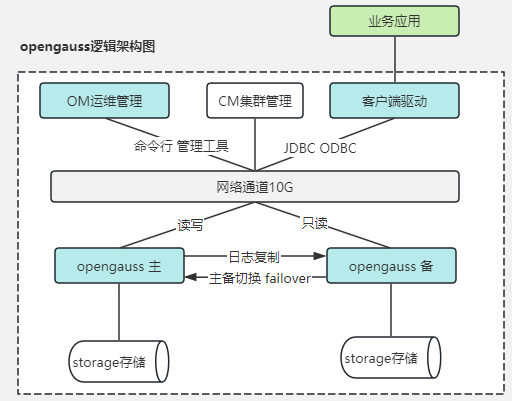
0.逻辑架构图
1.openGauss支持运行在ARM服务器和通用的x86服务器上,要求支持python3.7(centos python3.6.x),文件系统格式首选ext4。
ARM架构 | x86架构 |
openEuler 20.03LTS 推荐 | openEuler 20.03LTS 推荐 |
openEuler22.03LTS | openEuler22.03LTS |
麒麟V10 | centos7.6 |
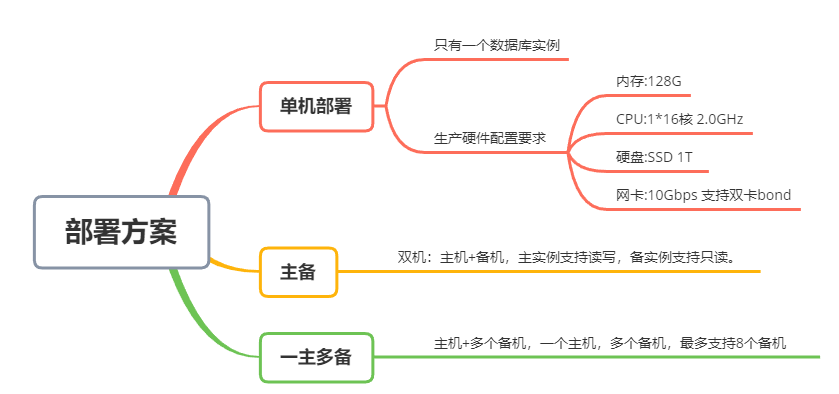
2.支持单机部署和一主多备部署两种部署形态。
3.资源规划
资源 2C 8G 100G+200G | centos7.6/openEuler20.0.3+ | 192.168.77. 161 master |
资源 2C 8G 100G+200G | centos7.6/openEuler20.0.3+ | 192.168.77. 162 slave1 |
资源 2C 8G 100G+200G | centos7.6/openEuler20.0.3+ | 192.168.77. 163 slave2 |
4.安装前准备,以下master slave1 slave2都需要配置
三.单机部署
0.单机安装
报错:
On systemwide basis, the maximum number of SEMMNI is not correct. the current SEMMNI value is: 128. Please check it.
The required value should be greater than 321. You can modify it in file '/etc/sysctl.conf'.
解决:
报错 :
-bash: ulimit: open files: 无法修改 limit 值: 不允许的操作
解决:
1.启停
2.登录,授权,访问控制
3.SQL
4.其他
报错: Port 5432 is used,
排查5432没有被占用,原因listen_addresses修改错误,修改为listen_addresses = '0.0.0.0'
解决:


 21
21

 被折叠的 条评论
为什么被折叠?
被折叠的 条评论
为什么被折叠?
 到【灌水乐园】发言


