


vue-cli实现《去哪儿旅行》App笔记(二)城市选择页
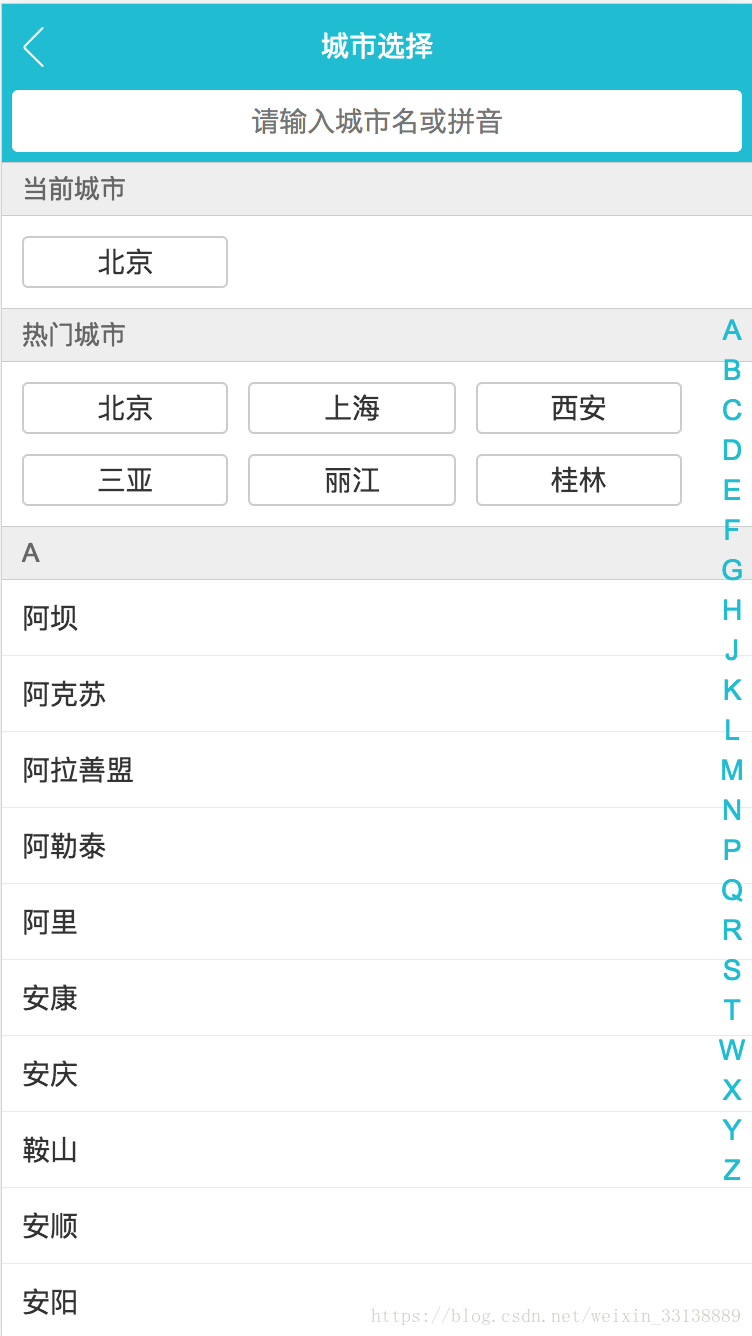
城市选择页共有4部分:头部、搜索框、列表和字母表
设置路由
在router/index.js中设置城市选择页的路由
import Vue from 'vue'
import Router from 'vue-router'
import Home from '@/pages/home/Home'
import City from '@/pages/city/City'

Vue.use(Router)

export default new Router({
  routes: [
    {
      path: '/',
      name: 'Home',
      component: Home
    },
    {
      path: '/city',
      name: 'City',
      component: City
    }
  ]
})
在Header.vue中为右侧按钮添加跳转链接:
<router-link to="/city">
<div class="header-right">
{{city}}<span class="iconfont arrow"></span>
</div>
</router-link>
头部
新建pages/city目录,添加City.vue文件和components/header.vue文件
City.vue代码:
<template>
  <div>
    <city-header></city-header>
  </div>
</template>

<script>
import CityHeader from './components/header'
export default {
  name: 'City',
  components: {
    CityHeader
  }
}
</script>

<style>
</style>
header.vue代码:
<template>
<div class="header">
<router-link to="/">
<div class="iconfont back-icon"></div>
</router-link>
城市选择
</div>
</template>
<script>
export default {
name: 'CityHeader'
}
</script>
<style lang="stylus" scoped>
@import '~styles/varibles.styl'
.header
position: relative
overflow: hidden
line-height: $headerHeight
text-align: center
color: #fff
background: $bgColor
.back-icon
position: absolute
left: .12rem
font-size: .4rem
color: #fff
</style>

搜索框
创建search.vue文件,代码:
<template>
  <div class="search">
    <input class="search-input" type="text" placeholder="请输入城市名或拼音">
  </div>
</template>

<script>
export default {
  name: 'CitySearch'
}
</script>

<style lang="stylus" scoped>
  @import '~styles/varibles.styl'
  .search
    height: .72rem
    background: $bgColor
    padding: 0 .1rem
    .search-input
      box-sizing: border-box
      padding: 0 .1rem
      width: 100%
      line-height: .62rem
      text-align: center
      border-radius: .06rem
      color: #666
</style>

列表、better-scroll插件和字母表
<template>
  <div class="list" ref="content">
    <div>
      <div class="area">
        <div class="title border-topbottom">当前城市</div>
        <div class="button-list">
          <div class="button-wrapper">
            <div class="button">北京</div>
          </div>
        </div>
      </div>
      <div class="area">
        <div class="title border-topbottom">热门城市</div>
        <div class="button-list">
          <div class="button-wrapper">
            <div class="button">北京</div>
          </div>
          <div class="button-wrapper">
            <div class="button">上海</div>
          </div>
          <div class="button-wrapper">
            <div class="button">丽江</div>
          </div>
          <div class="button-wrapper">
            <div class="button">桂林</div>
          </div>
          <div class="button-wrapper">
            <div class="button">海南</div>
          </div>
        </div>
      </div>
      <div class="area">
        <div class="title border-topbottom">A</div>
        <ul class="city-list">
          <li class="city-item border-bottom">阿克苏</li>
          <li class="city-item border-bottom">阿克苏</li>
          <li class="city-item border-bottom">阿克苏</li>
          <li class="city-item border-bottom">阿克苏</li>
          <li class="city-item border-bottom">阿克苏</li>
          <li class="city-item border-bottom">阿克苏</li>
          <li class="city-item border-bottom">阿克苏</li>
          <li class="city-item border-bottom">阿克苏</li>
        </ul>
      </div>
    </div>
  </div>
</template>

<script>
import BScroll from 'better-scroll'
export default {
  name: 'CityList',
  mounted () {
    this.scroll = new BScroll(this.$refs.content)
  }
}
</script>

<style lang="stylus" scoped>
  @import '~styles/varibles.styl'
  .border-topbottom
    &:before
      border-color: #ccc
    &:after
      border-color: #ccc
  .list
    overflow: hidden
    position: absolute
    top: 1.58rem
    left: 0
    right: 0
    bottom: 0
    .title
      padding-left: .2rem
      line-height: .54rem
      background: #eee
      font-size: .26rem
      color: #666
    .button-list
      overflow: hidden
      padding: .1rem .6rem .1rem .1rem
      .button-wrapper
        float: left
        width: 33.33%
        .button
          box-sizing: border-box
          margin: .1rem
          padding: .1rem 0
          text-align: center
          border: .02rem solid #ccc
          border-radius: .06rem
    .city-item
      padding-left: .2rem
      line-height: .76rem
</style>
better-scroll插件:
1.安装$ cnpm install better-scroll --save
2.引用
import BScroll from 'better-scroll'
export default {
  name: 'CityList',
  mounted () {
    this.scroll = new BScroll(this.$refs.content)
  }
}
3.需要滚动的区域必须是个完整的标签,所以所有的area区域整体套了一层<div>。
动态数据渲染
对于对象类型,值为数组的数据,vue循环遍历方式:
<div class="area"
           v-for="(item, key) of cities"
           :key="key"
      >
        <div class="title border-topbottom">{{key}}</div>
        <ul class="city-list">
          <li class="city-item border-bottom"
              v-for="innerItem of item"
              :key="innerItem.id"
          >
            {{innerItem.name}}
          </li>
        </ul>
      </div>
其中key是A、B等字母开头,value是城市对象的数组。
alphabet.vue中的循环:
computed: {
    letters () {
      const letters = []
      for (let i in this.cities) {
        letters.push(i)
      }
      return letters
    }
  }
for…in…和for…of…的区别。
字母表向城市列表传值
由字母表组件向父组件传递选中的字母,在li中绑定点击和拖动事件。其中拖动事件通过计算手指的位置来确定滑到了哪一个字母。
Alphabet.vue代码:
<template>
  <ul class="list">
    <li class="item"
        v-for="item of letters"
        :key="item"
        :ref="item"
        @touchstart="handleTouchStart"
        @touchmove="handleTouchMove"
        @touchend="handleTouchEnd"
        @click="handleLetterClick"
    >
      {{item}}
    </li>
  </ul>
</template>

<script>
export default {
  name: 'CityAlphabet',
  data () {
    return {
      touchStatus: true,
      timer: null
    }
  },
  props: {
    cities: Object
  },
  computed: {
    letters () {
      const letters = []
      for (let i in this.cities) {
        letters.push(i)
      }
      return letters
    },
    startY () {
    //通过offsetTop获取A字母在父标签ul中的纵坐标
    //在计算属性中计算是为了避免每次滑动时都获取一次坐标值
      return this.$refs['A'][0].offsetTop
    }
  },
  methods: {
    handleLetterClick (e) {
      this.$emit('change', e.target.innerText)
    },
    handleTouchStart () {
      this.touchStatus = true
    },
    handleTouchMove (e) {
    //函数节流,16ms后再执行计算操作
    //如果在这16ms之间又有了新的滑动,清空timer重新计算
      if (this.timer) {
        clearTimeout(this.timer)
      }
      this.timer = setTimeout(() => {
        if (this.touchStatus) {
          const touchY = e.touches[0].clientY - 79
          const index = Math.floor((touchY - this.startY) / 20)
          this.$emit('change', this.letters[index])
        }
      }, 16)
    },
    handleTouchEnd () {
      this.touchStatus = false
    }
  }
}
</script>

<style lang="stylus" scoped>
  @import '~styles/varibles.styl'
  .list
    display: flex
    flex-direction: column
    justify-content: center
    position: absolute
    top: 1.58rem
    right:0
    bottom: 0
    width: .4rem
    .item
      line-height: .4rem
      text-align: center
      color: $bgColor
</style>
list.vue代码:
//letter是通过alphabet.vue传向City.vue,再从City.vue通过属性传入list.vue
//list中监听letter属性,一旦变化触发better-scroll的跳转方法,跳转到对应列
 watch: {
    letter () {
      this.scroll.scrollToElement(this.$refs[this.letter][0])
    }
 }
注意:由于:ref是通过循环赋值的,所以letter对应的ref是一个数组,需要通过下标获取dom。
搜索逻辑
绑定搜索框input中的值到keyword属性,监听该属性,发生变化时进行搜索。
watch: {
    keyword () {
      if (this.timer) {
        clearTimeout(this.timer)
      }
      this.timer = setTimeout(() => {
        const result = []
        for (let item in this.cities) {
          this.cities[item].forEach((value) => {
            if (value.name.indexOf(this.keyword) > -1 ||
                value.spell.indexOf(this.keyword) > -1) {
              result.push(value)
            }
          })
        }
        this.cityList = result
      }, 100)
    }
  }
嵌套循环遍历cities,检查name和spell是否包含keyword的值。
methods: {
    hasList () {
      return this.keyword
    },
    hasCity () {
      return !this.cityList.length
    }
  }
根据keyword是否为空和是否筛选出结果显示搜索列表和未搜索到的提示。
Vuex共享数据
安装:$ cnpm install vuex --save
在src中新建store目录,创建index.js文件


vuex可以维护全局范围的数据,如上图,各个组件可以通过dispatch方法调用actions中定义的函数,这些函数又可以通过commit方法调用mutations中定义的函数,这些函数可以直接操作state属性中声明的变量。
index.js中store的声明:
import Vue from 'vue'
import Vuex from 'vuex'
//将state、actions和mutations拆分成独立的模块,便于维护
import state from './state'
import actions from './actions'
import mutations from './mutations'

Vue.use(Vuex)

export default new Vuex.Store({
  state,
  actions,
  mutations
})
state.js代码:
var defaultCity = '北京'
//city属性默认值为北京,当localStorage中有值时,city应用localStore.city
//使用localStorage前后最好加上try...catch...,当localStorage不存在时不会抛出异常
try {
  if (localStorage.city) {
    defaultCity = localStorage.city
  }
} catch (e) {

}

export default {
  city: defaultCity
}
actions.js代码:
export default {
//声明了名为changeCity的函数,ctx为当前上下文(store),city是需要改变的值
  changeCity (ctx, city) {
  //通过commit调用mutations中定义的changeCity函数
    ctx.commit('changeCity', city)
  }
}
mutations.js
export default {
//定义名为changeCity的方法,可直接操作state属性
  changeCity (state, city) {
    state.city = city
    try {
      localStorage.city = city
    } catch (e) {

    }
  }
}
main.js中引用store,import store from './store/index'
在根实例中添加store属性:
new Vue({
  el: '#app',
  router,
  store,
  components: { App },
  template: '<App/>'
})
需要改变当前城市的地方绑定函数:
import { mapState, mapActions } from 'vuex'
computed: {
	//这里是
	//computed:  mapState({
	//	city: 'city'
	//})的简写
	//使用扩展运算符对mapState数组进行结构赋值
	//将state中的所有值映射到当前组件的属性中
	//这样可以直接将this.$store.state.city写成this.city
    ...mapState(['city'])
},
methods: {
    handleCityClick (city) {
      this.changeCity(city)
      this.$router.push('/')
    },
    //将Actions中的changeCity方法映射到当前组件的changeCity方法中
    //方式与computed中的city属性相同
    ...mapActions(['changeCity'])
}
关于mapState等方法的帖子
扩展运算符帖子
keep-alive
安装:cnpm install keep-alive --save
在根组件App.vue中的路由标签外套一层keep-alive:
<template>
  <div id="app">
    <keep-alive>
      <router-view/>
    </keep-alive>
  </div>
</template>

<script>
export default {
  name: 'App'
}
</script>

<style>
</style>
这样每次跳转页面时,绑定在mounted生命周期中的ajax请求只会在第一次渲染时触发,之后将状态保存在内存中,避免重复渲染。当然如果每次ajax请求需要根据特定参数时,可以在activated生命周期钩子中来操作:
mounted () {
    this.lastCity = this.city
    this.getHomeInfo()
  },
  activated () {
  //同时还可以声明一个变量lastCity,判断当前城市是否有变化
    if (this.lastCity !== this.city) {
      this.lastCity = this.city
      this.getHomeInfo()
    }
  }


 4362
4362


 被折叠的 条评论
为什么被折叠?
被折叠的 条评论
为什么被折叠?
 到【灌水乐园】发言


