


重要:
1. RHEL 7 系统,18.3C 要求操作系统版高于 3.10.0-123.el7.x86_64 或更高版本。
2. RHEL 6 系统,18.3C 要求操作系统版高于 2.6.32-358.el6.x86_64 或更高版本。
3. 物理内存和交换分区不能小于 8G,否则在安装前检查项报警告。
修改swap虚拟内存大小
如果系统安装时设置的swap过小,则可通过下面方法扩容
cd /usr
mkdir swap
dd if=/dev/zero of=swapfile bs=1G count=4 (这条命令从硬盘里分出一个1×4G 大小的空间,挂在swapfile上)
mkswap /usr/swap/swapfile
swapon /usr/swap/swapfile
解决重启失效vi /etc/fstab增加行
/usr/swap/swapfile swap swap defaults 0 0
系统环境
centos7.2
Oracle18.3C
关闭iptables,selinux
安装依赖包yum install -y bc binutils compat-libcap1 glibc.i686 glibc glibc-devel.i686 glibc-devel ksh libaio.i686 libaio libaio-devel.i686 libaio-devel libX11.i686 libX11 libXau.i686 libXau libXi.i686 libXi libXtst.i686 libXtst libXrender-devel.i686 libXrender-devel libXrender.i686 libXrender libgcc.i686 libgcc libstdc++.i686 libstdc++ libstdc++-devel.i686 libstdc++-devel libxcb.i686 libxcb make nfs-utils net-tools python python-configshell python-rtslib python-six smartmontools sysstat targetcli
wget http://www.rpmfind.net/linux/centos/7.6.1810/os/x86_64/Packages/compat-libstdc++-33-3.2.3-72.el7.i686.rpm
wget http://www.rpmfind.net/linux/centos/7.6.1810/os/x86_64/Packages/compat-libstdc++-33-3.2.3-72.el7.x86_64.rpm
rpm -ivh compat-libstdc++-33-3.2.3-72.el7.i686.rpm
rpm -ivh compat-libstdc++-33-3.2.3-72.el7.x86_64.rpm
系统内核参数
vi /etc/sysctl.d/99-oracle-database-sysctl.conf
fs.aio-max-nr = 1048576
fs.file-max = 6815744
kernel.shmall = 2097152
kernel.shmmax = 8329582592
kernel.shmmni = 4096
kernel.sem = 250 32000 100 128
kernel.semopm = 100
net.ipv4.ip_local_port_range = 9000 65500
net.core.rmem_default = 262144
net.core.rmem_max = 4194304
net.core.wmem_default = 262144
net.core.wmem_max = 1048576
修改系统限制
vi /etc/security/limits.d/oracle-database-.conf
oracle soft nofile 1024
oracle hard nofile 65536
oracle soft nproc 16384
oracle hard nproc 16384
oracle soft stack 10240
oracle hard stack 32768
oracle hard memlock 134217728
oracle soft memlock 134217728
禁用THP配置
vi /etc/default/grub 在GRUB_CMDLINE_LINU 的 最后,加上 transparent_hugepage=never

vi /etc/redhat-release 改为redhat-7因为Oracle不支持centos
用户配置
groupadd -g 54321 oinstall
groupadd -g 54322 dba
groupadd -g 54323 oper
groupadd -g 54324 backupdba
groupadd -g 54325 dgdba
groupadd -g 54326 kmdba
groupadd -g 54330 racdba
/usr/sbin/useradd -u 54321 -g oinstall -G dba,oper,backupdba,dgdba,kmdba,racdba oracle
passwd oracle
切到Oracle用户vi /home/oracle/.bash_profile
# .bash_profile
# Get the aliases and functions
if [ -f ~/.bashrc ]; then
. ~/.bashrc
fi
# User specific environment and startup programs
export TMP=/tmp
export TMPDIR=$TMP
export ORACLE_BASE=/u01/app/oracle
export ORACLE_HOME=$ORACLE_BASE/product/18.3.0.0/dbhome_1
export ORACLE_SID=orcl
export PATH=$ORACLE_HOME/bin:$PATH
export LD_LIBRARY_PATH=$ORACLE_HOME/lib:/lib:/usr/lib
export CLASSPATH=$ORACLE_HOME/jre:$ORACLE_HOME/jlib:$ORACLE_HOME/rdbms/jlib
source .bash_profile

切到root
mkdir /u01
chmod -R 777 /u01
chown oracle.oinstall /u01
切到Oracle
mkdir –p $ORACLE_HOME
unzip LINUX.X64_180000_db_home.zip -d /u01/app/oracle/product/18.3.0.0/dbhome_1
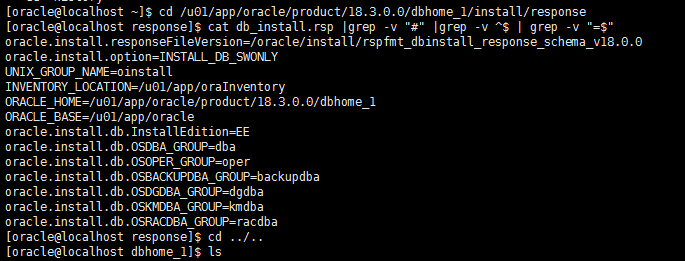
准备database安装响应文件
/u01/app/oracle/product/18.3.0.0/dbhome_1/install/response/db_install.rsp
安装前环境检查
./runInstaller -silent -executePrereqs -responseFile install/response/db_install.rsp,如果不通过看日志,回显中有输出日志文件,找日志文件中的error,看内存swap等是否满足还有kernel等设置,都会明确的告诉你当前是多少建议多少
执行静默安装
./runInstaller -silent -ignorePrereqFailure -responseFile install/response/db_install.rsp
执行完后根据提示使用root身份执行两个脚本
创建监听
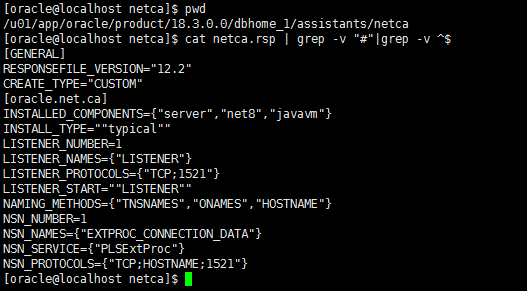
/u01/app/oracle/product/18.3.0.0/dbhome_1/bin/netca -silent -responsefile /u01/app/oracle/product/18.3.0.0/dbhome_1/assistants/netca/netca.rsp
执行完成后1521端口监听起来
创建数据库
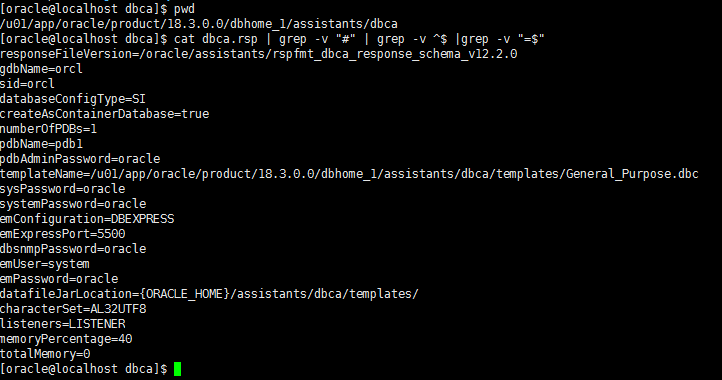
/u01/app/oracle/product/18.3.0.0/dbhome_1/bin/dbca -silent -responsefile /u01/app/oracle/product/18.3.0.0/dbhome_1/assistants/dbca/dbca.rsp
安装完成,使用客户端连接
如果客户端版本过低会造成ORA-28040 和 ORA-01017 错误
/u01/app/oracle/product/18.3.0.0/dbhome_1/network/admin/sqlnet.ora中加入行SQLNET.ALLOWED_LOGON_VERSION=8

重启监听lsnrctl stop;lsnrctl start
sqlplus / as sysdba
alter user sys identified by oracle;
alter user system identified by oracle;
如果连接报tns错,则在客户端配置tns,把服务端的tns复制过去修改下ip


 129
129


 被折叠的 条评论
为什么被折叠?
被折叠的 条评论
为什么被折叠?
 到【灌水乐园】发言


